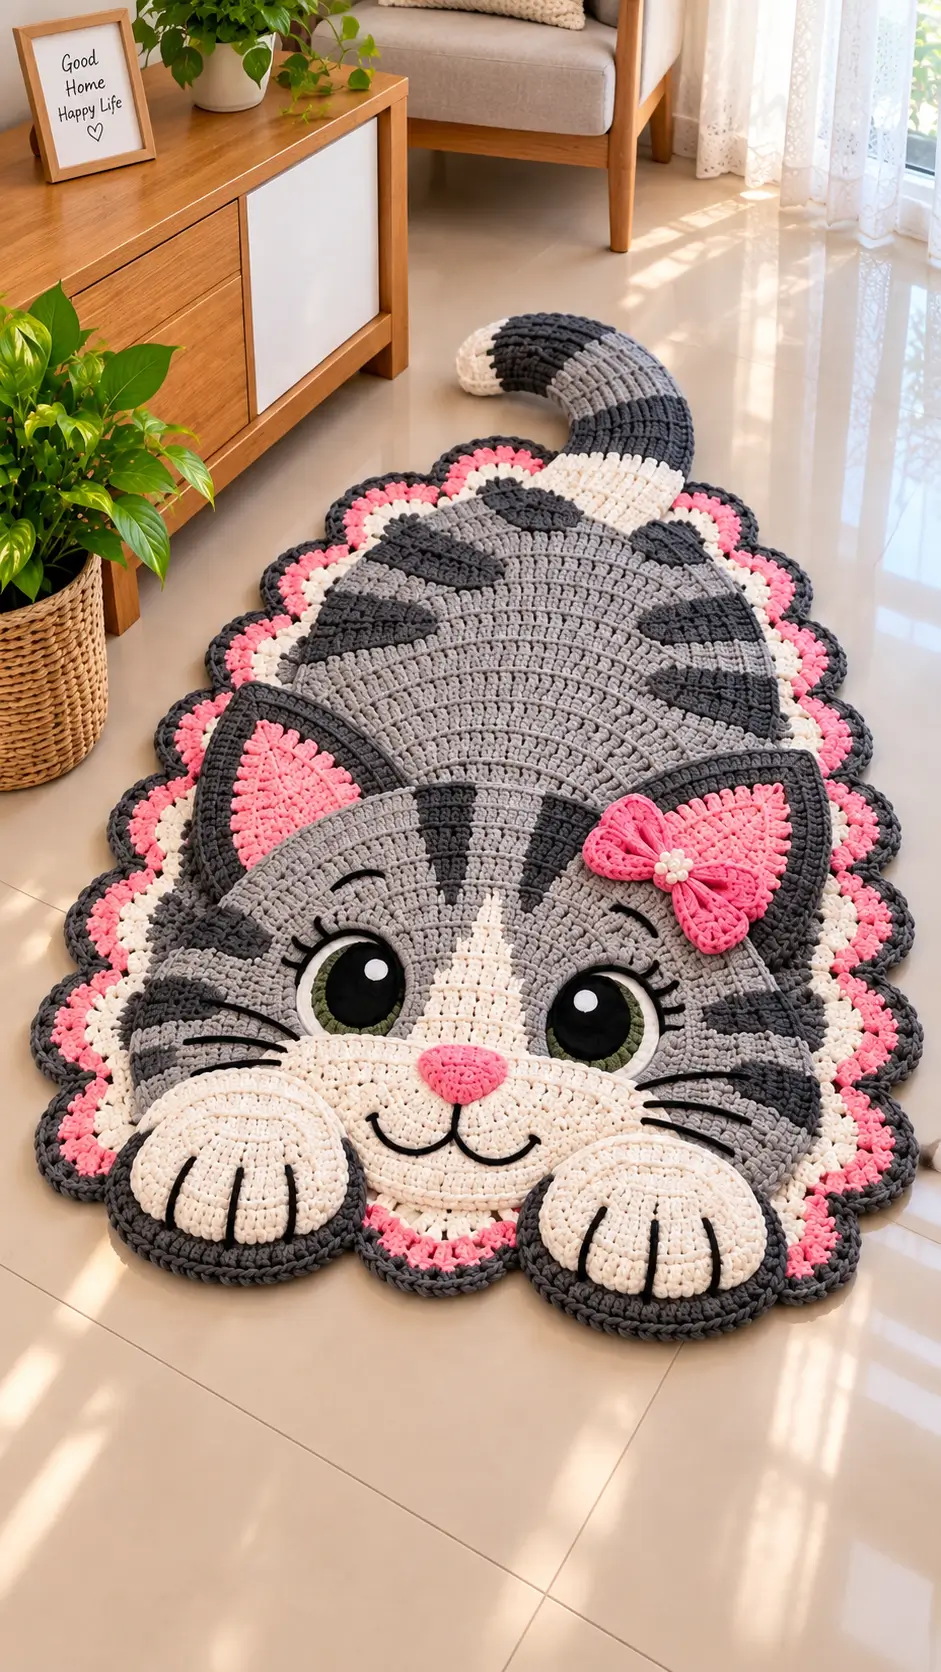
A tabby without forehead stripes stops reading as this cat before the ears are even attached. This cat amigurumi crochet pattern converts the reference design’s gray coat, white blaze, oversized paws and pink bow into a 20 cm stuffed figure using DK/light-worsted yarn and a 2.75 mm hook. The project suits intermediate crochet skills. Its separate markings also make color placement easier to adjust before permanent assembly.
The Design: What Makes This Gray Tabby Different
Three structural choices carry the reference design into three dimensions. First, the head reaches a 36-stitch plateau, producing enough width for the large eyes and cream muzzle without making the neck disproportionately heavy. Second, the front paws are deliberately broad; reducing them to thin cylinders would remove one of the strongest features of this gray cat amigurumi. Third, the tail is a narrow curved tube with alternating charcoal and gray sections, reproducing the visible tabby rhythm without complicated tapestry crochet.
The white facial blaze and dark forehead stripes are added after the base head is complete. That makes their alignment controllable. A frequent mistake in a tabby cat crochet pattern is placing the ears first and then forcing the forehead markings into the remaining space. Pin the face components before sewing either ear permanently.
Project Info at a Glance
| Skill Level | Time | Finished Size | Hook | Best For |
|---|---|---|---|---|
| Intermediate | 8–12 hours | Approx. 20 cm | 2.75 mm | Tabby colorwork and detailed assembly |
Materials and Tools
Yarn
- Medium gray — DK/light worsted — approximately 60–70 g
- Cream/white — DK/light worsted — approximately 15–20 g
- Charcoal — DK/light worsted — approximately 15 g
- Pink — DK/light worsted — approximately 5–10 g
- Black — small quantity for mouth, whiskers and detailing
Tools
- 2.75 mm crochet hook
- 12 mm safety eyes
- Polyester fiberfill
- Yarn needle
- Embroidery needle
- Scissors
- Pins
- Locking stitch markers
For a toy intended for a child for whom detachable components present a hazard, substitute embroidered eyes.
Abbreviations
- MR — magic ring
- sc — single crochet
- inc — 2 sc in one stitch
- dec — decrease
- sl st — slip stitch
- ch — chain
- BLO — back loop only
For an invisible decrease, insert the hook through the front loops of the next two stitches and complete one single crochet through both.
Pattern — Step by Step
Work in a continuous spiral unless otherwise stated. Use a stitch marker to identify the first stitch of every round.
Head
Yarn: medium gray.
R1: 6 sc in MR (6)
R2: inc ×6 (12)
R3: (1 sc, inc) ×6 (18)
R4: (2 sc, inc) ×6 (24)
R5: (3 sc, inc) ×6 (30)
R6: (4 sc, inc) ×6 (36)
R7–R12: 36 sc (36)
R13: (4 sc, dec) ×6 (30)
R14: (3 sc, dec) ×6 (24)
Install the eyes between R9 and R10, approximately 8 stitches apart. Begin firm, even stuffing.
R15: (2 sc, dec) ×6 (18)
R16: (1 sc, dec) ×6 (12)
R17: dec ×6 (6)
Fasten off. Leave a 25 cm tail.
Body
Yarn: medium gray.
R1: 6 sc in MR (6)
R2: inc ×6 (12)
R3: (1 sc, inc) ×6 (18)
R4: (2 sc, inc) ×6 (24)
R5: (3 sc, inc) ×6 (30)
R6: (4 sc, inc) ×6 (36)
R7–R12: 36 sc (36)
R13: (4 sc, dec) ×6 (30)
R14–R15: 30 sc (30)
R16: (3 sc, dec) ×6 (24)
R17–R18: 24 sc (24)
R19: (2 sc, dec) ×6 (18)
R20: (1 sc, dec) ×6 (12)
R21: dec ×6 (6)
Stuff firmly at the base and slightly more lightly near the neck.
Fasten off. Leave a 30 cm tail.
Front Legs and Paws — Make 2
Yarn: cream and medium gray.
Start with cream:
R1: 6 sc in MR (6)
R2: inc ×6 (12)
R3: (1 sc, inc) ×6 (18)
R4: (2 sc, inc) ×6 (24)
R5–R6: 24 sc (24)
R7: (2 sc, dec) ×6 (18)
Change to medium gray:
R8: 18 sc (18)
R9: (1 sc, dec) ×6 (12)
R10–R13: 12 sc (12)
Stuff each paw firmly while keeping the upper leg moderately soft. Embroider three charcoal toe divisions across each cream paw.
Fasten off. Leave a 25 cm tail.
Back Legs — Make 2
Yarn: medium gray.
R1: 6 sc in MR (6)
R2: inc ×6 (12)
R3: (1 sc, inc) ×6 (18)
R4: (2 sc, inc) ×6 (24)
R5–R7: 24 sc (24)
R8: (2 sc, dec) ×6 (18)
R9: 18 sc (18)
R10: (1 sc, dec) ×6 (12)
R11–R12: 12 sc (12)
Stuff evenly.
Fasten off. Leave a 25 cm tail.
Ears — Make 2
Yarn: charcoal with pink inner-ear appliqués.
R1: 6 sc in MR (6)
R2: (1 sc, inc) ×3 (9)
R3: (2 sc, inc) ×3 (12)
R4: (3 sc, inc) ×3 (15)
R5: (4 sc, inc) ×3 (18)
R6: 18 sc (18)
Flatten the lower edge rather than stuffing. Fasten off and leave a 20 cm sewing tail.
For each pink inner ear, ch 2 and work 3 sc into the second chain from the hook. Turn, ch 1 and increase across to 6 stitches. Fasten off and stitch the small pink triangle centrally onto the charcoal ear.
Muzzle Patches — Make 2
Yarn: cream.
R1: 6 sc in MR (6)
R2: inc ×6 (12)
R3: (1 sc, inc) ×6 (18)
R4: 18 sc (18)
Fasten off. Leave a 20 cm sewing tail. Flatten each circle slightly during attachment so the two pieces meet directly beneath the nose.
Cheek Patches — Make 2
Yarn: cream.
R1: 6 sc in MR (6)
R2: inc ×6 (12)
R3: (1 sc, inc) ×6 (18)
Fasten off. Leave a 15 cm tail. Position the patches laterally behind the muzzle to broaden the face.
Pink Nose
Yarn: pink.
R1: 6 sc in MR (6)
R2: (1 sc, inc) ×3 (9)
R3: 9 sc (9)
Flatten the piece into a soft triangle. Do not stuff.
Fasten off. Leave a 15 cm sewing tail.
Striped Tail
Yarn: alternate charcoal and medium gray.
R1: 6 sc in MR (6)
R2–R4: 6 sc (6) — charcoal
R5–R8: 6 sc (6) — gray
R9–R12: 6 sc (6) — charcoal
R13–R16: 6 sc (6) — gray
R17–R20: 6 sc (6) — charcoal
R21–R24: 6 sc (6) — gray
Stuff the tail lightly. Too much stuffing will prevent the curved shape visible in the reference design.
Fasten off. Leave a 25 cm tail.
Forehead Stripes — Make 3
Yarn: charcoal.
For the center stripe, ch 8 and work 7 sl st back along the chain.
For each side stripe, ch 6 and work 5 sl st back.
Fasten off with sewing tails. Pin all three stripes between the eyes and ears before stitching them permanently.
White Facial Blaze
Yarn: cream.
Ch 9.
Row 1: Beginning in the second chain from the hook, 8 sc (8)
Row 2: ch 1, dec, 4 sc, dec (6)
Row 3: ch 1, dec, 2 sc, dec (4)
Row 4: ch 1, dec ×2 (2)
Fasten off. Pin the blaze vertically between the eyes with its wider end meeting the muzzle.
Pink Bow
Yarn: pink.
Ch 16.
Row 1: Starting in the second chain, 15 sc; turn (15)
Rows 2–5: ch 1, 15 sc; turn (15)
Fasten off. Fold the rectangle so both short ends meet at the center. Wrap pink yarn around the midpoint 8–10 times and secure it at the back.
For the center decoration, work 6 sc into an MR and close tightly. Sew this small circle over the wrapped center. The completed bow should measure approximately 6–7 cm wide.
Tabby Body Stripes
Yarn: charcoal.
Create six short surface-crochet or embroidered stripes across the upper body. Keep each stripe approximately 3–5 cm long and angle the markings toward the spine rather than placing them completely horizontally.
Add two shorter markings to each side of the head. Position all stripes with pins before sewing so the pattern remains balanced.
Assembly
- Sew the head centrally to the narrow end of the body. Check that both eyes remain level when the cat is upright.
- Attach the cream muzzle circles beneath the eyes so their inner edges touch along the center line.
- Sew the pink nose across the upper junction of the muzzle pieces, then embroider the black mouth beneath it.
- Pin the white blaze between the eyes and forehead before attaching the ears. Stitch the blaze flat without stretching its edges.
- Position the ears symmetrically on the upper head and sew through the complete ear bases.
- Attach the front legs low on the chest with the cream paws facing forward. Embroider three dark toe lines on each paw.
- Sew the back legs against the lower sides of the body so they support the figure without pushing the body forward.
- Attach the curved striped tail to the lower back. Direct the tip upward and slightly to one side.
- Sew the charcoal forehead and body stripes in place. Embroider three black whiskers on each side of the muzzle.
- Attach the pink bow beside one ear. Weave all remaining yarn tails into the stuffed structure and inspect every seam before trimming the ends.
The completed gray tabby should measure approximately 20 cm when made close to the stated yarn weight and gauge.
7 Technical Tips for a Cleaner Cat Amigurumi
- Prevent stitch-marker drift: Move the marker after every completed round. A two-stitch shift can rotate the forehead blaze away from the center of the face.
- Control under-stuffing: The 36-stitch head should resist a light thumb press without becoming rigid. Insufficient filling can cause the large eye area to collapse inward.
- Hide decreases: Work decreases through the front loops when shaping the visible head and body surfaces. Conventional decreases can leave gaps that expose pale stuffing through gray stitches.
- Check eye placement early: Install the 12 mm eyes before the opening becomes too small to reach comfortably. Keep approximately eight stitches between the eyes and compare both sides before locking the washers.
- Correct loose tension: If stuffing shows between stitches, switch from a 2.75 mm hook to a 2.5 mm hook. Changing hook size is more consistent than pulling individual stitches excessively tight.
- Pin facial components: Use at least three pins on each muzzle circle and two on every forehead stripe. Movement of only 5 mm can make the finished face visibly asymmetrical.
- Secure yarn tails: Weave structural sewing tails through at least three directional changes inside the stuffed piece. Do not cut a sewing end directly beside its final stitch.
Finishing the Gray Tabby Cat
Before starting another cat amigurumi crochet pattern, photograph the finished cat from the front and side so eye spacing, paw position and tail curvature can be compared objectively. Record any hook or yarn substitution beside the finished measurement; those notes make later size adjustments repeatable.
For a closer match to the reference design, adjust the number and angle of the charcoal tabby stripes while keeping the 36-stitch head structure unchanged. Pin the finished gray tabby to Pinterest and share the completed version on Instagram with #GrayTabbyCatAmigurumi.
Which feature would you change first: the oversized cream paws, the white forehead blaze, or the striped curled tail?









