Introduction
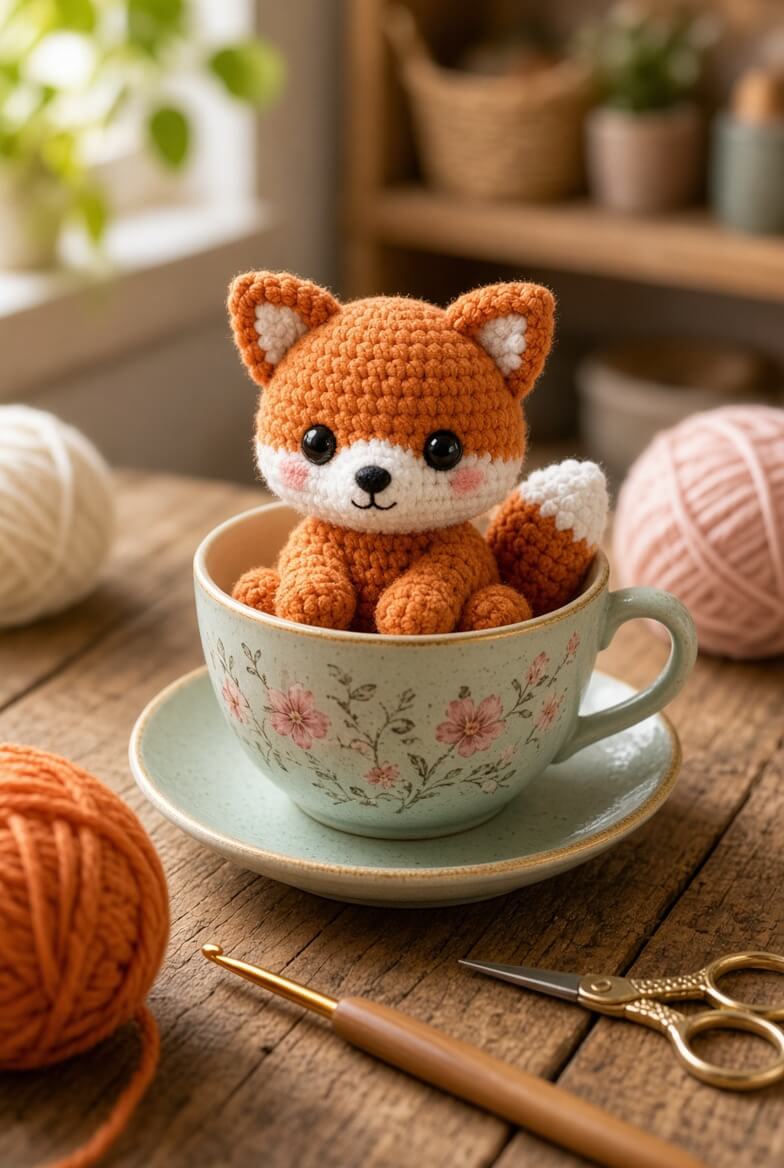
A fox’s tail can approach the body in visual size, so shrinking the cream tip turns this animal into a generic orange puppy. This fox amigurumi crochet pattern uses worsted or light chunky yarn, a 3.5 mm hook and 12 mm safety eyes to make an approximately 16 cm seated fox. The intermediate construction includes pointed ears, a cream facial mask and a large curled tail.
The Design: What Makes This Fox Different
The head expands to 42 stitches because the reference fox has an oversized spherical skull with a very short projecting muzzle. Its cream facial mask occupies the lower third of the face and extends toward both eyes, while the orange crown remains uninterrupted between the ears. The body reaches only 36 stitches, keeping this plush fox amigurumi compact enough for the rounded seated pose. Pointed ears provide vertical height without making the head taller. At the opposite end, the tail is deliberately substantial and finishes with a wide cream section rather than a narrow white point. One common mistake in a red fox crochet pattern is making the ears and muzzle too long at the same time. That creates a narrow adult-fox profile. Shortening the muzzle while keeping triangular ears produces the younger proportions visible in the supplied image.
Project Info at a Glance
| Skill Level | Time | Finished Size | Hook | Best For |
|---|---|---|---|---|
| Intermediate | 7–9 hours | Approximately 16 cm seated | 3.5 mm | Woodland collections, small displays and fox-themed gifts |
Materials and Tools
Yarn
- Burnt orange / rust — worsted or light chunky yarn — approximately 75–90 g — used for the head, body, legs, ears and tail.
- Warm cream — matching yarn — approximately 25–35 g — used for the face mask, muzzle, inner ears, paws and tail tip.
- Blush pink — DK or worsted yarn — approximately 2–3 g — used for cheek patches.
- Black — embroidery floss or smooth yarn — under 1 g — used for the nose and mouth.
Tools
- 3.5 mm crochet hook
- 12 mm safety eyes
- 10–12 mm safety nose or black embroidery yarn
- Polyester stuffing, approximately 50–70 g
- Yarn needle
- Embroidery needle
- Locking stitch markers
- Dressmaking pins
- Scissors
Comparable fox patterns use 12 mm safety eyes at approximately 15 cm scale, while smaller cotton designs may use 8 mm eyes. Replace detachable plastic features with embroidery when the finished toy is intended for a child under three. :contentReference[oaicite:16]{index=16}
Abbreviations
- MR — magic ring
- sc — single crochet
- inc — two single crochet stitches in one stitch
- dec — invisible single crochet decrease
- sl st — slip stitch
- ch — chain
- hdc — half double crochet
- dc — double crochet
- BLO — back loop only
- FLO — front loop only
An invisible decrease is worked through the front loops of the next two stitches before completing one single crochet through both loops.
Pattern — Step by Step
Work the stuffed components in continuous spirals unless a joined round is specified. Mark the first stitch and count the complete round before moving the marker.
Head
Yarn: burnt orange — Source: standard six-stitch amigurumi math.
R1: 6 sc in MR (6)
R2: inc ×6 (12)
R3: (sc, inc) ×6 (18)
R4: (2 sc, inc) ×6 (24)
R5: (3 sc, inc) ×6 (30)
R6: (4 sc, inc) ×6 (36)
R7: (5 sc, inc) ×6 (42)
R8–R13: sc around (42)
R14: (5 sc, dec) ×6 (36)
R15: (4 sc, dec) ×6 (30)
R16: (3 sc, dec) ×6 (24)
R17: (2 sc, dec) ×6 (18)
R18: (sc, dec) ×6 (12)
R19: dec ×6 (6)
Insert the 12 mm eyes between R10 and R11 with approximately nine visible stitches between the posts. Begin stuffing after R14 and pack the lower cheeks before filling the crown.
Fasten off. Leave a 25 cm tail and close the remaining six front loops.
Body
Yarn: burnt orange — Source: standard medium amigurumi math.
R1: 6 sc in MR (6)
R2: inc ×6 (12)
R3: (sc, inc) ×6 (18)
R4: (2 sc, inc) ×6 (24)
R5: (3 sc, inc) ×6 (30)
R6: (4 sc, inc) ×6 (36)
R7–R13: sc around (36)
R14: (4 sc, dec) ×6 (30)
R15–R16: sc around (30)
R17: (3 sc, dec) ×6 (24)
R18: sc around (24)
R19: (2 sc, dec) ×6 (18)
R20: (sc, dec) ×6 (12)
R21: dec ×6 (6)
Stuff the lower body firmly so it maintains the seated position. Reduce stuffing pressure near R18–R21 so the head attachment does not form a hard ridge.
Fasten off. Leave a 35 cm sewing tail.
Cream Face Panels (Make 2)
Yarn: warm cream — original flat-mask shaping.
R1: 6 sc in MR (6)
R2: inc ×6 (12)
R3: (sc, inc) ×6 (18)
Do not stuff. Stretch each piece into a shallow oval and position its upper edge just below one eye.
Fasten off. Leave a 20 cm sewing tail.
Muzzle
Yarn: warm cream — original compact fox-muzzle shaping.
R1: 6 sc in MR (6)
R2: inc ×6 (12)
R3: (sc, inc) ×6 (18)
R4–R5: sc around (18)
R6: (sc, dec) ×6 (12)
Add a small amount of stuffing to the front half. Flatten the 12-stitch opening horizontally before attachment.
Fasten off. Leave a 25 cm sewing tail.
Outer Ears (Make 2)
Yarn: burnt orange — original triangular construction.
R1: 6 sc in MR (6)
R2: sc around (6)
R3: (sc, inc) ×3 (9)
R4: (2 sc, inc) ×3 (12)
R5: (3 sc, inc) ×3 (15)
R6: sc around (15)
Do not stuff. Flatten the ear and pinch the base so the upper tip remains sharply triangular.
Fasten off. Leave a 25 cm sewing tail.
Inner Ears (Make 2)
Yarn: warm cream.
R1: 6 sc in MR (6)
R2: (sc, inc) ×3 (9)
R3: (2 sc, inc) ×3 (12)
Flatten and shape each circle into a small triangle during sewing. Leave a complete orange rim visible around the cream insert.
Fasten off. Leave a 15 cm tail.
Front Legs (Make 2)
Yarn: begin with cream, then change to burnt orange.
R1: 6 sc in MR with cream (6)
R2: inc ×6 (12)
R3: (sc, inc) ×6 (18)
R4–R5: sc around (18)
R6: change to orange, BLO sc around (18)
R7: (sc, dec) ×6 (12)
R8–R13: sc around (12)
Stuff the cream paw firmly and the orange section moderately. Leave the final two rounds lightly filled.
Fasten off. Leave a 30 cm sewing tail.
Back Legs (Make 2)
Yarn: burnt orange with cream paw end.
R1: 6 sc in MR with cream (6)
R2: inc ×6 (12)
R3: (sc, inc) ×6 (18)
R4: (2 sc, inc) ×6 (24)
R5–R6: sc around (24)
R7: change to orange, BLO sc around (24)
R8: (2 sc, dec) ×6 (18)
R9–R10: sc around (18)
R11: (sc, dec) ×6 (12)
R12–R13: sc around (12)
Pack the cream foot firmly. Leave the final orange rounds slightly softer so each hind leg can angle outward.
Fasten off. Leave a 30 cm sewing tail.
Tail
Yarn: begin with warm cream, then change to burnt orange. Fox tails are commonly worked as separately stuffed spiral components; the shaping below is original for this photographed proportion. :contentReference[oaicite:17]{index=17}
R1: 6 sc in MR with cream (6)
R2: inc ×6 (12)
R3: (sc, inc) ×6 (18)
R4: (2 sc, inc) ×6 (24)
R5–R7: sc around (24)
R8: change to burnt orange, sc around (24)
R9–R12: sc around (24)
R13: (2 sc, dec) ×6 (18)
R14–R16: sc around (18)
R17: (sc, dec) ×6 (12)
R18–R20: sc around (12)
Stuff R1–R13 firmly enough to keep the tail broad. Use progressively less filling toward R20 so the base can bend into a visible curve.
Fasten off. Leave a 40 cm sewing tail.
Cheek Patches (Make 2)
Yarn: blush pink — standard flat-circle math.
R1: 6 sc in MR (6)
R2: inc ×6 (12)
Do not stuff. Flatten each circle before sewing it over the cream mask.
Fasten off. Leave a 15 cm sewing tail.
Eyebrow Spots (Make 2)
Yarn: warm cream.
R1: 6 sc in MR (6)
Close the ring tightly and flatten the tiny circle. Position each spot approximately two crochet rounds above its eye.
Fasten off. Leave a 10 cm sewing tail.
Nose and Mouth
Yarn: black embroidery floss.
Work several short horizontal stitches at the upper center of the cream muzzle to create a compact triangular nose. Bring one vertical stitch down approximately 5–6 mm from the center, then add a shallow curve to the left and another to the right.
Secure the thread behind the muzzle and bury both ends beneath the stuffing.
Assembly
- Center the head over the body and sew around the complete attachment area, adding a narrow amount of stuffing at the neck before closing the final gap.
- Pin the two cream face panels beneath the eyes, leaving the orange forehead uninterrupted, then sew them flat before attaching the muzzle.
- Place the muzzle over the inner edges of both face panels, attach the black nose and mouth, then add the two blush cheek circles.
- Sew one cream inner-ear piece to each orange ear, pinch both bases and attach the ears near head R5–R8 with the tips angled slightly outward.
- Attach the front legs to the lower chest with approximately three to four body stitches between their inner edges.
- Pin the back legs low on both sides, place the fox on a level surface and adjust both paws before making the attachments permanent.
- Position the tail on the rear-right side with the cream tip pointing upward and outward, then sew the 12-stitch base firmly to the body.
- Add a second hidden attachment approximately 3 cm above the tail base so the curve remains visible rather than falling behind the fox.
- Sew the two cream eyebrow spots above the eyes and check the face from directly in front before tightening the final appliqué stitches.
- Weave all structural tails through at least 4 cm of dense crochet, reverse direction once and trim only after the ends retract beneath the fabric.
The completed fox should sit on its lower body and hind legs while both ears remain upright and the cream tail tip stays visible from the front three-quarter view.
7 Technical Tips
- Fox-to-cat silhouette: Ears wider than about 15 stitches at the base make the head read more like a domestic cat. Keep the ear width controlled and use height, rather than extra circumference, to create the pointed shape.
- Round muzzle: Overstuffing all six muzzle rounds creates a spherical nose area. Put filling mainly in the front half and keep the 12-stitch sewing edge flexible.
- Visible decrease gaps: Loose conventional decreases can expose stuffing through the orange fabric. Work each decrease through the front loops and match its tension to the adjacent single crochet stitches.
- Late eye placement: Installing 12 mm washers after the head has decreased below 30 stitches leaves restricted working space. Fit both eyes after R13 and verify approximately nine visible stitches between their posts before beginning the decreases.
- Tail collapse: Leaving the 24-stitch cream-and-orange tip underfilled makes the largest identifying feature look flat. Pack R1–R13 firmly, then reduce the stuffing only through the narrower base section.
- Uneven seated stance: Sewing one back leg permanently before positioning its partner can shift one paw by 5–10 mm. Pin both legs, place the fox on a hard surface and compare their front edges first.
- Hidden tail tip: A tail attached only at its base can rotate behind the torso. Add one concealed anchoring stitch approximately 3 cm above the base while keeping the remaining tail free.
Conclusion
Check the cream facial mask and tail tip together before trimming the structural ends because those two color areas carry most of the fox identification. Next, place the figure on a level surface and photograph the front and both three-quarter views. Those angles reveal unequal ears, a rotated muzzle or a tail hidden behind the body. Share the finished fox amigurumi crochet pattern project on Pinterest with a vertical photograph, then post the cream mask and tail detail on Instagram using #SeatedRedFoxAmigurumi. For this fox specifically, would you keep the full cream tail tip or shorten the white section for a more natural red-fox proportion?









