Introduction
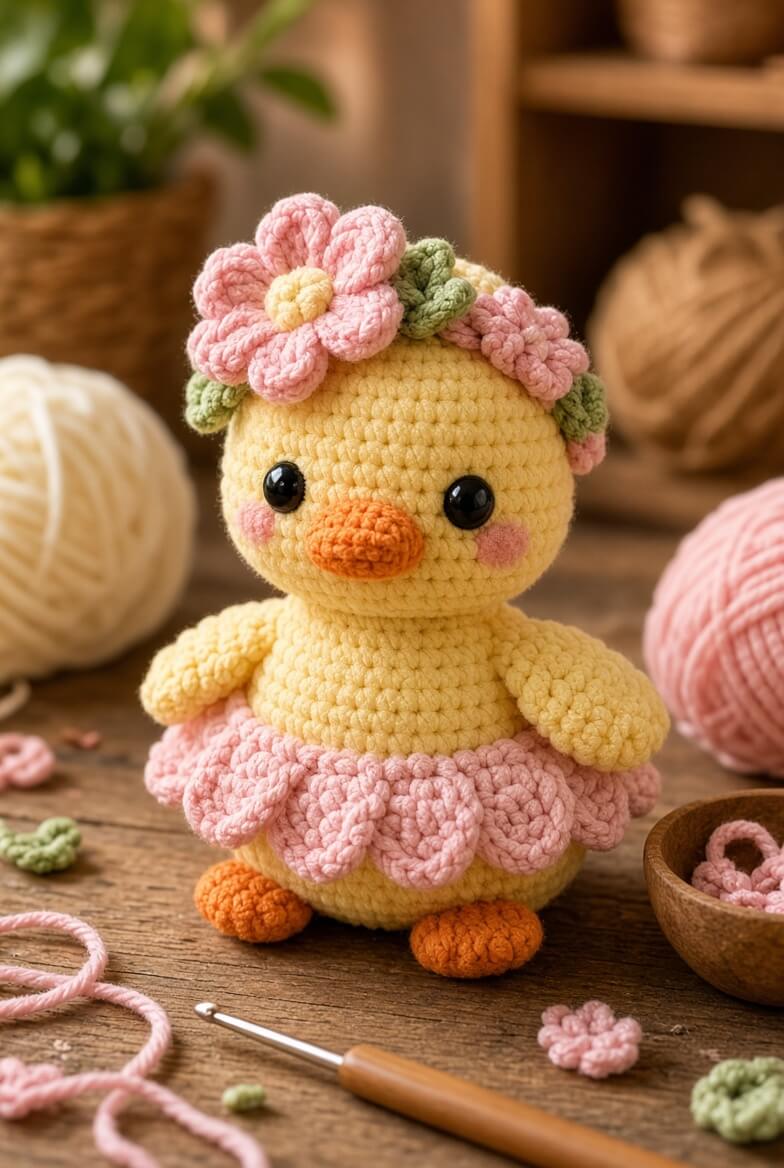
A duck’s bill has to stay wider than its muzzle while a flower crown pulls visual weight toward the top of the head. This flower duck amigurumi crochet pattern uses worsted or light chunky yarn, a 4 mm hook and 10–12 mm safety eyes to make an approximately 20 cm duckling. The intermediate build includes wings, orange feet, a floral crown and a layered pink petal skirt.
The Design: What Makes This Flower Duck Different
The head expands to 42 stitches because the photographed duck has a broad spherical face with the eyes set well apart from the bill. Its body stops at 36 stitches, keeping the torso narrower while leaving enough circumference for the attached pink skirt. A separately crocheted orange bill projects forward rather than lying flat against the yellow face. The wings remain compact and sit high on the torso so they do not cover the skirt petals. This spring duck crochet pattern also uses two different floral scales: one large crown flower controls the asymmetry, while smaller blossoms and sage leaves fill the remaining head band. One common mistake is making every flower the same size. That creates a rigid wreath rather than the uneven botanical crown visible in the reference.
Project Info at a Glance
| Skill Level | Time | Finished Size | Hook | Best For |
|---|---|---|---|---|
| Intermediate | 8–10 hours | Approximately 20 cm tall | 4.0 mm | Spring display, Easter projects and floral amigurumi collections |
Materials and Tools
Yarn
- Butter yellow — worsted or light chunky yarn — approximately 90–110 g — used for the head, body and wings.
- Dusty pink — matching yarn — approximately 35–45 g — used for the skirt, crown flowers and cheeks.
- Orange — matching yarn — approximately 10–15 g — used for the bill and feet.
- Sage green — worsted yarn — approximately 5–8 g — used for crown leaves.
- Pale yellow — worsted yarn — approximately 3–5 g — used for flower centers.
- Black — embroidery floss — under 1 g if additional eye detailing is required.
Tools
- 4.0 mm crochet hook
- 10–12 mm safety eyes
- Polyester stuffing, approximately 60–80 g
- Yarn needle
- Locking stitch marker
- Dressmaking pins
- Scissors
Replace plastic safety eyes with securely embroidered eyes when the finished duck will be handled by a child under three.
Abbreviations
- MR — magic ring
- sc — single crochet
- inc — two single crochet stitches in one stitch
- dec — invisible single crochet decrease
- sl st — slip stitch
- ch — chain
- hdc — half double crochet
- dc — double crochet
- tr — treble crochet
- BLO — back loop only
- FLO — front loop only
An invisible decrease is worked through the front loops of the next two stitches before completing one single crochet through both loops.
Pattern — Step by Step
Work the stuffed components in continuous spirals unless a joined round or row is specified. Mark the first stitch of every round and count the complete round before moving the marker.
Head
Yarn: butter yellow — Source: standard six-stitch amigurumi math.
R1: 6 sc in MR (6)
R2: inc ×6 (12)
R3: (sc, inc) ×6 (18)
R4: (2 sc, inc) ×6 (24)
R5: (3 sc, inc) ×6 (30)
R6: (4 sc, inc) ×6 (36)
R7: (5 sc, inc) ×6 (42)
R8–R13: sc around (42)
R14: (5 sc, dec) ×6 (36)
R15: (4 sc, dec) ×6 (30)
R16: (3 sc, dec) ×6 (24)
R17: (2 sc, dec) ×6 (18)
R18: (sc, dec) ×6 (12)
R19: dec ×6 (6)
Insert the safety eyes between R10 and R11 with approximately nine visible stitches between the posts. Begin stuffing after R14 and pack the cheek area before filling the crown.
Fasten off. Leave a 25 cm tail and close the remaining six front loops.
Body
Yarn: butter yellow — Source: standard medium amigurumi math.
R1: 6 sc in MR (6)
R2: inc ×6 (12)
R3: (sc, inc) ×6 (18)
R4: (2 sc, inc) ×6 (24)
R5: (3 sc, inc) ×6 (30)
R6: (4 sc, inc) ×6 (36)
R7–R13: sc around (36)
R14: (4 sc, dec) ×6 (30)
R15–R16: sc around (30)
R17: (3 sc, dec) ×6 (24)
R18: sc around (24)
R19: (2 sc, dec) ×6 (18)
R20: (sc, dec) ×6 (12)
R21: dec ×6 (6)
Stuff R1–R16 firmly. Keep the upper rounds slightly softer so the head can sit close to the torso without a hard ridge.
Fasten off. Leave a 35 cm sewing tail.
Bill
Yarn: orange — original flattened oval construction.
R1: 6 sc in MR (6)
R2: inc ×6 (12)
R3: (sc, inc) ×6 (18)
R4–R5: sc around (18)
R6: (sc, dec) ×6 (12)
Add only a small amount of stuffing. Flatten the 12-stitch opening horizontally so the bill becomes broader than it is tall.
Fasten off. Leave a 25 cm sewing tail.
Wings (Make 2)
Yarn: butter yellow.
R1: 6 sc in MR (6)
R2: inc ×6 (12)
R3: (sc, inc) ×6 (18)
R4–R6: sc around (18)
R7: (sc, dec) ×6 (12)
R8: sc around (12)
Stuff only the rounded lower half. Flatten the opening so the wing sits against the body.
Fasten off. Leave a 25 cm sewing tail.
Feet (Make 2)
Yarn: orange — original rounded duck-foot construction.
R1: 6 sc in MR (6)
R2: inc ×6 (12)
R3: (sc, inc) ×6 (18)
R4–R5: sc around (18)
R6: (sc, dec) ×6 (12)
R7: dec ×6 (6)
Stuff lightly and press each piece into a flattened oval. The feet should project forward rather than downward.
Fasten off. Leave a 20 cm sewing tail.
Cheek Patches (Make 2)
Yarn: dusty pink — standard flat-circle construction.
R1: 6 sc in MR (6)
R2: inc ×6 (12)
Do not stuff. Flatten both patches before attachment.
Fasten off. Leave a 15 cm sewing tail.
Skirt Foundation
Yarn: dusty pink — original removable-look waistband construction.
Row 1: ch 37, sc in second ch from hook and across (36)
Row 2: ch 1, turn, sc across (36)
Wrap the strip around body R10–R11 before fastening off. Add or remove stitches if your body circumference differs.
Fasten off. Leave a 30 cm tail for closing the waistband around the body.
Large Skirt Petals (Make 10)
Yarn: dusty pink.
R1: 6 sc in MR (6)
R2: inc ×6 (12)
R3: (sc, inc) ×6 (18)
R4–R6: sc around (18)
R7: (sc, dec) ×6 (12)
R8: dec ×6 (6)
Do not stuff. Flatten each piece and pinch the closed end so the opposite end remains broad and rounded.
Fasten off. Leave a 20 cm sewing tail.
Small Skirt Petals (Make 10)
Yarn: dusty pink.
R1: 6 sc in MR (6)
R2: inc ×6 (12)
R3–R5: sc around (12)
R6: dec ×6 (6)
Flatten the pieces completely. These form the shorter upper layer between the larger petals.
Fasten off. Leave an 18 cm sewing tail.
Large Crown Flower
Yarn: pale yellow center and dusty pink petals.
Center R1: with pale yellow, 6 sc in MR (6)
Center R2: inc ×6 (12)
Change to dusty pink.
Repeat six times around the center: sl st in next stitch, ch 5, 3 tr in same stitch, ch 5, sl st in next stitch.
Shape the six petals into broad rounded loops. The flower should measure approximately 6–7 cm across after blocking.
Fasten off. Leave a 25 cm attachment tail.
Medium Crown Flowers (Make 2)
Yarn: dusty pink.
R1: 5 sc in MR (5)
R2: in each stitch work (sl st, ch 3, 2 dc, ch 3, sl st) (5 petals)
Keep these flowers approximately half to two-thirds the width of the large crown flower.
Fasten off. Leave a 20 cm sewing tail.
Crown Leaves (Make 5)
Yarn: sage green.
Row 1: ch 7
Row 2: starting in second ch from hook: sl st, sc, hdc, dc, hdc, sc; work 2 sc into the final chain, then continue along the opposite side with sc, hdc, dc, hdc, sc, sl st.
Pinch the center foundation chain gently so each leaf develops a shallow vein.
Fasten off. Leave a 15 cm sewing tail.
Optional Crown Buds (Make 2)
Yarn: dusty pink.
R1: 6 sc in MR (6)
R2: inc ×6 (12)
R3: sc around (12)
R4: dec ×6 (6)
Do not stuff. Flatten each piece slightly and position it between leaves where a complete flower would be too wide.
Fasten off. Leave a 15 cm tail.
Assembly
- Center the head over the body and sew around the complete attachment area, adding a narrow amount of stuffing at the neck before closing the final gap.
- Pin the orange bill below and between the eyes, keeping its widest dimension horizontal, then sew around the complete 12-stitch opening.
- Attach the two pink cheek patches beside the bill and compare their height from directly in front before securing the final stitches.
- Sew the wings high on the torso around body R13–R16 so their lower tips remain above the future skirt.
- Attach the orange feet beneath the front of the body, keeping approximately six body stitches between them and both flattened ends pointing forward.
- Wrap the pink waistband around the body near its widest section, close the short ends at the back and tack the band to the torso at four evenly spaced points.
- Sew the ten large petals around the lower edge of the waistband, overlapping neighboring petals by approximately 5–8 mm.
- Attach the ten small petals across the upper layer, placing each one over the gap between two larger petals.
- Pin the large flower above one eye, distribute the medium flowers and five sage leaves around the crown, then sew each motif without flattening its outer petals.
- Weave structural tails through at least 4 cm of dense crochet, reverse direction once and trim only after the yarn ends retract beneath the fabric.
The completed duck should remain upright on its lower body and feet while the skirt forms an even ring and the largest crown flower remains offset from the facial center line.
7 Technical Tips
- Bill rotation: A duck bill sewn only from one side can shift 5–8 mm as the seam tightens. Pin the top, bottom and both side points before sewing between them.
- Head flattening: A 42-stitch stuffed head can dent around the eye washers when filling is added in one large piece. Add stuffing in portions smaller than about 3 cm and pack the cheeks before the crown.
- Visible decrease gaps: Conventional decreases can expose stuffing through lighter yarn. Work every decrease through the front loops and match its tension to the neighboring single crochet stitches.
- Late eye placement: Installing 10–12 mm eye backs after the head has decreased below 30 stitches restricts access. Fit both eyes after R13 and confirm approximately nine visible stitches between the posts first.
- Skirt bunching: Attaching petals before fitting the waistband can force excess fabric into one side. Close and tack the 36-stitch band to the body first, then divide it into ten approximately equal petal positions.
- Crown tilt: Concentrating every large flower above the same eye adds visual and physical weight to one side. Use one 6–7 cm anchor flower, then balance it with smaller blossoms and at least two leaves toward the opposite ear area.
- Hidden wings: Sewing the wings lower than the skirt waistband leaves their tips buried under the petals. Position the lowest wing edge at least 1.5–2 cm above the waistband before making permanent stitches.
Conclusion
Check the flower crown before securing the last skirt petals because those two pink sections compete for the same visual weight. Next, place the duck on a level surface and photograph the front and both three-quarter views before trimming structural tails. Those angles expose a rotated bill, unequal feet or a crown that leans too far toward one eye. Share the finished flower duck amigurumi crochet pattern project on Pinterest with a vertical photograph, then post a close view of the crown and layered skirt on Instagram using #FlowerCrownDuck. For this duck specifically, would you keep the skirt entirely dusty pink or alternate every second petal with pale yellow?









