Introduction
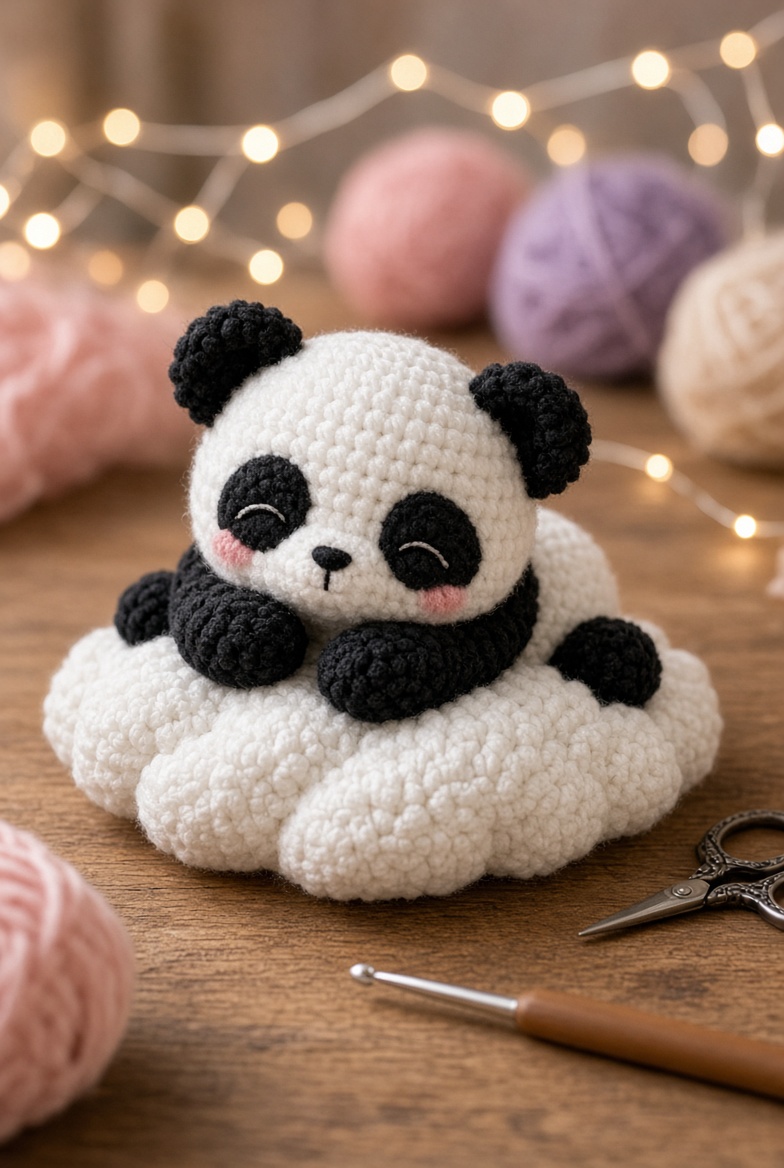
A panda reclining on a cloud has to keep its black forelegs visible even though most of the torso sinks into white crochet. This panda amigurumi crochet pattern uses worsted yarn, a 3.5 mm hook and 10–12 mm eyes for an approximately 18–22 cm panda. Separate eye patches, rounded ears, four limbs and a clustered cloud base create an intermediate display with a low horizontal pose.
The Design: What Makes This Cloud Panda Different
The panda uses a 36-stitch head because the face needs enough width for two elongated black eye patches without crowding the central muzzle. A similarly wide body is worked longer than the head but positioned horizontally across the cloud rather than standing vertically. Both front legs angle forward and rest on the upper cloud puffs, while the rear legs sit farther back and remain partly concealed. The eye patches are crocheted separately so their long oval shape can be rotated before sewing. Rounded black ears sit behind the crown instead of directly on top. The cloud is constructed from one central core plus multiple stuffed lobes, creating a broad platform rather than a single white sphere. A common failure with a sleepy panda crochet pattern is placing the cloud too high around the shoulders; enough black foreleg area must remain visible to establish the reclining pose.
Project Information at a Glance
| Skill Level | Time | Finished Size | Hook | Best For |
|---|---|---|---|---|
| Intermediate | 11–15 hours | Panda 18–22 cm; cloud 27–31 cm wide | 3.5 mm panda / 4 mm cloud | Nursery shelf decor, desk display and panda collections |
Materials and Tools
Yarn
- White — worsted/Aran yarn — approximately 90–120 g — panda head/body plus cloud
- Black — worsted/Aran yarn — approximately 35–50 g — ears, patches and limbs
- Blush pink — yarn scrap — cheeks
- Black embroidery yarn — small amount — nose and mouth
- White embroidery yarn — small amount — optional sleepy eyelid accents
Tools
- 3.5 mm crochet hook
- 4 mm crochet hook for the cloud if using thicker yarn
- Two 10–12 mm black safety eyes
- Polyester toy stuffing
- Large-eye yarn needle
- Locking stitch marker
- Dressmaking pins
- Scissors
Use a compact gauge on the panda so white stuffing does not show between black stitches. The cloud may be worked slightly looser because each puff is individually stuffed and then anchored to a structural core.
Abbreviations
- MR — magic ring
- sc — single crochet
- inc — two single crochet stitches in one stitch
- dec — decrease over two stitches
- sl st — slip stitch
- ch — chain
- hdc — half double crochet
- dc — double crochet
- BLO — back loop only
- FLO — front loop only
An invisible decrease is made through the front loops of the next two stitches before completing them together as one single crochet.
Pattern — Step by Step
Work all stuffed pieces in continuous spirals unless a section states otherwise. Mark the first stitch of every round and verify the bracketed count before continuing.
Head
Yarn: white — standard six-stitch sphere construction.
R1: 6 sc in MR (6)
R2: inc × 6 (12)
R3: (sc, inc) × 6 (18)
R4: (2 sc, inc) × 6 (24)
R5: (3 sc, inc) × 6 (30)
R6: (4 sc, inc) × 6 (36)
R7–R12: sc around (36)
R13: (4 sc, dec) × 6 (30)
Do not install the safety eyes until the crocheted eye patches have been pinned in position. The stems should pass through both patch and head fabric.
R14: (3 sc, dec) × 6 (24)
R15: (2 sc, dec) × 6 (18)
R16: (sc, dec) × 6 (12)
R17: dec × 6 (6)
Stuff firmly after R13, distributing small pieces around both eye washers before filling the crown.
Fasten off. Pass a 25 cm tail through the remaining six front loops and close.
Body
Yarn: white.
R1: 6 sc in MR (6)
R2: inc × 6 (12)
R3: (sc, inc) × 6 (18)
R4: (2 sc, inc) × 6 (24)
R5: (3 sc, inc) × 6 (30)
R6: (4 sc, inc) × 6 (36)
R7–R12: sc around (36)
R13: (4 sc, dec) × 6 (30)
R14–R15: sc around (30)
R16: (3 sc, dec) × 6 (24)
R17: (2 sc, dec) × 6 (18)
R18: (sc, dec) × 6 (12)
R19: dec × 6 (6)
Stuff firmly through R15, then slightly softer toward the final closure. The body will lie horizontally and needs enough flexibility to conform to the cloud.
Fasten off and leave a 40 cm structural tail.
Ears — Make Two
Yarn: black.
R1: 6 sc in MR (6)
R2: inc × 6 (12)
R3: (sc, inc) × 6 (18)
R4–R5: sc around (18)
R6: (sc, dec) × 6 (12)
Do not stuff heavily. Add only a trace of filling or leave flat depending on yarn thickness.
Fasten off and leave a 25 cm sewing tail.
Eye Patches — Make Two
Yarn: black. Work around both sides of a short chain.
Ch 5.
R1: starting in second ch from hook, inc, 2 sc, 4 sc in final ch; continue on opposite side with 2 sc, inc (12)
R2: inc, 3 sc, inc × 2, 3 sc, inc × 2 (16)
Fasten off with a 25 cm sewing tail.
Stretch each patch into a tilted oval. Rotate the outer ends slightly downward before pinning to reproduce the panda eye-mask shape.
Muzzle
Yarn: white.
R1: 6 sc in MR (6)
R2: inc × 6 (12)
R3: sc around (12)
Add only a thin layer of stuffing. Fasten off with a 25 cm tail.
Nose and Mouth
Yarn: black embroidery yarn.
Embroider a small horizontal oval or triangle approximately 8–10 mm wide across the centre of the muzzle. Add one vertical stitch downward and two short curves for the mouth.
Cheek Patches — Make Two
Yarn: blush pink.
R1: 6 sc in MR (6)
Fasten off with a 10 cm tail. Compress each circle into a low oval while sewing.
Front Legs — Make Two
Yarn: black.
R1: 6 sc in MR (6)
R2: inc × 6 (12)
R3: (sc, inc) × 6 (18)
R4–R6: sc around (18)
R7: (sc, dec) × 6 (12)
R8–R10: sc around (12)
R11: dec × 6 (6)
Stuff the rounded paw firmly through R6. Leave the upper third softer so each arm can lie naturally across the cloud.
Fasten off and leave a 30 cm tail.
Back Legs — Make Two
Yarn: black.
R1: 6 sc in MR (6)
R2: inc × 6 (12)
R3: (sc, inc) × 6 (18)
R4: (2 sc, inc) × 6 (24)
R5–R6: sc around (24)
R7: (2 sc, dec) × 6 (18)
R8: (sc, dec) × 6 (12)
R9: sc around (12)
R10: dec × 6 (6)
Stuff to medium firmness and flatten slightly. Much of each rear leg is concealed by the white torso and cloud.
Fasten off with a 30 cm attachment tail.
Optional White Rear Hip Patch
The photograph shows a white rear body section above the black hind foot. Use the body itself for this area rather than adding a separate part unless your assembly leaves a visible gap.
Cloud Core
Yarn: white.
R1: 6 sc in MR (6)
R2: inc × 6 (12)
R3: (sc, inc) × 6 (18)
R4: (2 sc, inc) × 6 (24)
R5: (3 sc, inc) × 6 (30)
R6: (4 sc, inc) × 6 (36)
R7: (5 sc, inc) × 6 (42)
R8: (6 sc, inc) × 6 (48)
R9–R12: sc around (48)
R13: (6 sc, dec) × 6 (42)
R14: (5 sc, dec) × 6 (36)
R15: (4 sc, dec) × 6 (30)
R16: (3 sc, dec) × 6 (24)
R17: (2 sc, dec) × 6 (18)
R18: (sc, dec) × 6 (12)
R19: dec × 6 (6)
Stuff firmly but flatten the finished core into a broad oval approximately 22–25 cm across.
Fasten off and close.
Large Cloud Puffs — Make Eight
Yarn: white.
R1: 6 sc in MR (6)
R2: inc × 6 (12)
R3: (sc, inc) × 6 (18)
R4: (2 sc, inc) × 6 (24)
R5–R7: sc around (24)
R8: (2 sc, dec) × 6 (18)
R9: (sc, dec) × 6 (12)
Stuff to medium firmness. Fasten off with a 25 cm tail.
Medium Cloud Puffs — Make Four
Yarn: white.
R1: 6 sc in MR (6)
R2: inc × 6 (12)
R3: (sc, inc) × 6 (18)
R4–R5: sc around (18)
R6: (sc, dec) × 6 (12)
R7: dec × 6 (6)
Stuff lightly and leave a 20 cm sewing tail.
Assembly
- Pin both black eye patches onto the white head first, rotating their outer ends slightly downward. Insert the safety-eye stems through the patches and head, then secure the washers.
- Sew the muzzle centrally between and below the eye patches, then embroider the black nose and short mouth before the cloud restricts access to the face.
- Attach the black ears behind the upper sides of the head. Spread each seam across approximately 6–7 head stitches so the ears remain rounded instead of folding inward.
- Sew the two pink cheek patches below the eye masks, keeping them outside the muzzle edges and at comparable heights.
- Attach the head to the white body at a slight downward angle. The face should project beyond the front of the body rather than point vertically upward.
- Sew both black front legs to the shoulder area and angle them forward. Position the two hind legs farther back, leaving the white torso visible between the front and rear limb groups.
- Arrange the eight large cloud puffs around the 48-stitch core, placing the broadest pieces across the front and sides. Fill the upper gaps with the four medium puffs.
- Sew every puff through both the cloud core and at least one neighboring puff. Leave a shallow depression near the centre where the panda body will sit.
- Place the assembled panda horizontally across the cloud and pin the body, front paws and one rear contact point. Sew the hidden lower torso firmly to the core while leaving the visible limbs raised.
- Set the finished display on a level surface, adjust the cloud puffs until the panda does not roll sideways, then weave all structural yarn tails through at least three stitch directions.
The completed panda should recline across the upper cloud with the face angled forward, both front paws visible and the white cloud extending beyond the animal on every side.
7 Technical Tips
- Eye-patch rotation: Perfectly vertical oval patches can make the face look rigid. Tilt each outer end downward by approximately 10–15 degrees before securing the safety eye.
- Head droop: A loosely stuffed 36-stitch head can sink onto the cloud and hide the muzzle. Keep the crown firm enough that finger pressure compresses it by no more than about 5 mm.
- Decrease holes: White stuffing is especially visible through black yarn. Work every decrease through the front loops of the next two stitches.
- Front-paw crowding: Paws attached less than about 2 cm apart can merge into one black mass. Pin both limbs before sewing and leave visible white chest between their upper seams.
- Cloud-puff separation: A puff attached only to the core can rotate outward. Give every large puff at least one second seam to a neighboring puff.
- Cloud collapse: Overly soft stuffing lets the 27–31 cm base flatten under the panda. Fill the structural core more firmly than the exterior lobes.
- Panda rolling: A single central body seam acts like a pivot. Secure the reclining panda at a minimum of three zones: lower torso, one front-body contact and rear body.
Shaping the Panda Head
The face is the dominant feature of this panda amigurumi crochet pattern. A 36-stitch plateau provides enough uninterrupted white surface for two black eye masks, a projecting muzzle and broad cheek spacing.
Keep the head spherical through the forehead but slightly softer around the muzzle attachment. Packing that lower section too firmly pushes the white muzzle outward and can distort the eye patches.
Place the patches before the safety eyes. That sequence lets you rotate both black shapes until they mirror one another before making permanent holes in the white head.
Making the Panda Eye Patches
The photographed masks are elongated rather than circular. Working around both sides of a foundation chain creates that geometry with less shaping than a standard magic-ring disk.
Do not sew the entire outer edge immediately. Tack the top, bottom and inner end first, then compare both patches from the front.
Once their angles match, finish the perimeter seam. Leave the fabric flat against the head so the patch does not cast a heavy raised ridge around the eye.
Building the Small Muzzle
The white muzzle breaks the black-and-white face into three clear zones: eye masks, muzzle and cheek areas. Its 12-stitch size is deliberately compact.
Add very little stuffing. A thick spherical snout changes the panda into a bear with an exaggerated muzzle, while the reference uses a low oval projection.
Embroider the nose after the muzzle is attached. That makes it easier to keep the black centre aligned with the eyes.
Constructing the Reclining Body
The horizontal pose requires different assembly from an upright panda. Rather than centring the head over the body opening, angle it forward so the chin approaches the front paws.
The body reaches the same 36-stitch maximum as the head but carries that width for six rounds. This provides enough white surface between the black shoulders and hind legs.
Before sewing the panda to the cloud, rotate the torso until one rear black foot remains visible from the front-side angle. That small black shape helps communicate the full reclining body.
Positioning the Front Paws
Both forelegs rest across the cloud rather than hanging beside the torso. Stuff their rounded ends firmly and keep their shoulder ends softer.
Angle the paws slightly toward the centre without allowing them to touch. A narrow strip of white chest should remain visible between them.
Attach the inner upper edge firmly, then leave part of the outer paw free. This produces the raised black shapes visible against the white cloud.
Constructing the Cloud Base
The cloud needs an internal core because individual stuffed balls alone can spread apart under the panda’s weight. A 48-stitch central oval becomes the load-bearing section.
Eight large puffs define the outside silhouette, while four medium pieces close visible gaps around the upper surface. Arrange the puff sizes irregularly rather than alternating large and small in a strict pattern.
Keep the outer lobes softer than the core. The exterior should remain rounded while the centre needs enough firmness to carry the animal.
Making the Cloud Look Continuous
Visible gaps between cloud puffs break the illusion of one large soft form. After attaching the first ring, inspect the cloud from directly above.
Place the four smaller puffs where the structural core can still be seen. Their seams can sit partly underneath neighboring large puffs.
Use white yarn for every cloud assembly stitch. Pass the needle beneath surface loops rather than across exposed stitch tops whenever possible.
Balancing Black and White
A panda can quickly become too dark if the front legs, eye patches and ears cluster closely. Preserve enough white space between these elements.
The forehead should retain a broad white band between the ears and eye masks. Likewise, white muzzle edges need to remain visible inside the black eye areas.
At the body, keep the black legs separated by white torso and cloud. That distinction is particularly important in a reclining pose where several parts overlap.
Adjusting the Finished Size
Keep the written stitch totals and change yarn weight for the cleanest scaling. DK yarn with a 2.75–3 mm hook produces a smaller version while preserving the head-to-cloud relationship.
For a larger panda, switch to bulky yarn before increasing the head beyond 36 stitches. An additional increase round would require larger patches, ears, legs and a wider cloud.
Finish one large cloud puff after choosing the yarn. If its diameter exceeds roughly one-quarter of the intended total cloud width, use a thinner yarn or smaller hook for the base.
Stuffing Strategy
The panda and cloud require different stuffing densities. The head needs the firmest filling because it supports eye hardware and must retain a clean sphere.
The body can be slightly softer so it settles naturally into the cloud depression. Front paws need firm ends but flexible shoulders.
Cloud puffs should remain springy. Pack the central core more densely, then use lighter filling in the exterior lobes to preserve their rounded outlines.
Finishing Checks
Place the completed display on a hard, level table. The cloud should touch the surface across several lobes rather than rocking on one central puff.
View the panda directly from the front. Both eye masks should have comparable tilt, the muzzle must sit on the face centre line and the cheeks need similar spacing.
Check the reclining silhouette from the side last. The head should sit slightly higher than the torso, both forelegs should rest across the cloud and at least part of the rear body should remain readable behind them.
Conclusion
Measure the finished cloud at its widest point and record the panda’s head diameter before storing your project notes. Those two measurements make a second version easier to scale because the reclining pose depends on the cloud being broader than the animal. Photograph the finished piece from a low front angle to check eye-patch symmetry, paw separation and cloud balance. Save this panda amigurumi crochet pattern to Pinterest and share the completed plush on Instagram with #SleepyCloudPanda. Reshape the exterior cloud puffs before the final photograph. Would you keep the pure white cloud or add pale blue puffs around its lower edge?
Sources
- DIY Fluffies — Free Panda Crochet Pattern: current free panda tutorial with written and video instructions.
- Cuddly Stitches Craft — Free Crochet Panda Pattern: 2024 low-sew panda, 21 cm seated size and separate eye-patch construction.
- Yarn + Chai — Amigurumi Panda: bulky chenille/velvet construction, 4 mm hook, separate eye patches and 18-stitch ears.
- Jess Huff — Easy Free Panda Crochet Pattern: worsted #4 yarn with a 3.5 mm hook.
- Amigurum.com — Plush Panda Amigurumi: 30 cm finished size, 4 mm hook and 10 mm safety eyes.
- Amigurumi Corner — 2026 Panda Amigurumi Guide: crocheted eye patches with 12 mm safety eyes.









