Introduction
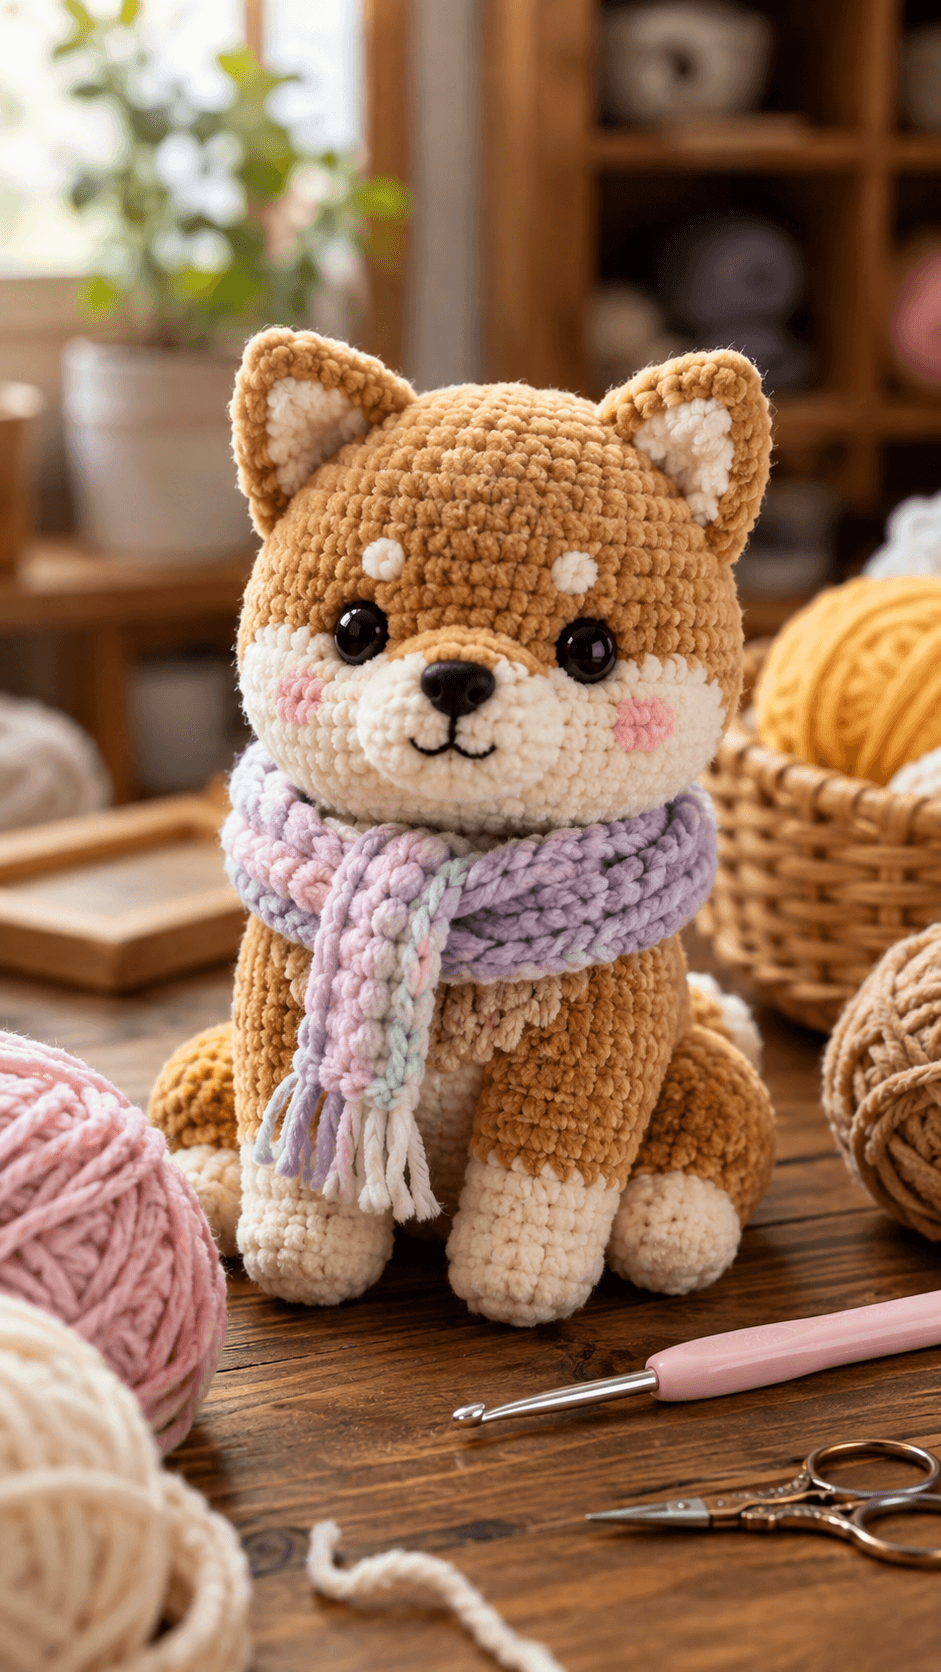
A Shiba’s tail should curl over the back, but that curve has to remain visible beside a bulky scarf and oversized seated body. This Shiba Inu amigurumi crochet pattern uses chunky chenille, a 4.5 mm hook and 12–14 mm safety eyes to make an approximately 22 cm puppy. The intermediate build includes pointed ears, a cream facial mask, curled tail and striped lavender scarf.
The Design: What Makes This Shiba Inu Different
The head reaches a 42-stitch plateau because the photographed Shiba has a broad forehead and rounded cheek area rather than a narrow canine skull. A separate cream muzzle projects from the lower face while larger cream cheek sections create the breed’s pale facial mask. The body stops at 36 stitches, keeping the head dominant without making the seated torso too narrow. Long front legs run almost vertically toward the table, while the rear legs sit farther apart and form the base of this plush Shiba Inu crochet pattern. The triangular ears remain relatively small compared with the head. One common error is widening them until the puppy reads as a fox. Keep the ears compact, then let the curled tail and cream mask carry more of the Shiba-specific silhouette.
Project Info at a Glance
| Skill Level | Time | Finished Size | Hook | Best For |
|---|---|---|---|---|
| Intermediate | 8–10 hours | Approximately 22 cm seated | 4.5 mm | Dog collections, desk display and plush photography |
Materials and Tools
Yarn
- Warm caramel — chunky chenille/plush yarn — approximately 100–120 g — used for the head, body, ears, limbs and tail.
- Warm cream — matching chunky yarn — approximately 40–50 g — used for the facial mask, muzzle, paws and ear centers.
- Lavender — chunky or heavy-worsted yarn — approximately 25–30 g — used for the main scarf.
- Blush pink — chunky or heavy-worsted yarn — approximately 5 g — used for cheeks and one scarf accent row.
- Pale mint — chunky or heavy-worsted yarn — approximately 3–5 g — used for a narrow scarf accent.
- Black or very dark brown — embroidery floss — under 1 g — used for the mouth and eyebrows.
Tools
- 4.5 mm crochet hook
- 12–14 mm safety eyes
- 12–14 mm safety nose or embroidered nose
- Polyester stuffing, approximately 70–90 g
- Yarn needle
- Embroidery needle
- Locking stitch markers
- Dressmaking pins
- Scissors
Replace plastic eyes and nose with securely embroidered features when the finished dog is intended for a child under three.
Abbreviations
- MR — magic ring
- sc — single crochet
- inc — two single crochet stitches in one stitch
- dec — invisible single crochet decrease
- sl st — slip stitch
- ch — chain
- hdc — half double crochet
- dc — double crochet
- BLO — back loop only
- FLO — front loop only
An invisible decrease is worked through the front loops of the next two stitches before completing one single crochet through both loops.
Pattern — Step by Step
Work stuffed pieces in a continuous spiral unless a joined round or row is specified. Mark the first stitch and move the marker only after checking the total count.
Head
Yarn: warm caramel — Source: standard six-stitch amigurumi math.
R1: 6 sc in MR (6)
R2: inc ×6 (12)
R3: (sc, inc) ×6 (18)
R4: (2 sc, inc) ×6 (24)
R5: (3 sc, inc) ×6 (30)
R6: (4 sc, inc) ×6 (36)
R7: (5 sc, inc) ×6 (42)
R8–R13: sc around (42)
R14: (5 sc, dec) ×6 (36)
R15: (4 sc, dec) ×6 (30)
R16: (3 sc, dec) ×6 (24)
R17: (2 sc, dec) ×6 (18)
R18: (sc, dec) ×6 (12)
R19: dec ×6 (6)
Insert the eyes between R10 and R11 with approximately nine visible stitches between the posts. Begin stuffing after R14 and add small pieces around each washer before filling the center.
Fasten off. Leave a 25 cm tail and close the six remaining front loops.
Body
Yarn: warm caramel — Source: standard six-stitch amigurumi math.
R1: 6 sc in MR (6)
R2: inc ×6 (12)
R3: (sc, inc) ×6 (18)
R4: (2 sc, inc) ×6 (24)
R5: (3 sc, inc) ×6 (30)
R6: (4 sc, inc) ×6 (36)
R7–R13: sc around (36)
R14: (4 sc, dec) ×6 (30)
R15–R16: sc around (30)
R17: (3 sc, dec) ×6 (24)
R18: sc around (24)
R19: (2 sc, dec) ×6 (18)
R20: (sc, dec) ×6 (12)
R21: dec ×6 (6)
Stuff the lower body firmly enough to support the seated pose. Reduce the filling pressure in the final three rounds so the neck area stays slightly compressible.
Fasten off. Leave a 35 cm sewing tail.
Cream Muzzle
Yarn: warm cream — Source: original broad dog-muzzle shaping.
R1: 6 sc in MR (6)
R2: inc ×6 (12)
R3: (sc, inc) ×6 (18)
R4: (2 sc, inc) ×6 (24)
R5–R6: sc around (24)
R7: (2 sc, dec) ×6 (18)
Stuff only the front half. Flatten the 18-stitch opening slightly before pinning the muzzle beneath the eye line.
Fasten off. Leave a 30 cm sewing tail.
Cream Cheek Panels (Make 2)
Yarn: warm cream — Source: original flat-mask construction.
R1: 6 sc in MR (6)
R2: inc ×6 (12)
R3: (sc, inc) ×6 (18)
Do not stuff. Stretch each panel into a slight oval and position it from the lower eye area toward the muzzle.
Fasten off. Leave a 20 cm sewing tail.
Eyebrow Spots (Make 2)
Yarn: warm cream.
R1: 6 sc in MR (6)
Close the ring firmly and flatten. Each mark should remain small and sit approximately two rounds above its corresponding eye.
Fasten off. Leave a 10 cm tail.
Front Legs (Make 2)
Yarn: begin with warm cream, then change to caramel.
R1: 6 sc in MR with cream (6)
R2: inc ×6 (12)
R3: (sc, inc) ×6 (18)
R4–R5: sc around (18)
R6: change to caramel, BLO sc around (18)
R7: (sc, dec) ×6 (12)
R8–R16: sc around (12)
Stuff the cream paw and lower caramel section firmly. Keep the final 4 cm lightly filled so the leg can hang vertically.
Fasten off. Leave a 30 cm sewing tail.
Back Legs and Feet (Make 2)
Yarn: begin with warm cream, then change to caramel.
R1: 6 sc in MR with cream (6)
R2: inc ×6 (12)
R3: (sc, inc) ×6 (18)
R4: (2 sc, inc) ×6 (24)
R5–R7: sc around (24)
R8: change to caramel, BLO sc around (24)
R9: (2 sc, dec) ×6 (18)
R10–R12: sc around (18)
R13: (sc, dec) ×6 (12)
R14–R15: sc around (12)
Pack the cream foot firmly and leave the final rounds softer so the rear leg can angle outward.
Fasten off. Leave a 35 cm sewing tail.
Outer Ears (Make 2)
Yarn: warm caramel — Source: original pointed-ear shaping.
R1: 6 sc in MR (6)
R2: sc around (6)
R3: (sc, inc) ×3 (9)
R4: (2 sc, inc) ×3 (12)
R5: (3 sc, inc) ×3 (15)
R6–R7: sc around (15)
Do not stuff. Flatten each ear and pinch the base so the tip remains upright.
Fasten off. Leave a 25 cm sewing tail.
Inner Ears (Make 2)
Yarn: warm cream.
R1: 6 sc in MR (6)
R2: (sc, inc) ×3 (9)
R3: (2 sc, inc) ×3 (12)
Flatten each circle into a shallow triangle during attachment and leave approximately one crochet round of caramel visible around it.
Fasten off. Leave a 15 cm sewing tail.
Tail
Yarn: warm caramel — Source: original curled-tail tube inspired by standard Shiba tail construction.
R1: 6 sc in MR (6)
R2: inc ×6 (12)
R3–R12: sc around (12)
R13: (sc, dec) ×4 (8)
R14–R17: sc around (8)
Stuff R1–R8 lightly and leave the remaining section nearly unstuffed. Curve the tube into a C shape before attachment.
Fasten off. Leave a 35 cm sewing tail.
Cheek Patches (Make 2)
Yarn: blush pink — Source: standard flat-circle math.
R1: 6 sc in MR (6)
R2: inc ×6 (12)
Do not stuff. Flatten each circle and place it over the cream cheek area without touching the eye.
Fasten off. Leave a 15 cm sewing tail.
Scarf
Yarn: lavender with blush-pink and pale-mint accents — Source: original accessory construction.
Row 1: ch 61, hdc in second ch from hook and across (60)
Row 2: ch 1, turn, hdc across in lavender (60)
Row 3: change to blush pink, ch 1, turn, hdc across (60)
Row 4: change to pale mint, ch 1, turn, sc across (60)
Row 5: change back to lavender, ch 1, turn, hdc across (60)
Row 6: ch 1, turn, hdc across (60)
Test the strip around the finished neck before fastening off. Add or remove four stitches when the scarf is too loose or too tight.
Fasten off and weave in the working tail.
Scarf Fringe
Use lavender, cream and blush-pink yarn.
Cut 12 strands approximately 10 cm long. Fold each strand in half and pull the folded loop through a short-end stitch with the hook, then draw the two loose ends through the loop.
Attach six fringe bundles to each scarf end and trim them to approximately 4 cm.
Nose and Mouth
Yarn: black or dark brown embroidery floss.
Place the nose at the upper center of the cream muzzle. Work several horizontal stitches across approximately two crochet stitches, then bring one vertical stitch downward about 6–7 mm.
Add one shallow curved stitch to the left and one to the right to form the split mouth.
Secure the floss behind the muzzle and bury the ends inside the stuffing.
Assembly
- Center the head over the body and sew through one head stitch and one body stitch at a time, adding a narrow amount of stuffing at the neck before closing.
- Pin the two cream cheek panels beneath the eyes, then place the muzzle over their inner edges and sew all three facial pieces before adding embroidery.
- Attach the nose, mouth, blush cheek circles and small cream eyebrow spots, checking the face directly from the front after every component.
- Sew each cream inner-ear panel to its caramel ear, then attach the completed ears near head R5–R8 with their tips angled slightly outward.
- Attach the front legs to the upper body with approximately four body stitches between their inner edges and both cream paws facing forward.
- Pin the rear legs low on each side of the torso, place the Shiba on a level surface and adjust the feet until the body remains upright without support.
- Curve the tail into a loose C and sew its base to the lower rear body, adding one hidden anchoring stitch farther up the tail so the curl remains visible from the front-right view.
- Wrap the scarf around the neck, cross the ends near one shoulder and secure the overlap with two hidden lavender stitches.
- Arrange the fringe so it hangs below the scarf knot without covering either front leg.
- Weave all structural tails through at least 4 cm of dense plush fabric, reverse direction once and trim only after the yarn retracts beneath the surface.
The completed Shiba should sit on the lower body and rear legs while the front paws remain vertical, both ears stand upright and the tail curve stays visible beside the torso.
7 Technical Tips
- Fox-like ears: Increasing the ears beyond about 15 stitches makes them dominate the head and weakens the Shiba silhouette. Keep the base compact and rely on the pointed tip rather than extra width.
- Flattened muzzle: Firm stuffing across all seven muzzle rounds makes the face project like a ball. Concentrate filling in the front half and keep the 18-stitch sewing edge flexible.
- Visible decrease holes: Chenille can expose stuffing around conventional decreases. Work through the two front loops and keep the working tension equal to neighboring single crochet stitches.
- Late eye installation: Fitting 12–14 mm washers after the head decreases below 30 stitches restricts access. Install both eyes after R13 and confirm approximately nine visible stitches between the posts first.
- Tail uncurling: Stuffing the entire 17-round tail firmly forces it into a straight tube. Keep the final nine rounds lightly filled or empty and anchor the curve with one second attachment point 3–4 cm above the base.
- Uneven seated feet: Permanently sewing one hind leg before positioning its partner can shift the body by 5–10 mm. Pin both rear legs, place the dog on a hard surface and compare the front edges of the cream paws before stitching.
- Scarf bulk: A scarf more than six rows deep hides the lower jaw and pushes the head upward. Keep the finished width near 5–6 cm and secure the overlap near one shoulder rather than directly beneath the muzzle.
Conclusion
Check the ear angle and tail curl before fixing the scarf because those two points carry most of the breed-specific silhouette. Next, place the Shiba on a level surface and photograph the front, side and three-quarter views before trimming structural tails. Those angles expose a rotated muzzle, unequal paw height or a tail hidden behind the body. Share the finished Shiba Inu amigurumi crochet pattern project on Pinterest with a vertical full-body photograph, then post the scarf and cream face detail on Instagram using #ScarfShibaAmigurumi. For this Shiba specifically, would you keep the lavender scarf or switch it to a traditional red collar?









