Introduction
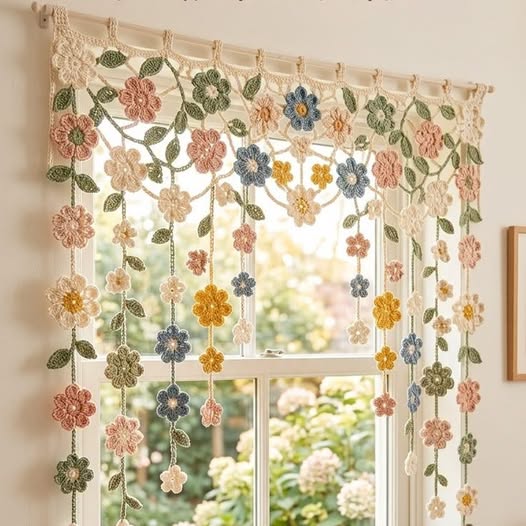
A floral curtain fails if every blossom hangs from an isolated vertical string; the upper third needs to behave like a branching plant. This crochet flower curtain pattern uses sport-weight cotton and a 2.75 mm hook to build an approximately 130 × 100 cm window hanging. Dusty pink, blue, yellow and cream flowers connect through green leaves and vines, while staggered lower garlands keep the centre of the window open.
The Design: What Makes This Floral Curtain Different
The upper section is constructed as a connected botanical canopy rather than a solid rectangle. Large flowers act as visual anchor points, with narrow green stems traveling between them and pairs of leaves filling the spaces. Below that canopy, the structure changes. Long vertical chains carry smaller flowers at irregular intervals, producing transparency across the lower window. Cream hanging loops remain visible along the rod and distribute the weight across the entire width. This floral crochet curtain also alternates flower scale: broad dusty-pink and blue blooms dominate the top, while compact yellow, cream and peach flowers appear lower down. One common maker error is attaching every strand at exactly the same length. The bottom should be staggered; identical drops create a rigid horizontal edge that does not match the botanical structure in the reference.
Project Information at a Glance
| Skill Level | Time | Finished Size | Hook | Best For |
|---|---|---|---|---|
| Intermediate | 18–26 hours | Approx. 130 × 100 cm | 2.75 mm | Window decor, doorway panel or botanical wall hanging |
The finished dimensions are intentionally adjustable. Published flower curtains include a customizable 195 × 100 cm design and a smaller 45 cm design, so the window measurement should control the final strand count rather than one fixed industry size.
Materials and Tools
Yarn
- Warm cream — sport/light DK cotton — approximately 180–230 g — top band, loops, connecting sections and selected flowers
- Dusty pink — sport cotton — approximately 45–55 g — main flowers and smaller blooms
- Soft peach — sport cotton — approximately 25–35 g — secondary flowers
- Muted blue — sport cotton — approximately 25–35 g — accent flowers
- Butter yellow — sport cotton — approximately 25–35 g — small and medium flowers
- Sage green — sport cotton — approximately 65–80 g — stems and leaves
- Olive green — sport cotton — approximately 35–50 g — secondary leaves
Tools
- 2.75 mm crochet hook
- Yarn needle
- Locking stitch markers
- Rust-resistant blocking pins
- Blocking mat
- Measuring tape
- Scissors
- Wooden curtain rod or dowel approximately 130–140 cm long
Current flower-curtain patterns commonly use 4-ply, sport or light cotton with hooks around 2.5–3 mm. Cotton is particularly useful here because the flowers and leaves need clear edges while hanging under their own weight.
Abbreviations
- MR — magic ring
- sc — single crochet
- hdc — half double crochet
- dc — double crochet
- tr — treble crochet
- sl st — slip stitch
- ch — chain
- sp — space
- st — stitch
- RS — right side
- WS — wrong side
When a two-stitch decrease is required in a single-crochet section, work through the front loops of the next two stitches and complete them together.
Pattern — Step by Step
Make the floral motifs first, block them, then assemble the curtain from the top down. Do not permanently attach the vertical strands until the upper canopy has been pinned to its target width.
Large Five-Petal Flower — Make 18
Use dusty pink, muted blue, cream and peach in an irregular distribution.
R1: 10 sc in MR, join with sl st (10)
Work each petal across two base stitches:
Petal: sl st in next st, ch 2, 2 dc in same st, 3 tr in next st, 2 dc in same st, ch 2, sl st in same st.
Repeat five times around the centre.
Fasten off and leave a 25 cm tail when the flower will be sewn to a vine. Otherwise weave in the tail after blocking.
Target blocked diameter: approximately 7–8 cm.
Medium Five-Petal Flower — Make 14
Use cream, dusty pink, yellow and blue.
R1: 10 sc in MR, join (10)
For each petal:
sl st in next st, ch 2, 3 dc in next st, ch 2, sl st in next st.
Repeat five times, distributing the petals evenly around the ring.
Fasten off.
Target blocked diameter: approximately 5–6 cm.
Small Flower — Make 24
Use yellow, cream, peach, pink and blue.
R1: 5 sc in MR (5)
In each stitch work:
(sl st, ch 2, 2 dc, ch 2, sl st)
Repeat five times.
Fasten off and block to approximately 3.5–4.5 cm.
Optional Contrast Flower Centres
For flowers that need a distinct centre, make:
R1: 6 sc in MR (6)
R2: inc ×6 (12)
Fasten off and sew the circle over the existing flower centre.
Use pale yellow centres in blue or cream flowers and cream centres in dusty-pink flowers.
Large Leaves — Make 30
Alternate sage and olive green.
Ch 9.
Starting in second ch from hook:
sl st, sc, hdc, dc, dc, hdc, sc, sl st.
Work 3 sc in the final chain and continue along the opposite side:
sl st, sc, hdc, dc, dc, hdc, sc, sl st.
Fasten off and leave a 15 cm attachment tail.
Target length: approximately 5–6 cm.
Small Leaves — Make 24
Use sage and olive green.
Ch 7.
Starting in second ch from hook:
sl st, sc, hdc, dc, sc, sl st.
Work 3 sc in the final chain and repeat the stitch sequence down the opposite side.
Fasten off and leave a 12 cm tail.
Main Horizontal Top Band
Yarn: warm cream.
Ch 181 or make a chain that measures approximately 125–130 cm without stretching.
Row 1: dc in fourth ch from hook and in each ch across.
Row 2: ch 3, turn, dc across.
Row 3: ch 1, turn, sc across.
Fasten off.
Block the strip to the exact finished curtain width before adding loops or floral branches.
Rod Loops — Make 12
Yarn: warm cream.
Ch 18.
Starting in second ch from hook, sl st across 17 chains.
Fasten off with a 15 cm tail.
Fold each cord into a loop and sew both ends to the top band. Space the loops approximately 10–11 cm apart.
Upper Scallop Sections
Yarn: warm cream.
Join yarn near the lower edge of the top band.
*Skip approximately 8 band stitches, work 7 dc into next stitch, skip approximately 8 stitches, sl st into next stitch.*
Repeat across, adjusting the skipped stitches slightly so the scallops finish evenly at both ends.
Fasten off.
Primary Green Vine — Make Four
Yarn: sage green.
Ch 61.
Starting in second chain, sl st back across all 60 chains.
Fasten off and leave a 20 cm sewing tail.
Finished length should be approximately 35–40 cm after blocking.
Secondary Green Vine — Make Six
Ch 41 and slip stitch back across 40 chains.
Fasten off.
Target finished length: approximately 24–28 cm.
Short Connecting Vine — Make Eight
Ch 26 and slip stitch back across 25 chains.
Fasten off.
Use these shorter cords between neighboring flowers across the upper canopy.
Curved Branch Vine — Make Six
Ch 36.
Work:
sl st in next 10 ch, 2 sc in each of next 8 ch, sl st in remaining chains.
The middle section will curve naturally.
Fasten off and shape the curve during blocking.
Long Hanging Flower Strands — Make Five
Use cream or sage depending on placement.
Make chains to approximate finished lengths of:
- 85 cm
- 92 cm
- 100 cm
- 94 cm
- 88 cm
After reaching the required chain length, slip stitch back along the complete chain.
Do not fasten off until the length has been measured while hanging.
Medium Hanging Strands — Make Six
Make finished cords measuring approximately:
- 55 cm
- 62 cm
- 68 cm
- 72 cm
- 60 cm
- 65 cm
Work every cord as a chain with slip stitches back across its full length.
Attach Flowers to Long Strands
Lay one cord flat.
Position one medium or small flower approximately 10–15 cm below its attachment point. Add another flower 12–18 cm lower.
Continue down the strand, varying the distance between blooms.
Use 3–5 flowers on most long strands. Some strands may use only two flowers plus one or two leaves.
Attach Leaves to Vertical Strands
Sew one or two leaves between neighboring flowers. Angle the leaves alternately left and right rather than attaching every pointed tip in the same direction.
Leave at least 6–8 cm of undecorated cord in several areas so the curtain retains its open appearance.
Build the Upper Floral Canopy
Lay the blocked top band horizontally on a large table or blocking surface.
Position six large flowers approximately 10–15 cm below the band. Offset their heights by several centimetres.
Add primary and secondary green vines between those anchor flowers. Allow several vines to arc downward rather than running parallel with the band.
Place another row of large and medium flowers below the first row. Fill the spaces with leaves and smaller blooms.
Do not sew permanently until the complete canopy has been pinned.
Side Cascades — Make Two
Each side cascade should contain:
- 2 large flowers
- 2–3 medium flowers
- 3–4 small flowers
- 5–6 leaves
- one long green vine
Build each cascade vertically down the outer edge. Keep the innermost side relatively open so the window frame remains visible.
Optional End Leaves
At the bottom of several flower-free cords, attach a small leaf instead of another bloom. This changes the terminal shapes and prevents every strand from ending in the same motif.
Assembly
- Block all large, medium and small flowers individually, measuring at least one motif from every color before assembly so the sizes remain consistent.
- Block the cream top band to the target 125–130 cm width and sew the 12 rod loops across its upper edge at approximately equal intervals.
- Pin the four primary green vines beneath the band first, forming broad arcs that define the upper botanical canopy.
- Add large flowers at the vine junctions, then place medium flowers between them and fill open areas with the large and small leaves.
- Sew the short and curved green branches between neighboring motifs, hiding most cord ends beneath flowers or leaves.
- Attach the five long hanging strands beneath the central and outer canopy areas, leaving different gaps between their upper flower and the canopy.
- Add the six medium strands between the long drops. Keep neighboring finished lengths different by at least 5–8 cm whenever possible.
- Build the two outer cascades and check that the floral weight appears balanced on the left and right sides without making them perfectly mirrored.
- Slide all 12 loops onto the curtain rod and hang the complete piece temporarily. Adjust any strand that twists, crosses another strand or hides a major flower.
- Remove the curtain from the rod, secure every final attachment, weave the yarn tails into the backs of flowers and vines, then hang the finished curtain again for its final measurement.
The completed curtain should have a dense botanical upper third, an open central window area and multiple lower flower strands ending at visibly different heights.
7 Technical Tips
- Top-band sag: A 130 cm strip can bow under dozens of motifs. Keep the 12 rod loops no more than approximately 10–11 cm apart and attach them through the full top-band depth.
- Flower rotation: A bloom stitched to a vine through only its centre can turn sideways while hanging. Add two hidden anchoring stitches roughly 1.5 cm apart across the back of each large flower.
- Leaf flipping: A leaf attached only at its base may rotate backward against the window. Add one small stitch through the centre ridge approximately halfway along each large leaf.
- Strand stretching: Cotton chains can lengthen once the flowers are attached. Hang-test every completed strand for at least 30 minutes before trimming or fixing its final lower motif.
- Bottom-edge rigidity: Equal strand lengths create an artificial straight line. Maintain at least 5 cm of difference between most neighboring terminal flowers.
- Motif crowding: Flowers positioned less than approximately 2 cm apart can overlap after gravity stretches the connecting cords. Leave visible vine between most large neighboring blooms.
- Twisted hanging loops: A loop sewn with one end rotated makes the top band pull diagonally. Lay all 12 loops flat against the rod before securing their second ends.
Building the Upper Floral Canopy
The canopy is the structural signature of this crochet flower curtain pattern. If flowers are attached only to straight vertical strings, the result becomes a garland curtain rather than the branching garden visible in the reference.
Begin with the longest green vines. Their curves establish where the large flowers will sit. The blooms then hide several vine intersections, making the finished network look continuous even though it consists of separately crocheted cords.
Keep some empty space between branches. The wall or window behind the curtain should remain visible through the upper section. Excessive leaves make the canopy read as a solid textile panel and increase its weight substantially.
Making the Five-Petal Flowers
A ten-stitch centre divides naturally into five two-stitch sections, which gives the large flowers a balanced five-petal structure. Treble crochet supplies the height at each petal tip, while double crochet narrows the sides back toward the centre.
Use the same structural flower in several colors rather than changing every motif shape. The consistent petal geometry gives the curtain visual order while the irregular color distribution keeps it botanical.
Block the petals before assembly. Once the flowers are attached to narrow vines, access for pinning becomes restricted and the floral edges are harder to correct.
Using Multiple Flower Sizes
The photograph mixes broad statement blooms with tiny flowers. That scale shift matters. A curtain made entirely from 8 cm flowers becomes heavy and leaves little negative space.
Place the large flowers primarily in the canopy and at major side-cascade points. Medium flowers bridge those anchors, while the smallest motifs work along the long hanging cords.
Use yellow primarily as a small accent. Dusty pink and cream carry more of the visual mass, with muted blue appearing occasionally through the central area.
Constructing the Leaves
The leaves are worked along both sides of one foundation chain. This creates a visible centre line without requiring a separate embroidered vein.
Longer stitches belong near the middle of each leaf because that is where the shape reaches maximum width. Slip stitches at both ends keep the point and base narrow.
Alternate leaf orientation during assembly. Attach some tips upward and others outward. Repeating the exact same angle on every vine produces a geometric rather than botanical result.
Making Strong Hanging Vines
A single foundation chain is fast to make but tends to twist under the weight of several cotton flowers. Slip stitching back across the chain increases its body while preserving a narrow cord.
Do not pull those slip stitches tightly. A cord that contracts after the return row becomes wavy before any flowers are attached.
Measure the finished length while the cord hangs vertically. Measuring a relaxed chain on a table does not account for the amount of extension produced by attached motifs.
Planning the Staggered Lower Edge
The longest central strand can reach approximately 100 cm from the top band, while neighboring strands stop earlier. The outermost drops can also be shorter so the curtain frames the window instead of creating a rectangular wall of yarn.
Position terminal flowers at different heights. One strand can end in a yellow bloom, another in cream, and another in a small leaf.
Stand several metres away during layout. Differences that look significant on the worktable may almost disappear once the curtain is viewed across an entire window.
Attaching the Curtain to a Rod
Twelve narrow loops distribute the project weight more evenly than four or five large loops. The photo shows repeated small attachment points along the rod, which also helps the top line remain level.
Fit the loops around the actual rod before finishing all their seams. A loop that fits one thin dowel may be too short for a thicker curtain pole.
Keep the top band below the rod rather than wrapping the entire band around it. This leaves the floral canopy visible immediately beneath the hanging hardware.
Choosing Yarn for a Flower Curtain
Current mixed-flower curtain patterns commonly specify cotton and hooks around 2.5–3 mm, while Ravelry’s Flowers Curtain uses sport-weight yarn with a 2.5 mm hook. :contentReference[oaicite:16]{index=16}
Sport cotton is a practical match for the supplied image because the flowers need enough firmness to retain petal edges without becoming heavy. A very thick yarn enlarges every blossom and increases stretching across the top band.
Use the same yarn family for most motifs when possible. Mixing radically different fiber weights changes the flower diameters even when identical stitch counts are used.
Estimating Yarn for the Full Curtain
A current customizable mixed-flower curtain lists approximately 600–1200 yards, while a 195 × 100 cm Ravelry curtain uses several separate cotton yarns and multiple balls of green. :contentReference[oaicite:17]{index=17}
For this 130 × 100 cm photo-matched version, treat the listed gram quantities as purchasing estimates. Make one large flower, one leaf and 30 cm of finished vine first, then weigh those samples.
Multiply the sample weights by the planned motif counts and add material for the top band, loops and assembly. Green can consume more yarn than expected because every leaf is accompanied by a separate connecting structure.
Changing the Curtain Width
Measure the usable rod width rather than the entire window recess. For a 100 cm curtain, reduce the number of rod loops and omit one or two canopy anchor flowers.
For a 160–180 cm span, add flowers and strands rather than stretching the original top band. Current flower-curtain patterns are commonly described as customizable, and one published example reaches approximately 195 cm wide. :contentReference[oaicite:18]{index=18}
Keep the average rod-loop spacing close to 10–11 cm. Wider loop gaps increase sag as more motifs are added to the lower edge.
Changing the Curtain Length
Length is controlled almost entirely through the hanging cords. The upper canopy can remain unchanged while the longest strands are shortened for a kitchen window or extended for a doorway.
Add length below the lowest existing flower rather than increasing every gap between motifs. Overly large gaps can make a strand appear visually disconnected.
For a shorter valance, stop the drops around 45–60 cm and increase the number of flowers in the upper section. A current Ravelry flower-curtain pattern is available around 45 cm, demonstrating the smaller-format approach. :contentReference[oaicite:19]{index=19}
Blocking the Finished Curtain
Block individual flowers and leaves first. After assembly, lay the curtain flat and smooth the vines without stretching the top band beyond its target width.
Do not permanently set every lower cord to a table measurement. Gravity changes the finished lengths once the piece is suspended.
After the first hanging test, lightly dampen any twisted cord and allow it to dry while hanging freely away from contact with the floor or furniture.
Finishing Checks
Hang the curtain on its final rod and inspect the top band first. All rod loops should carry weight, with no one loop pulling significantly tighter than its neighbors.
Check the canopy next. Large flowers should face forward, several leaf tips should remain visible and no long green cord should hang loose without connecting visually to another motif.
Inspect the lower drops last. Neighboring flowers should not sit in one horizontal row, strands should remain separated and the centre of the window should retain substantial open space.
Conclusion
Measure the finished curtain only after it has hung long enough for the cotton strands to settle, then record the top width and longest drop beside the hook and yarn used. Photograph the entire window straight on to check flower distribution, loop spacing and strand balance. Save this crochet flower curtain pattern to Pinterest and share the finished hanging on Instagram with #HangingFlowerGardenCurtain. Reshape the larger petals and turn any backward-facing leaves before photographing it. For another version, would you keep the muted blue flowers scattered among the pink blooms or replace them with soft lavender?
Sources
- Ravelry — Flowers Curtain by Phoa Crochet: sport/5-ply yarn, 2.5 mm hook and approximately 45 cm size reference.
- Ravelry — Flower Curtain by Kwannie Cheng: customizable cotton curtain measuring approximately 195 × 100 cm.
- The Loomie Crochet — Mixed Flower Curtains: 2.5–3 mm hook and approximately 600–1200 yards for a customizable flower-curtain design.
- Etsy — current Crochet Pattern for Flower Curtains marketplace showing active competition in daisy, vine, floral-panel and garland curtain patterns.
- Pinterest — current Crochet Flower Curtain discovery page showing ongoing search interest in botanical window hangings.









