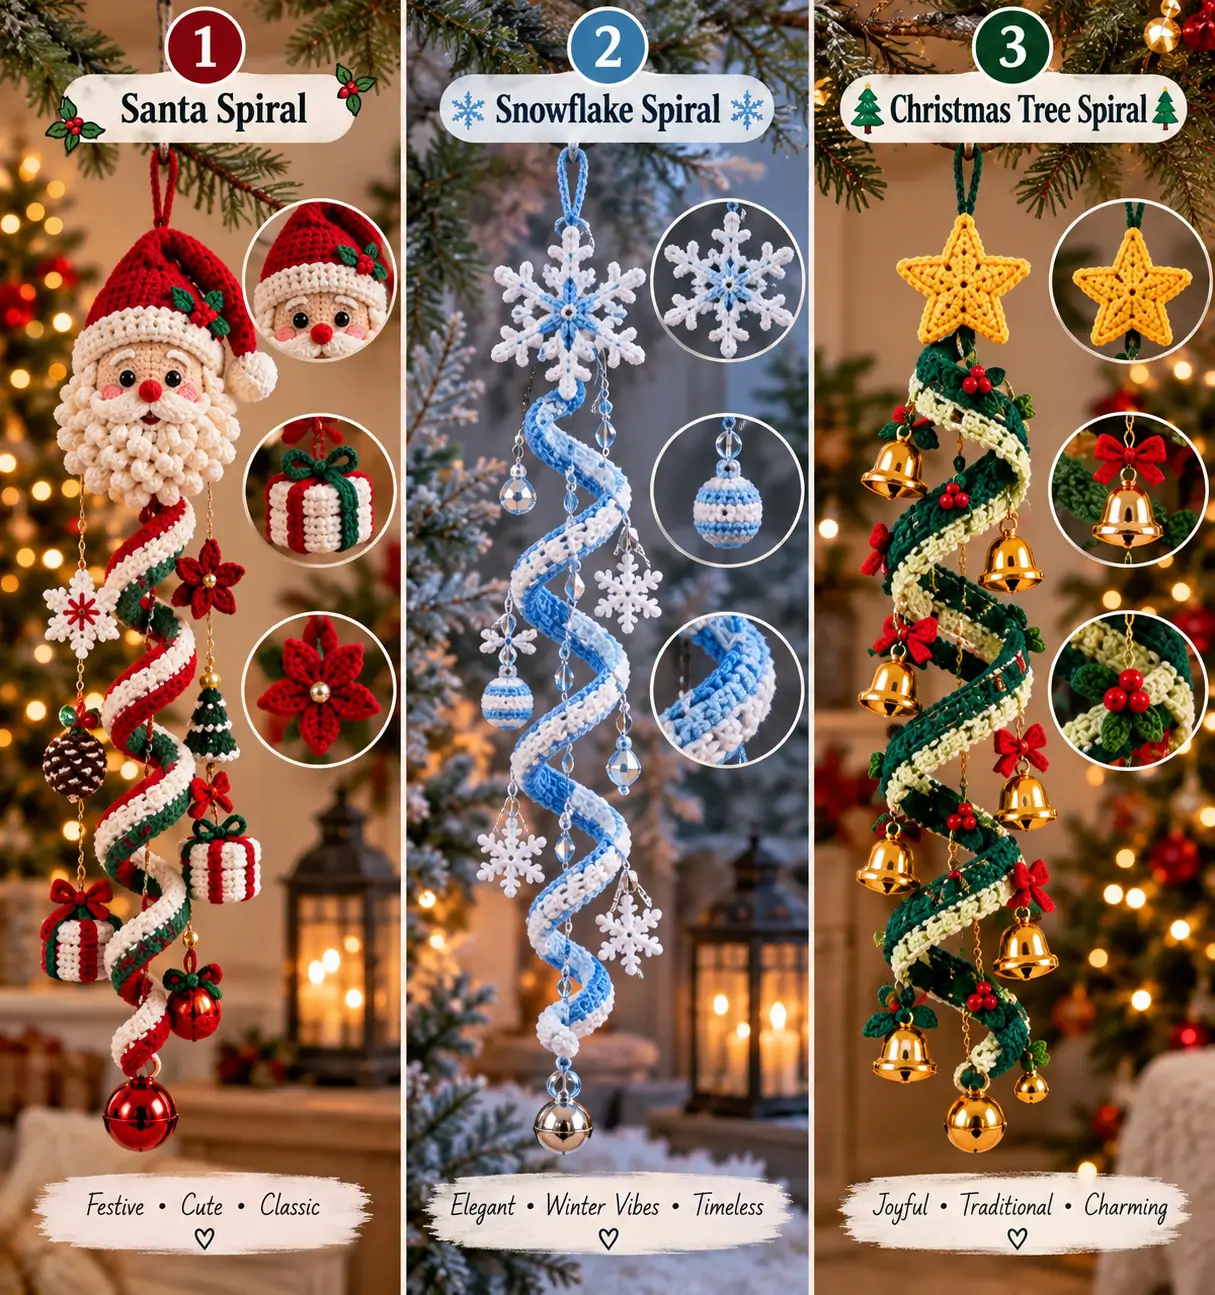
Santa’s beard has to remain wider than his face while a 30–40 cm helix hangs directly beneath it. This Santa spiral crochet ornament uses DK cotton, a 3.0 mm hook, safety eyes and scrap yarn to build that structure. The project is intermediate level and uses a 36-stitch head above a long forced-curl strip. Its narrow footprint makes it practical for doors, branches and vertical Christmas displays.
The Design: What Makes This Santa Different
A normal Santa amigurumi distributes weight through a stuffed torso and legs. This design cannot. The head therefore stays compact while the crochet spiral Christmas ornament below it remains mostly unstuffed.
A 36-stitch head provides enough width for two safety eyes, a dimensional nose, mustache and layered beard without producing an oversized topper. The spiral gets its curl from deliberate stitch multiplication rather than stuffing. This reduces weight and creates the characteristic hanging helix.
The hat is relatively shallow and bent sideways. A tall stuffed cone would move the visual center too far above the face. One common mistake with a crochet Santa hanging ornament is attaching heavy bells and beads before checking the suspension point. Uneven accessory weight can make the finished Santa rotate sideways.
Project Info at a Glance
| Skill Level | Time | Finished Size | Hook | Best For |
|---|---|---|---|---|
| Intermediate | 4–6 hours | Approx. 30–40 cm hanging length | 3.0 mm | Hanging Christmas décor |
The final measurement depends on yarn, tension and how tightly the crochet strip forms its helix.
Materials and Tools
Yarn
- Christmas red — DK cotton — approximately 20–25 g
- Cream/white — DK cotton — approximately 20 g
- Dark green — DK cotton — approximately 10–15 g
- Peach/flesh — DK cotton — approximately 10 g
- Pink — DK cotton scrap — under 2 g
- Black — DK cotton scrap or embroidery thread
- Yellow/gold — DK cotton scrap for decorative details
The yarn quantities are working estimates. Actual consumption changes with yarn thickness, tension, spiral length and the number of hanging decorations added.
Tools
- 3.0 mm crochet hook
- 8–10 mm safety eyes
- Polyester stuffing
- Tapestry needle
- Stitch markers
- Scissors
- Pins
- Strong hanging cord, optional
- Small bells, beads or baubles, optional
Safety note: Detachable beads, bells, baubles and safety eyes make this design unsuitable as a toy for babies or young children. Use it as a decorative hanging ornament.
Abbreviations
- MR — magic ring
- sc — single crochet
- inc — 2 sc in one stitch
- dec — single crochet decrease
- sl st — slip stitch
- ch — chain
- hdc — half double crochet
- dc — double crochet
- BLO — back loop only
- FO — fasten off
For an invisible decrease, insert the hook through the front loops of the next two stitches before completing one single crochet through both.
Santa Spiral Crochet Ornament Pattern
Work the stuffed components in a continuous spiral unless another method is specified. Numbers in parentheses show the stitch count at the end of the round.
Head
Yarn: peach.
R1: 6 sc in MR (6)
R2: inc ×6 (12)
R3: (sc, inc) ×6 (18)
R4: (2 sc, inc) ×6 (24)
R5: (3 sc, inc) ×6 (30)
R6: (4 sc, inc) ×6 (36)
R7–R12: sc around (36)
Insert the safety eyes between R9 and R10, approximately 6 stitches apart. Check the face from the front before securing the washers.
R13: (4 sc, dec) ×6 (30)
R14: (3 sc, dec) ×6 (24)
Stuff firmly while keeping the head rounded.
R15: (2 sc, dec) ×6 (18)
R16: (sc, dec) ×6 (12)
R17: dec ×6 (6)
Fasten off. Leave a 15 cm tail and close the opening.
Santa Hat
Yarn: red and cream.
R1: 6 sc in MR (6)
R2: sc around (6)
R3: inc ×6 (12)
R4: sc around (12)
R5: (sc, inc) ×6 (18)
R6: sc around (18)
R7: (2 sc, inc) ×6 (24)
R8: sc around (24)
R9: (3 sc, inc) ×6 (30)
R10: sc around (30)
R11: (4 sc, inc) ×6 (36)
Change to cream.
R12: sc around (36)
R13: BLO sc around (36)
Fasten off. Leave a 25 cm sewing tail. Fold the narrow tip toward one side before stitching the hat to the head.
Hat Pom-Pom
Yarn: cream.
R1: 6 sc in MR (6)
R2: inc ×6 (12)
R3: sc around (12)
R4: dec ×6 (6)
Add a small amount of stuffing. Fasten off and leave approximately 15 cm for sewing.
Santa Nose
Yarn: red.
R1: 6 sc in MR (6)
R2: inc ×6 (12)
R3: sc around (12)
R4: dec ×6 (6)
Add a small amount of stuffing. Fasten off with a 15 cm tail. Position the nose centrally below and between the eyes.
Cheek Patches – Make 2
Yarn: pink.
R1: 6 sc in MR (6)
R2: inc ×6 (12)
Slip stitch into the next stitch and fasten off. Flatten each circle before sewing. Position the cheeks below the outer portions of the eyes.
Mustache – Make 2
Yarn: cream.
Ch 7.
Starting in the second chain from the hook:
Row 1: sl st, sc, hdc, dc, hdc, sc (6)
Fasten off, leaving a 15 cm tail. Turn the two pieces in opposite directions and sew their narrow ends beneath the nose.
Beard Curls – Make 8
Yarn: cream.
Ch 8.
Work 3 sc into the second chain from the hook, then 3 sc into every remaining chain. The additional stitches force the strip to curl.
Fasten off with a 15 cm sewing tail. Arrange the eight curls in overlapping rows beneath the mustache. Position the lowest curls near the center to produce the pointed beard shape visible on the Santa ornament.
Holly Leaves – Make 2
Yarn: dark green.
Ch 7.
Starting in the second chain from the hook: sl st, sc, hdc, dc, hdc, sc.
Continue around the opposite side of the foundation chain: sc, hdc, dc, hdc, sc, sl st.
Fasten off and leave a 12 cm sewing tail.
Holly Berries – Make 3
Yarn: red.
R1: 6 sc in MR (6)
Slip stitch to the first stitch and pull the center closed. Fasten off. Arrange the three small berries between the two green leaves.
Main Three-Color Spiral
Yarn: red, cream and dark green.
With red, ch 71.
Row 1: Starting in the second chain from the hook, work 2 sc into every chain across (140).
Fasten off.
Join cream to the first stitch.
Row 2: Ch 2. Work 2 hdc into every stitch across (280).
Fasten off.
Join dark green along the outer edge.
Row 3: Sl st loosely and evenly along the outer edge.
Fasten off with a 25 cm tail.
The increase rate creates the curl. Allow the strip to coil naturally first, then rotate it by hand until the red, cream and green sections form a regular helix. Attach the upper end directly beneath the Santa head.
Snowflake Pendant
Yarn: cream.
R1: 6 sc in MR (6)
For each of the six arms: ch 5, sl st in the second chain from the hook, ch 3, sl st in the same chain position, ch 2, then sl st back toward the center.
Sl st into the next stitch of R1.
Repeat until six arms are complete. Fasten off and flatten the snowflake before attachment.
Mini Gift Box
Yarn: cream with red accent.
R1: 6 sc in MR (6)
R2: inc ×6 (12)
R3: (sc, inc) ×6 (18)
R4: BLO sc around (18)
R5–R7: sc around (18)
R8: BLO sc around (18)
R9: (sc, dec) ×6 (12)
Stuff lightly.
R10: dec ×6 (6)
Fasten off and close. Surface-stitch red yarn vertically and horizontally around the piece to imitate gift ribbon. Add a small green hanging loop.
Poinsettia
Yarn: red.
R1: 6 sc in MR (6)
For each petal: ch 5, sl st in the second chain, sc, hdc, dc, then sl st into the next stitch of R1.
Repeat six times. Fasten off.
Mini Christmas Tree
Yarn: dark green.
R1: 6 sc in MR (6)
R2: sc around (6)
R3: inc ×6 (12)
R4: sc around (12)
R5: (sc, inc) ×6 (18)
R6: sc around (18)
R7: (2 sc, inc) ×6 (24)
Fasten off. Flatten slightly or add only a small quantity of stuffing. Embroider cream stitches around the tree to imitate snow or garland.
Hanging Loop
Yarn: red.
Ch 30.
Sl st into the first chain to create a closed loop. Fasten off with two 20 cm tails.
Pass both tails through the top of the hat and secure them through the stuffed head. The head should carry the ornament’s weight rather than the hat fabric alone.
Assembly
- Sew the Santa hat around the upper circumference of the head, keeping the cream brim approximately one round above the eyes.
- Bend the hat tip sideways and secure it with several concealed stitches. Attach the cream pom-pom to the tip.
- Sew the red nose centrally between and below the eyes, then position both cheek patches symmetrically.
- Attach the two mustache pieces below the nose. Arrange the eight beard curls beneath them in overlapping rows.
- Sew the two holly leaves and three berries to one side of the hat brim without covering an eye.
- Secure the hanging loop through the hat and stuffed head. Keep the suspension point on the vertical centerline.
- Attach the upper end of the three-color spiral beneath the head. Hang the project temporarily to check its natural rotation.
- Add the snowflake, poinsettia, gift box and miniature tree at different heights along the spiral.
- Attach optional bells or baubles only after testing the balance. Move decorations when their weight makes the Santa face rotate sideways.
- Weave the yarn tails through several stitches, trim concealed ends and perform one final hanging test.
The completed Santa should face forward while the red, cream and green spiral drops from the center of the head.
7 Technical Tips for a Better Santa Spiral
- Mark the first stitch. Put a locking stitch marker into the first stitch of every head round. Losing the round start shifts the decrease sections and can distort the eye line.
- Control stuffing firmness. Fill the head until it remains spherical when suspended from the hanging loop. An underfilled crown can collapse under the weight of a 30–40 cm spiral.
- Use invisible decreases. Work through the front loops when reducing the head. Conventional decreases can produce six visible gaps around a reduction round.
- Install the eyes before reducing the opening. Fit the safety eyes before R13. Once the opening reaches 24 stitches, installing and positioning the washers becomes more difficult.
- Keep the spiral tension consistent. Use the same 3.0 mm hook through the foundation and increase rows. A loose section can form one oversized loop instead of an even helix.
- Test the ornament vertically before final sewing. Pin the decorations and hang the project first. If the face rotates substantially to one side, redistribute the heaviest accessories before stitching them permanently.
- Leave long structural tails. Keep approximately 15–25 cm for parts carrying weight. Weave those tails through several directions inside the head rather than relying on one short pass.
Finishing the Santa Spiral Crochet Ornament
Check the Santa’s balance before attaching the final bell, bead or bauble. The suspension line should pass through the center of the head and continue directly into the spiral rather than pulling from the edge of the hat.
Measure the finished helix and record the foundation-chain length if you plan to crochet a matching set. The same construction can then be adapted to blue-and-white snowflake decorations or green Christmas-tree spirals while keeping the hanging lengths consistent.
This Santa spiral crochet ornament works best when the accessories remain lighter than the stuffed head and are distributed around the helix instead of along one edge. Pin the miniature decorations first, test the balance, then complete the permanent sewing.
Save the finished Santa to Pinterest or share your version on Instagram with #SantaSpiralCrochet. Which hanging detail would you place closest to Santa: the snowflake, poinsettia, miniature Christmas tree or wrapped gift?









