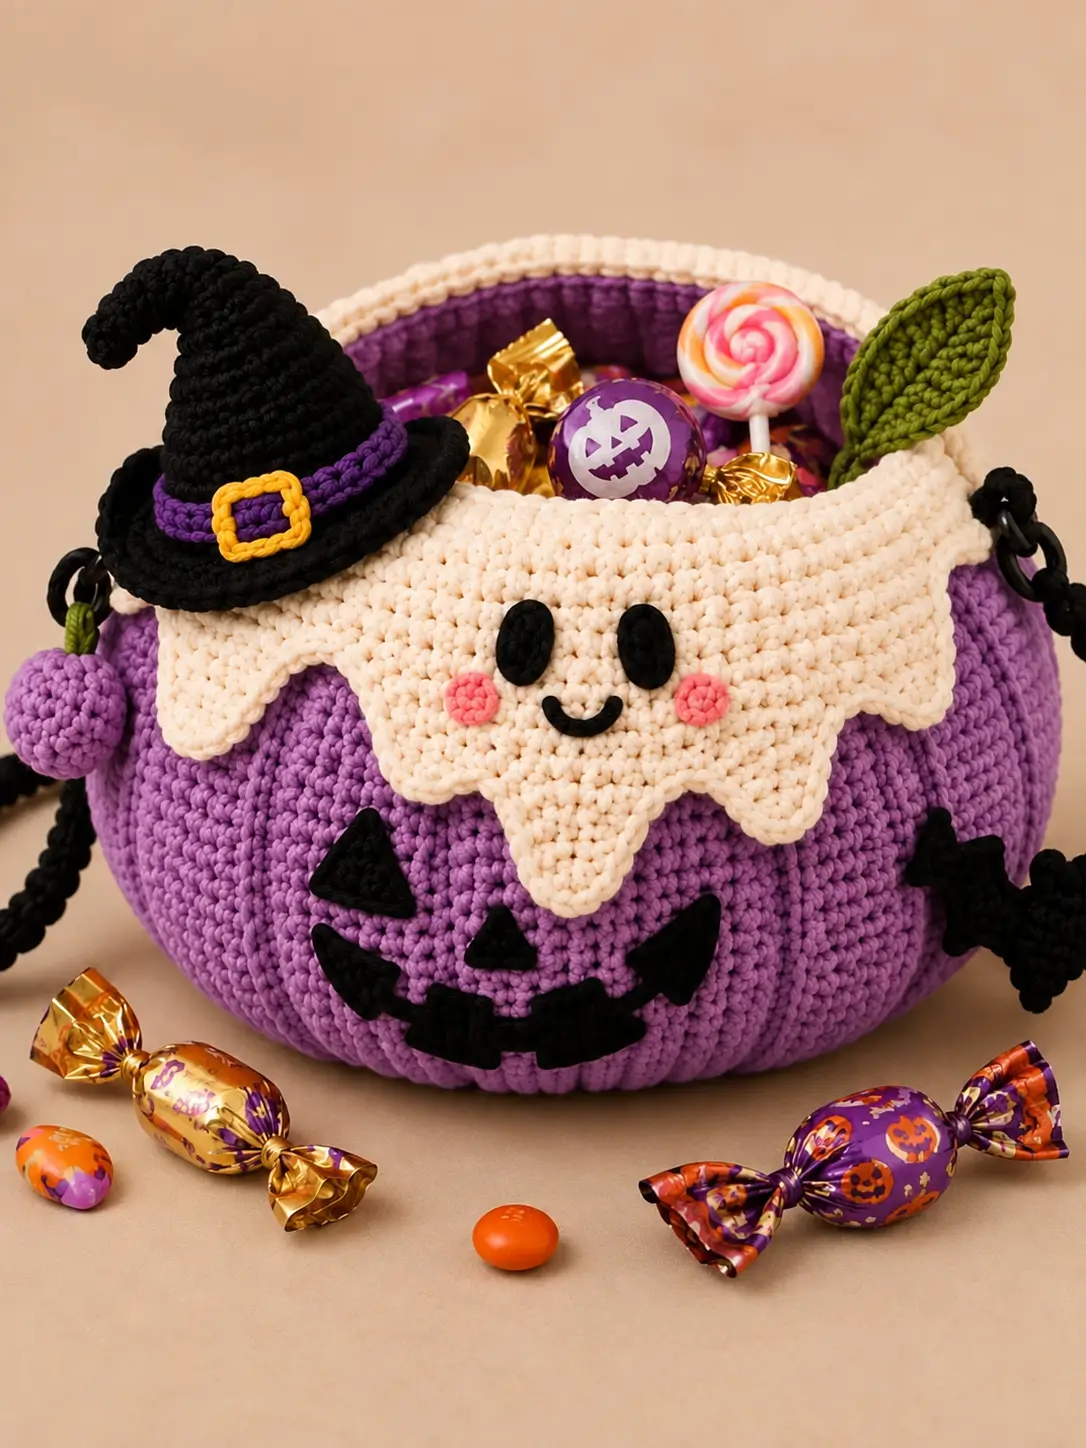
A pumpkin bucket cannot carry Halloween candy if its scalloped ghost rim collapses into the opening. This Halloween crochet pumpkin basket pattern solves that structure first, then adds the details visible in the design: a purple pumpkin body, cream dripping ghost, smiling embroidered face, black witch hat, green leaf and jack-o’-lantern appliqués. Worked in bulky cotton with a 6 mm hook, the finished basket measures approximately 24–26 cm wide and 17–19 cm high before the hat.
The Design: What Makes This Halloween Basket Different
The basket combines three separate Halloween forms. A broad purple pumpkin supplies the functional container, a cream ghost wraps around the upper edge, and a dimensional witch hat sits over one side of the rim.
The pumpkin needs a flat circular base before the sides begin. Controlled increases create the lower curve, straight rounds establish capacity, and decreases near the rim pull the silhouette inward without closing the candy opening.
The cream ghost is intentionally irregular. Five downward points of different lengths create the dripping edge visible across the front, while two black oval eyes, pink cheeks and a curved mouth turn the central section into a face.
A common failure is making the decorative rim too heavy. Thick stuffing or oversized appliqués can pull the basket wall outward, so the ghost remains flat and the witch hat attaches primarily at its brim.
Project Information
| Skill Level | Time | Finished Size | Hook | Best For |
|---|---|---|---|---|
| Intermediate | 7–10 hours | Approx. 24–26 cm wide | 6 mm | Halloween candy, party display, seasonal storage |
The measurements above are targets for this photo-inspired construction. Finished dimensions change with yarn thickness and individual tension.
Materials and Tools
Yarn
- Purple — bulky #5 cotton or cotton-blend yarn — approximately 180–220 g
- Cream — bulky #5 yarn — approximately 90–110 g
- Black — bulky #5 yarn — approximately 70–90 g
- Dark purple — bulky or worsted yarn — approximately 15 g
- Golden yellow — worsted yarn — approximately 5 g
- Pink — worsted yarn — approximately 5 g
- Olive green — worsted or bulky yarn — approximately 15 g
Tools
- 6 mm crochet hook for the basket
- 5 mm crochet hook for appliqués and hat details
- Stitch markers
- Large tapestry needle
- Scissors
- Small amount of polyester stuffing for the witch hat
- Optional plastic canvas for a firmer base
- Optional removable plastic rings for the side handles
No safety eyes are required. The face in this design is made from crocheted and embroidered components.
Abbreviations
- MR — magic ring
- ch — chain
- sc — single crochet
- hdc — half double crochet
- dc — double crochet
- tr — treble crochet
- inc — 2 sc in one stitch
- dec — single crochet decrease
- sl st — slip stitch
- BLO — back loop only
- FLO — front loop only
- st/sts — stitch/stitches
For an invisible decrease, insert the hook through the front loops of the next two stitches, yarn over and pull through both loops, then complete the single crochet.
Halloween Crochet Pumpkin Basket Pattern
Work the main basket in a continuous spiral unless a joined round is specified. Mark the first stitch of every round.
Purple Pumpkin Basket Base
Yarn: purple.
R1: 6 sc in MR (6)
R2: inc ×6 (12)
R3: (1 sc, inc) ×6 (18)
R4: (2 sc, inc) ×6 (24)
R5: (3 sc, inc) ×6 (30)
R6: (4 sc, inc) ×6 (36)
R7: (5 sc, inc) ×6 (42)
R8: (6 sc, inc) ×6 (48)
R9: (7 sc, inc) ×6 (54)
R10: (8 sc, inc) ×6 (60)
The base should lie flat. If it begins to cup before R10, increase the hook by 0.5 mm or loosen the working tension.
Turning the Basket Wall
R11: 60 sc BLO (60)
R12: 60 sc (60)
R13: 60 sc (60)
The BLO round creates a defined fold between the base and pumpkin wall.
Pumpkin Body
R14: (9 sc, inc) ×6 (66)
R15: 66 sc (66)
R16: (10 sc, inc) ×6 (72)
R17: 72 sc (72)
R18: 72 sc (72)
R19: 72 sc (72)
R20: 72 sc (72)
R21: 72 sc (72)
R22: 72 sc (72)
R23: 72 sc (72)
R24: (10 sc, dec) ×6 (66)
R25: 66 sc (66)
R26: (9 sc, dec) ×6 (60)
R27: 60 sc (60)
R28: 60 sc (60)
Do not stuff the basket. The center must remain completely open for candy or seasonal storage.
Reinforced Basket Rim
R29: 60 sc BLO (60)
R30: 60 sc (60)
R31: 60 reverse sc or standard sc (60)
Fasten off and weave the tail through several stitches on the inside.
If the rim feels too flexible, crochet R30 and R31 with a 5.5 mm hook rather than 6 mm.
Pumpkin Sculpting Ribs
Cut six lengths of purple yarn, each approximately 60–70 cm.
Thread one strand through a long tapestry needle. Insert it near the lower edge, carry it vertically along the outside of the basket and secure it beneath the upper rim.
Pull only enough to create a shallow indentation.
Repeat at six evenly spaced positions around the body.
The basket must remain functional. Deep sculpting will pull the opening closed, so these channels should be considerably shallower than those used on a stuffed pumpkin.
Cream Ghost Rim
Yarn: cream.
Ch 61.
Row 1: Starting in second ch from hook, 60 sc (60)
Row 2: Ch 1, turn, 60 sc (60)
Row 3: Ch 1, turn, 60 sc (60)
Row 4: Ch 1, turn, 60 sc (60)
Row 5: Ch 1, turn, 60 sc (60)
The next section creates the irregular dripping lower edge.
Ghost Drip 1
Work 8 sc.
Ch 6. Starting in second ch from hook, work 1 sc, 1 hdc, 2 dc, 1 hdc.
Sl st into the next base stitch.
Ghost Drip 2
Work 7 sc.
Ch 9. Starting in second ch from hook, work 1 sc, 1 hdc, 3 dc, 2 hdc, 1 sc.
Sl st into the next base stitch.
Central Ghost Point
Work 7 sc.
Ch 12. Starting in second ch from hook, work 1 sc, 2 hdc, 5 dc, 2 hdc, 1 sc.
Sl st into the next base stitch.
Ghost Drip 4
Work 7 sc.
Ch 9. Starting in second ch from hook, work 1 sc, 1 hdc, 3 dc, 2 hdc, 1 sc.
Sl st into the next base stitch.
Ghost Drip 5
Work 7 sc.
Ch 6. Starting in second ch from hook, work 1 sc, 1 hdc, 2 dc, 1 hdc.
Sl st into the next base stitch.
Work sc across the remaining stitches.
Fasten off with a 50 cm sewing tail.
Ghost Face Eyes — Make 2
Yarn: black.
R1: 6 sc in MR (6)
R2: inc ×6 (12)
R3: 12 sc (12)
Fasten off.
Flatten each circle into a vertical oval while sewing. Each eye should measure approximately 3–3.5 cm high.
Pink Cheeks — Make 2
Yarn: pink.
R1: 6 sc in MR (6)
R2: inc ×6 (12)
Sl st into the first stitch.
Fasten off with a 15 cm sewing tail.
Ghost Smile
Yarn: black.
Ch 12.
Starting in the second chain from the hook, work 11 sl st.
Fasten off with long tails at both ends.
Curve the strip into a shallow U shape beneath the eyes. Sew both ends and the lowest center point to the cream ghost panel.
Witch Hat Cone
Yarn: black.
R1: 6 sc in MR (6)
R2: 6 sc (6)
R3: (1 sc, inc) ×3 (9)
R4: 9 sc (9)
R5: (2 sc, inc) ×3 (12)
R6: 12 sc (12)
R7: (3 sc, inc) ×3 (15)
R8: 15 sc (15)
R9: (4 sc, inc) ×3 (18)
R10: 18 sc (18)
R11: (5 sc, inc) ×3 (21)
R12: 21 sc (21)
R13: (6 sc, inc) ×3 (24)
R14: 24 sc (24)
R15: (7 sc, inc) ×3 (27)
R16: 27 sc (27)
R17: (8 sc, inc) ×3 (30)
R18: 30 sc (30)
Add a small amount of stuffing to the lower half only. Leave the upper third nearly empty so the hat tip can bend.
Witch Hat Brim
Continue in black.
R19: FLO inc ×30 (60)
R20: (9 sc, inc) ×6 (66)
R21: 66 sc (66)
Sl st into the next stitch and fasten off.
Flatten the brim. Curve the upper portion of the cone toward one side before attaching the hat to the basket.
Purple Hat Band
Yarn: dark purple.
Ch 31.
Starting in second chain from hook, work 30 sc.
Fasten off with a 25 cm tail.
Wrap the strip around the lower cone immediately above the brim. Overlap the ends at the back and sew securely.
Gold Hat Buckle
Yarn: golden yellow.
Ch 16 and join with a sl st to form a ring.
Work sc around the chain while shaping it into a small rectangle.
Fasten off.
Sew the buckle over the front center of the purple hat band.
Green Leaf
Yarn: olive green.
Ch 14.
Starting in second chain from hook:
1 sc, 1 hdc, 2 dc, 4 tr, 2 dc, 1 hdc, 1 sc, then work 3 sc into the final chain.
Continue along the opposite side:
1 sc, 1 hdc, 2 dc, 4 tr, 2 dc, 1 hdc, 1 sc.
Sl st at the base.
Ch 1 and work sc around the outside. At the tip work sc, ch 2, sc.
Fasten off with a 25 cm sewing tail.
Leaf Vein
Join matching green yarn at the base of the leaf.
Surface crochet slip stitches along the original foundation chain to the point.
Keep the surface stitches loose so the leaf remains flat.
Jack-o’-Lantern Eyes — Make 2
Yarn: black.
Ch 5.
Row 1: sc in second ch and next 3 ch (4)
Row 2: ch 1, turn, dec, 2 sc (3)
Row 3: ch 1, turn, dec, 1 sc (2)
Row 4: ch 1, turn, dec (1)
Fasten off with a 15 cm sewing tail.
Jack-o’-Lantern Nose
Yarn: black.
Repeat the eye construction once, but stop after Row 3 to produce a smaller triangle.
Fasten off with a 15 cm tail.
Jack-o’-Lantern Mouth
Yarn: black.
Ch 24.
Starting in the second chain from the hook, work 23 sc.
Fasten off with long sewing tails.
Pin the strip into a wide upward-curving jack-o’-lantern smile.
For the blocky tooth effect visible in the design, make three small black rectangles:
Row 1: Ch 4, sc in second ch and next 2 ch (3)
Row 2: Ch 1, turn, 3 sc (3)
Fasten off.
Sew the rectangles along the mouth at different angles.
Side Handle Loops — Make 2
Yarn: black.
Ch 18.
Join to the first chain with a sl st, checking that the chain is not twisted.
R1: 18 sc around (18)
R2: 18 sc (18)
Fasten off with a 30 cm sewing tail.
These loops can be used decoratively as shown in the image or as attachment points for a longer removable handle.
Optional Long Candy-Basket Handle
Yarn: black.
Ch 75.
Starting in second chain from hook, work 74 sc.
Turn and work 74 sl st back across the strip.
Fasten off with a 30 cm tail at each end.
Attach each end securely through a side loop. Reinforce the attachment if the basket will carry substantial candy weight.
Optional Purple Hanging Pumpkin Charm
Yarn: purple.
R1: 6 sc in MR (6)
R2: inc ×6 (12)
R3: (1 sc, inc) ×6 (18)
R4: 18 sc (18)
R5: 18 sc (18)
R6: (1 sc, dec) ×6 (12)
Add a small amount of stuffing.
R7: dec ×6 (6)
Fasten off and close the opening.
Wrap matching purple yarn vertically around the ball three times to create pumpkin segments.
Add a short green stem and attach the charm to one side loop.
Assembly
- Finish the purple basket first and confirm that the circular base sits flat before adding any decorative components.
- Add the six shallow sculpting lines around the purple body, keeping the opening approximately 20–22 cm wide.
- Pin the cream ghost panel around the upper front half of the basket and sew its upper edge directly below the reinforced rim.
- Attach the two black oval eyes, pink cheeks and curved smile to the central cream section before securing the lower ghost points.
- Sew the jack-o’-lantern eyes, nose and mouth onto the exposed purple front below the cream ghost.
- Position the witch hat over the upper-left rim and attach only the underside of the brim so the cone remains dimensional.
- Sew the olive-green leaf behind the opposite side of the rim, leaving the upper half unattached.
- Attach one black loop to each side of the basket with several passes of strong matching yarn.
- Add the optional long handle and purple pumpkin charm only after checking that both side loops are firmly anchored.
- Weave all remaining tails into dense stitches on the inside, reshape the witch-hat tip and check that the basket stands level when empty.
The finished piece should function as an open candy basket while retaining the purple pumpkin silhouette, cream ghost edge and dimensional witch hat.
How to Keep the Basket Standing Upright
A candy basket needs more structural resistance than a decorative stuffed pumpkin. Tight stitches are the first requirement. If the 6 mm hook produces obvious gaps in your chosen bulky yarn, change to 5.5 mm.
The BLO transition at the base is also important. It creates a mechanical fold that encourages the sides to rise vertically rather than continuing outward like a flat circle.
For additional stiffness, cut a circle of plastic canvas slightly smaller than the finished base. Place it inside the basket and cover it with a separate crocheted or fabric liner.
Do not stiffen the entire basket wall unless required. A small amount of flexibility allows the pumpkin shaping lines to remain visible.
How to Create the Pumpkin Shape Without Stuffing
The basket cannot be sculpted as aggressively as a stuffed pumpkin because the center must remain open.
Instead, the lower increases establish the broad pumpkin base. Several straight rounds create capacity, then two decrease rounds narrow the upper section.
Six external shaping strands provide the final segmentation.
Keep those strands relatively loose. Each channel should move inward only about 5–10 mm. Pulling farther can distort the circular opening and reduce the amount of candy the basket holds.
Positioning the Ghost Face
The central cream point should align roughly with the middle of the pumpkin face below it.
Place the black eyes approximately 3–4 cm apart. Their long axes should remain vertical.
The pink cheeks sit slightly lower than the bottom edges of the eyes. Keep each cheek about 1–1.5 cm away from its nearest eye.
Position the smile directly between the cheeks. Its lowest point should sit above the beginning of the long central ghost drip.
Pin all five facial components before sewing. Moving one eye by even a centimeter can make the face appear noticeably asymmetrical.
Shaping the Witch Hat
The cone should not stand perfectly vertical. The reference design uses a strongly curved upper section, which gives the hat its recognizable silhouette.
Stuff only the bottom half. Leave the final several rounds soft and bend them forward after the hat is complete.
If the tip repeatedly straightens, pass a strand of black yarn from the tip to a lower round on the inside curve. Tighten slightly and knot it inside the cone.
The brim can overlap the cream ghost panel. Attach the hat at three or four points beneath the brim rather than sewing around the complete circumference.
7 Technical Tips for a Better Halloween Candy Basket
- Basket wall collapsing: check the fabric after R15. If it cannot stand approximately 5 cm above the base without folding, reduce the hook from 6 mm to 5.5 mm.
- Base becoming wavy: stop increasing if the circular base develops visible ripples before R10. Excess diameter at the base transfers into unstable folds once the side wall begins.
- Pumpkin grooves closing the opening: limit each sculpting indentation to approximately 5–10 mm. Deeper channels can turn the circular rim into a six-sided opening.
- Ghost points curling: lightly block each cream point before attaching the panel. Pin the longest central drip at its tip until completely dry.
- Witch hat falling outward: attach the underside of the brim at a minimum of three points spaced 3–4 cm apart. A single attachment point allows the stuffed cone to rotate.
- Handle attachment stretching: sew each side loop through at least four adjacent basket stitches. Concentrating the load on one stitch can enlarge the hole when the basket is filled.
- Face becoming crooked: measure from the central ghost point before attaching the eyes. Keep both inner eye edges approximately the same distance from that centerline.
Changing the Basket Size
For a smaller basket, stop the base increases at 48 stitches rather than 60. Work the sides proportionally shorter and reduce the width of the ghost panel to match the new circumference.
For a larger candy bowl, continue the standard six-point increase sequence beyond 60 stitches. Add one increase round at a time and check that the base remains flat.
Increasing the yarn thickness is another option. A super bulky yarn produces a larger basket without requiring extensive stitch-count changes, although the decorative appliqués must also be scaled accordingly.
Always make the main basket first. Measure the completed circumference before crocheting the ghost panel or hat.
Color Variations
The purple, cream and black combination separates the three major Halloween elements clearly. Purple reads as the pumpkin body, cream defines the ghost and black isolates the witch hat and jack-o’-lantern features.
For a traditional version, replace purple with pumpkin orange while keeping the cream ghost and black hat.
A black basket with orange facial details produces a darker Halloween version. Another option is a cream pumpkin body with lavender ghost details and a dark purple hat.
Keep the hat buckle in a contrasting yellow or gold shade. That small color break prevents the purple band from disappearing against the black brim.
Using the Basket for Halloween Candy
Place wrapped candy inside the basket rather than loose unwrapped food. Crochet fabric is not a food-storage surface.
If the basket will be carried, test the handle with progressively increasing weight before Halloween. Fill it with lightweight objects first and inspect both side attachments.
For a stationary candy bowl, the long handle can be omitted completely. The black side loops, witch hat and leaf still reproduce the main features of the photographed design.
A removable fabric liner can also protect the crochet interior from candy wrappers and make seasonal cleaning easier.
Finishing the Halloween Pumpkin Basket
Inspect the inside before trimming the final yarn tails. Decorative pieces should be anchored through several stitches rather than tied to individual loops.
Shape the basket by hand and press the base onto a flat surface. Adjust the six purple segments until the opening sits approximately centered over the base.
Next, flatten the cream ghost panel with your fingers and separate each pointed drip. Re-form the curve in the witch hat and angle the green leaf outward so it remains visible above the rim.
Finally, check that no black sewing yarn is visible across the cream section and no cream attachment yarn crosses the purple body.
Conclusion
The construction of this Halloween crochet pumpkin basket pattern depends on keeping the functional basket separate from its decorative layers. Build the purple base first, establish only shallow pumpkin grooves, then attach the cream ghost, jack-o’-lantern face and witch hat after the rim can support itself. The next practical step is to crochet through R11 and confirm that the 60-stitch base lies completely flat before continuing upward. Save the finished candy basket to Pinterest or share it on Instagram with #HalloweenPumpkinCandyBasket. For your version, will the central cream ghost keep its smiling face, or will you change the mouth to a small surprised Halloween expression? “`2









