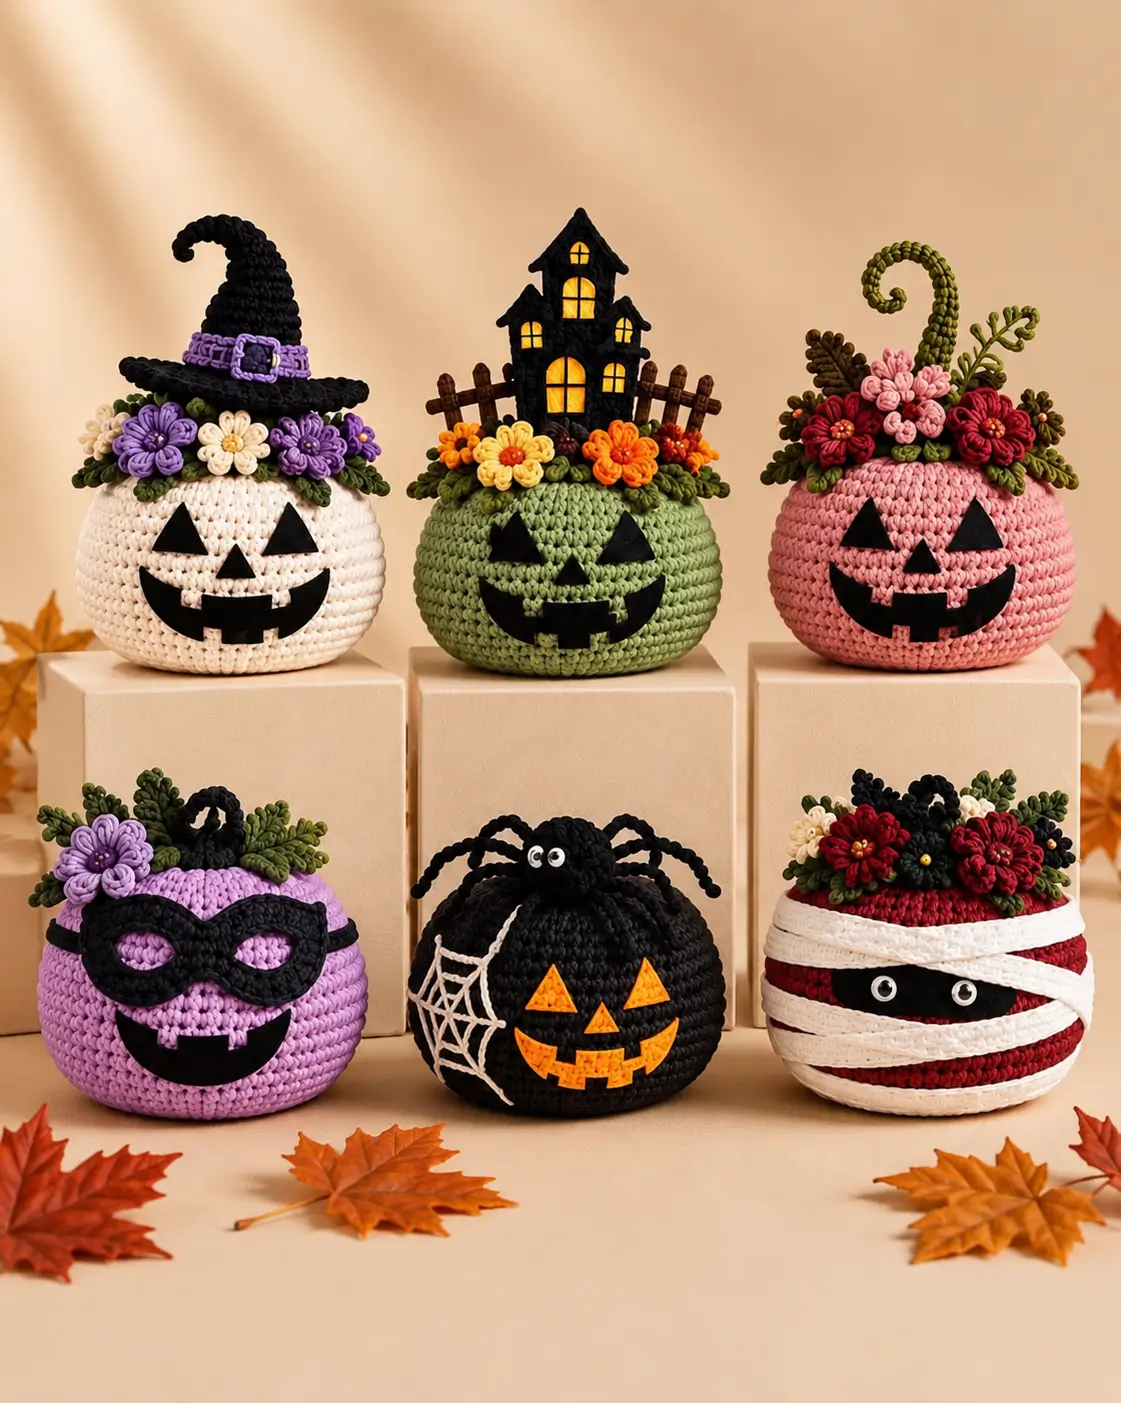
A witch hat, haunted house, spider and mummy turn the same pumpkin silhouette into six completely different Halloween characters. This Halloween crochet pumpkin basket pattern uses worsted/Aran yarn, a 4 mm hook and a structured round body approximately 23 cm wide. The intermediate project combines jack-o’-lantern faces with flowers, leaves, webs, bandages and dimensional toppers for reusable Halloween table or shelf decorations.
The Design: What Makes These Halloween Pumpkins Different
The six designs share one body construction, but their surface treatments change independently. Cream, sage, pink, lavender, black and deep red establish the base colors, while appliqué faces prevent complicated colorwork across the curved walls. That matters because triangular eyes and a wide jack-o’-lantern mouth remain easier to position when they are made separately.
The upper decoration is equally important. Flowers and leaves conceal the transition around the opening, while the witch hat, haunted house and spider add height without changing the underlying crochet Halloween pumpkin.
The mummy uses another approach: narrow cream bands cross a red body while leaving a black eye opening exposed. A frequent construction failure is attaching the facial pieces before deciding which side is the true front. Mark the center first; even a small offset becomes obvious once the topper is installed.
Project Info at a Glance
| Skill Level | Time | Finished Size | Hook | Best For |
|---|---|---|---|---|
| Intermediate | 4–7 hours each | Approx. 22–24 cm wide | 4 mm | Halloween decor, candy and seasonal displays |
Published crochet pumpkin baskets vary substantially in size. One Ravelry design measures 20 cm wide by 12 cm high, while a published Jack-O’-Lantern basket measures 9 inches, approximately 23 cm, in diameter and uses Aran yarn with a 4 mm hook. Those measurements provide the scale benchmark for this photo-inspired version.
Materials and Tools
Yarn
- Cream — worsted/Aran #4 — approximately 120–160 g for one body.
- Sage green — worsted/Aran #4 — approximately 120–160 g.
- Dusty pink — worsted/Aran #4 — approximately 120–160 g.
- Lavender — worsted/Aran #4 — approximately 120–160 g.
- Black — worsted/Aran #4 — approximately 120–170 g for the black version, plus smaller amounts for faces.
- Deep red — worsted/Aran #4 — approximately 120–160 g.
- Orange, yellow, purple, pink, burgundy and white — small quantities for flowers and facial details.
- Olive and dark green — approximately 20–40 g for leaves and vines.
- Brown — approximately 15–25 g for the fence and decorative details.
Tools
- 4 mm crochet hook
- 3–3.5 mm hook for small appliqués
- Polyester fiberfill if making stuffed decorative pumpkins
- Stitch markers
- Tapestry needle
- Scissors
- Sewing pins
- Optional craft felt for very crisp facial features
- Optional floral wire for curled vines
Abbreviations
- MR — magic ring
- sc — single crochet
- inc — 2 sc in one stitch
- dec — invisible decrease
- hdc — half double crochet
- dc — double crochet
- sl st — slip stitch
- ch — chain
- BLO — back loop only
- FLO — front loop only
- st/sts — stitch/stitches
An invisible decrease is worked through the front loops of the next two stitches before completing one single crochet, reducing the visible ridge created by ordinary decreases.
Halloween Pumpkin Body Pattern
This body is used for the witch, haunted-house, floral, masked, spider and mummy versions. Work continuously unless stated otherwise. Keep a marker in the first stitch of every round.
Large Pumpkin Body
Yarn: selected main body color.
R1: 6 sc in MR (6).
R2: inc ×6 (12).
R3: (sc, inc) ×6 (18).
R4: (2 sc, inc) ×6 (24).
R5: (3 sc, inc) ×6 (30).
R6: (4 sc, inc) ×6 (36).
R7: (5 sc, inc) ×6 (42).
R8–R20: sc around (42).
If the piece will function as a container, stop here and work several firm rim rounds instead of closing. For a stuffed display pumpkin matching the rounded photograph, continue below.
R21: (5 sc, dec) ×6 (36).
R22: (4 sc, dec) ×6 (30).
R23: (3 sc, dec) ×6 (24).
Begin stuffing. Push fiberfill toward the lower perimeter before filling the center.
R24: (2 sc, dec) ×6 (18).
R25: (sc, dec) ×6 (12).
Add the final stuffing. Keep the upper surface firm enough to support flowers or a topper.
R26: dec ×6 (6).
Fasten off and close the opening. Leave a 120 cm tail if the body will be sculpted into pumpkin sections.
Creating the Pumpkin Ribs
Thread the long body-color tail onto a tapestry needle. Pass the needle through the bottom center and bring it out at the top center.
Carry the yarn down the exterior and pass through the centers again. Pull gently until the first groove appears.
Repeat around the pumpkin to create six equal sections. Viewed from above, the sculpting strands should be separated by approximately 60 degrees.
Do not tighten one groove substantially more than its neighbors. Unequal tension will pull the topper away from the vertical center.
Jack-O’-Lantern Face
The cream, sage, pink and lavender versions use black features. The black pumpkin reverses the contrast with orange facial pieces.
Triangle Eyes – Make 2
Yarn: black or orange.
Row 1: ch 2, 2 sc in second ch from hook (2).
Row 2: ch 1, turn, inc in each st (4).
Row 3: ch 1, turn, inc, 2 sc, inc (6).
Row 4: ch 1, turn, inc, 4 sc, inc (8).
Fasten off with a 15 cm sewing tail.
Triangle Nose
Row 1: ch 2, 2 sc in second ch (2).
Row 2: ch 1, turn, inc in each st (4).
Row 3: ch 1, turn, inc, 2 sc, inc (6).
Fasten off with a sewing tail.
Jack-O’-Lantern Mouth
Yarn: black or orange.
Ch 25.
Row 1: sc in second ch and across (24).
Row 2: ch 1, turn, sc 5, ch 3, skip 3, sc 6, ch 3, skip 3, sc 4 (18 sc plus chain spaces).
Row 3: ch 1, turn, sc across, working 3 sc into each ch-3 space (24).
Fasten off with a 30 cm tail.
Curve the strip upward at both ends while pinning. The chain spaces create the square tooth interruptions visible in the mouth.
Design 1: Cream Witch Pumpkin
Witch Hat
Yarn: black.
R1: 6 sc in MR (6).
R2: sc around (6).
R3: (2 sc, inc) ×2 (8).
R4: sc around (8).
R5: (3 sc, inc) ×2 (10).
R6: sc around (10).
R7: (4 sc, inc) ×2 (12).
R8: sc around (12).
R9: (sc, inc) ×6 (18).
R10: (2 sc, inc) ×6 (24).
R11: (3 sc, inc) ×6 (30).
Do not fasten off.
Hat Brim
R12: FLO (4 sc, inc) ×6 (36).
R13: (5 sc, inc) ×6 (42).
R14: (6 sc, inc) ×6 (48).
Fasten off.
Bend the upper point slightly before sewing the hat in place. Add a lavender chain or narrow crocheted strip around the crown as the hatband.
Lavender Hatband
Ch 31.
Row 1: sc in second ch and across (30).
Row 2: ch 1, turn, sc across (30).
Fasten off and wrap around the hat.
Design 2: Sage Haunted-House Pumpkin
The center pumpkin replaces the witch hat with a tall haunted-house silhouette, small fence and orange/yellow flowers.
Haunted House Base
Yarn: black.
Ch 19.
Row 1: sc in second ch and across (18).
Rows 2–15: ch 1, turn, sc across (18).
Begin roof shaping.
Row 16: dec, sc 14, dec (16).
Row 17: dec, sc 12, dec (14).
Row 18: dec, sc 10, dec (12).
Row 19: dec, sc 8, dec (10).
Row 20: dec, sc 6, dec (8).
Row 21: dec, sc 4, dec (6).
Row 22: dec, sc 2, dec (4).
Row 23: dec ×2 (2).
Fasten off.
Add small side towers using narrow rectangles and triangular roof pieces. Yellow or orange surface stitches form the windows. Sew the completed house onto a firm backing or insert a thin piece of plastic canvas behind it before attaching it to the pumpkin.
Fence Pickets – Make 5
Yarn: brown.
Ch 10.
Row 1: sl st in second ch and across (9).
Fasten off. Arrange five vertical pickets and sew two horizontal chains across them.
Design 3: Pink Floral Pumpkin
This version keeps the jack-o’-lantern face simple and concentrates the detail around the crown.
Large Flower – Make 3
Yarn: burgundy, red or pink.
R1: 6 sc in MR (6).
R2: In each stitch work (sl st, ch 3, 2 dc, ch 3, sl st).
Fasten off with a sewing tail.
Small Flower – Make 3 to 5
R1: 5 sc in MR (5).
R2: In each stitch work (sl st, ch 2, hdc, dc, hdc, ch 2, sl st).
Fasten off.
Leaves – Make 8 to 12
Yarn: dark or olive green.
Ch 8.
Starting in second ch: sl st, sc, hdc, 2 dc, hdc, 3 sc in final ch. Work along opposite side: hdc, 2 dc, hdc, sc, sl st.
Fasten off with a sewing tail.
Curled Vine
Ch 35.
Work 3 sc into each chain across. The strip will curl automatically.
Fasten off. Shape the spiral before attaching it behind the flowers.
Design 4: Lavender Masked Pumpkin
The lavender pumpkin uses a black dimensional eye mask instead of triangular eyes.
Mask
Yarn: black.
Ch 35.
Row 1: sc in second ch and across (34).
Row 2: ch 1, turn, sc 6, ch 8, skip 7, sc 8, ch 8, skip 7, sc 6.
Row 3: ch 1, turn, sc across, working 8 sc around each ch-8 opening.
Row 4: sc around the entire outer edge, placing 2 sc at each outer corner.
Fasten off with a long tail.
Pin the mask before attaching the mouth. Both eye openings must sit at equal distances from the marked front center.
Design 5: Black Spider Pumpkin
The black pumpkin uses orange jack-o’-lantern features, a white web and a dimensional spider above the face.
Spider Body
Yarn: black.
R1: 6 sc in MR (6).
R2: inc ×6 (12).
R3: (sc, inc) ×6 (18).
R4–R7: sc around (18).
R8: (sc, dec) ×6 (12).
Stuff lightly.
R9: dec ×6 (6).
Fasten off and close.
Spider Legs – Make 8
Ch 18.
Starting in second ch, sl st across (17).
Fasten off, leaving a sewing tail. Attach four legs to each side of the spider body and bend them into shallow arches.
Spider Eyes – Make 2
Use small crocheted white circles with black yarn centers rather than safety eyes when the decoration may be accessible to young children.
R1: 6 sc in MR (6).
Fasten off and embroider one black center stitch on each eye.
Spider Web
Yarn: white or cream.
Anchor four long strands from one side of the pumpkin to create the web spokes. Weave shorter curved strands between the spokes, beginning close to the center and moving outward.
Secure every crossing with one small stitch so the web does not shift when the pumpkin is handled.
Design 6: Red Mummy Pumpkin
The mummy uses a red body, black eye opening, white eyes and multiple cream bandage strips.
Black Eye Panel
Yarn: black.
Ch 25.
Row 1: sc in second ch and across (24).
Rows 2–5: ch 1, turn, sc across (24).
Fasten off and sew across the upper front of the pumpkin.
Mummy Eyes – Make 2
Yarn: white.
R1: 6 sc in MR (6).
R2: inc ×6 (12).
Fasten off. Embroider a small black pupil in the center.
Bandage Strips – Make 5 to 7
Yarn: cream or off-white.
For each strip, ch approximately 55–75 depending on its position.
Row 1: sc in second ch and across.
Row 2: ch 1, turn, sc across.
Fasten off with long tails.
Wrap the strips diagonally around the red pumpkin. Overlap some sections but leave the black eye panel visible. Stitch the bands at several hidden points rather than relying on one seam at the back.
Flower Crown Assembly
Most versions in the reference use flowers and foliage around the crown. Treat this layer as a separate assembly rather than sewing pieces randomly into the pumpkin.
- Mark the exact front center of the completed pumpkin.
- Pin the jack-o’-lantern eyes approximately 3–4 cm apart and position the nose directly between them.
- Pin the mouth beneath the nose and curve both ends upward before sewing the facial pieces permanently.
- Place the largest topper—witch hat, haunted house, vine or spider—on the vertical center line.
- Arrange the largest flowers immediately beside the topper, keeping them clear of the face.
- Fill visible spaces with smaller flowers before adding leaves.
- Slide leaf bases beneath the flowers and sew each leaf at its base and midpoint so the tips remain dimensional.
- For the spider version, attach all eight legs before sewing the spider body onto the pumpkin.
- For the mummy, attach the black eye panel and eyes before wrapping the cream bandages.
- Inspect the decoration from the front and both sides before weaving in the final yarn tails.
The finished piece should retain a clearly centered face while the topper and flowers form a separate decorative layer above it.
7 Technical Tips for Halloween Crochet Pumpkins
- Prevent face drift: Mark the vertical front center before attaching any appliqué. A triangular nose displaced by even 10 mm makes the two eyes appear uneven once the mouth is installed.
- Control stuffing firmness: Do not pack fiberfill into a hard sphere. The finished body should compress approximately 10–15 mm when the sculpting strand is tightened so six pumpkin grooves can form without puckering the stitches.
- Check stitch-marker drift: Continuous rounds can move the apparent seam sideways. Count all 42 stitches at least every three plateau rounds instead of assuming the marker alone confirms the count.
- Hide decreases: Standard decreases can produce six visible bumps near the crown. Work invisible decreases through the front loops so flowers and toppers sit against a smoother surface.
- Control dark-yarn tension: Black stitches are harder to distinguish under low light. If the 4 mm hook creates gaps where stuffing is visible, reduce to 3.5 mm rather than pulling every stitch excessively tight.
- Pin dimensional toppers: A witch hat or haunted house can lean once its weight is concentrated at one point. Pin the topper at a minimum of four attachment points and inspect it from both sides before sewing.
- Secure structural tails: Leave at least 15–20 cm on flowers, leaves and facial pieces. Weave each tail in more than one direction so handling the decoration does not pull the appliqué away from the pumpkin.
How to Make a Smaller Halloween Pumpkin
For a smaller version, stop increasing at 36 stitches rather than 42.
R1: 6 sc in MR (6).
R2: inc ×6 (12).
R3: (sc, inc) ×6 (18).
R4: (2 sc, inc) ×6 (24).
R5: (3 sc, inc) ×6 (30).
R6: (4 sc, inc) ×6 (36).
R7–R17: sc around (36).
R18: (4 sc, dec) ×6 (30).
R19: (3 sc, dec) ×6 (24).
R20: (2 sc, dec) ×6 (18).
R21: (sc, dec) ×6 (12).
R22: dec ×6 (6).
Fasten off with a long tail and sculpt the body into six sections. Reduce the facial appliqués and flower quantities proportionally rather than crowding the smaller surface.
Choosing Colors for the Six-Pumpkin Set
| Design | Body | Face | Main Topper |
|---|---|---|---|
| Witch | Cream | Black | Black hat + purple flowers |
| Haunted House | Sage green | Black | Black house + orange/yellow flowers |
| Floral | Dusty pink | Black | Red/pink flowers + green vine |
| Masked | Lavender | Black | Black mask + purple flowers |
| Spider | Black | Orange | Black spider + white web |
| Mummy | Deep red | Black/white | Cream bandages + dark flowers |
Finishing the Halloween Pumpkin Set
Complete one undecorated body first and record its final circumference before producing the remaining five. That measurement controls the face size, mummy-bandage length and spacing of every crown decoration. Make all six bodies from the same yarn family if they will be displayed together; even yarns carrying the same weight classification can produce noticeably different dimensions.
Next, arrange the finished cream, sage, pink, lavender, black and red pumpkins in their intended display order before permanently attaching the tallest toppers. The Halloween crochet pumpkin basket pattern can then be adapted by swapping flowers, facial pieces or crown decorations without changing the underlying 42-stitch construction. Share the completed six-piece set on Pinterest or Instagram with #HalloweenCrochetPumpkins. Which version will you make first: the witch, haunted house, floral pumpkin, masked pumpkin, spider or mummy? “`0









