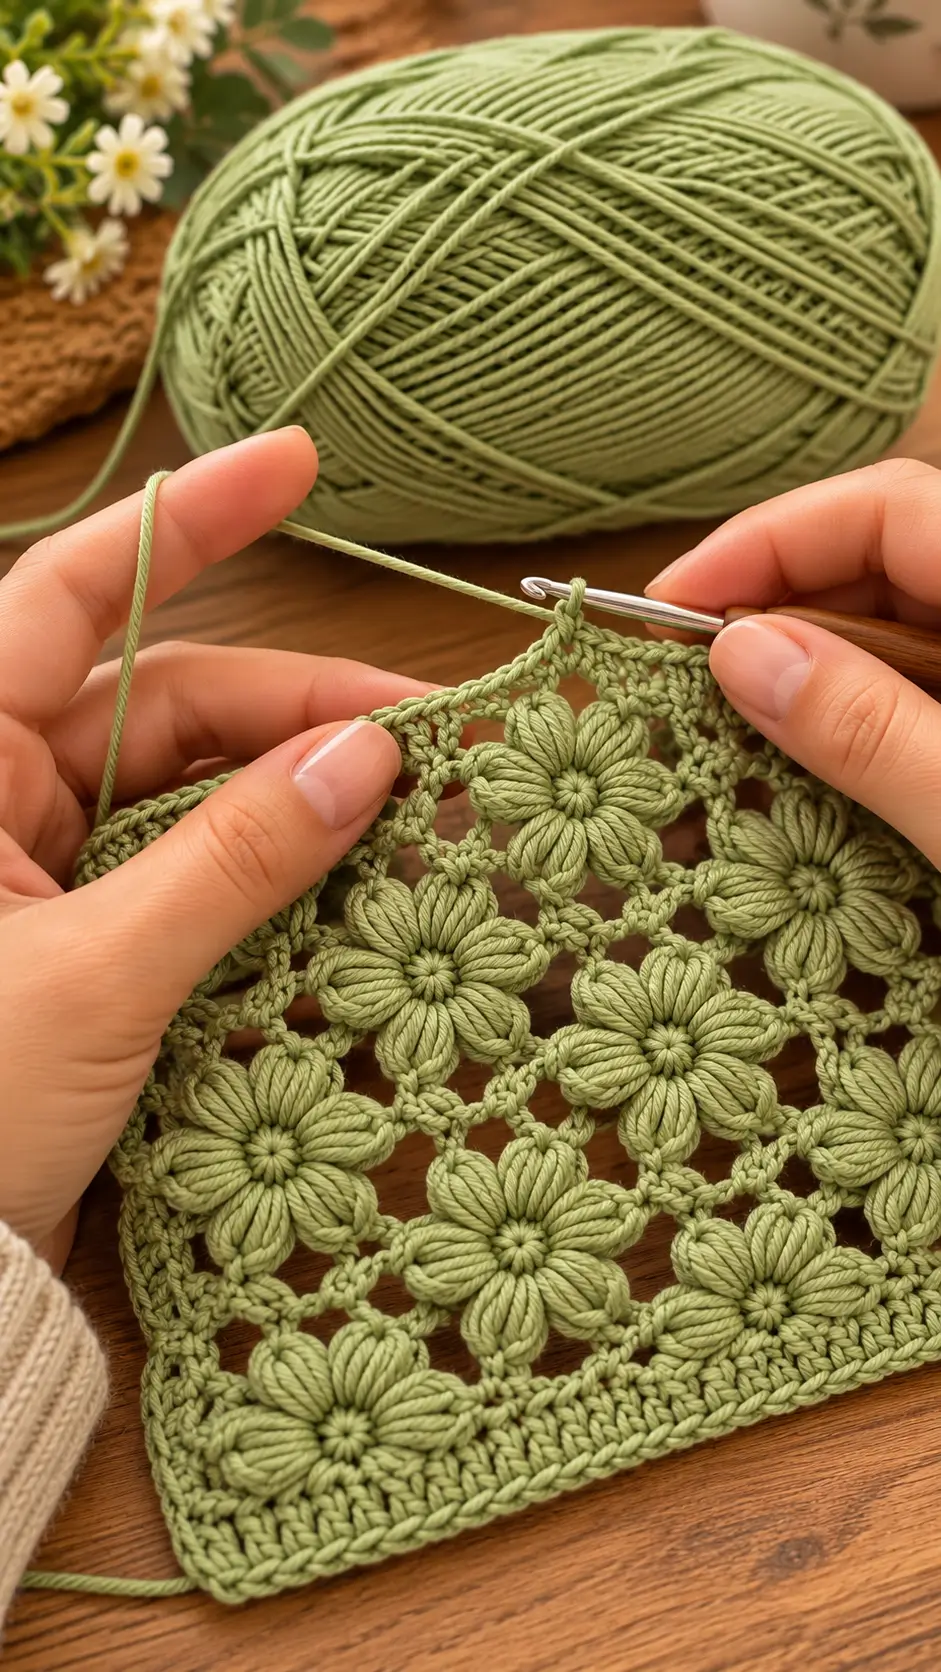
Each flower in this sage-green square depends on six thick petals meeting a tiny center without closing the open lattice around it. This puff flower crochet square recreates that balance with raised petal motifs, chain-space joins, and a firm rectangular border. Worked in smooth cotton yarn with a 3.5 mm hook, the photo-inspired sample targets approximately 32 × 32 cm and suits cushion fronts, table mats, decorative panels, and joined blankets.
The Design: What Makes This Floral Square Different
The flowers are not simply embroidered onto a mesh background. Each six-petal motif is built as a dimensional crochet unit, then connected to neighboring flowers through small chain spaces. That construction leaves deliberate openings between motifs while keeping the flower centers aligned in a grid.
The second structural feature is the petal thickness. Multiple elongated loops are gathered together to create each raised petal, producing substantially more relief than an ordinary double-crochet flower.
Finally, a dense lower border and compact side edging stabilize the open floral center. This matters because puff stitches consume considerably more yarn and can pull neighboring chain spaces inward. The most common failure is tightening the joining chains; even a few short joins can make an otherwise square panel bow toward the center.
Project Info at a Glance
| Skill Level | Time | Target Size | Hook | Construction |
|---|---|---|---|---|
| Intermediate | 5–7 hours | Approx. 32 × 32 cm | 3.5 mm | 16 joined six-petal flower motifs plus border |
The dimensions in this pattern are targets for recreating the proportions visible in the supplied image. They are not direct measurements from the photograph. Make one flower first and use its blocked measurement to calculate the exact size of your finished panel.
Materials and Tools
Yarn
- Sage green DK cotton or cotton-blend yarn — approximately 180–220 g for a 32 cm square
A smooth yarn with clear twist works well for the raised petals because individual loops remain visible. Very fuzzy yarn reduces the definition between neighboring puff stitches.
Tools
- 3.5 mm crochet hook
- 3.0 mm crochet hook if your joining chains are loose
- Yarn needle
- Scissors
- Locking stitch markers
- Flexible measuring tape
- Blocking mat and rustproof pins
Abbreviations
- MR — magic ring
- ch — chain
- sc — single crochet
- hdc — half double crochet
- dc — double crochet
- sl st — slip stitch
- sp — space
- yo — yarn over
- st / sts — stitch / stitches
- PS — puff stitch
For this pattern, one puff stitch is made by drawing up five elongated loops from the same space, yarning over, pulling through all loops on the hook, then making ch 1 to lock the puff.
Gauge and Motif Measurements
One completed six-petal flower should measure approximately 6–6.5 cm across after light blocking.
A joined four-flower row should measure approximately 25–27 cm before the outer border is added. The completed border increases the panel to approximately 30–32 cm.
Because the puff petals contain many elongated loops, consistency matters more than conventional stitch gauge. Draw every petal loop to approximately the same height.
Sage Green Puff Flower Crochet Square Pattern
Flower Center – Make 16
Use sage-green yarn.
R1: Make an MR. Ch 1 and work 12 sc into the ring. Join with sl st to first sc. (12)
Pull the center firmly closed.
Do not fasten off.
First Puff Petal
Ch 3.
Working into the next stitch, yo and draw up a loop approximately 1.5 cm high.
Repeat four more times in the same stitch until five elongated loops have been drawn up.
Yo and pull through all loops on hook.
Ch 1 to secure.
Work one second puff stitch into the next stitch using the same method.
Ch 2.
Sl st into the next stitch.
The two adjacent puff stitches form one broad raised petal.
Remaining Five Petals
Repeat the petal construction around the center:
[Ch 3, puff in next st, puff in next st, ch 2, sl st in next st].
Distribute six petals evenly around the center.
If your stitch placement causes the final petal to crowd the first, adjust the slip-stitch positions evenly rather than forcing extra stitches into the center.
Join to the beginning of the round.
Petal Definition Round
Sl st toward the top of the first petal.
Work 3 sc around the side of the first puff.
At the petal tip work:
(sc, ch 1, sc).
Work 3 sc down the opposite side.
Sl st into the gap between petals.
Repeat around all six petals.
Fasten off with a 20 cm tail unless the motif will be joined directly to the next flower.
Alternative Fuller Puff Petal
The reference image shows substantial petal volume. If five drawn-up loops produce a petal that looks too narrow with your yarn, use seven elongated loops instead.
Keep every loop approximately 1.5 cm high.
Do not mix five-loop and seven-loop puffs within the same panel because the flower diameters will differ.
Preparing the Flower Grid
Arrange the 16 flowers in a 4 × 4 grid.
Rotate individual motifs until the six petals form visually consistent diagonal lines.
The flowers do not need to touch petal-to-petal. The open chain lattice between them should remain visible.
Target approximately 1.5–2 cm of open space between neighboring flower edges before joining.
Joining the First Two Flowers
Join sage yarn to the tip of one petal on Flower 1.
Ch 4.
Sl st into the corresponding petal tip on Flower 2.
Ch 4.
Return to the next joining position on Flower 1 with sl st.
Repeat at a second pair of neighboring petals.
Two joins are sufficient between adjacent flowers. More joining points can close the decorative openings.
Joining Flowers Across a Row
Place Flower 3 beside Flower 2.
Join the matching petals with two ch-4 bridges.
Repeat with Flower 4.
Lay the completed row flat.
The flowers should remain approximately 1.5–2 cm apart at their nearest unjoined sections.
Joining the Second Row
Arrange four more flowers below the first row.
Connect each flower horizontally using the same two ch-4 bridges.
Then connect the upper petals of Row 2 to the lower petals of Row 1.
At intersections where four motifs approach one another, preserve a small central opening rather than joining all four flowers into a solid knot.
Joining Rows Three and Four
Repeat the same joining system until all 16 motifs form a square.
After every row, place the panel on a flat surface.
Measure horizontally and vertically through the center.
A difference greater than approximately 1 cm usually indicates that one set of joining chains is tighter than the other.
Filling the Open Lattice
The photograph shows small connecting lines between flowers rather than completely empty gaps.
Join yarn to one ch-4 bridge.
Ch 3.
Sl st into the neighboring bridge.
Ch 3.
Move to the next connection.
Continue through the grid to form a light diamond-shaped lattice.
Do not fill every opening. The negative space is part of the floral pattern.
Top Edge Foundation
Join sage yarn at the upper-left corner of the floral grid.
Work sc across exposed petal edges and chain spaces.
Use approximately 3 sc in each ch-4 joining space.
Work 1–2 sc across each exposed petal section as required.
The exact total depends on your flower gauge.
Distribute stitches evenly so the edge remains flat rather than forcing a predetermined count.
Right Side Foundation
At the upper-right corner work:
(sc, ch 2, sc).
Continue down the right edge.
Work 3 sc into each major joining space and compact sc along exposed flower edges.
At the lower-right corner work another (sc, ch 2, sc).
Bottom Foundation
Work sc evenly across the bottom edge.
Keep the stitches compact because the reference has a denser lower band beneath the final row of flowers.
At the lower-left corner work:
(sc, ch 2, sc).
Left Side Foundation
Work upward using the same spacing as the right side.
At the final corner work (sc, ch 2, sc).
Join with sl st.
Measure all four sides before continuing.
Dense Bottom Border
If you want the wider lower edge visible in the reference, work additional rows along the bottom only.
Join yarn at the lower-left corner.
Row 1: Ch 1, sc across. Turn.
Row 2: Ch 1, sc across. Turn.
Row 3: Ch 1, hdc across. Turn.
Row 4: Ch 1, sc across.
Fasten off.
The band should measure approximately 2.5–3 cm deep.
Outer Border Round 1
Join yarn at a corner.
Ch 1.
Sc evenly around the entire panel.
At each corner work:
(sc, ch 2, sc).
Where the wider bottom band meets a side edge, place enough stitches to prevent puckering but avoid adding unnecessary increases.
Join with sl st.
Outer Border Round 2
Ch 1.
Sc in each stitch around.
In each ch-2 corner space work:
(sc, ch 2, sc).
Join.
This round establishes the firm frame visible around the open floral center.
Decorative Final Edge
For the compact cord-like finish shown in the photograph, work a reverse single crochet edge.
Without turning, ch 1.
Work reverse sc in each stitch around.
Place 2 reverse sc near each corner if necessary to prevent the edge from pulling inward.
Join and fasten off.
Optional Raised Flower Centers
If a more dimensional center is wanted, join yarn to one flower center.
Ch 1.
Work 6 small puff stitches evenly around the MR.
Each center puff should use only three drawn-up loops so it remains smaller than the petals.
Join and fasten off on the reverse.
Repeat on the remaining flowers.
Alternative Join-as-You-Go Method
The motifs can also be connected while completing their petal-definition rounds.
When reaching a petal that must connect to an existing flower, work to the tip.
Ch 1.
Sl st through the corresponding tip on the neighboring flower.
Ch 1.
Continue down the petal.
This creates a tighter floral fabric than the ch-4 lattice method.
Use the separate chain-bridge method when matching the more open spacing visible in the reference image.
Making a Single Puff Flower Motif
A single motif can be used independently as an appliqué.
Work the 12-stitch center and all six paired-puff petals.
Add the petal-definition round.
Block to approximately 6–6.5 cm across.
Leave a 30 cm tail if the flower will be sewn to another crochet project.
Making a 3 × 3 Floral Square
For a smaller decorative panel, make nine flowers instead of sixteen.
Arrange them in three rows of three.
Use the same ch-4 joining method.
Add the foundation border and two outer rounds.
Depending on gauge, the finished square should measure approximately 24–26 cm across.
Making a 5 × 5 Cushion Front
For a larger cushion panel, crochet 25 flowers.
Arrange them in five rows of five.
Join with the same lattice construction.
Measure the panel before adding the border.
A five-motif row made from 6–6.5 cm flowers will usually produce a panel in the mid-30 cm range before edging, depending on join spacing.
Add border rounds until the panel matches the intended cushion insert.
Making a Puff Flower Blanket
The same motif system can be expanded without changing the individual flower.
For a baby blanket, make enough motifs to reach the desired width and length after blocking.
Calculate from the joined measurement rather than the diameter of an isolated flower.
For example, if four joined flowers measure 26 cm, divide 26 by four to obtain an approximate repeat of 6.5 cm. Use that repeat to estimate the number of motifs required.
Add extra yarn for borders and swatching before purchasing the final quantity.
Assembly
- Crochet 16 matching sage-green flower centers and complete six raised puff petals around every center.
- Add the compact petal-definition round and block one test flower to approximately 6–6.5 cm before finishing the complete set.
- Arrange all motifs in a 4 × 4 grid with approximately 1.5–2 cm between neighboring flower edges.
- Join adjacent flowers with two ch-4 bridges while preserving the small openings between four-motif intersections.
- Add light ch-3 lattice connections where additional stability is required without closing the openwork.
- Work an even single-crochet foundation around all four sides and form each corner with a ch-2 space.
- Add the optional 2.5–3 cm dense bottom band if matching the asymmetrical edge treatment shown in the reference.
- Work two compact outer border rounds, checking that all four sides remain flat after each round.
- Finish with reverse single crochet and weave yarn tails into nearby stitches of the same motif or border section.
- Block the panel to approximately 32 × 32 cm, aligning the flower centers into straight horizontal, vertical, and diagonal lines.
The completed panel should show sixteen raised six-petal flowers separated by an open sage lattice and contained within a firm rectangular crochet border.
7 Technical Tips for Better Puff Flowers
- Draw every petal loop to approximately 1.5 cm. A difference of only 4–5 mm can make one petal noticeably shorter. Check the loop height before closing each puff.
- Keep finished flower diameters within 5 mm. Motifs that vary by more than this become difficult to align in a straight grid. Measure several flowers before joining the full panel.
- Maintain 1.5–2 cm between neighboring flower edges. Shorter joins compress the floral grid and can make the panel cup. Longer joins create oversized holes and reduce stability.
- Do not tighten the final locking chain of each puff. An excessively tight locking chain pinches the petal at its tip. Keep it firm enough to hold the loops but similar in tension to the surrounding chains.
- Check the grid after every completed row. A horizontal measurement more than 1 cm different from the vertical measurement signals inconsistent joining tension. Correct the affected joins before adding the border.
- Place border stitches evenly rather than forcing a fixed count. Too many stitches create rippling; too few pull the floral grid inward. Lay the work flat after every side.
- Block the flower centers into straight lines. Pin the four corners first, then align the centers rather than stretching individual petals. This keeps the open lattice consistent across the full 32 cm panel.
How to Keep Puff Stitches Full
The hook must pull every elongated loop to approximately the same height before the puff is closed.
If the first loops become shorter while later loops remain tall, the finished petal will lean. Hold the existing loops lightly against the hook shaft while drawing up the next loop.
Do not use an excessively small hook to create firmness. Dense yarn combined with multiple loops can make it difficult to pull the final yarn-over through the complete group.
How to Stop the Flowers from Curling
Curling usually comes from one of three areas: tight petal bases, short joining chains, or a border that contains too few stitches.
Place an isolated flower on a table first. If it lies flat, the motif itself is not the problem.
Next, inspect the joined grid. If the panel cups only after motifs are connected, lengthen the joining chains slightly.
If distortion begins after the border, add stitches evenly along the affected side rather than increasing at random positions.
Choosing the Sage Green Yarn
The photograph uses a muted botanical green rather than a bright emerald shade. Sage, olive-sage, eucalyptus, dried herb, and light moss colors can create a similar appearance.
Choose a yarn with visible twist. The raised petals rely on parallel strands to create their ribbed texture.
Mercerized cotton gives sharper definition and a slight sheen, while matte cotton creates a softer visual finish. Both can work with the same construction.
Alternative Color Ideas
An ivory version produces a neutral lace panel with stronger emphasis on texture.
For a spring palette, alternate pale sage, cream, dusty pink, and muted yellow flowers while keeping the lattice in one consistent green.
A two-color version can use cream petals with sage centers and joins.
For stronger flower definition, work the motifs in one color and use a slightly darker shade for the outer border.
Turning the Panel into a Cushion Cover
Block the floral square before constructing the cushion back.
Measure the finished panel without stretching it.
Crochet a solid back panel to the same dimensions using single crochet or half double crochet.
Place the panels with wrong sides together and join three edges with single crochet.
Insert the cushion form.
The fourth edge can be closed permanently or fitted with buttons and loops if the cover needs to be removable.
Using the Pattern for a Table Mat
A cotton version can be used as a decorative table mat beneath lightweight serving pieces or a vase.
The raised flowers create an uneven surface, so the design is less suitable beneath narrow-stemmed glasses or objects requiring a perfectly level base.
For table use, keep the border firm and block the complete piece thoroughly.
Do not treat the mat as a heat protector unless the chosen yarn and construction are specifically suitable for the temperature involved.
How to Weave in Puff-Stitch Tails
Do not pull tails directly through the center of a raised petal because this can compress its loops.
Thread each tail through the flatter stitches at the flower center or along the joining lattice.
Change direction at least once before trimming.
For motif tails near the perimeter, weave them into the border only after confirming that the motif spacing is correct.
Blocking the Finished Floral Square
Dampen the panel according to the yarn manufacturer’s care directions.
Lay it flat on blocking mats.
Pin all four corners to the target dimensions.
Measure both diagonals. They should be approximately equal.
Next, align the four flower rows and four columns.
Adjust individual petals only after the overall square geometry is established.
Do not flatten the puff petals with heavy objects. Their raised structure should remain visible after the surrounding lattice has dried.
Care Instructions
Follow the washing instructions for the selected cotton or cotton-blend yarn.
Support the entire panel when wet because open chain joins can stretch under the weight of absorbed water.
Press excess moisture between clean towels rather than twisting the square.
Dry flat and reshape the border to the original measurements.
If the piece is stored between projects, lay it flat or roll it loosely. Avoid placing heavy items directly over the raised flowers for extended periods.
Conclusion
The raised petals and open connecting lattice are the defining elements of this sage green puff flower crochet square. Keep every elongated puff loop close to the same height, make all flower motifs before joining, and maintain consistent chain spacing across the 4 × 4 grid. A firm outer border then controls the openwork without covering the floral edges. Your next practical step is to crochet one six-petal test flower and block it to approximately 6–6.5 cm before calculating the final panel dimensions. Save the finished project to Pinterest or share it on Instagram with #SagePuffFlowerSquare. Would you keep all sixteen flowers sage green or alternate cream flowers through the center rows?









