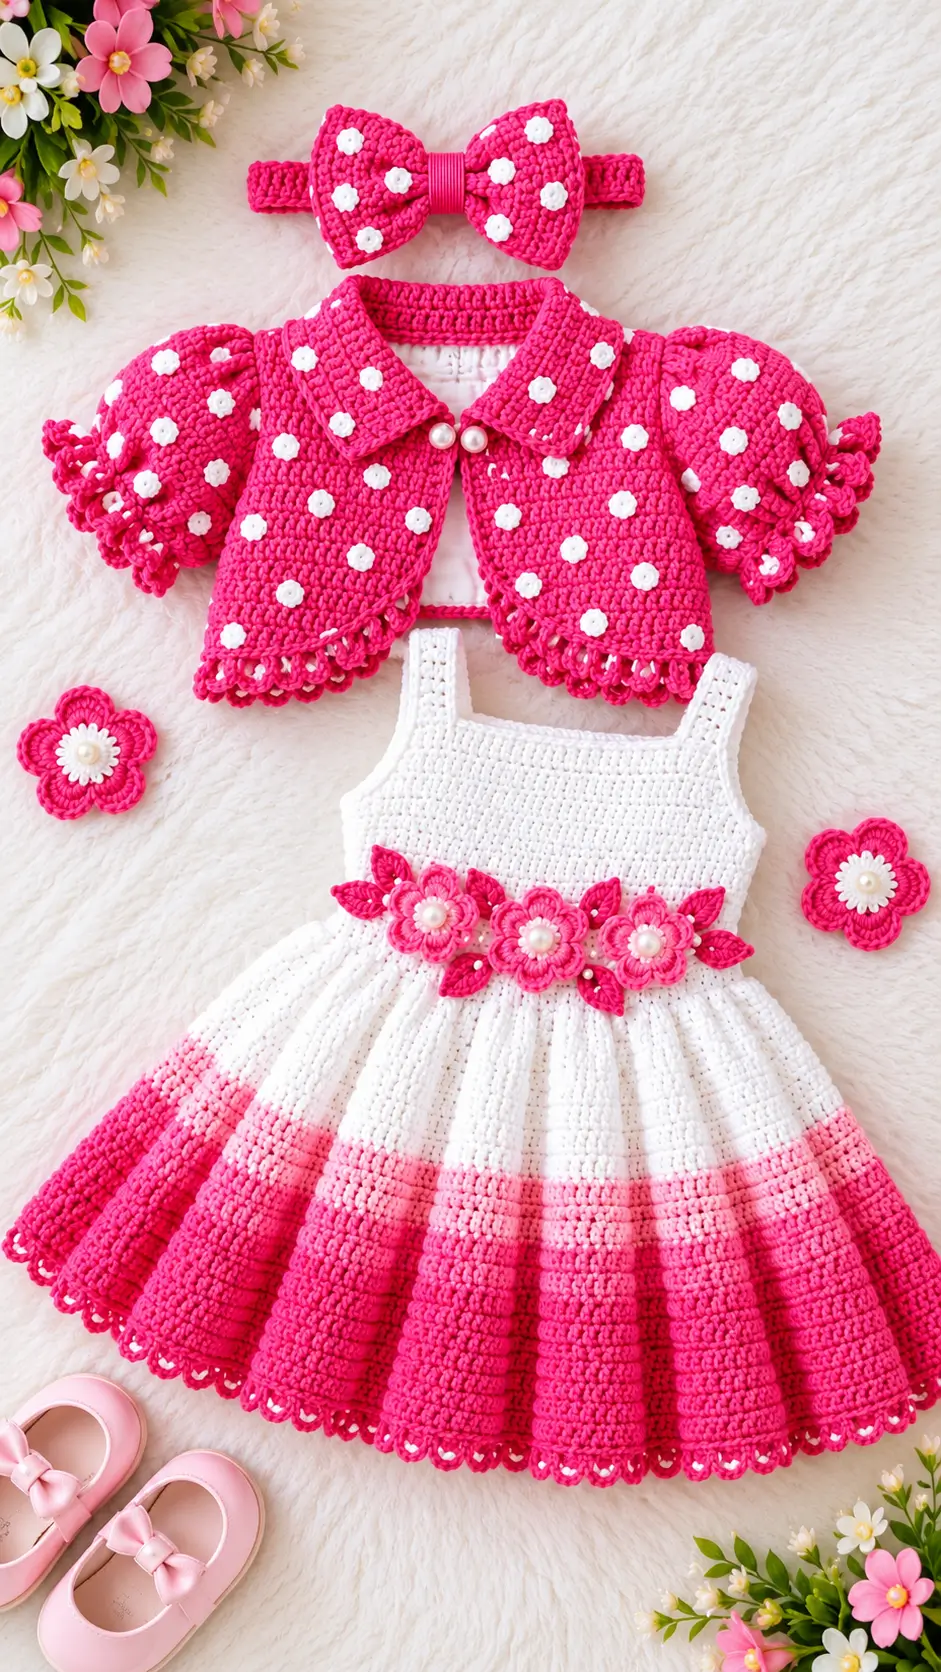
Three raised flowers across the waist determine where every color transition in this dress needs to land. This pink and white crochet baby dress pattern reconstructs the photographed set with sport-weight yarn, a 4 mm hook and an approximate 6–12-month target size. The intermediate project combines a flared dress, floral waistband, puff-sleeve bolero and bow headband, making one gauge setup useful across three coordinated pieces.
The Design: What Makes This Set Different
The skirt carries most of the visual weight, so its circumference needs to expand well below a comparatively firm white bodice. That prevents the straps and square neckline from spreading under the fuller lower section. The second structural decision is the cropped crochet baby dress with bolero combination: the jacket stops above the flower belt instead of concealing it.
Puff sleeves create the third proportion problem. Their fullness needs to sit near the sleeve cap while the cuff contracts again; otherwise a puff sleeve crochet bolero becomes wide from shoulder to cuff rather than rounded.
One common mistake is increasing the skirt too aggressively in a single row. Excess fabric then ripples directly below the waist. Controlled increases distribute the flare over several rounds while preserving the fitted upper section.
Project Info at a Glance
| Skill Level | Time | Finished Size | Hook | Best For |
|---|---|---|---|---|
| Intermediate | 12–16 hours estimated | Approx. 48 cm chest × 38 cm dress length | 4 mm | 6–12-month reference size |
A published category-2 baby dress pattern uses a 4 mm hook and gives 38 cm as the 6–12-month dress length. Actual fit depends on gauge and body measurements.
Materials and Tools
Yarn
- White — sport/baby #2 — approximately 180–220 g available for the bodice, upper skirt and details.
- Fuchsia pink — sport/baby #2 — approximately 80–100 g available for the bolero, headband, flowers and lower skirt.
- Pale pink — sport/baby #2 — approximately 30–40 g for the middle skirt band and layered flower details.
Choose a smooth, washable baby yarn with consistent stitch definition. Yarn quantities are purchasing allowances for the complete multi-piece set rather than exact consumption figures.
Tools
- 4 mm crochet hook
- Yarn needle
- Locking stitch markers
- Scissors
- Flexible measuring tape
- Rust-proof blocking pins
- Sewing thread for appliqué attachment
The photographed set appears to use pearl-like decorative centers. For an infant garment, crocheted or embroidered centers avoid detachable bead-like pieces. If decorative beads or buttons are used, treat the garment as requiring close supervision and check every attachment before use.
Abbreviations
- MR — magic ring
- sc — single crochet
- hdc — half double crochet
- dc — double crochet
- inc — 2 stitches in one stitch
- dec — decrease
- sl st — slip stitch
- ch — chain
- BLO — back loop only
- FLO — front loop only
- st/sts — stitch/stitches
An invisible decrease is made through the front loops of the next two stitches before completing one single crochet; it reduces bulk compared with a standard sc2tog.
Pink and White Crochet Baby Dress Pattern
This garment does not use the standard six-stitch amigurumi increase system for its main construction. Garment circumference is controlled by gauge and measurements. The instructions below reconstruct the main geometry visible in the photographed set.
Dress Bodice
Yarn: white.
Target gauge: approximately 20 dc = 10 cm after blocking.
Foundation: Ch 97.
Row 1: Dc in 4th ch from hook and across.
Row 2: Ch 2, turn, dc across.
Row 3: Ch 2, turn, dc across.
Row 4: Ch 2, turn, dc across.
Row 5: Ch 2, turn, dc across.
Row 6: Ch 2, turn, dc across.
Measure the piece before continuing. The finished circumference target is approximately 48 cm. Gauge takes priority over the foundation-chain count.
Join the short edges neatly, leaving sufficient opening for dressing if the chosen construction requires a back closure.
Round 7: Ch 1, sc evenly around the waist edge.
Round 8: Sc around.
Do not attach the flowers at this stage. The garment should be blocked before their final positions are established.
Shoulder Straps — Make 2
Yarn: white.
Foundation: Ch 9.
Row 1: Sc in second ch from hook and across (8).
Rows 2–24: Ch 1, turn, sc across (8).
Check each strap against the required shoulder-to-bodice measurement. Add or remove rows when necessary rather than depending on age sizing alone.
Fasten off, leaving approximately 20 cm for sewing. Attach both straps to the front and back bodice with equal spacing from the side seams.
Flared Skirt
Yarn: white, pale pink and fuchsia.
Join white yarn at the lower edge of the bodice.
Round 1: Ch 3. Work 2 dc in every third stitch around, distributing increases evenly.
Round 2: Dc around without increasing.
Round 3: Repeat 5 dc, 2 dc in next st around. Adjust the final repeat if required to meet the beginning of the round cleanly.
Rounds 4–9: Dc around.
Round 10: Repeat 7 dc, 2 dc in next st around.
Rounds 11–16: Dc around.
Lay the skirt flat after each increase round. A strongly rippled edge indicates excessive increases, while a skirt that pulls inward requires additional circumference.
Change to pale pink.
Rounds 17–23: Dc around.
Change to fuchsia.
Rounds 24–32: Dc around.
Scalloped Hem
Round 33: Ch 1, sc around.
Round 34: Repeat skip 1 st, 5 dc in next st, skip 1 st, sl st in next st around.
Fasten off and weave the yarn tail securely into the wrong side.
Waist Flowers — Make 3
Yarn: fuchsia and pale pink.
With pale pink:
Round 1: 6 sc in MR (6).
Round 2: Inc ×6 (12).
Change to fuchsia.
Round 3: Work sl st in next st, ch 3, 3 dc in next st, ch 3, sl st in next st, repeating the sequence around to form the petals.
Fasten off. Make three flowers of matching diameter and arrange them horizontally across the front waist.
Leaves — Make 6
Yarn: fuchsia.
Foundation: Ch 8.
Row 1: Sl st in second ch from hook, sc, hdc, dc, hdc, sc, sl st. Continue along the opposite side of the foundation chain using the reverse stitch order to form the second half of the leaf.
Fasten off, leaving approximately 15 cm for attachment.
Position two leaves around each flower. Angle the tips diagonally so they remain visible outside the flower petals.
Crochet Baby Bolero Pattern
Bolero Back
Yarn: fuchsia.
Foundation: Ch 49.
Row 1: Hdc in second ch from hook and across (48).
Rows 2–16: Ch 1, turn, hdc across (48).
The photographed jacket is deliberately cropped. Check the piece against the dress and stop around the upper waist rather than extending the bolero over the floral belt.
Bolero Front Panels — Make 2
Yarn: fuchsia.
Foundation: Ch 25.
Row 1: Hdc in second ch and across (24).
Rows 2–10: Hdc across (24).
Row 11: Hdc 22, hdc2tog (23).
Row 12: Hdc across (23).
Row 13: Hdc 21, hdc2tog (22).
Row 14: Hdc across (22).
Row 15: Hdc 20, hdc2tog (21).
Row 16: Hdc across (21).
Fasten off. Reverse the shaping when constructing the second panel so the two fronts mirror one another.
Puff Sleeves — Make 2
Yarn: fuchsia.
Ch 37 and join without twisting.
Round 1: Ch 2, hdc around (36).
Round 2: Repeat hdc, 2 hdc in next st around (54).
Round 3: Hdc around (54).
Round 4: Hdc around (54).
Round 5: Repeat 7 hdc, hdc2tog around (48).
Round 6: Hdc around (48).
Round 7: Repeat 6 hdc, hdc2tog around (42).
Round 8: Hdc around (42).
Round 9: Repeat 5 hdc, hdc2tog around (36).
Round 10: Sc around (36).
Sleeve Cuff
Round 11: Work sl st, ch 3, 2 dc in next st, ch 3, sl st around, spacing the decorative shells evenly.
Fasten off and leave approximately 25 cm for seaming.
Bolero Collar
Yarn: fuchsia.
Join yarn at one front neckline edge.
Row 1: Sc evenly around the first front neckline, back neck and opposite front neckline.
Row 2: Ch 2, hdc across.
Row 3: Repeat 3 hdc, 2 hdc in next st across to create a shallow spread.
Row 4: Hdc across.
Fasten off. Block the collar flat. If the outer edge turns upward after blocking, reduce the number of increases in Row 3.
White Dot Appliqués
Yarn: white.
Make enough small circles to distribute across the bolero and matching bow.
Round 1: 6 sc in MR (6).
Round 2: Inc ×6 (12).
Fasten off immediately to maintain a small, flat motif. Sew the dots individually across the front panels, collar, sleeves and bow while keeping them clear of major seams.
Crochet Bow Headband
Headband
Yarn: fuchsia.
Measure the intended head circumference. Chain to that measurement minus approximately 2–3 cm, adjusting for the actual stretch of the yarn and stitch pattern.
Join the foundation chain without twisting.
Round 1: Hdc around.
Rounds 2–4: Hdc around.
Fasten off and weave in both tails securely.
Bow
Yarn: fuchsia.
Foundation: Ch 31.
Rows 1–12: Hdc across (30).
Fasten off. Shape the rectangle into a bow by compressing its center. Wrap the middle firmly with matching yarn or crochet a narrow center band and sew it around the gathered section.
Make four to six white dot appliqués and stitch them to the bow before attaching the bow to the headband.
Bolero Scalloped Border
Join fuchsia yarn along the lower edge of the completed bolero.
Round 1: Sc evenly across.
Round 2: Repeat skip 1 st, 5 dc in next st, skip 1 st, sl st in next st across.
Use the same approximate scallop size at the sleeve cuffs and jacket hem. Consistent shell dimensions make the separate components read as one coordinated garment.
Assembly
- Block the dress bodice and skirt to the target dimensions before attaching the raised decorations.
- Sew both shoulder straps to the bodice, checking that their front and back spacing matches.
- Position the three waist flowers across the center front and stitch every flower through its center and inner petal edges.
- Place two leaves around each waist flower and secure their center spines while keeping the pointed ends visible.
- Sew the bolero shoulder seams, then connect the front panels and back at the side seams.
- Pin each puff sleeve into its armhole at four equally spaced points before sewing. Distribute the sleeve-cap fullness symmetrically.
- Add the collar and lower scalloped border after checking that the bolero fronts are equal in length.
- Sew the white dot appliqués across the front panels, sleeves, collar and bow. Keep the spacing irregular but visually balanced, as shown in the reference image.
- Attach the completed bow to the center of the headband and weave every yarn tail securely into neighboring stitches.
- Block the completed components separately and inspect every flower, leaf and appliqué attachment before use.
The completed set consists of a three-tone crochet dress, dimensional floral waistband, cropped puff-sleeve bolero and coordinating bow headband.
7 Technical Tips for a Cleaner Finish
- Mark every skirt round at the side seam. Losing the round boundary can shift the increase positions diagonally and create an asymmetric hem after multiple rounds.
- Check the skirt after every increase round. Strong waves indicate too much added circumference, while vertical pulling indicates insufficient increases.
- Measure the 48 cm chest target before starting the skirt. A 3 cm bodice error becomes significantly harder to correct after the skirt contains several hundred stitches.
- Pin each sleeve at four equal points. Concentrating the extra sleeve fabric near one point creates a twisted puff rather than an evenly rounded sleeve cap.
- Keep flower centers securely attached. A loose raised center can detach from an infant garment, so stitch through several points rather than attaching only through the center ring.
- Check color changes at the side seam. Starting a new shade several stitches away from the marker creates a visible diagonal transition in the three-color skirt.
- Weave each yarn tail through at least three changes of direction. A tail woven in one straight path can migrate out when the garment stretches during dressing or washing.
Conclusion
Block the dress before sewing on the three waist flowers; this sequence makes their final spacing easier to control. Then measure the bodice circumference, dress length and strap position against the intended wearer rather than relying on an age label alone. This pink and white crochet baby dress pattern can be photographed as a complete set once the bolero and headband have been checked for secure appliqués and loose ends. Save the finished project to Pinterest and share your completed set on Instagram with #PinkFloralBabyDress. For your version, would you keep all three skirt color bands shown in the photograph, or extend the fuchsia section higher toward the flower belt?









