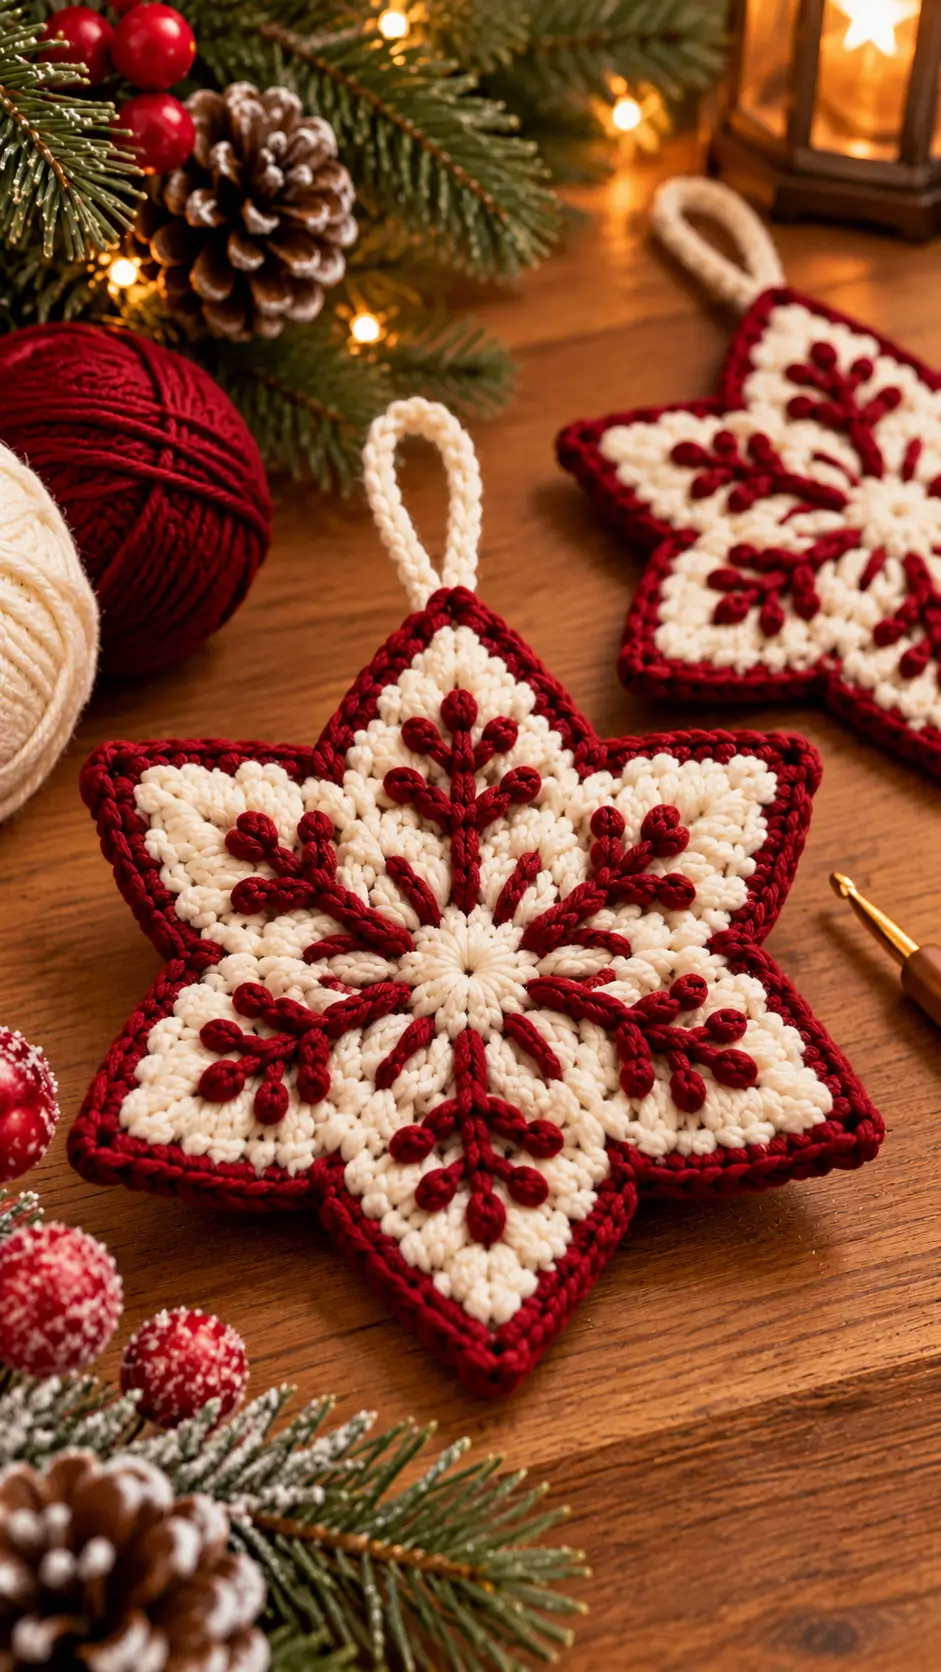
A six-point Christmas star has nowhere to hide uneven geometry: if one point is shorter, the entire snowflake immediately looks off-center. This crochet Christmas star ornament uses a warm cream body, deep red border, raised branching embroidery-style crochet, and a cream hanging loop. Worked in firm cotton yarn, the finished ornament targets approximately 18–20 cm across, making it suitable for a tree, door handle, gift package, or flat holiday decoration.
The Design: What Makes This Crochet Christmas Star Different
The ornament is built around six matching points rather than a conventional five-point star. Each cream section widens near the center and narrows toward a sharp outer tip, creating the snowflake-like silhouette visible in the reference. A compact red border then follows every angle without softening the points.
The raised red decoration is structural to the appearance. Six primary branches radiate from a small cream center, then split into shorter stems ending in rounded buds. Those details imitate stylized snowflake crystals while remaining dimensional.
The hanging loop attaches behind one point so the star maintains a vertical axis when suspended. The most common construction problem is adding too many stitches at the inner valleys. That makes the star ruffle and reduces the depth between neighboring points.
Project Info at a Glance
| Skill Level | Time | Finished Size | Hook | Construction |
|---|---|---|---|---|
| Intermediate | 3–5 hours | Approx. 18–20 cm across | 3.5 mm | Six-point flat star with surface decoration |
The dimensions are working targets for this photo-inspired construction rather than measurements taken directly from the photograph. Yarn thickness, hook size and blocking will affect the final measurement.
Materials and Tools
Yarn
- Warm cream DK or light worsted cotton yarn — approximately 45–55 g
- Deep Christmas red DK or light worsted cotton yarn — approximately 25–35 g
A smooth, tightly twisted cotton gives the six points and raised red branches clear definition. Use cream and red yarns of similar thickness so the border does not distort the star.
Tools
- 3.5 mm crochet hook
- 3.0 mm crochet hook for the raised red details if needed
- Large-eye yarn needle
- Scissors
- 6 locking stitch markers
- Flexible measuring tape
- Blocking mat
- Rustproof pins
Abbreviations
- MR — magic ring
- ch — chain
- sc — single crochet
- hdc — half double crochet
- dc — double crochet
- tr — treble crochet
- inc — increase
- sl st — slip stitch
- sp — space
- st / sts — stitch / stitches
- picot — ch 3, sl st into first ch
Surface slip stitches are worked through the cream fabric after the star is complete. Keep them relaxed so the decorative red branches do not shorten the six points.
Gauge and Finished Measurements
Target approximately 18–20 sc per 10 cm with the 3.5 mm hook. Exact gauge is less important than producing a dense, flat ornament with six equal points.
Before the red border is added, target approximately 16–18 cm across. The finished red edging should increase the measurement to approximately 18–20 cm.
Each primary point should extend approximately 7–8 cm from the center.
Crochet Christmas Star Ornament Pattern
Cream Center
Use cream yarn and a 3.5 mm hook.
R1: 6 sc in MR. Join with sl st. (6)
R2: Inc ×6. Join. (12)
R3: [Sc, inc] ×6. Join. (18)
R4: [Sc 2, inc] ×6. Join. (24)
R5: [Sc 3, inc] ×6. Join. (30)
R6: [Sc 4, inc] ×6. Join. (36)
Place one marker every 6 stitches. These six positions determine the directions of the star points.
First Cream Star Point
Join cream yarn at the first marker.
Ch 15.
Starting in second ch from hook:
Sl st in next ch.
Sc in next 2 ch.
Hdc in next 3 ch.
Dc in next 4 ch.
Tr in next 3 ch.
Hdc in final ch.
Work 3 sc around the end of the foundation area to turn.
Continue down the opposite side of the chain, mirroring the stitch sequence.
Attach to the center approximately 5 stitches beyond the starting position.
Fasten off.
Second Star Point
Join cream yarn at the next marked position.
Repeat the complete first-point instructions.
Before fastening off, compare the new point with the first one. Both should measure approximately the same distance from the center to the tip.
Star Points 3–6
Repeat the same construction around the remaining four marked positions.
After the sixth point is complete, place the star on a flat surface.
The six tips should form an approximately even radial arrangement. Correct a noticeably short point before adding the perimeter because the red border will make differences more visible.
Connecting the Six Points
Join cream yarn at the base of the first point.
Sc along the lower edge toward the valley.
Work one sl st at the deepest part of the valley.
Continue with sc along the neighboring point.
Repeat around all six sections.
Do not fill the valleys with multiple tall stitches. The visible indentation between neighboring points is part of the snowflake silhouette.
Cream Shaping Round
Continue around the entire star with sc.
At each outer point work:
(sc, ch 2, sc).
At each inner valley work one sl st.
Along straight sections work one sc per available stitch.
Join and fasten off.
The cream star should lie flat before the red yarn is introduced.
Deep Red Outer Border
Switch to deep red yarn.
Join yarn at an inner valley.
Sc toward the first point.
At the point work:
(sc, ch 2, sc).
Continue sc down the opposite side.
At the next valley work one sl st.
Repeat around all six points.
Join and fasten off.
The border should create a narrow red outline rather than a broad frame.
Optional Second Red Border Round
If the first border appears too thin with your yarn, work one additional compact round.
Join red yarn at a valley.
Sc in each stitch toward the point.
Work (sc, ch 1, sc) at the tip.
Continue around.
Use sl st in each valley.
Fasten off.
Skip this second round if it causes the points to curve or the valleys to become shallow.
Raised Red Central Branches
The red surface decoration begins at the cream center and extends toward each of the six points.
Join red yarn at the center from the reverse side.
Surface sl st toward the first point for approximately 4–5 cm.
Stop before reaching the red perimeter.
Fasten off on the reverse.
Return to the center and repeat toward each of the remaining five points.
The result should be six red primary branches radiating evenly from the cream center.
First Side Branch
Join red yarn approximately halfway along one primary branch.
Surface sl st diagonally toward the left for approximately 2 cm.
At the end, form a small rounded bud:
Ch 3, work 3 sc into second ch from hook, sl st into next ch, then sl st back into the branch.
Fasten off.
Second Side Branch
Join yarn at approximately the same height on the opposite side of the primary branch.
Work a matching 2 cm diagonal line.
Finish with the same rounded bud.
Fasten off.
Upper Branch Pair
Move approximately 1.5–2 cm farther toward the point.
Add a shorter branch on each side of the primary line.
Finish each branch with a small red bud.
The branch tips should decrease slightly in length as they approach the star point.
Repeat the Snowflake Branching
Repeat the branch construction on all six primary red lines.
Each major branch can carry two or three pairs of side stems depending on available space.
Keep the arrangement symmetrical enough to read as a snowflake, but do not crowd the cream background.
Alternative Crocheted Bud
For a rounder tip, use this compact construction:
Ch 2.
Work 4 sc into the second chain from hook.
Sl st into the first sc.
Fasten off.
Sew the small circle to the end of the surface branch.
This method adds slightly more dimension than the integrated branch tip.
Cream Center Rosette
The reference ornament has a small light center where the six branches meet.
With cream yarn, make an MR.
R1: 12 hdc in MR. Join with sl st. (12)
Fasten off with a 20 cm tail.
Pull the ring closed.
Sew the rosette over the exact intersection of the six red branches.
Keep the stitches near the outer edge of the rosette so its center remains smooth.
Cream Hanging Loop
Join cream yarn to the reverse of the uppermost star point.
Ch 35.
Sl st into the same attachment area to create a loop.
Turn the loop.
Work one sl st into each chain around the complete loop for reinforcement.
Fasten off with a 20 cm tail.
Weave the tail through the red border and cream point.
The finished loop should extend approximately 7–9 cm above the star when laid flat.
Reinforcing the Hanging Point
Thread a cream or red yarn tail onto a needle.
Pass through approximately 2 cm of stitches below the loop attachment.
Return through a neighboring path.
This distributes the ornament’s weight across a wider area instead of concentrating it at the outermost point.
Optional Double-Layer Ornament
For a thicker ornament, crochet a second six-point cream star using the same instructions but omit the red surface decoration.
Place both pieces with wrong sides together.
Join red yarn through both layers at one valley.
Sc around the complete perimeter, passing through both stars.
Maintain every point with (sc, ch 2, sc).
Use sl st in the valleys.
Before closing the final section, insert a very thin layer of polyester filling if a lightly padded ornament is wanted.
Do not overfill. Excess stuffing rounds the points and changes the snowflake silhouette.
Optional Flat Backing
If the ornament will be used as a wall or package decoration, a second crochet layer is not required.
A small piece of cream felt can instead be trimmed to fit behind the center.
Use the felt only beneath the central area rather than behind the six points.
This can hide surface-crochet tails while leaving the star flexible.
Blocking the Christmas Star
Dampen the ornament according to the yarn care instructions.
Place it on a blocking mat.
Pin the center first.
Measure from the center to each of the six tips.
Target approximately 7–8 cm per point.
Pin all six points.
Next, pin the six inner valleys so they remain deep and evenly spaced.
Arrange the red raised branches after the main geometry has been established.
Do not stretch the hanging loop during blocking.
Allow the ornament to dry completely before removing the pins.
Assembly
- Crochet the cream circular center to 36 stitches and mark six evenly spaced directions for the star points.
- Work all six cream points separately and compare their center-to-tip measurements before continuing.
- Connect the point bases while retaining a deep valley between every neighboring pair.
- Work the cream shaping round and confirm that the star lies flat before adding contrast yarn.
- Add the compact red perimeter, preserving every sharp point and inner valley.
- Surface crochet six red primary branches from the center toward the six points.
- Add matching side branches and rounded red buds, decreasing branch length toward each outer point.
- Sew the small cream rosette over the intersection of the six primary branches.
- Crochet and reinforce the cream hanging loop behind the upper point without pulling that point out of shape.
- Weave all tails into matching-color stitches, block the six tips to equal measurements, and allow the ornament to dry flat.
The finished decoration should show six cream points outlined in deep red, six branching red snowflake arms, a small cream center, and one reinforced hanging loop.
7 Technical Tips for a Better Crochet Christmas Star
- Keep all six points within 5 mm of the same length. A short point is highly visible in radial designs. Measure from the cream center to every tip before adding the red border.
- Use only one compact stitch at each inner valley. Adding several stitches there can make the 18–20 cm ornament ruffle. A slip stitch produces a deeper and cleaner indentation.
- Keep the red border below approximately 8 mm wide. A broad border can overwhelm the cream interior and round the points. One compact round is enough with most DK and light worsted yarns.
- Do not tighten the surface branches. A branch that is 5–8 mm shorter than the cream fabric beneath it can bend the entire point upward. Check the ornament on a table after completing each arm.
- Keep branch buds under approximately 8 mm. Oversized tips make the decoration look crowded and add unnecessary weight. Use the same bud construction throughout the six sections.
- Reinforce at least 2 cm below the hanging loop. Attaching a loop only through the outermost point can stretch that point during storage or display. Distribute the attachment into the denser stitches below it.
- Pin the six main points before the red branches during blocking. Correcting decorative details first can distort the overall star. Establish the radial geometry before arranging the surface crochet.
How to Make a Smaller Christmas Tree Ornament
For a compact tree ornament, use sport or DK cotton with a 2.5–3.0 mm hook.
Reduce each point foundation from 15 chains to approximately 10–11 chains.
Shorten the red branches proportionally.
Target a finished diameter of approximately 11–13 cm.
Reduce the hanging loop to approximately 24–26 chains so it remains proportional to the smaller star.
How to Make a Larger Christmas Star
Increase each point foundation by 4–6 chains.
Extend the dc and tr sections through the middle of each point rather than increasing heavily along the edges.
A larger version can finish around 25–28 cm across.
At that scale, use three pairs of red side branches on every primary snowflake arm and reinforce the hanging point with a second strand of yarn.
Choosing the Cream Yarn
Warm ivory, natural cotton and soft cream all work with the deep red border. Pure white produces a sharper contrast and a cooler Christmas palette.
A smooth yarn is useful because the cream area contains much of the visible stitch texture. Highly fuzzy fibers can obscure the distinction between the background and the raised red branches.
Choosing the Red Yarn
Deep cranberry, burgundy, classic Christmas red and dark cherry all suit the design.
The red needs enough contrast to define both the outer silhouette and the branching snowflake pattern.
Use the same dye lot for the border and surface decoration. A small color difference is easier to see when two red sections touch at the points.
Alternative Christmas Color Combinations
A traditional variation can use white with forest green surface branches and a red center.
For a neutral ornament, combine oatmeal with dark brown or charcoal.
A winter version can use white with icy blue details.
For a metallic effect without changing the construction, substitute a thin gold accent yarn for selected red buds while retaining red for the main border and branches.
Using the Star as a Christmas Tree Ornament
The 18–20 cm version works best on a medium or large tree because the six-point silhouette needs visible space around it.
Hang it from a sturdy branch rather than the tip of a flexible branch.
Position the ornament so the cream loop remains vertical and the lowest star point hangs directly beneath the upper point.
For a smaller tree, use the reduced 11–13 cm version.
Using the Star as a Gift Topper
Omit the long hanging loop and replace it with a 10-chain attachment loop.
Thread ribbon through that loop and tie the star to a wrapped gift.
The recipient can remove the decoration and add a longer loop later for tree use.
A flat single-layer star works better as a package topper than the padded double-layer variation.
Making a Christmas Garland
Crochet several stars at approximately 10–12 cm across.
Use the same cream and red palette or alternate reversed colors.
Instead of individual hanging loops, crochet a long cream chain and attach each star through its upper point.
Leave approximately 12–15 cm between motifs so the points do not overlap.
For a 150 cm garland, five to seven stars provide a balanced arrangement depending on their final size.
Making a Matching Set
Complete and block the first ornament before making the remaining pieces.
Record the center-to-tip measurement, number of branch pairs, border width and hanging-loop length.
Use those measurements rather than visual estimates for subsequent stars.
For variation within a coordinated set, reverse the colors on every second ornament: deep red body, cream border and cream branching details.
Keeping the Star Flat
Inspect the ornament at three stages: after the cream body, after the red perimeter, and after the raised branches.
If the cream body ruffles, the perimeter contains too many stitches.
If it cups after the red border, reduce increases near the points.
If distortion appears only after the branches are added, those surface stitches are too tight.
Correct the tension before blocking rather than trying to force severe distortion flat with pins.
Care and Storage
Follow the care instructions for the selected yarn.
For a lightly soiled ornament, spot cleaning is preferable because repeated washing can soften sharply blocked points.
If washing is required, support the wet star with both hands and press excess water between clean towels.
Reshape all six points and dry flat.
For seasonal storage, place the ornament flat between sheets of acid-free tissue or clean fabric. Avoid folding the points or placing heavy decorations directly on top of the raised red branches.
Conclusion
Equal point length and relaxed surface crochet control the final appearance of this crochet Christmas star ornament. Build the six cream points first, preserve the valleys, and confirm that the star lies flat before adding its deep red perimeter. The branching red details should radiate from one center without pulling the underlying fabric, while the reinforced cream loop carries the ornament from a single upper point. Start by crocheting the 36-stitch center and one 15-chain point, then use that first measurement as the template for the remaining five. Save the finished ornament to Pinterest or share it on Instagram with #CrochetChristmasStar. Would you make a matching second star with a red body and cream snowflake branches?









