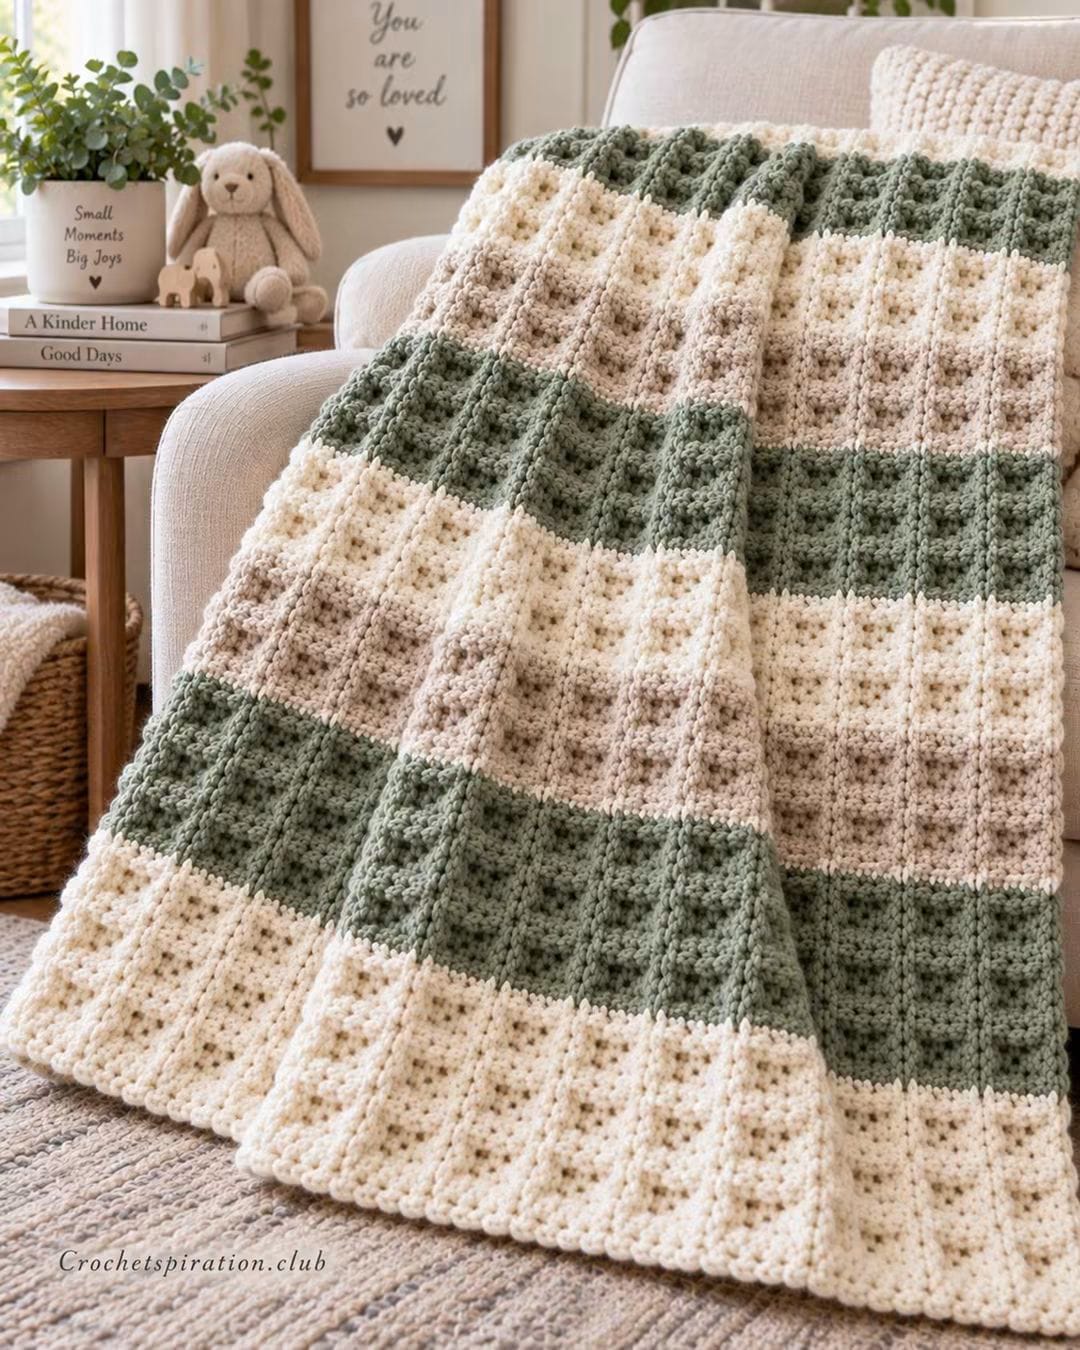
Raised vertical columns interrupt every broad stripe in this blanket, which is what separates it from a basic three-color throw. This textured crochet blanket pattern combines sage green, warm cream and light oatmeal with alternating solid rows, relief stitches and subtle open sections. Worked flat as one piece with chunky yarn, the finished blanket targets approximately 127 × 152 cm and uses a 10 mm crochet hook.
The Design: What Makes This Textured Blanket Different
The photographed blanket combines horizontal color blocking with vertical relief. Sage sections provide the strongest contrast, cream brightens the fabric, and oatmeal creates a quieter transition between the two. The colors repeat in broad sections rather than thin stripes.
Texture supplies the second design layer. Raised front-post stitches form columns through selected sections while plain half-double crochet rows stabilize the fabric between them. Several columns are staggered, preventing the blanket from looking like a rigid grid.
The entire throw is worked as one rectangle. There are no separate squares to sew together. That reduces finishing work, but stitch count becomes critical: losing one edge stitch repeatedly produces a diagonal side that becomes difficult to correct when the border is added.
Project Info at a Glance
| Skill Level | Finished Size | Hook | Yarn Weight | Construction |
|---|---|---|---|---|
| Intermediate | Approx. 127 × 152 cm | 10 mm | Super Bulky #6 | One-piece striped throw |
The 127 × 152 cm target creates a substantial sofa throw. Current photo-inspired chunky blanket references also use approximately this finished size with #6 super-bulky yarn and a 10 mm hook. Always measure a test swatch because yarns carrying the same weight classification can differ considerably in diameter.
Materials and Tools
Yarn
- Sage green super-bulky #6 yarn — approximately 900–1,000 g
- Warm cream super-bulky #6 yarn — approximately 700–800 g
- Light oatmeal or beige super-bulky #6 yarn — approximately 450–550 g
Plan for approximately 2,050–2,350 g total. Raised post stitches consume more yarn than a flat stitch pattern, so buying a small reserve is preferable when matching dye lots matters.
A soft acrylic, acrylic-wool blend or washable chunky polyester can be used. Choose three yarns with closely matched thickness. Even a small diameter difference can alter the height of the broad color sections.
Tools
- 10 mm crochet hook
- Large-eye yarn needle
- Scissors
- 4 locking stitch markers
- Flexible measuring tape
Abbreviations
- ch — chain
- sc — single crochet
- hdc — half double crochet
- dc — double crochet
- FPdc — front-post double crochet
- sl st — slip stitch
- ch-sp — chain space
- st / sts — stitch / stitches
- RS — right side
- WS — wrong side
A front-post double crochet is worked around the post of the stitch below rather than through its top loops. This moves the stitch forward and creates the raised vertical lines used throughout the blanket.
Gauge
Before beginning the full blanket, make a test swatch measuring at least 15 × 15 cm.
A practical target for super-bulky yarn with a 10 mm hook is approximately 8–9 hdc stitches per 10 cm, but the finished blanket measurement is more important than matching a generic gauge exactly.
The fabric should remain flexible when folded. If it stands stiffly, increase the hook size. If the spaces between stitches become excessive and the raised columns lose definition, reduce the hook size.
Sage Green, Cream and Oatmeal Textured Crochet Blanket Pattern
Finished target: approximately 127 × 152 cm.
Construction: worked flat from the bottom upward.
Body stitch count: 102 stitches.
Foundation
With cream yarn, ch 103.
Check the chain without stretching it. Adjust the foundation length before continuing if your yarn produces a substantially different width.
Foundation Row
Hdc in second ch from hook and in each chain across. (102)
Ch 1 and turn.
Cream Textured Section A
Row 1: Hdc in every st across. (102)
Row 2: Hdc in every st across. (102)
Row 3: Hdc in first 3 sts, *FPdc around next st, hdc in next 5 sts*. Repeat across, adjusting the final repeat with plain hdc as required. (102)
Row 4: Hdc across. (102)
Row 5: Hdc in first 6 sts, *FPdc around next st, hdc in next 5 sts*. Repeat across. (102)
Row 6: Hdc across. (102)
Row 7: Repeat Row 3. (102)
Row 8: Hdc across. (102)
Row 9: Repeat Row 5. (102)
Row 10: Hdc across. (102)
Row 11: Repeat Row 3. (102)
Row 12: Hdc across. (102)
The alternating placement of the post stitches creates vertical relief without turning the entire cream section into dense ribbing.
Oatmeal Transition Section A
Change to light oatmeal on the final yarn-over of the previous row.
Row 13: Sc in every st across. (102)
Row 14: Hdc in every st across. (102)
Row 15: Hdc in first 4 sts, *FPdc around next st, hdc in next 7 sts*. Repeat across. (102)
Row 16: Hdc across. (102)
Row 17: Repeat Row 15. (102)
Row 18: Hdc across. (102)
Change to sage green at the completion of Row 18.
Sage Green Textured Section A
Row 19: Hdc across. (102)
Row 20: Hdc in first 3 sts, *FPdc around next 2 sts, hdc in next 4 sts*. Repeat across. (102)
Row 21: Hdc across. (102)
Row 22: Hdc in first 6 sts, *FPdc around next 2 sts, hdc in next 4 sts*. Repeat across. (102)
Row 23: Hdc across. (102)
Row 24: Repeat Row 20. (102)
Row 25: Hdc across. (102)
Row 26: Repeat Row 22. (102)
Row 27: Hdc across. (102)
Row 28: Repeat Row 20. (102)
Row 29: Hdc across. (102)
Row 30: Repeat Row 22. (102)
The paired post stitches make the sage columns heavier than those in the cream section, matching the stronger raised texture visible in the darker bands.
Cream Section B
Change to cream.
Row 31: Sc across. (102)
Row 32: Hdc across. (102)
Row 33: Hdc in first 3 sts, *FPdc around next st, hdc in next 5 sts*. Repeat across. (102)
Row 34: Hdc across. (102)
Row 35: Hdc in first 6 sts, *FPdc around next st, hdc in next 5 sts*. Repeat across. (102)
Row 36: Hdc across. (102)
Rows 37–42: Repeat Rows 33–36 as required, alternating the two post-stitch positions while maintaining exactly 102 stitches.
Oatmeal Textured Section B
Change to oatmeal.
Row 43: Sc across. (102)
Row 44: Hdc across. (102)
Row 45: Hdc in first 5 sts, *FPdc around next 2 sts, hdc in next 6 sts*. Repeat across. (102)
Row 46: Hdc across. (102)
Row 47: Hdc in first 9 sts, *FPdc around next 2 sts, hdc in next 6 sts*. Repeat across. (102)
Row 48: Hdc across. (102)
Rows 49–54: Repeat Rows 45–48 while keeping the raised columns staggered.
Sage Green Section B
Change to sage green.
Row 55: Sc across. (102)
Row 56: Hdc across. (102)
Row 57: Hdc in first 3 sts, *FPdc around next 2 sts, hdc in next 4 sts*. Repeat across. (102)
Row 58: Hdc across. (102)
Row 59: Hdc in first 6 sts, *FPdc around next 2 sts, hdc in next 4 sts*. Repeat across. (102)
Row 60: Hdc across. (102)
Rows 61–66: Continue alternating the two raised-column positions.
Repeat the Color Sequence
Continue the blanket using the following broad sequence:
- Cream textured section — approximately 12 rows
- Oatmeal textured section — approximately 10–12 rows
- Sage textured section — approximately 12 rows
- Cream textured section — approximately 12 rows
- Oatmeal textured section — approximately 10–12 rows
- Sage textured section — approximately 12 rows
- Final cream section — work until the blanket body reaches approximately 145 cm
The exact number of repeats depends on row gauge. Measure the actual blanket rather than adding rows solely to match a fixed total.
Optional Open Texture Rows
The reference blanket contains areas where the texture appears slightly more open. One open row can be inserted into selected cream sections.
Open Row: Hdc in first 2 sts, *ch 1, skip 1 st, hdc in next 2 sts*. Repeat across.
Following Row: Hdc into each hdc and ch-1 space while restoring the established stitch count.
Use open rows sparingly. Repeating them too frequently reduces the dense appearance of the chunky fabric.
How to Work the Raised Columns
Yarn over once.
Insert the hook from front to back and then back to front around the post of the designated stitch below.
Yarn over and draw up a loop.
Yarn over and pull through two loops. Yarn over again and pull through the remaining two loops.
The finished FPdc sits in front of the surrounding fabric.
Do not pull the post stitch tightly around the stitch below. A short FPdc can compress the row and create a horizontal ridge.
Changing Colors
Work the final stitch of the old color until two loops remain on the hook.
Drop the old yarn and complete the final yarn-over with the new color.
Leave approximately 15–20 cm of yarn at both ends of the color change.
Because each color section is broad, cut the yarn instead of carrying an unused super-bulky strand along the edge. Carrying it would add unnecessary thickness beneath the border.
Preparing the Blanket for the Border
Place the completed body on a flat surface.
Measure the width at the top, center and bottom. Then measure both long sides.
Mark all four corners.
If one side is substantially shorter, inspect the edge for missed stitches before adding the border. The border can correct minor irregularity but should not be used to hide significant narrowing.
Border
Round 1 – Cream
Join cream yarn at any corner.
Ch 1 and sc evenly around the entire blanket.
Along the top and bottom, work approximately one sc into each stitch.
Along the row ends, distribute stitches at a rate that allows the blanket to lie flat.
Work (sc, ch 2, sc) in each corner.
Join with sl st.
Round 2 – Cream
Ch 1.
Hdc in each stitch around.
Work (hdc, ch 2, hdc) in each corner space.
Join with sl st.
Round 3 – Sage Green
Change to sage green.
Sc in every stitch around.
Work 3 sc in each corner space.
Join with sl st.
Round 4 – Sage Textured Edge
Ch 1.
*Sc in next 3 sts, work one front-post single crochet around the next available stitch structure.* Repeat around.
At each corner, work (sc, ch 2, sc).
Join with sl st and fasten off.
Optional Cream Accent Edge
For the narrow pale line visible around the photographed blanket, join cream yarn and work loose surface slip stitches immediately inside the sage border.
Maintain relaxed tension. Tight surface stitches can shorten the perimeter and cause the blanket to cup.
Assembly and Finishing
- Lay the completed blanket body on a flat surface before starting the border.
- Count 102 stitches across the final body row and check that no edge stitches have been lost.
- Measure the top, middle and bottom widths and compare the results.
- Mark all four corners with locking stitch markers.
- Work the first cream border round while adjusting side-edge spacing to keep the fabric flat.
- Add the second cream round and check that all four corners remain square.
- Change to sage green and work the outer border without tightening the corner stitches.
- Add the optional cream accent only after confirming that the sage frame lies flat.
- Weave each super-bulky yarn tail in one direction, reverse it and weave through a second section before trimming.
- Lay the completed throw flat, shape it to approximately 127 × 152 cm and record the final dimensions.
The completed blanket should have broad sage, cream and oatmeal sections, staggered vertical relief and a narrow contrasting frame.
7 Technical Tips for This Textured Crochet Blanket
- Prevent narrowing sides. Maintain exactly 102 body stitches and mark the first and final stitch. Repeatedly missing one edge stitch produces a diagonal side.
- Control raised-column tension. A front-post stitch pulled too tightly shortens the row beneath it. Draw the post stitch up to the same height as the surrounding half-double crochets before completing it.
- Keep color changes level. Unequal row counts create visibly different stripe depths. Measure each repeated section through the center rather than along a folded edge.
- Check bulky-yarn diameter. Two #6 yarns can produce different gauges. Crochet a 15 cm swatch with each color before combining yarn from different product lines.
- Avoid border ruffling. Too many stitches along the long edges force the border outward. Stop after Round 1 and place the entire blanket flat before continuing.
- Control corner placement. A misplaced corner increase gradually twists the frame. Mark each ch-2 corner space immediately after completing it.
- Secure thick tails. Super-bulky yarn can work free when woven through only a few stitches. Weave each tail through at least 7–10 cm of dense fabric, reverse direction, then trim.
How to Make a Smaller Blanket
For a baby blanket, target approximately 80 × 100 cm. Reduce the foundation chain while keeping enough stitches for the post-stitch repeat.
Make each color section approximately 8–10 cm deep rather than reproducing the full-size bands. This preserves the visual proportions.
Work fewer complete sage, cream and oatmeal repeats until the required length is reached.
How to Make a Larger Blanket
For a larger sofa or bed throw, increase the foundation width before beginning the texture pattern.
Measure a swatch and calculate how many stitches are required for the desired width. Keep the additional stitches compatible with the six-stitch rhythm used by the main raised-column sections.
Add complete color sections to increase length. Adding only one oversized final stripe changes the visual balance of the blanket.
Choosing the Yarn Colors
The sage should be muted rather than highly saturated if you want to stay close to the reference image. Look for gray-green, eucalyptus or soft sage shades.
Choose an ivory or natural cream instead of brilliant optical white. The third color should sit between the two dominant shades: oatmeal, pale mushroom, stone or light beige all work with this layout.
Place the three skeins together in natural daylight before beginning. Artificial indoor light can make sage appear substantially grayer or warmer than it does during the day.
Why the Raised Texture Matters
A three-color striped blanket can look flat when every section uses the same stitch. The raised columns change that without requiring separate panels.
Front-post stitches physically sit above the surrounding fabric. Staggering them between successive texture rows produces broken vertical lines rather than continuous ribs.
The photograph shows this effect most clearly in the sage sections, where pronounced columns run through the broad darker bands. Cream and oatmeal sections use lighter relief so they remain visually distinct.
Care Instructions
Follow the washing directions printed on the yarn label. If the three colors come from different yarn lines, use the most restrictive care instructions among them.
Wash a small three-color swatch before washing the completed blanket if color transfer is a concern.
After washing, arrange the blanket flat and square the corners while damp. Do not aggressively stretch the post-stitch columns.
Store the finished chunky throw folded. Hanging a heavy blanket from one edge for long periods can stretch the upper rows and distort the border.
Conclusion
The raised columns are the measurement to watch when making this sage green textured crochet blanket. Keep the body at 102 stitches, maintain consistent height in every front-post stitch and measure each color section before beginning the next one. Once the body reaches the required length, check all four edges on a flat surface before adding the cream and sage frame. Record the final yarn quantity, gauge and finished dimensions if another version is planned. Save the completed blanket to Pinterest or share the finished texture on Instagram with #SageTexturedCrochetBlanket. For this specific three-color layout, would you keep the oatmeal sections or replace them with cream?









