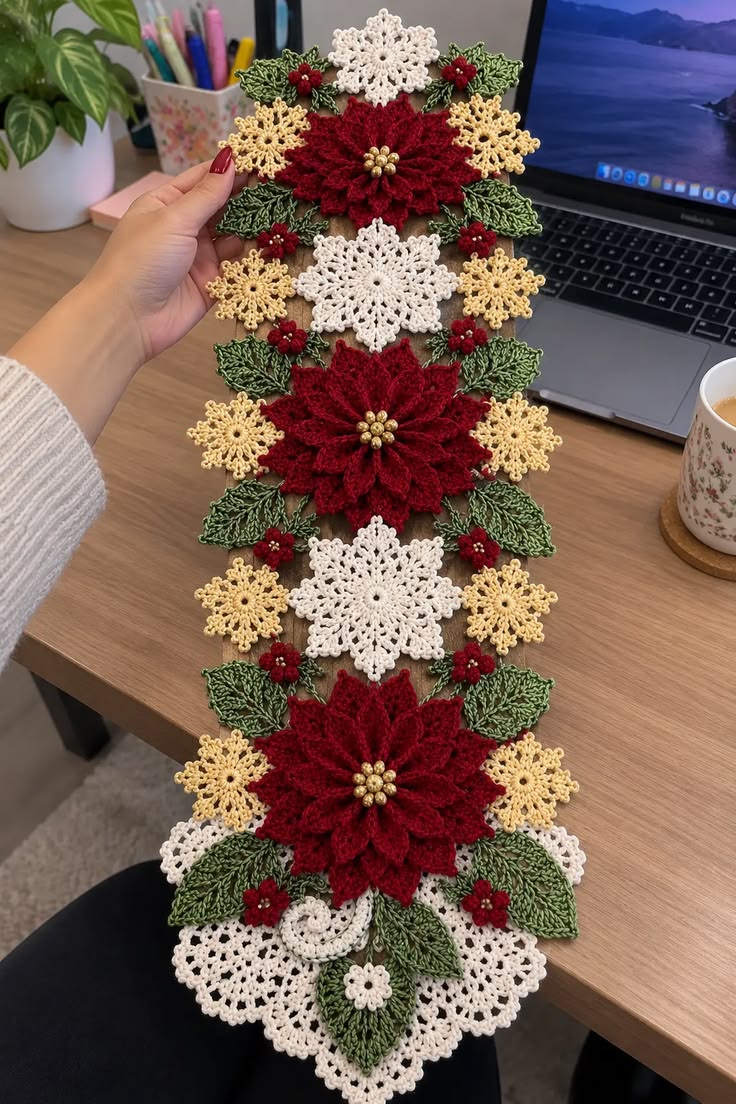
Three dimensional red poinsettias form the spine of this Christmas runner, while white and gold snowflakes fill the spaces between the flowers. This crochet Christmas table runner pattern recreates that distinctive arrangement with layered poinsettias, pointed green leaves, small berry clusters and lace snowflake motifs. The pieces are crocheted individually, blocked, arranged into an elongated composition and joined securely from the back.
The Design: What Makes This Christmas Runner Different
This is not a conventional rectangular runner worked in rows. Its outline is created by individual crochet motifs, so flowers and leaves extend beyond the central axis and produce the decorative open edges visible in the reference image.
Three large burgundy-red poinsettias establish the main vertical line. Large white snowflakes alternate between them, while smaller gold snowflakes occupy the side spaces. Green leaves fill structural gaps and small red berry flowers cover selected joins.
Scale is critical. The poinsettias need to remain larger than every snowflake, while the small gold motifs should function as secondary details. Another important decision is yarn weight: fine cotton gives the snowflakes crisp points, while DK or light worsted yarn provides enough body for the layered flowers and leaves.
Project Info at a Glance
| Skill Level | Time | Finished Size | Hooks | Construction |
|---|---|---|---|---|
| Intermediate | 10–14 hours | Approx. 30 × 100 cm | 2.0 mm and 3.5–4.0 mm | Joined motifs |
The exact finished dimensions depend on motif spacing. Crochet snowflakes made with fine cotton commonly range from approximately 8–11 cm across; published examples include an 8 cm snowflake made with a 2 mm hook and a 10.5 cm version made with a 3 mm hook.
Materials and Tools
Yarn and Thread
- Deep burgundy red — DK or light worsted cotton — approximately 80–100 g
- Leaf green — DK or light worsted cotton — approximately 60–80 g
- White or ivory crochet cotton — approximately 40–50 g
- Pale gold or champagne crochet cotton — approximately 25–35 g
- Red yarn — approximately 10 g reserved for berry motifs
- Gold yarn or embroidery thread — small quantity for flower centers
Published poinsettia patterns commonly use worsted yarn with approximately a 4 mm hook, while lace snowflakes are frequently made from cotton thread with hooks around 1.8–3 mm. Using two yarn thicknesses gives the runner the contrast between substantial flowers and delicate snowflakes visible in the photograph.
Tools
- 3.5–4.0 mm crochet hook for poinsettias and leaves
- 2.0–2.5 mm crochet hook for snowflakes
- Yarn needle
- Embroidery needle
- Scissors
- Blocking pins
- Blocking mat
- Fabric stiffener or starch — optional for snowflakes
Avoid loose beads if the runner will be used where small children can reach it. The gold centers can be embroidered entirely with yarn.
Abbreviations
- MR — magic ring
- ch — chain
- sc — single crochet
- hdc — half double crochet
- dc — double crochet
- tr — treble crochet
- sl st — slip stitch
- sp — space
- st / sts — stitch / stitches
- picot — ch 3, sl st into first ch
Keep slip stitches loose when making snowflakes. Tight joins can pull one arm inward and prevent the motif from blocking symmetrically.
Motif Plan
For a runner approximately 100 cm long, make the following pieces:
- 3 large red poinsettias
- 3 large white snowflakes
- 8 small gold snowflakes
- 14–18 green leaves
- 10–12 small red berry flowers
- 3 gold poinsettia centers
The exact number of leaves and berry clusters can be adjusted after the main motifs have been arranged.
Large Crochet Poinsettia – Make 3
Use deep burgundy DK or light worsted yarn with a 3.5–4.0 mm hook.
The flower consists of two petal layers sewn together. Published poinsettia designs also commonly use separate flower, leaf and center components to create dimensional construction.
Small Petal Layer
R1: Make MR. Work 12 sc into ring. Join with sl st. (12)
R2: *Ch 7. Starting in second ch from hook, sc, hdc, dc, tr, dc, hdc. Sl st into next 2 sts of R1.* Repeat 6 times.
You should have 6 pointed petals.
Fasten off, leaving a 20 cm tail.
Large Petal Layer
R1: Make MR. Work 12 sc into ring. Join. (12)
R2: *Ch 10. Starting in second ch from hook, sc, hdc, dc, dc, tr, tr, dc, hdc, sc. Sl st into next 2 sts of R1.* Repeat 6 times.
You should have 6 large petals.
Fasten off, leaving a 25 cm tail.
Optional Third Petal Layer
For a fuller flower closer to the reference image, make one additional layer.
R1: MR, 12 sc. Join. (12)
R2: *Ch 8. Starting in second ch, sc, hdc, dc, tr, dc, hdc, sc. Sl st into next 2 sts.* Repeat around.
Fasten off.
Poinsettia Assembly
Place the largest petal layer on the bottom.
Rotate the middle layer so its petals sit between those of the lower layer.
Position the smallest layer on top, again offsetting the petals.
Sew through the center only. Do not stitch the petal tips together; they need to remain free to produce the dimensional flower structure.
Gold Poinsettia Center – Make 3
Use gold yarn or embroidery thread.
R1: MR, 6 sc into ring. Join. (6)
R2: Work one small bobble into each stitch around. (6 bobbles)
Fasten off with a long tail.
Sew the gold cluster into the center of the assembled poinsettia.
For a larger center like the reference image, embroider two or three additional French knots between the bobbles.
Large White Snowflake – Make 3
Use white or ivory crochet cotton with a 2.0–2.5 mm hook.
R1: Make MR. Ch 3, dc into ring, ch 3. *2 dc into ring, ch 3.* Repeat until six groups have been formed. Join with sl st.
R2: Sl st into first ch-3 sp. Ch 3, 3 dc into same sp, ch 3. *4 dc into next ch-3 sp, ch 3.* Repeat around. Join.
R3: Sl st to the center of the first dc group. Into each ch-3 space work: (ch 3, sl st), (ch 5, sl st), (ch 7, sl st), (ch 5, sl st), (ch 3, sl st).
Repeat the point sequence in all six spaces.
Fasten off and weave in the ends.
This three-round construction follows standard six-point snowflake geometry. A published cotton snowflake using a 2 mm hook likewise begins with six sections around a central ring and develops the points in three rounds.
Blocking the White Snowflakes
Blocking is required if the snowflake points curl or lean to one side.
Dampen the finished motif.
Place it on a blocking mat and pin the six primary points at equal distances from the center.
Pin the smaller side points only after the six main arms are symmetrical.
Allow the snowflake to dry completely before removing the pins.
A small amount of fabric stiffener can be used when additional structure is required. Cotton thread generally holds blocked snowflake points more clearly than soft acrylic.
Small Gold Snowflake – Make 8
Use pale gold crochet cotton with a 2.0 mm hook.
R1: MR. Ch 3, dc, ch 2. *2 dc, ch 2.* Repeat five more times. Join.
R2: Sl st into first ch-2 sp. Into the space work: sc, ch 5, sl st into first ch, sc, ch 7, sl st into first ch, sc, ch 5, sl st into first ch, sc.
Repeat in each of the remaining five spaces.
Fasten off.
Block the six points evenly.
The small gold snowflakes should finish smaller than the white motifs. If both versions come out nearly identical in diameter, reduce the gold hook size by 0.25–0.5 mm.
Pointed Green Leaf – Make 14–18
Use green DK or light worsted yarn with a 3.5 mm hook.
Ch 13.
Starting in second ch from hook:
Side 1: Sl st, sc, hdc, dc in next 5 ch, hdc, sc, sl st.
Work 3 sc into the final chain.
Continue along the opposite side of the foundation chain.
Side 2: Sl st, sc, hdc, dc in next 5 sts, hdc, sc, sl st.
Join at the base.
Vein: Surface sl st from the leaf base toward the tip along the foundation chain.
Fasten off with a 20 cm sewing tail.
The center surface stitches give the leaf a visible vein and help it hold the pointed shape seen around the poinsettias.
Large Green Leaf – Optional
Use these around the lowest poinsettia where the foliage is more substantial.
Ch 16.
Starting in second ch: sl st, sc, hdc, dc in next 8 ch, hdc in next 2 ch, sc, sl st.
Work 3 sc into the end chain.
Mirror the same stitch sequence along the opposite side.
Surface sl st along the center vein.
Fasten off.
Small Red Berry Flower – Make 10–12
Use burgundy yarn and a 3–3.5 mm hook.
R1: MR, 5 sc. Join. (5)
R2: *Sl st in next st, ch 3, 2 dc into same st, ch 3, sl st into same st.* Repeat in each stitch around.
Fasten off.
Add three small gold French knots to the center.
These motifs should remain approximately 2–3 cm across. They function as fillers between leaves and snowflakes rather than as primary flowers.
Optional Crochet Berry Cluster
For a more dimensional detail, replace selected small flowers with three crocheted berries.
Berry: MR, 6 sc. Join.
R2: Sc around. (6)
Insert a tiny amount of yarn scrap into the center.
R3: Work 3 decreases. (3)
Fasten off and close.
Make three berries and sew them together at their bases.
Bottom Lace Medallion
The lower end of the reference runner expands into a larger white lace section. Make one oversized snowflake or medallion to reproduce that finish.
R1: MR. Work 12 dc separated by ch 1. Join.
R2: Sl st into first ch-1 sp. Work 2 dc, ch 2, 2 dc in each space around. Join.
R3: In each ch-2 space work: sc, ch 5, sc, ch 7, sc, ch 5, sc.
R4: Sl st to first ch-5 loop. Work 7 dc into each large outer loop, placing ch 3 between groups.
R5: Work decorative picots across each outer group: *sc, ch 3, sl st into first ch*. Repeat evenly around.
Fasten off and block into a circular or slightly oval shape.
Planning the Runner Layout
Do not sew motifs together immediately after crocheting them.
Block every white and gold snowflake first. Shape the poinsettia petals with your fingers and flatten the leaves lightly.
Then arrange the motifs on a table or blocking mat.
Use this sequence from top to bottom:
- Small white snowflake or lace motif
- Large red poinsettia
- Large white snowflake
- Large red poinsettia
- Large white snowflake
- Large red poinsettia
- Large white lace medallion
Place pairs of gold snowflakes to the left and right of the central line. Fill the remaining spaces with green leaves and red berry flowers.
Joining the Motifs
The runner needs enough attachment points to lift as one piece without turning into a rigid mat.
Thread a yarn needle with matching green, cream or burgundy yarn depending on the motifs being connected.
Join neighboring pieces at two or three discreet points.
For example, connect a poinsettia petal to the base of a leaf rather than sewing an entire petal edge down. Connect snowflakes at their side points or inner chain spaces.
Work mainly from the back of the runner so joining stitches remain hidden.
After each major section is connected, lift the runner by both ends. If a motif folds away from the composition, add one more attachment point.
Assembly
- Block all white and gold snowflakes before arranging the runner.
- Stack and sew the petal layers of each red poinsettia, rotating the layers so the points alternate.
- Attach one gold center securely to each poinsettia.
- Place the three poinsettias along the central vertical axis and measure the spacing between them.
- Position the large white snowflakes between the poinsettias without allowing their main points to disappear beneath the flowers.
- Add pairs of small gold snowflakes along the outer sides of the arrangement.
- Position green leaves beneath poinsettia petals and between snowflake points to cover structural gaps.
- Add the small red berry flowers where three motifs meet or where a visible open area remains.
- Sew neighboring motifs together from the back at two or three points, working from the center toward both ends.
- Lay the completed runner flat, correct any twisted snowflake points and confirm that the finished outline remains approximately 30 × 100 cm.
The completed runner should form one flexible decorative piece with three dominant poinsettias, alternating white snowflakes, smaller gold motifs and green foliage.
7 Technical Tips for a Better Christmas Table Runner
- Block every snowflake before assembly. A difference of 5–10 mm between arms becomes obvious when motifs are positioned beside straight poinsettia petals. Pin the six primary points first and allow the cotton to dry completely.
- Keep the poinsettia centers compact. A center wider than approximately 2.5 cm hides too much of the inner petal layer. Attach gold knots or bobbles only inside the central ring.
- Do not over-sew the petals. Stitching a complete petal edge to the runner removes the dimensional effect. Use one hidden attachment near the petal base and another only when stability requires it.
- Check the central axis. Three flowers positioned even 2 cm off line can make a long runner appear curved. Place a measuring tape through the center of all major motifs before joining them.
- Control leaf direction. Leaves attached parallel to every flower produce a rigid repeated pattern. Angle paired leaves approximately 30–45 degrees away from the central line.
- Match the gold snowflakes. Small motifs made at different tension can vary visibly in diameter. Measure the first finished snowflake and use it as the size template for the remaining seven.
- Secure every joining tail. A motif runner is handled by its joins whenever it is moved. Weave each tail through at least 4–5 cm of crochet fabric, reverse direction and pass through a second section before trimming.
How to Make the Runner Longer
The modular construction makes length adjustment simple. Add another white snowflake and poinsettia section before the final lace medallion.
One additional flower section adds approximately 25–30 cm depending on motif size and spacing.
Maintain the established sequence rather than placing two large poinsettias directly beside each other. A white motif between the red flowers keeps the design visually separated.
How to Make a Shorter Centerpiece
For a dining-table centerpiece measuring approximately 60–70 cm, use two large poinsettias instead of three.
Place one white snowflake between them and another at each end. Add four small gold snowflakes and approximately eight leaves.
Keep the poinsettia and snowflake dimensions unchanged. Reducing motif size as well as motif count can make the finished arrangement look disproportionately delicate.
Choosing Yarn for the Flowers and Snowflakes
Cotton is particularly useful for the snowflakes because it responds well to blocking and optional starch. Published snowflake patterns commonly use cotton thread with hooks from approximately 1.25–3 mm, producing motifs from about 2.5 cm to more than 10 cm depending on thread size.
The poinsettias require more body. Worsted-weight poinsettia patterns commonly use hooks around 4 mm, although finer thread can be used for highly detailed botanical versions.
For this runner, using heavier yarn for the flowers and finer cotton for the snowflakes creates the most useful contrast. Keep the leaves close to the poinsettia yarn weight so they can support the larger motifs visually.
Color Placement
Use a dark red rather than bright scarlet if you want the runner to stay close to the reference image. Burgundy, wine and cranberry shades all create sufficient contrast against cream.
The leaves should use a medium or dark botanical green. Variegated green thread can also reproduce the mottled appearance visible in the photograph.
Choose warm ivory for the large snowflakes and pale champagne or muted gold for the smaller motifs. The two light colors need enough difference to remain identifiable when placed beside each other.
Blocking and Final Shaping
After all motifs have been joined, place the entire runner on a large flat surface.
Do not stretch the poinsettias. Shape each red petal individually with your fingers.
Pin the outer points of the white and gold snowflakes only where they have shifted during assembly.
Arrange paired leaves so their tips point away from the central flowers.
If cotton snowflakes need additional stiffness, apply fabric stiffener to those motifs only. Avoid saturating the poinsettias because the dimensional petals should remain flexible.
Allow the runner to dry completely before moving it.
Care Instructions
Hand washing is the safest option for a runner combining several yarn weights and dimensional motifs. Use cool water and avoid twisting the flowers.
Press excess water out between towels instead of wringing the runner.
Dry flat and reshape every poinsettia, leaf and snowflake while damp.
Store the runner flat or loosely rolled. Folding directly through a starched snowflake can create a permanent crease at one of its points.
Conclusion
The scale hierarchy is the key measurement in this crochet Christmas table runner pattern: large red poinsettias first, white snowflakes second, then smaller gold snowflakes, leaves and berry flowers. Crochet and block every motif before making permanent joins, then establish the central flower line before filling the side spaces. For the next step, make one poinsettia and one white snowflake as test motifs and compare their diameters before producing the full set. Pin the completed runner to a Christmas crochet board on Pinterest or share the finished arrangement on Instagram with #PoinsettiaSnowflakeRunner. Would you keep the small snowflakes champagne gold, or make them white to match the larger motifs? “`0









