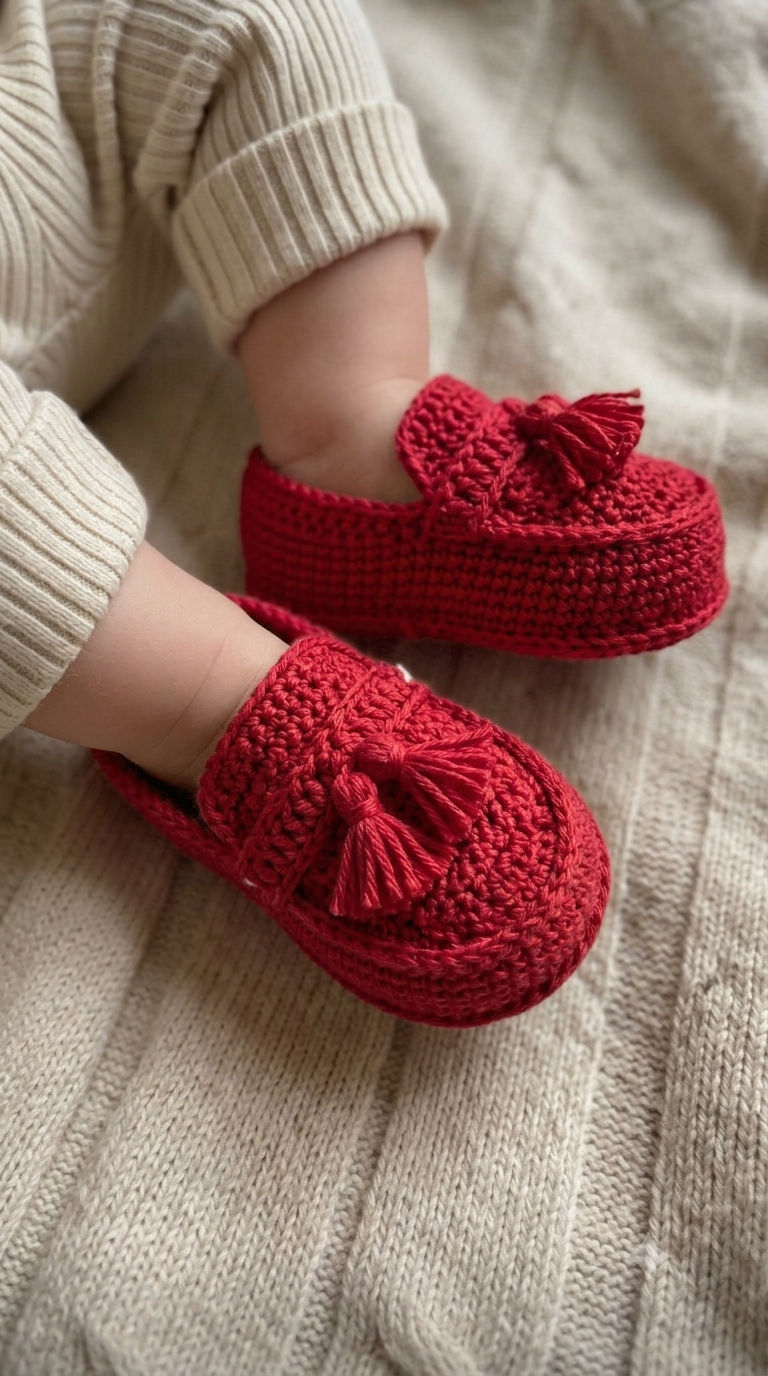
A tassel loafer needs a broad toe, low heel opening, and separate vamp or tongue to look like a miniature shoe rather than a sock. This red crochet baby loafers pattern recreates those details with a structured oval sole, dense single crochet sides, a shaped front panel, and two matching tassels. The pattern uses worsted-weight cotton yarn and a 3.75 mm crochet hook and is sized for approximately 3–6 months.
The Design: What Makes These Crochet Baby Loafers Different
The shape depends on three separate structural areas: the sole, sidewall, and vamp. The sole is worked around a foundation chain so increases can be concentrated at the toe and heel. This produces an elongated footprint instead of the circular base normally used for amigurumi.
The upper begins directly around the sole. Keeping the first sidewall round in the back loops creates a visible edge and makes the shoe turn upward more sharply. A separate front panel then covers the toes while preserving the open loafer-style heel.
The final detail is the pair of yarn tassels attached to the vamp. They should remain small in relation to the shoe. Oversized tassels can hide the stitch definition of the front panel and make the toe look disproportionately short.
Project Info at a Glance
| Skill Level | Time | Finished Sole | Hook | Best For |
|---|---|---|---|---|
| Intermediate | 3–5 hours | Approx. 10.2 cm / 4 in | 3.75 mm (F) | 3–6 months / pre-walking use |
Published crochet baby loafer patterns commonly place a 3–6 month sole at approximately 4 inches (10.2 cm). Finished measurements can change with yarn, hook size, and individual tension, so measure the sole before beginning the upper.
Materials and Tools
Yarn
- Deep red or crimson — medium/worsted weight cotton yarn — approximately 25–30 g for one pair.
- Deep red or crimson — approximately 2–3 g reserved for the tassels.
A firm cotton or cotton-rich yarn is useful here because the stitches need enough definition to maintain the loafer silhouette. Medium worsted cotton is also used in published baby-loafer patterns.
Tools
- 3.75 mm (F) crochet hook
- Yarn needle
- Stitch markers
- Sharp scissors
- Measuring tape
- Rustproof pins for positioning the vamp
Important: These crocheted loafers are intended as soft pre-walking footwear or a photo prop. They do not provide the structure, traction, or protection of walking shoes. Tassels and other attached components should be secured firmly and inspected before use.
Abbreviations
- ch — chain
- sc — single crochet
- hdc — half double crochet
- dc — double crochet
- inc — 2 stitches worked into the same stitch
- dec — decrease
- sl st — slip stitch
- BLO — back loop only
- st / sts — stitch / stitches
For an invisible single-crochet decrease, insert the hook through the front loop of each of the next two stitches, yarn over and draw through the two front loops, then complete one single crochet.
Red Crochet Baby Loafers Pattern – Step by Step
Size: Approximately 3–6 months.
Target sole length: Approximately 10.2 cm / 4 inches.
Make two identical shoes. Check the sole measurement after the foundation rounds because differences in tension can change the final size.
Sole – Make 2
Yarn: deep red worsted-weight cotton.
Foundation: Ch 11.
R1: Work 4 sc in the second ch from hook. Sc in next 4 ch, hdc in next ch, dc in next 3 ch. Work 7 dc in final ch. Continue along the opposite side of the foundation chain: dc in next 3 ch, hdc in next ch, sc in next 4 ch. Join with sl st. (27)
R2: Ch 1. Work 2 sc in each of next 4 sts, sc in next 9 sts, 2 sc in each of next 5 sts, sc in next 9 sts. Join with sl st. (36)
R3: Ch 1. Sc in first st. Repeat [sc, 2 sc in next st] 3 times. Sc across the long side toward the toe. Space five increases evenly around the toe curve, then sc along the opposite side and distribute the remaining shaping around the heel. Join with sl st.
Measure the sole at this stage. The target is approximately 10.2 cm from heel to toe. If it is substantially larger or smaller, change hook size before continuing rather than trying to correct the fit in the upper.
Sidewall – Make 2
The sidewall turns the flat sole into the shoe body.
R1: Working BLO, sc evenly around the entire sole. Join with sl st.
R2: Ch 1, sc in every st around. Join.
R3: Ch 1, sc around, keeping the heel stitches unchanged and beginning decreases across the front third of the shoe. Join.
R4: Sc around to the toe section. Work evenly spaced decreases across the front 10–12 sts, then sc around the heel. Join.
R5: Repeat the toe shaping with fewer decreases so the front begins to curve inward without tightening the heel opening.
R6: Sc evenly around. Join and fasten off.
The finished sidewall should stand upright while the heel remains low enough for the baby’s foot to enter the shoe.
Vamp / Front Panel – Make 2
Yarn: deep red.
Row 1: Ch 7. Starting in second ch from hook, sc across. (6)
Row 2: Ch 1, turn. Inc, sc in next 4 sts, inc. (8)
Row 3: Ch 1, turn. Sc across. (8)
Row 4: Ch 1, turn. Inc, sc in next 6 sts, inc. (10)
Rows 5–8: Ch 1, turn. Sc across. (10)
Row 9: Ch 1, turn. Dec, sc in next 6 sts, dec. (8)
Rows 10–11: Ch 1, turn. Sc across. (8)
Do not fasten off immediately. Work one round of sc evenly around the outside edge of the panel, placing additional stitches at the corners when required to prevent curling.
Fasten off and leave approximately a 30 cm tail for sewing.
Decorative Loafer Band – Make 2
Yarn: deep red.
Foundation: Ch 11.
Row 1: Starting in second ch from hook, sc across. (10)
Row 2: Ch 1, turn, sc across. (10)
Fasten off, leaving a 20 cm sewing tail.
Lay the strip horizontally across the upper section of the vamp. Sew only the short ends to the vamp so the center remains slightly raised.
Tassels – Make 4
Cut a piece of cardboard approximately 2.5 cm wide.
Wrap the red yarn around the cardboard 10–12 times. Thread a separate strand beneath the wraps at one end and knot it tightly.
Remove the bundle from the cardboard. Tie another strand approximately 5–7 mm below the top knot to form the tassel neck.
Cut through the loops at the bottom and trim the strands so the finished tassel measures approximately 2 cm.
Make four matching tassels.
Attach two tassels to the center of each loafer band. Stitch through the tassel head several times rather than attaching it only by the hanging strand.
Heel Opening
The reference design has a low, open heel rather than a tall bootie cuff. If the opening stretches excessively after the vamp has been attached, work one finishing round of slip stitches around the heel portion only.
Do not tighten this round enough to reduce the opening significantly. Its function is to stabilize the edge.
Assembly
- Place each sole flat and confirm that both pieces have the same heel-to-toe measurement.
- Shape each sidewall with your fingers so the BLO transition sits directly above the sole edge.
- Center the vamp over the front of the shoe. The center line of the panel must align with the center of the toe.
- Pin the curved front and side edges of the vamp before sewing. Check both shoes together before making permanent stitches.
- Sew the vamp to the sidewall with matching yarn, catching the inner loops where possible so the seam remains less visible.
- Leave the upper portion of the vamp free enough to preserve the loafer opening.
- Position the narrow decorative band horizontally across the front panel and stitch down its two ends.
- Attach two matching tassels near the center of each band. Secure every attachment point with several passes of yarn.
- Weave yarn tails through multiple stitches on the inside of the shoe, change direction, and weave back through the fabric before trimming.
- Place both loafers side by side and compare sole length, vamp height, tassel position, and heel-opening width.
The completed pair should have matching oval soles, low heel openings, centered front panels, and two tassels on each shoe.
7 Technical Tips for Better Crochet Baby Loafers
- Mark the toe center. Put a stitch marker at the center front of each sole before beginning the upper. A vamp positioned even two or three stitches off center can make one loafer appear twisted.
- Measure the sole before building the upper. For this version, aim for approximately 10.2 cm. Correct an inaccurate sole with a different hook size instead of adding random stitches to the sidewall.
- Control the BLO transition. Accidentally catching both loops in the first upper round weakens the visible sole edge. Check each stitch while working the first sidewall round.
- Keep toe decreases symmetrical. Uneven decreases pull the toe toward one side. Mark the center stitch and distribute shaping equally to its left and right.
- Pin the vamp before sewing. A front panel sewn directly into place can shift during the first few stitches. Use at least three pins: one at the center toe and one on each side.
- Keep the tassels near 2 cm long. Longer tassels can extend over the toe and obscure the loafer band. Trim all four together so the pair remains visually balanced.
- Secure every yarn tail. A short tail woven in only one direction can pull free during handling. Weave through several stitches, reverse direction, and pass through the fabric again before cutting.
Adjusting the Size
Baby shoe sizing should be based on actual foot length whenever possible rather than age alone. Published patterns use different age ranges and gauges, so two patterns labeled 3–6 months may not produce identical shoes.
For a smaller loafer, use a shorter foundation chain or a slightly smaller hook while maintaining the same basic construction. For a larger size, lengthen the sole first and then distribute the extra upper stitches along the straight sides rather than concentrating them at the toe.
Do not scale only the vamp. The sole, sidewall, front panel, and heel opening need to change together for the proportions to remain consistent.
Yarn Selection and Gauge
Worsted-weight yarn works well for this structure because it produces a relatively dense fabric with a 3.5–3.75 mm hook. Published baby-shoe and loafer patterns also commonly pair medium/worsted yarn with hooks in this range.
Cotton gives the sole and vamp more visible stitch definition. A very soft or loosely spun yarn may produce a more flexible shoe, but the front panel can lose some of its loafer shape.
Gauge matters most at the sole. If the sole is already too long after the shaping rounds, the completed shoe will also be too large. Measure early.
Making the Tassels Match
The tassels are small, but inconsistent lengths are easy to see when the shoes are placed together. Wrap each tassel around the same cardboard template and use the same number of wraps.
After all four are assembled, hold them together by their top knots and trim the lower edges at the same time. Attach them only after the vamp and decorative band have been sewn to the shoe. This keeps the tassels away from the structural seams and makes their final position easier to control.
Care Instructions
Follow the washing instructions supplied with the yarn. For cotton or cotton-blend yarn, gentle hand washing is usually the least disruptive option for maintaining the shape of a small structured crochet item.
Reshape the sole, toe, vamp, and heel while damp and allow the loafers to dry flat. Check the tassels after washing and separate the strands with your fingers if they have compressed.
Before each use, inspect the tassels and decorative band for loose yarn. These loafers contain attached decorative components and should not be treated as protective footwear.
Conclusion
The defining feature of this red crochet baby loafers pattern is the construction sequence: shape the oval sole first, raise a compact sidewall, center the separate vamp, and add the band and tassels only after the shoe structure is stable. Make the second loafer alongside the first whenever possible so measurements can be compared before seams are finished. After completing the pair, photograph the shoes from directly above to check whether the vamps and tassels are symmetrical. Save the finished project to Pinterest or share it on Instagram with #RedTasselBabyLoafers. For the next pair, would you keep all four tassels red or use a contrasting color?









