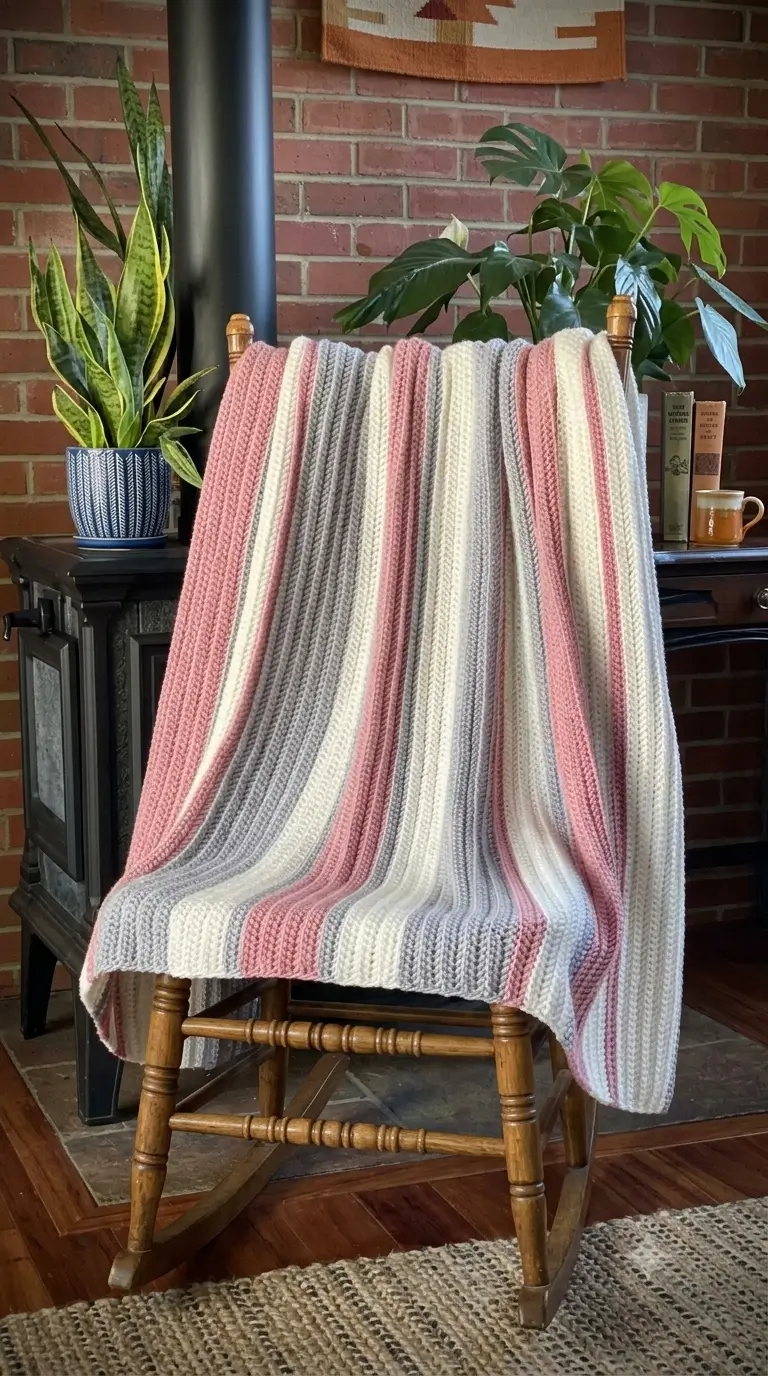
Three unequal dusty-pink bands interrupt the gray and cream ribs before the blanket reaches its opposite edge. This striped crochet blanket pattern recreates that specific vertical layout with worsted yarn, a 5.5 mm hook and a target size near 127 × 168 cm. The skill level is easy. Lengthwise construction makes the stripe widths adjustable without sewing separate panels, which is useful when matching a room palette or available yarn.
The Design: What Makes This Ribbed Blanket Different
The dominant design decision is direction. Instead of crocheting across the blanket’s width and building horizontal bands, the rows run along its long dimension. Each completed row therefore becomes part of a vertical stripe.
Back-loop-only single crochet supplies the second structural feature. Leaving the front loop unworked forms a ridge between rows, producing the corded surface visible in the reference photograph. A ribbed crochet blanket also gains useful flexibility across its width.
Third, the color sequence deliberately avoids equal bands. Cream and gray occupy broad sections while dusty pink appears as both broad and narrow interruptions. That irregular distribution gives this vertical stripe crochet blanket a closer visual relationship to the photograph.
A common mistake is measuring stripe width by row count alone. BLO fabric can contract considerably, so measure the relaxed fabric rather than assuming ten rows always equal the same number of centimeters.
Project Info at a Glance
| Skill Level | Time | Finished Size | Hook | Best For |
|---|---|---|---|---|
| Easy | Approx. 18–25 hours | 127 × 168 cm | 5.5 mm | Sofa throw / bed accent |
The target dimensions produce a practical rectangular throw while retaining the long vertical proportions visible in the reference blanket.
Materials and Tools
Yarn
Use worsted or Aran-weight yarn with similar meterage across all three colors. Keeping the same yarn line for each shade helps maintain consistent gauge when changing colors.
- Dusty pink — worsted/Aran — approximately 450–500 g
- Light gray — worsted/Aran — approximately 550–600 g
- Ivory/cream — worsted/Aran — approximately 550–600 g
Plan for approximately 1,500–1,700 g of yarn in total. Actual consumption changes with fiber, meterage, personal tension and final dimensions, so compare meterage rather than grams when substituting yarn.
Tools
- 5.5 mm crochet hook
- Scissors
- Tapestry needle
- Locking stitch markers
- Flexible measuring tape
Abbreviations
- ch — chain
- sc — single crochet
- BLO — back loop only
- st/sts — stitch/stitches
- RS — right side
- WS — wrong side
BLO means inserting the hook beneath only the back loop of the stitch. The unused front loop remains visible on the surface and forms the raised horizontal ridge that becomes vertical when the finished blanket is positioned normally.
Gauge and Finished Size
The target finished measurement is approximately 127 cm wide × 168 cm long.
Make a test swatch before beginning the full blanket. A useful starting gauge for worsted yarn and a 5.5 mm hook is approximately 14 single crochet stitches per 10 cm, but the actual measurement of your fabric takes priority over this figure.
The ribbing affects width considerably. Measure the swatch while it lies naturally on a flat surface. Do not pull the ribs apart while measuring.
Striped Crochet Blanket Pattern — Step by Step
This blanket is worked flat in rows rather than rounds. The rows run along the full length of the blanket, which causes the color changes to appear as vertical stripes when the finished piece is positioned on a chair, sofa or bed.
Foundation
Use dusty pink yarn.
Make a foundation chain long enough to measure approximately 168 cm without stretching.
For a gauge close to 14 stitches per 10 cm, approximately 236 chains provides a useful starting point. Treat this number as adjustable because yarn thickness and individual tension can alter the finished length.
Row 1: Sc in second ch from hook and in every ch across. Ch 1, turn.
Count the stitches after completing Row 1. Write down that number because every subsequent row must contain the same number of stitches.
Ribbed Row
Row 2: Sc BLO in every st across. Ch 1, turn.
Repeat Row 2 throughout the entire blanket.
The turning chain does not count as a stitch. Place a locking stitch marker in the first and final working stitch if either edge begins changing shape.
Working every row through the back loop creates the pronounced ribbed structure. Because the blanket is constructed lengthwise, those ridges become the long vertical lines visible across the finished throw.
Pink, Gray and Cream Stripe Sequence
The photographed blanket does not use a rigid sequence of identical stripes. Wide neutral sections are interrupted by both narrow and medium dusty-pink bands. The following arrangement recreates that irregular appearance.
Stripe 1 — Dusty Pink: 10 rows
Stripe 2 — Cream: 4 rows
Stripe 3 — Dusty Pink: 4 rows
Stripe 4 — Cream: 6 rows
Stripe 5 — Light Gray: 18 rows
Stripe 6 — Cream: 5 rows
Stripe 7 — Dusty Pink: 9 rows
Stripe 8 — Light Gray: 6 rows
Stripe 9 — Cream: 14 rows
Stripe 10 — Light Gray: 7 rows
Stripe 11 — Cream: 7 rows
Stripe 12 — Dusty Pink: 4 rows
Stripe 13 — Light Gray: 11 rows
Stripe 14 — Cream: 10 rows
Stripe 15 — Dusty Pink: 5 rows
Stripe 16 — Cream: 12 rows
Stripe 17 — Light Gray: 7 rows
After completing the sequence, place the blanket on a flat surface and measure across the ribbing.
If the width is less than 127 cm, continue the established color balance rather than repeating the entire sequence mechanically. Add a medium gray band, a narrow cream section and a narrow dusty-pink stripe, then finish with cream or gray until the required width is reached.
The physical measurement takes priority over the total number of rows. Back-loop single crochet compresses differently according to yarn fiber and tension, so two blankets containing the same number of rows can finish at different widths.
How to Change Colors
Work the final single crochet of the current stripe until two loops remain on the hook.
Drop the current color. Place the new color over the hook and pull it through both remaining loops. The final stitch is now completed with the incoming color.
Ch 1 and turn. Continue in BLO with the new shade.
If a color will return after only a small number of rows, carry the unused strand loosely along the side edge. Do not pull the carried strand tight.
For wider sections, cut the previous color and leave approximately a 15 cm tail. That length provides enough yarn for secure weaving during finishing.
Keeping the Blanket Edges Straight
Long crochet rows amplify small counting errors. Missing one stitch may not look significant at first, but repeated mistakes gradually produce a diagonal side.
Insert a locking stitch marker into the first working stitch of each row. Place another marker into the final stitch.
Move both markers as you crochet.
Count the row periodically rather than waiting until the blanket is nearly finished. The stitch total established after Row 1 should remain unchanged from the first stripe to the last.
Also check the side edge every few stripes. Lay the work down without stretching it. A straight edge should remain flat rather than curving inward around the color changes.
Optional Simple Crochet Border
The reference blanket has a restrained finish, so a thick decorative border is unnecessary. Leaving the ribbed edges exposed also keeps attention on the vertical stripe structure.
If the side edges need correction, add one round of single crochet.
Join the final color at one corner.
Work approximately one sc into each row end along the first side. Place 3 sc into the corner.
Continue with one sc in each stitch across the long edge.
Work 3 sc into the next corner and continue around the remaining sides in the same manner.
Join with a slip stitch to the first sc.
Fasten off and leave a 15 cm tail.
Finishing the Blanket
- Lay the completed blanket on a large flat surface without stretching the ribbing.
- Check that the foundation edge and final edge remain approximately parallel.
- Measure the length along the left side, center and right side.
- Measure the width across the top, middle and bottom.
- Correct any tight carried strands before securing the yarn tails.
- Thread each loose end onto a tapestry needle.
- Weave the yarn through matching-color stitches and reverse direction at least once.
- Trim the ends only after checking that they remain secure under light tension.
- Block the blanket according to the care instructions supplied with the chosen yarn.
- Allow the fabric to return to its normal dimensions before taking the final measurement.
The completed blanket forms one rectangular piece with continuous vertical ribbing and irregular dusty-pink, cream and light-gray stripes.
7 Technical Tips for Better Ribbed Stripes
- Prevent missing edge stitches. Put locking markers into the first and last stitch of every row. Repeatedly losing even one stitch causes a long blanket edge to angle inward.
- Check the foundation chain before Row 10. Compare the foundation edge with the developing fabric. If it is more than approximately 2 cm shorter than the fabric beside it, remake the chain with a hook 0.5–1 mm larger.
- Do not stretch the ribbing while measuring. BLO fabric expands when pulled sideways. Measuring it under tension can result in a finished blanket that becomes several centimeters narrower once released.
- Complete color changes on the final pull-through. Changing yarn only after completing the previous stitch creates a visible color bump at the edge. Pull the incoming color through the final two loops instead.
- Watch carried-yarn tension. The unused strand should follow the edge without pulling it inward. A tight carried strand can create puckering even when every row has the correct stitch count.
- Measure stripe width as well as counting rows. Two 10-row sections can have slightly different widths when tension changes. Check the relaxed measurement after every major stripe.
- Secure yarn tails through at least 5 cm of fabric. Reverse the weaving direction once before trimming. Short tails positioned directly beside a color change are more likely to work loose during washing.
Adjusting the Blanket Size
The construction makes resizing relatively simple because length and width are controlled independently.
To make the blanket longer or shorter, change the foundation-chain length. Measure the chain while it lies relaxed and stop when it reaches the required blanket length.
To make the blanket wider or narrower, change the total number of BLO rows. Continue adding stripes until the relaxed fabric reaches the required width.
For a baby blanket, reduce both dimensions and retain the same proportional mixture of wide neutral stripes and narrow pink accents.
For a larger bed throw, extend the foundation first and then add additional gray, cream and dusty-pink sections until the width matches the intended mattress or bed layout.
Keep the stripe widths irregular when resizing. Equalizing every band changes the defining visual feature of this design.
Choosing Yarn Colors
Dusty pink functions as the accent rather than the dominant shade. Light gray provides the strongest neutral contrast, while cream separates sections that might otherwise merge visually.
For a close interpretation of the photographed blanket, choose a muted pink rather than a highly saturated rose. Pair it with a medium-light cool gray and an ivory or warm white.
The same stripe structure can also be worked with different palettes. Sage, cream and taupe produce a neutral version; navy, gray and white create stronger contrast. Keep one color visually dominant and another relatively limited if you want to retain the uneven three-color structure.
Final Pattern Notes
Measure a 20-row BLO swatch before purchasing the full yarn quantity. Its relaxed dimensions provide a more reliable estimate of final yarn requirements and blanket width than a generic row gauge.
Arrange the dusty-pink, light-gray and cream skeins in the intended sequence before beginning. Photograph the order so the stripe plan remains available throughout the project.
For the closest match to the reference image, keep the ribs vertical and avoid converting every section into an identical stripe width. The combination of long ribbing, broad neutral areas and narrow dusty-pink interruptions defines this striped crochet blanket pattern.
Save the finished blanket to Pinterest or share your version on Instagram with #PinkGrayRibbedBlanket. Which part of this specific color layout would you change first: the width of the dusty-pink bands or the balance between gray and cream?









