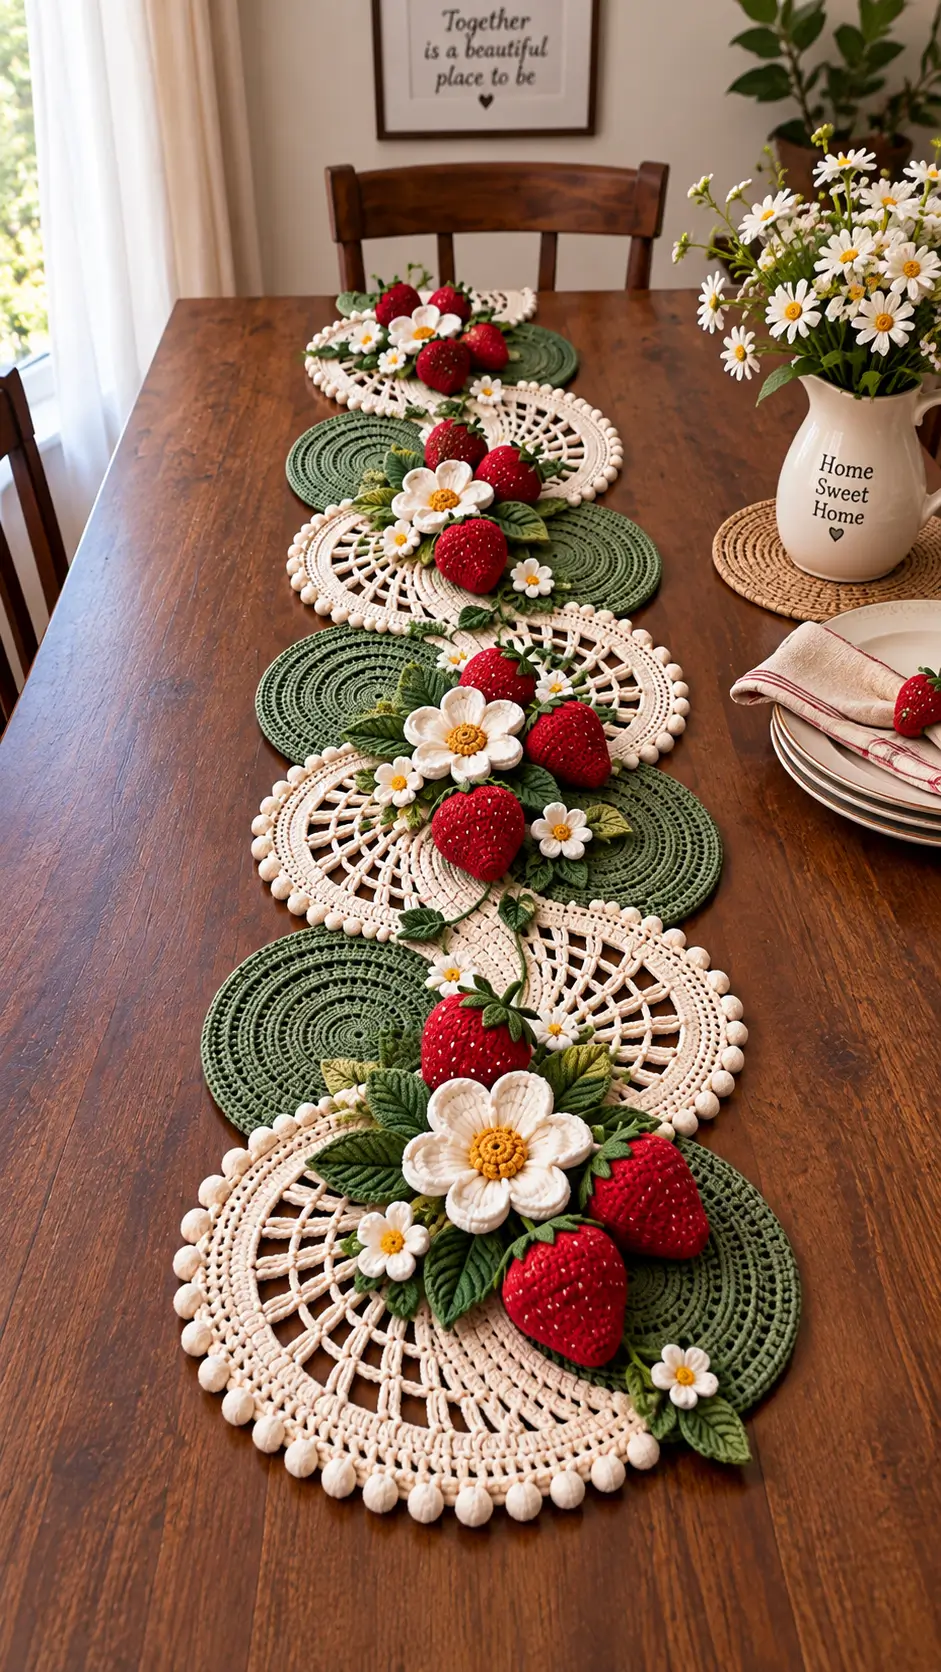
A strawberry has to widen from a pointed base without turning into a red ball. This strawberry amigurumi crochet pattern uses worsted yarn, a 4 mm hook and a 36-stitch body to produce an approximately 10–11 cm berry suited to intermediate beginners. Add a five-point calyx, embroidered seeds, leaves and flowers to build the botanical table decoration shown in the reference rather than a character-style fruit.
The Design: What Makes This Strawberry Different
The berry starts at its lower point and expands gradually, keeping the first increase rounds separated by plain rounds so the lower third remains tapered. A 36-stitch plateau supplies enough circumference for firm stuffing without producing the spherical profile common in generic crochet fruit.
The calyx is deliberately flatter than the body. Its five points spread across the berry’s upper curve and visually connect the red fruit to the surrounding foliage. Separate leaves and flowers turn the crochet strawberry pattern into a modular table-decoration system rather than a stand-alone plush.
Another structural decision is the absence of a face. Although character-style crochet strawberry amigurumi patterns commonly use safety eyes, the photographed berries rely on seed embroidery and botanical detailing. A frequent error is overstuffing the lower point; that rounds off the taper and makes the fruit resemble an apple.
Project Info at a Glance
| Skill Level | Time | Finished Size | Hook | Best For |
|---|---|---|---|---|
| Intermediate beginner | 1–2 hours per berry cluster | Approx. 10–11 cm berry | 4.0 mm | Table décor, garlands, centerpieces |
Published reference patterns report strawberries around 10.5 cm and 11.4 cm when worked at comparable larger amigurumi scales.
Materials and Tools
Yarn
- Strawberry red — medium/worsted weight — approximately 15 g per berry — smooth cotton, cotton blend or acrylic with firm stitch definition.
- Leaf green — medium/worsted weight — approximately 3 g per berry plus additional yarn for separate leaves.
- Cream/white — medium or DK — approximately 10–15 g for a flower cluster.
- Golden yellow — DK or worsted scraps — approximately 2–3 g for flower centers.
- Cream — optional larger quantity for the surrounding lace runner.
- White or pale yellow — scrap yarn for embroidered strawberry seeds.
Tools
- 4.0 mm crochet hook
- Polyester stuffing
- Yarn needle
- Removable stitch markers
- Scissors
- Pins
No safety eyes are required for this face-free botanical design.
Abbreviations
- MR — magic ring
- sc — single crochet
- inc — 2 sc in one stitch
- dec — invisible decrease
- sl st — slip stitch
- ch — chain
- BLO — back loop only
- hdc — half double crochet
- dc — double crochet
- tr — treble crochet
- st/sts — stitch/stitches
For an invisible decrease, insert the hook through the front loops of the next two stitches, draw up a loop, then complete one single crochet through the remaining loops.
Pattern — Step by Step
Work the berry in a continuous spiral unless a section says otherwise. Place a stitch marker in the first stitch of each round and move it upward as you work.
Berry Body
Yarn: strawberry red. The berry uses a 36-stitch medium-size plateau.
R1: 6 sc in MR (6)
R2: inc ×6 (12)
R3: sc around (12)
R4: (sc, inc) ×6 (18)
R5: sc around (18)
R6: (2 sc, inc) ×6 (24)
R7: sc around (24)
R8: (3 sc, inc) ×6 (30)
R9: sc around (30)
R10: (4 sc, inc) ×6 (36)
R11: sc around (36)
R12: sc around (36)
R13: sc around (36)
R14: sc around (36)
R15: (4 sc, dec) ×6 (30)
R16: sc around (30)
R17: (3 sc, dec) ×6 (24)
Begin stuffing. Keep the lower tip defined rather than forcing a dense amount of filling into R1–R4.
R18: (2 sc, dec) ×6 (18)
R19: (sc, dec) ×6 (12)
Add the final stuffing in small pieces. The upper surface should be firm enough to support the calyx.
R20: dec ×6 (6)
Fasten off. Leave a 15 cm tail, pass it through the front loops of the six remaining stitches, pull the opening closed and secure the yarn.
Strawberry Seeds
Yarn: cream, pale yellow or white.
Cut approximately 80 cm of yarn for one medium berry. Bring the needle out between R5 and R6.
Make one short vertical stitch spanning approximately one round. Move internally to the next seed position.
Place seeds roughly 3–4 stitches apart horizontally and 2–3 rounds apart vertically. Offset consecutive rows rather than building straight columns.
Do not pull the embroidery tightly enough to dent the berry. Fasten the yarn inside the body or beneath the calyx.
Five-Point Strawberry Calyx
Yarn: leaf green.
R1: 6 sc in MR (6)
R2: inc ×6 (12)
R3: (sc, inc) ×6 (18)
Now form five pointed extensions around the disk.
Point: ch 6. Starting in the second ch from hook: sl st, sc, hdc, dc, dc. Sl st into the next available stitch on R3.
Repeat the point sequence five times, distributing the five points as evenly as possible around the center.
Fasten off. Leave a 25 cm sewing tail.
Large Botanical Leaf
Make 6–10 for a table cluster.
Yarn: dark or medium green.
Ch 11.
First side: Starting from the second ch from hook, work sl st, sc, hdc, dc, dc, tr, dc, hdc, sc, sl st.
Ch 2 at the end to turn around the tip.
Opposite side: Work sl st, sc, hdc, dc, tr, dc, dc, hdc, sc, sl st.
Ch 1. Sl st into the base.
Fasten off. Leave a 20 cm tail if the leaf will be sewn directly into the arrangement.
For the ribbed appearance visible in the reference, surface-crochet or embroider one central vein from the base to the tip. Add two or three diagonal side veins on each side.
Small Leaf
Make 4–8.
Yarn: green.
Ch 8.
Starting in the second ch from hook, work:
First side: sl st, sc, hdc, dc, hdc, sc, sl st.
Ch 2 and continue along the opposite side:
Second side: sl st, sc, hdc, dc, hdc, sc, sl st.
Fasten off. Leave a 15 cm sewing tail.
Large Strawberry Flower
Yarn: cream or white.
R1: 6 sc in MR (6)
R2: inc ×6 (12)
Begin forming the petals.
Petal 1: sl st in next st, ch 5. Working back along the chain: sc, hdc, dc, dc. Sl st into the next stitch on the center.
Repeat until five petals have been formed, distributing their bases around the center.
Fasten off and weave the white tail beneath the flower.
The flowers in the reference have substantial dimensional petals. For extra volume, crochet a second identical flower and place it underneath the first with its petals offset.
Large Flower Center
Yarn: golden yellow.
R1: 6 sc in MR (6)
R2: inc ×6 (12)
Sl st to the first stitch.
Fasten off with a 20 cm tail.
Sew the yellow disk over the center of the white petals. Add several small French knots or short surface stitches across the disk to reproduce the textured center.
Small Daisy
Make 4–10.
Yarn: white and golden yellow.
With yellow:
R1: 6 sc in MR (6)
Change to white.
R2: (sl st in next st, ch 3, 2 hdc in second ch from hook, sl st into same base stitch) ×6.
This produces six small petals.
Fasten off. Leave a 20 cm tail when the daisy will be attached directly to the table arrangement.
Green Circular Medallion
The botanical clusters in the reference sit over large flat green crochet circles. Work these as flat circular motifs.
R1: 6 sc in MR (6)
R2: inc ×6 (12)
R3: (sc, inc) ×6 (18)
R4: (2 sc, inc) ×6 (24)
R5: (3 sc, inc) ×6 (30)
R6: (4 sc, inc) ×6 (36)
R7: (5 sc, inc) ×6 (42)
R8: (6 sc, inc) ×6 (48)
R9: (7 sc, inc) ×6 (54)
R10: (8 sc, inc) ×6 (60)
Continue the same six-increase progression until the circle reaches the required diameter.
If the circle begins cupping upward, check tension and the increase spacing. Heavy rippling indicates excessive circumference and should be corrected before adding more rounds.
Cream Lace Base
The reference contains large openwork cream semicircles connecting the green medallions. These sections use lace construction rather than stuffed amigurumi shaping.
For a project centered on the strawberry amigurumi crochet pattern, the berry clusters can be attached to an existing cream crochet runner, connected flat medallions or a separate lace table-runner base.
This separation also makes the decorative strawberries removable. Individual clusters can then be used on a table runner, garland, wreath or seasonal centerpiece without changing the berry construction.
Assembly
- Close the berry body completely and redistribute the stuffing so the lower third retains its tapered strawberry shape.
- Position the green calyx over R19–R20. Its center should cover the closure at the top of the berry.
- Sew around the central calyx disk. Leave most of each pointed section free so the five green tips remain dimensional.
- Add the seed stitches if they were not embroidered before closure. Maintain approximately 3–4 stitches between neighboring seeds.
- Pin the large leaves beneath each strawberry before permanent sewing. Angle the leaf tips in different directions instead of forming a rigid symmetrical fan.
- Position one large white flower beside a strawberry rather than directly over the calyx. Attach it through the yellow center and lower petal layer.
- Add the small daisies to open spaces between the strawberries, large leaves and flowers. Leave sections of the green and cream background visible.
- Build additional clusters with two or three strawberries where the table runner needs a larger botanical section. Rotate the fruit so the pointed ends face slightly different directions.
- Sew the completed clusters to the green medallions or cream runner. Use matching yarn and small anchoring stitches that remain inconspicuous from the front.
- Weave each tail through several stitches on the wrong side, reverse direction once, and trim only after confirming that every component remains secure and the runner lies flat.
The finished module contains a stuffed strawberry, five-point calyx, embroidered seeds, dimensional leaves and crochet flowers corresponding to the primary botanical elements in the reference image.
7 Technical Tips for Better Crochet Strawberries
- Prevent a lost round start. Move the stitch marker immediately after working the first stitch of every round. A marker placed one stitch late shifts the decrease columns and can twist the upper portion of the berry.
- Keep the strawberry tip tapered. Put only a small amount of stuffing into R1–R4. Packing the bottom as firmly as the 36-stitch middle section turns the pointed lower section into a rounded base.
- Control visible decrease gaps. Work decreases through the front loops of the next two stitches. A conventional decrease can leave openings where pale polyester stuffing becomes visible against the red yarn.
- Do not add unnecessary safety eyes. The photographed botanical strawberries use zero safety eyes. Keep the surface focused on embroidered seeds when reproducing this table-runner style.
- Stop large flowers from rotating. Pin each flower in at least two positions before sewing. Attaching only the center can allow a dimensional flower to turn when the runner is moved.
- Correct an upright calyx. Damp-block the five green points if they curl away from the berry. Pin every point flat while drying without stretching the central disk out of shape.
- Prevent woven tails from pulling free. Pass each sewing tail through at least 4–5 cm of dense crochet and reverse direction before trimming. Cutting beside the final attachment stitch leaves too little yarn inside the fabric to resist movement.
Conclusion
Finish one berry first and measure it before committing yarn to the complete table arrangement. A roughly 10–11 cm fruit works with the scale developed here, while changing the yarn weight will alter both berry and flower proportions. Next, crochet two leaves and one flower, pin the components around the finished fruit, and use that test cluster to establish spacing across the runner. Save this strawberry amigurumi crochet pattern to Pinterest and share the finished botanical arrangement on Instagram with #StrawberryBotanicalCrochet. For the next version, decide one structural detail before starting: should the strawberry clusters remain concentrated around the large flowers, or continue along the full length of the table runner?









