Introduction
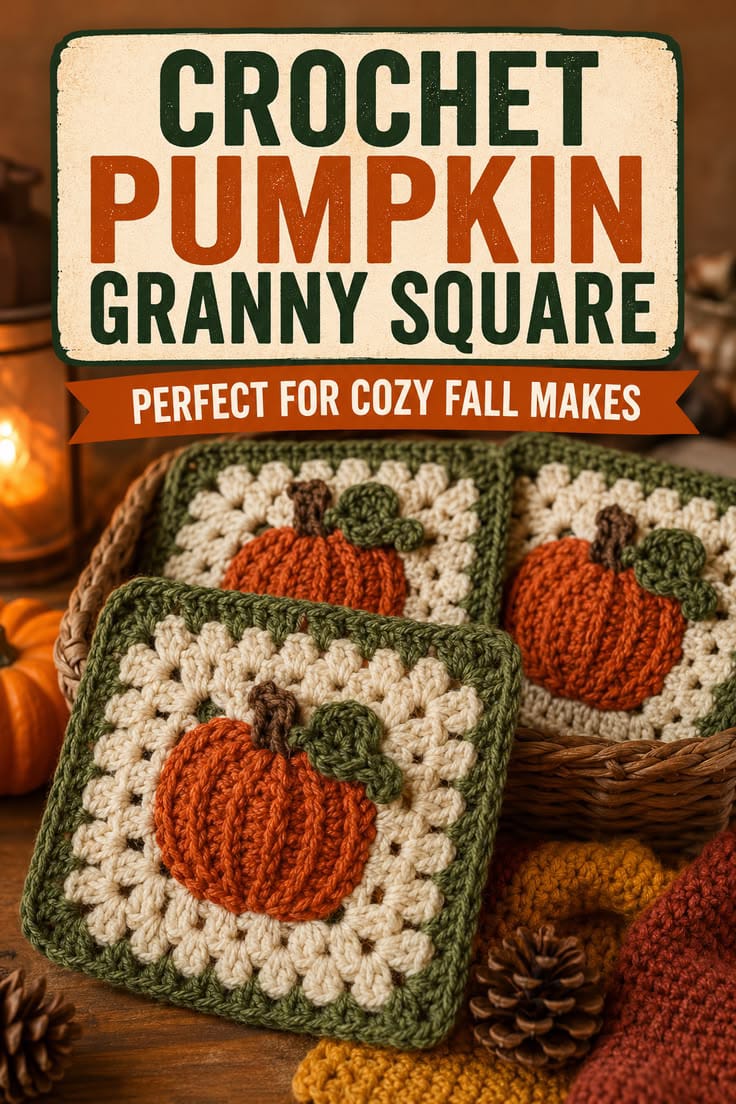
A pumpkin appliqué loses its shape when the vertical ribs disappear into the background square. This pumpkin granny square crochet pattern uses worsted yarn and a 5 mm hook to make an approximately 15–16 cm block. A cream granny base supports a raised burnt-orange pumpkin, brown stem and olive leaf, while two green finishing rounds frame the motif for blankets, cushions and bags.
The Design: What Makes This Pumpkin Square Different
The pumpkin is made separately from the granny background, which allows its ribbed surface to remain dimensional after assembly. Back-loop half double crochet forms narrow vertical columns across the orange appliqué, then shaping stitches pull the top and bottom edges inward to create a broad pumpkin silhouette. The cream square remains comparatively open, giving the dense orange motif enough contrast without adding more colorwork inside the background rounds. A short brown stem sits behind the pumpkin crown, while one olive leaf overlaps the upper-right side. The outer green frame repeats that leaf color and defines the finished block. This ribbed pumpkin granny square depends on controlled appliqué placement. A common mistake is sewing the pumpkin perimeter too tightly; that stretches the cream clusters inward and flattens the raised ribs.
Project Info at a Glance
| Skill Level | Time | Finished Size | Hook | Best For |
|---|---|---|---|---|
| Advanced beginner / intermediate | 2–3 hours | Approx. 15–16 cm square | 5.0 mm | Blankets, cushions, bags and autumn table panels |
Materials and Tools
Yarn
- Warm cream — worsted / medium #4 — approximately 25–35 g — granny-square background.
- Burnt pumpkin orange — worsted / medium #4 — approximately 15–20 g — ribbed pumpkin appliqué.
- Olive green — worsted / medium #4 — approximately 8–12 g — leaf and outer border.
- Medium brown — worsted / medium #4 — approximately 3–5 g — pumpkin stem.
Use yarns with similar thickness and elasticity. A softer orange yarn can spread farther than the cream square after blocking even when both yarn labels state the same weight.
Tools
- 5.0 mm crochet hook
- 4.0–4.5 mm crochet hook for a firmer leaf if required
- Yarn needle
- Locking stitch markers
- Dressmaking pins
- Scissors
- Blocking mat
- Rust-resistant pins
- Measuring tape
Abbreviations
- MR — magic ring
- ch — chain
- sc — single crochet
- hdc — half double crochet
- dc — double crochet
- sl st — slip stitch
- BLO — back loop only
- sp — space
- st — stitch
- RS — right side
- WS — wrong side
Back-loop half double crochet leaves the unused front loop visible, creating the raised vertical lines needed for the pumpkin rib texture.
Pattern — Step by Step
Make the pumpkin, stem and leaf separately. Work the cream granny square next, block all pieces, then assemble the motif before adding the final olive border.
Ribbed Pumpkin Panel
Yarn: burnt pumpkin orange.
Ch 15.
Row 1: Hdc in second ch from hook and across. Turn. (14)
Row 2: Ch 1, hdc BLO across. Turn. (14)
Row 3: Ch 1, hdc BLO across. Turn. (14)
Row 4: Ch 1, hdc BLO across. Turn. (14)
Row 5: Ch 1, hdc BLO across. Turn. (14)
Row 6: Ch 1, hdc BLO across. Turn. (14)
Row 7: Ch 1, hdc BLO across. Turn. (14)
Row 8: Ch 1, hdc BLO across. Turn. (14)
Row 9: Ch 1, hdc BLO across. Turn. (14)
Row 10: Ch 1, hdc BLO across. Turn. (14)
Row 11: Ch 1, hdc BLO across. (14)
Fasten off, leaving a 50 cm tail.
The panel should measure approximately 8–9 cm tall and 9–10 cm wide before shaping, depending on tension.
Shape the Pumpkin Top
Thread the long orange tail onto the yarn needle.
Run the yarn in and out through the eleven row ends across the upper edge.
Pull until the edge contracts by approximately 25–30 percent.
Do not close it completely.
Secure temporarily.
Shape the Pumpkin Bottom
Cut another approximately 50 cm length of orange yarn.
Run it through the row ends along the opposite edge.
Pull slightly more firmly than the top edge.
The lower center should become rounded while the outer ribs remain broad.
The completed appliqué should measure approximately 9–10 cm wide × 7–8 cm high.
Define the Pumpkin Ribs
Lay the shaped panel right side up.
The eleven BLO columns naturally form the rib texture.
Pinch the center rib gently upward.
Using the orange tail, make one concealed stitch at the top and one at the bottom of the center rib if additional definition is needed.
Repeat only on the two ribs immediately beside the center when the fabric appears flat.
Do not stitch every rib down. The raised columns should remain flexible.
Brown Stem
Yarn: medium brown.
Ch 6.
Starting in the second chain from the hook:
sc in each chain across. (5)
Ch 1 and turn.
Sc across. (5)
Fasten off. Leave a 20 cm sewing tail.
The finished stem should measure approximately 3–3.5 cm long.
Olive Leaf
Yarn: olive green.
Ch 8.
Starting in second ch from hook:
sl st, sc, hdc, dc, hdc, sc, sl st.
Work 3 sc in the final chain.
Continue along the opposite side:
sl st, sc, hdc, dc, hdc, sc, sl st.
Fasten off. Leave a 20 cm sewing tail.
Pinch the foundation chain lightly to create the central leaf vein.
Cream Granny Square — Round 1
Yarn: warm cream.
Make an MR.
Ch 3.
Work 2 dc in MR, ch 2.
*3 dc in MR, ch 2.* Repeat three more times.
Join with sl st to the top of the beginning ch 3.
You should have four 3-dc clusters and four corner spaces.
Cream Granny Square — Round 2
Sl st to the next corner space.
In the corner work:
ch 3, 2 dc, ch 2, 3 dc.
In each remaining corner work:
3 dc, ch 2, 3 dc.
Join with sl st.
Cream Granny Square — Round 3
Sl st into the first corner.
Work 3 dc, ch 2, 3 dc in the corner.
Work 3 dc in the next side space.
Repeat around, placing 3 dc, ch 2, 3 dc in every corner.
Join with sl st.
Cream Granny Square — Round 4
Work one 3-dc cluster in each side space.
At every corner work:
3 dc, ch 2, 3 dc.
Join with sl st.
Fasten off.
Block the cream square before assembling the pumpkin. Target approximately 12.5–13.5 cm square at this stage.
Position the Pumpkin
Place the blocked cream square right side up.
Center the orange pumpkin horizontally.
The pumpkin lower edge should sit approximately 15–20 mm above the bottom cream clusters.
The top center should remain approximately 20–25 mm below the upper cream edge before the stem is added.
Pin the center first, then both outer pumpkin edges.
Attach the Pumpkin
Using the remaining orange yarn, sew around the shaped perimeter.
Catch only small sections of the orange edge and the tops of the cream stitches beneath it.
Keep the sewing yarn relaxed.
Leave the middle 60–70 percent of each raised rib free from attachment stitches.
The appliqué should lie flat at the perimeter while retaining visible vertical relief through the center.
Attach the Stem
Slide the lower 8–10 mm of the brown stem behind the upper orange edge.
Center it over the pumpkin.
Sew the lower portion to both the pumpkin and cream square.
Leave the upper 15–20 mm free.
Attach the Leaf
Position the olive leaf diagonally beside the stem.
The tip should point toward the upper-right or upper-left corner.
Sew only through the center vein and the lower 10–15 mm.
Leaving the outer edge unattached gives the leaf the raised profile visible in the reference.
Olive Border — Round 1
Yarn: olive green.
Join in any cream corner space.
Work:
3 dc, ch 2, 3 dc
in the corner.
Work one 3-dc cluster in every side space.
Repeat around all four sides.
Join with sl st.
Olive Border — Round 2
Ch 1.
Sc in every dc and chain space around the square.
At each corner work:
2 sc, ch 2, 2 sc.
Join with sl st.
Fasten off.
The completed block should measure approximately 15–16 cm square.
Blocking
Place the finished square on a blocking mat.
Pin all four corners to the same measurement.
Add one pin at the midpoint of each side.
Keep the olive border square while allowing the orange pumpkin ribs to remain raised.
Dampen according to the yarn-care instructions.
Do not press the pumpkin with an iron or heavy object.
Allow the block to dry completely before removing the pins.
Assembly
- Make the 11-row orange BLO panel and confirm that all fourteen stitches remain present on every row.
- Gather the upper and lower row-end edges until the pumpkin measures approximately 9–10 cm wide × 7–8 cm high.
- Make the brown stem and olive leaf before beginning the final square assembly.
- Work four cream granny rounds and block the background to approximately 12.5–13.5 cm square.
- Center the pumpkin with its lower edge approximately 15–20 mm above the lower cream clusters.
- Sew only around the pumpkin perimeter so the middle sections of the BLO ribs remain visibly raised.
- Insert the lower 8–10 mm of the brown stem behind the pumpkin crown and secure it through both appliqué and background.
- Attach the leaf through its center vein and lower 10–15 mm, leaving the outer edge free.
- Work the olive granny-style border followed by one single-crochet finishing round.
- Block the finished pumpkin granny square crochet pattern to approximately 15–16 cm and weave every tail through at least 3–4 cm of matching stitches.
The finished block should remain square while the pumpkin ribs, brown stem and green leaf project slightly above the cream background.
7 Technical Tips
- Pumpkin turning rectangular: Weak top and bottom gathering leaves the 11-row panel too straight. Reduce both row-end edges by approximately 25–30 percent before sewing the appliqué to the square.
- Ribs flattening: Sewing through the center of every orange column removes the raised BLO texture. Place most attachment stitches within 5–8 mm of the outer pumpkin perimeter.
- Square puckering beneath the pumpkin: Tight appliqué stitches shorten the cream fabric. Pin the pumpkin at the center and both sides first, then sew with enough slack that the background remains flat.
- Stem leaning: A stem attached only to the pumpkin edge can rotate during blocking. Sew its lower 8–10 mm through both the orange appliqué and the cream square.
- Leaf appearing flat: Sewing around the complete leaf perimeter removes its dimensional edge. Attach mainly through the center vein and leave approximately 5–8 mm of the outside edge free.
- Olive border waving: Extra corner stitches add too much circumference. Keep the first border corners at 3 dc, ch 2, 3 dc and use 2 sc, ch 2, 2 sc in the finishing round.
- Squares finishing different sizes: A difference of 5 mm becomes significant when several blocks are joined into a blanket. Block every completed square to one 15–16 cm template before assembly into a larger project.
Conclusion
Check the orange rib direction before permanently attaching the appliqué because the pumpkin depends on straight vertical columns through its center. The next practical step is to block the cream background, mark its horizontal midpoint and pin the pumpkin before sewing any edge stitches. Add the stem and leaf only after the orange shape is stable, then complete the olive frame. Share the finished pumpkin granny square crochet pattern project on Pinterest with several blocks arranged as a small autumn grid, then post a close view of the raised ribs on Instagram using #RibbedPumpkinGrannySquare. For this square specifically, would you keep the olive border or switch it to dark brown?









