Introduction
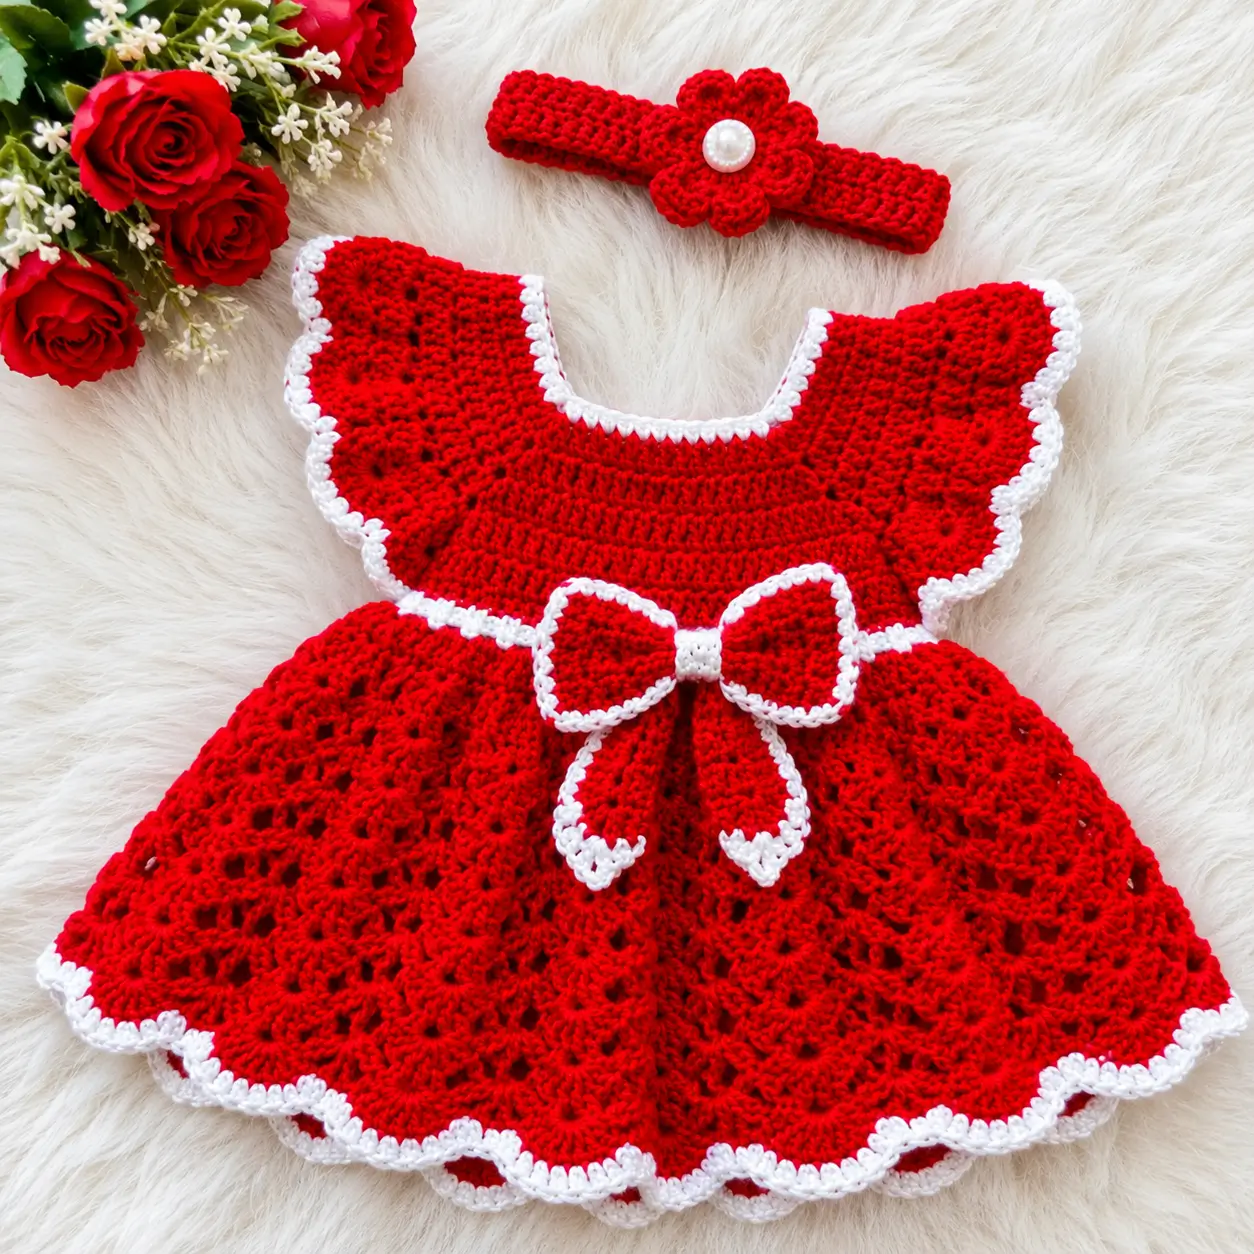
The square-cut yoke, white-edged red bow, and pearl-centered flower make this dress identifiable before the skirt flare even begins. This red crochet baby dress pattern is drafted for a 0–3 month fit using DK yarn, 3.5 mm and 4 mm hooks, and a two-color shell construction. Finished length targets 30 cm. The skill level is advanced beginner to intermediate, and the separate headband keeps the neckline free of extra decoration.
The Design: What Makes This Red Dress Different
Three structural decisions control the result. First, the yoke is built as flat front and back sections rather than forcing a circular yoke to reproduce the photograph’s squared neckline; this keeps the shoulder line broad and makes the arm openings easier to measure. Second, the skirt begins with an increase from 84 to 112 stitches before switching to repeated open fans, giving the red and white crochet baby dress its flare without gathering a bulky waistband. Third, the bow is made independently and outlined after shaping, so the white border remains visible around both loops.
A common mistake in a crochet dress with bow is attaching the bow before the skirt hangs naturally; that can pull the center front upward and distort the waist seam. Pin it only after blocking and measuring the finished yoke.
Published baby-dress references support DK/#3 yarn, 3.5–4 mm hooks, and roughly 40–44 cm finished chest measurements for the smallest sizes.
Project Info at a Glance
| Skill Level | Time | Finished Size | Hook | Best For |
|---|---|---|---|---|
| Advanced beginner–intermediate | About 5–7 hours | Approx. 40 cm bust × 30 cm length | 3.5 mm + 4 mm | 0–3 month dress set |
Comparable DK baby-dress projects commonly require around five to seven hours, although dense tension, extra edging, and the flower headband can extend the working time.
Materials and Tools
Yarn
- Red DK/#3 yarn — approximately 165–200 g — choose a smooth baby cotton, cotton blend, or baby acrylic.
- White DK/#3 yarn — approximately 20 g — used for the neckline, armholes, hem, bow border, and center wrap.
- Small additional red yarn allowance — used for the matching headband and flower.
A 200 g supply of red yarn gives a practical margin for gauge variation, the large waist bow, and the matching headband.
Tools
- 3.5 mm crochet hook — yoke, bow, headband, and edging
- 4 mm crochet hook — skirt
- 2 stitch markers
- Tapestry needle
- Scissors
- Measuring tape
- 2 small flat buttons, about 8–10 mm for the back opening
- Optional 10–12 mm pearl-style button for the flower center
- Blocking pins
For baby wear, a yarn-embroidered flower center is preferable for routine use. A bead or pearl-style button is a small detachable component and should not be used where an infant could mouth it or wear it unattended.
Abbreviations
- MR — magic ring
- ch — chain
- sc — single crochet
- hdc — half double crochet
- dc — double crochet
- sl st — slip stitch
- inc — increase
- dec — decrease
- sk — skip
- sp — space
- BLO — back loop only
- st / sts — stitch / stitches
- rep — repeat
An invisible decrease is formed through the front loops of the next two stitches before completing one single crochet through them; it is not required in the dress construction below.
Pattern — Step by Step
Construction note: This is an original photo-matched garment draft. It is worked in rows and joined rounds rather than a continuous amigurumi spiral.
Gauge: 20 dc × approximately 11 rows = 10 cm with the 3.5 mm hook. Check the gauge before beginning the full yoke because small differences can change the finished chest measurement substantially.
Front Yoke
Yarn: red
With the 3.5 mm hook, ch 44.
Row 1: Dc in 3rd ch from hook and in each ch across. Ch 2, turn. [42 dc]
Row 2: Dc in each st across. Ch 2, turn. [42]
Row 3: Dc in each st across. Ch 2, turn. [42]
Row 4: Dc in each st across. Ch 2, turn. [42]
Row 5: Dc in each st across. Ch 2, turn. [42]
Row 6: Dc in each st across. Ch 2, turn. [42]
Begin the square neckline.
Row 7, first shoulder: Dc in first 11 sts. Ch 2, turn. [11]
Row 8: Dc across. Ch 2, turn. [11]
Row 9: Dc across. Ch 2, turn. [11]
Row 10: Dc across. [11]
Fasten off.
Skip the center 20 stitches of Row 6. Join red to the remaining 11 stitches.
Rows 7–10, second shoulder: Repeat the first shoulder. [11 each row]
Fasten off. Leave a 20 cm tail on each shoulder for joining.
Back Yoke
Yarn: red
Ch 44.
Rows 1–6: Repeat Front Yoke Rows 1–6. [42 sts each row]
Create a center-back opening.
Row 7, left half: Dc over first 21 sts. [21]
Row 8: Ch 2, turn, dc across. [21]
Fasten off.
Join yarn at stitch 22 of Row 6.
Rows 7–8, right half: Dc across the remaining half. [21 each row]
For Row 9, work only the outermost 11 stitches of each half.
Rows 9–10, left shoulder: 11 dc. [11]
Rows 9–10, right shoulder: 11 dc. [11]
The inner ten stitches on each back half remain unworked, creating the back neck and opening.
Fasten off.
Shoulder and Side Joining
Yarn: red
Lay the front and back pieces with right sides facing.
Join the 11 front shoulder stitches to the corresponding 11 back shoulder stitches with mattress stitch or slip stitch. Repeat for the second shoulder.
At each side, seam only the lowest two yoke rows together. Leave the remaining side edge open for the armhole.
The assembled yoke should measure approximately 40–42 cm around the lower edge before the skirt is attached. If it is more than 2 cm outside that range, correct the gauge before continuing.
Skirt
Yarn: red
Change to the 4 mm hook.
Join yarn to the lower yoke edge at one side seam.
Round 1: Ch 3, dc evenly around the full lower edge, placing one dc into each foundation stitch from front and back. Join. [84 dc]
Round 2: Ch 3, *dc in next 2 sts, 2 dc in next st* around. Join. [112 dc]
The skirt now divides into 14 repeats of eight base stitches.
Round 3: *Sc in next st, ch 5, sk next 7 sts* ×14. Join. [14 sc, 14 ch-5 spaces]
Round 4: *7 dc in next ch-5 sp, sc in next sc* ×14. Join. [14 seven-dc fans + 14 sc; 112 worked sts]
Round 5: *Ch 5, sc in the center — fourth — dc of next fan* ×14. Join. [14 ch-5 spaces, 14 sc]
Round 6: *7 dc in next ch-5 sp, sc in next sc* ×14. Join. [14 fans + 14 sc; 112 worked sts]
Rounds 7–14: Repeat Rounds 5–6 four more times. [14 motifs per round]
Start the lower flare.
Round 15: *Ch 6, sc in center dc of next fan* ×14. Join. [14 ch-6 spaces, 14 sc]
Round 16: *9 dc in next ch-6 sp, sc in next sc* ×14. Join. [14 nine-dc fans + 14 sc; 140 worked sts]
Round 17: *Ch 6, sc in fifth dc of next fan* ×14. Join. [14 spaces, 14 sc]
Round 18: Repeat Round 16. [140 worked sts]
Round 19: Repeat Round 17. [14 spaces, 14 sc]
Round 20: Repeat Round 16. [140 worked sts]
Increase the visual width of the final scallops.
Round 21: *Ch 7, sc in fifth dc of next fan* ×14. Join. [14 ch-7 spaces, 14 sc]
Round 22: *11 dc in next ch-7 sp, sc in next sc* ×14. Join. [14 eleven-dc fans + 14 sc; 168 worked sts]
Round 23: *Ch 7, sc in sixth dc of next fan* ×14. Join. [14 spaces, 14 sc]
Round 24: Repeat Round 22. [168 worked sts]
Round 25: Repeat Round 23. [14 spaces, 14 sc]
Round 26: Repeat Round 22. [168 worked sts]
Measure from the shoulder to the lowest point of a fan. The target before white edging is about 29 cm. If the row gauge creates extra length, stop after an even-numbered fan round rather than adding another motif pair.
Fasten off red.
White Scalloped Hem
Yarn: white
Attach white at the first dc of any final red fan.
Round 1: Across each 11-dc fan, sc in first 5 dc, *(sc, ch 2, sc)* in the sixth dc, sc in remaining 5 dc; sl st into the red sc between fans. Repeat around. [14 outlined scallops]
Fasten off. The white line should follow the existing red fan shape instead of filling the spaces between motifs.
Armhole Edging — Make 2
Yarn: white
With the 3.5 mm hook, attach white at the underarm seam.
Round 1: Work 32 sc evenly around the armhole. Join. [32]
Round 2: *Sl st in next st, ch 2, sl st in next st* ×16. [16 small scallops]
Fasten off. Repeat on the opposite armhole.
If 32 stitches cause puckering, remove the edging and redistribute the same stitches more evenly rather than adding a large number of additional stitches.
Neck and Back-Opening Edging
Yarn: white
Attach white at the lower left side of the center-back slit.
Row 1: Work 56 sc evenly up the slit, around the back neckline, across the front square neck, and down the opposite slit edge. [56]
On the buttonhole side, work two evenly spaced ch-2 button loops, positioning one near the top and the second about 2.5–3 cm below it.
Fasten off.
Sew two 8–10 mm flat buttons opposite the loops.
Waist Bow
Yarn: red and white
With red and the 3.5 mm hook, ch 31.
Row 1: Hdc in 2nd ch from hook and across. Ch 1, turn. [30]
Rows 2–7: Hdc across. [30 each row]
Fasten off red.
Join white and work one round of sc around the complete rectangle, placing three sc at each corner.
Fasten off.
Pinch the rectangle at its center to create two bow loops.
Bow Center Band
Yarn: white
Ch 7.
Row 1: Sc in 2nd ch and across. [6]
Rows 2–7: Ch 1, turn, sc across. [6]
Fasten off with a 20 cm tail.
Wrap the band around the pinched bow center and stitch its short edges together on the reverse.
Bow Tails — Make 2
Yarn: red and white
With red, ch 10.
Row 1: Hdc in 2nd ch and across. [9]
Rows 2–7: Hdc across. [9]
Row 8: Hdc2tog, hdc in next 5, hdc2tog. [7]
Row 9: Hdc2tog, hdc in next 3, hdc2tog. [5]
Fasten off red.
Attach white and sc down both long sides and around the lower point. Fasten off.
Place the two tails behind the center band at a slight outward angle.
Headband
Yarn: red
Use a target finished circumference of approximately 33 cm for 0–3 months. Check the finished measurement rather than relying only on the starting-chain count because yarn elasticity varies.
With the 3.5 mm hook, ch 67.
Row 1: Sc in 2nd ch from hook and across. Ch 1, turn. [66]
Row 2: Sc BLO across. Ch 1, turn. [66]
Row 3: Sc BLO across. Ch 1, turn. [66]
Row 4: Sc BLO across. Ch 1, turn. [66]
Row 5: Sc BLO across. Ch 1, turn. [66]
Row 6: Sc BLO across. [66]
Fasten off with a 20 cm tail.
Join the short ends to form a ring. The finished circumference should be approximately 32–34 cm without hard stretching.
Six-Petal Headband Flower
Yarn: red
Ch 4 and join to form a ring.
Round 1: Work 12 sc into ring. Join. [12]
Round 2: *Sl st in next st, 5 dc in next st* ×6. Join. [6 petals]
Fasten off with a 25 cm sewing tail.
Sew the flower over the headband seam. Add a securely stitched pearl-style center only for supervised decorative wear. For routine baby use, several tight white yarn stitches can reproduce the light center without adding a detachable component.
Assembly
- Join both 11-stitch front shoulders to the matching back shoulders and weave the structural tails into at least 5 cm of fabric.
- Close the lower two rows of each yoke side seam, leaving the remaining side edges open as armholes.
- Work the red skirt from the full 84-stitch lower yoke edge and complete all flare rounds before attaching decoration.
- Add the white hem edging, then measure the dress from shoulder to the lowest scallop; target approximately 30 cm.
- Work the white armhole edging on both openings, checking that neither opening puckers toward the underarm.
- Add the white neckline and back-opening edging, then sew the two back buttons opposite their loops.
- Pin the completed bow at the center-front waist seam with its upper edge level rather than tilted toward either armhole.
- Place the two bow tails behind the center band, then sew through the bow, tails, and yoke fabric using multiple small passes.
- Seam the headband short ends, sew the six-petal flower directly over that seam, and add the selected center treatment.
- Weave every remaining yarn tail through several stitch directions, block the skirt flat to the 40 cm bust/30 cm length target, and remove all pins before use.
The finished set consists of one dress, one attached waist bow, and one matching flower headband.
7 Technical Tips
- Stitch-marker drift: Place markers at both skirt side seams immediately after Round 1. A seam that moves by more than two stitches makes the 14 fan motifs appear rotated relative to the yoke.
- Layered bow bulk: This garment contains no stuffing, so excess thickness comes from yarn tails and layered bow seams. Keep the bow attachment flatter than approximately 4–5 mm at its thickest center point.
- Invisible-decrease mismatch: Do not substitute amigurumi invisible decreases into the skirt flare. The fabric depends on open chain spaces and fan placement, and a hidden sc decrease shifts the eight-stitch motif base.
- Neck-opening error: Check the neck and back slit before sewing on the bow or headband flower. If the front opening cannot lie flat at approximately 10 cm across, correct the edging first.
- Velvet tension failure: Do not substitute velvet yarn using the same stitch counts. Its thicker row height can change both armhole depth and the intended 40–42 cm chest measurement.
- Bow pinning error: Pin all four outer bow corners before sewing the center band to the dress. A difference of even 1 cm between the left and right bow tips is conspicuous against the straight waistline.
- Tail-weaving failure: Weave structural ends for at least 5 cm and change direction twice. Short tails hidden only beneath the white border can pull free when the skirt is stretched during dressing.
Conclusion
Measure the blocked yoke before treating the accessory work as finished: the target is about 40 cm around the bust and 30 cm from shoulder to scalloped hem. The next practical step is to crochet a 10 cm gauge swatch with the selected red DK yarn and 3.5 mm hook, then adjust hook size before starting the yoke. Save this red crochet baby dress pattern to Pinterest and share the finished dress and matching headband on Instagram with #RedBowBabyDress. When posting, include the yarn weight and finished chest measurement so other makers can compare gauge. For this specific design, would you keep the six-petal headband flower red, or switch it to white while retaining the pearl-style center?









