Introduction
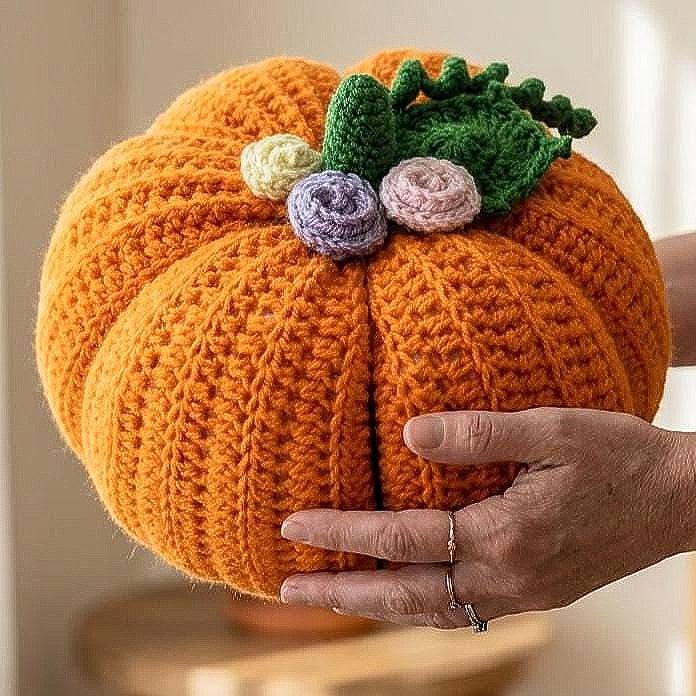
Three roses can sit on a pumpkin crown only if the six body grooves converge tightly enough to create a stable mounting point. This large crochet pumpkin pattern uses worsted yarn and a 5 mm hook to make an approximately 28–32 cm pumpkin. A sculpted orange body, three green leaves, one curled tendril and cream, lavender and blush roses reproduce the oversized floral design.
The Design: What Makes This Large Pumpkin Different
The body begins as one continuous stuffed form rather than six individually joined wedges. A 42-stitch maximum establishes the circumference, while additional plateau rounds create the substantial height visible in the reference. Six exterior shaping lines are added after stuffing, pulling the fabric inward to form broad vertical lobes without interrupting the horizontal crochet texture. The crown is intentionally different from a standard fall pumpkin: no tall brown stem is visible. Instead, three overlapping green leaves form a low foundation for three compact spiral roses and one curled vine. That keeps the decoration proportional to the oversized body. A common mistake with a sculpted crochet pumpkin is packing the center harder than the outside. The shaping yarn then cannot compress the body deeply enough, leaving shallow grooves and an almost spherical profile.
Project Info at a Glance
| Skill Level | Time | Finished Size | Hook | Best For |
|---|---|---|---|---|
| Intermediate | 8–10 hours | Approx. 28–32 cm wide × 24–27 cm high | 5.0 mm | Large fall displays, tables and seasonal floor-level arrangements |
Materials and Tools
Yarn
- Deep harvest orange — worsted / Aran #4 — approximately 220–280 g — body and six sculpting strands.
- Forest green — worsted / Aran #4 — approximately 35–50 g — crown leaves and curled tendril.
- Soft cream — worsted / Aran #4 — approximately 8–12 g — first spiral rose.
- Muted lavender — worsted / Aran #4 — approximately 8–12 g — second spiral rose.
- Dusty blush — worsted / Aran #4 — approximately 8–12 g — third spiral rose.
Use a firm plied yarn for the body. The orange fabric needs enough structure to retain the deep channels after the shaping strands are tightened.
Tools
- 5.0 mm crochet hook
- 4.0–4.5 mm crochet hook for firmer roses if required
- Polyester stuffing — approximately 300–380 g
- Long doll or tapestry needle — preferably at least 12 cm
- Standard yarn needle
- Six locking stitch markers
- Dressmaking pins
- Scissors
- Measuring tape
Abbreviations
- MR — magic ring
- sc — single crochet
- inc — two single crochet stitches in one stitch
- dec — invisible decrease
- sl st — slip stitch
- ch — chain
- hdc — half double crochet
- dc — double crochet
- tr — treble crochet
An invisible decrease is worked through the front loops of the next two stitches before completing one single crochet through both loops.
Pattern — Step by Step
Work the orange body in a continuous spiral. Move the stitch marker after every round.
Large Pumpkin Body
Yarn: deep harvest orange — Source: standard six-stitch amigurumi math adapted to large sculpted pumpkin proportions.
R1: 6 sc in MR (6)
R2: inc ×6 (12)
R3: (sc, inc) ×6 (18)
R4: (2 sc, inc) ×6 (24)
R5: (3 sc, inc) ×6 (30)
R6: (4 sc, inc) ×6 (36)
R7: (5 sc, inc) ×6 (42)
R8: sc around (42)
R9: sc around (42)
R10: sc around (42)
R11: sc around (42)
R12: sc around (42)
R13: sc around (42)
R14: sc around (42)
R15: sc around (42)
R16: sc around (42)
R17: sc around (42)
R18: sc around (42)
R19: sc around (42)
R20: sc around (42)
R21: (5 sc, dec) ×6 (36)
R22: sc around (36)
R23: (4 sc, dec) ×6 (30)
R24: sc around (30)
R25: (3 sc, dec) ×6 (24)
R26: sc around (24)
R27: (2 sc, dec) ×6 (18)
R28: sc around (18)
R29: (sc, dec) ×6 (12)
R30: sc around (12)
R31: dec ×6 (6)
Begin stuffing after R21. Place most of the fiberfill against the outer wall and keep the vertical central core approximately 15–20 percent softer. Add the final filling before R31.
Fasten off. Leave a 60 cm tail and close the remaining six front loops.
Vertical Body Compression
Yarn: matching orange.
Cut approximately 150 cm of yarn.
Thread the long needle and enter through the bottom center.
Exit through the exact crown center.
Pass back through the body to the lower center.
Pull gradually until the pumpkin loses approximately 2–3 cm of height.
The circumference should widen slightly while the crown and base develop shallow central recesses.
Secure the yarn temporarily rather than making the final knot.
Mark the Six Lobes
View the pumpkin directly from above.
Place six markers around the widest circumference at approximately 60-degree intervals.
Follow each marker visually from the crown to the lower center.
Move any marker that produces a section more than approximately 15 mm wider than its opposite lobe.
Sculpting Channel 1
Yarn: matching orange.
Cut approximately 180 cm of yarn.
Anchor the strand securely at the bottom center.
Bring the yarn over the outside of the pumpkin through the first marked valley.
Insert through the crown and pass the needle through the full body.
Exit through the bottom center.
Pull until the channel sits approximately 15–20 mm below the fullest neighboring surfaces.
Do not knot permanently.
Sculpting Channel 2
Work the groove directly opposite Channel 1.
Match its depth before moving to another section.
Opposite-pair shaping prevents all the stuffing from being displaced toward one unfinished side.
Sculpting Channels 3 and 4
Add another groove approximately 60 degrees from the first.
Immediately make its opposite channel.
Set the pumpkin down and compare the four developing lobes.
Redistribute stuffing through the outside if one section becomes flatter than its opposite.
Sculpting Channels 5 and 6
Complete the final opposite pair.
Rotate the pumpkin through a full circle.
Adjust all six strands until the broad lobe widths differ by no more than approximately 10–15 mm.
Secure the shaping strands at the bottom center and bury the tails deeply inside the body.
Deepen the Crown
Thread a new 90 cm orange strand.
Pass from crown center to bottom center and back.
Pull until the top recess measures approximately 15–18 mm deep.
The floral crown needs a flat recessed area rather than a sharp central hole.
Secure and bury the strand.
Large Green Leaf — Make 1
Yarn: forest green.
Ch 13.
Starting in the second chain from the hook:
sl st, sc, hdc, dc, 3 tr, 2 dc, hdc, sc, sl st.
Work 3 sc in the final chain.
Continue along the opposite side:
sl st, sc, hdc, 2 dc, 3 tr, dc, hdc, sc, sl st.
Fasten off. Leave a 30 cm sewing tail.
The finished leaf should measure approximately 9–11 cm long.
Medium Green Leaf — Make 1
Yarn: forest green.
Ch 10.
Starting in second chain from hook:
sl st, sc, hdc, dc, 2 tr, dc, hdc, sc.
Work 3 sc in the final chain.
Repeat the same stitch sequence down the opposite side.
Fasten off, leaving a 25 cm sewing tail.
Small Green Leaf — Make 1
Yarn: forest green.
Ch 8.
Starting in second chain from hook:
sl st, sc, hdc, dc, hdc, sc, sl st.
Work 3 sc into the final chain.
Repeat along the opposite side.
Fasten off. Leave a 20 cm tail.
Leaf Veins
Use each remaining green sewing tail to make one long surface stitch along the foundation chain.
Add two short diagonal stitches on the large leaf and one on each smaller leaf.
Do not pull the center veins tightly enough to cup the leaves.
Cream Spiral Rose
Yarn: soft cream — Source: standard rolled-strip crochet rose construction.
Ch 28.
Starting in the second chain from the hook:
Work 2 hdc in each of the first 8 chains.
Work 2 dc in each of the next 10 chains.
Work 3 dc in each remaining chain.
The strip will curl automatically.
Fasten off, leaving a 35 cm tail.
Roll from the tighter hdc end toward the larger dc end.
Sew through the bottom layers several times to hold the spiral.
Target finished diameter: approximately 4–5 cm.
Lavender Spiral Rose
Yarn: muted lavender.
Repeat the Cream Spiral Rose.
Roll this flower slightly tighter so its finished diameter is approximately 4 cm.
Fasten securely through the base.
Dusty Blush Spiral Rose
Yarn: dusty blush.
Repeat the Cream Spiral Rose.
Keep the outside two turns slightly looser than the lavender flower.
Target approximately 4–4.5 cm diameter.
Green Spiral Tendril
Yarn: forest green.
Ch 24.
Starting in the second chain from the hook, work 3 sc in each of the first 18 chains.
Work 1 sc in each remaining chain.
The increased portion should coil into a tight spiral.
Fasten off. Leave a 20 cm tail.
Optional Crown Base Disc
Yarn: forest green.
R1: 6 sc in MR (6)
R2: inc ×6 (12)
R3: (sc, inc) ×6 (18)
R4: (2 sc, inc) ×6 (24)
Fasten off. Leave a 30 cm tail.
This flat disc can be used beneath the leaves when the crown recess is unusually deep. Omit it when the leaves already cover the center cleanly.
Build the Floral Crown
Place the pumpkin with its most balanced lobe facing forward.
Pin the largest green leaf so it projects upward and slightly backward from the crown center.
Angle the medium leaf toward one side and place the small leaf across the opposite front edge.
The three leaf bases should overlap within an area approximately 5–6 cm across.
Sew only the lower 15–25 mm of each leaf to the pumpkin. Leave the outer sections raised.
Position the Roses
Place the cream rose slightly left of center.
Position the lavender rose lower and toward the front.
Place the dusty blush rose beside it, allowing the two flowers to touch without stacking one directly on the other.
The three roses should form a compact triangle rather than a straight row.
Attach the Roses
Use each flower tail to sew through the rose base, the green leaf layer and the orange pumpkin crown.
Make at least four anchoring passes per flower.
Keep all attachment stitches underneath the rose petals.
Do not sew through the outer petal edges.
Attach the Tendril
Place the straight end of the green spiral behind the largest leaf.
Sew approximately 15–20 mm of the straight end to the crown.
Leave the coiled section completely free.
Turn the spiral so it arcs sideways rather than resting directly on top of a rose.
Assembly
- Complete and stuff the orange body through R31, keeping the central core softer than the outside wall.
- Compress the pumpkin vertically by approximately 2–3 cm before marking the six exterior shaping positions.
- Form the six deep grooves as three opposite pairs and adjust each channel to approximately 15–20 mm depth.
- Deepen the crown center to approximately 15–18 mm so the floral cluster has a stable recessed mounting area.
- Pin the large, medium and small green leaves first, attaching only their lower 15–25 mm to preserve dimensional edges.
- Place the cream, lavender and blush roses in a triangular group at the front of the crown rather than in one straight line.
- Sew each rose through its base, the leaf layer and the orange body using at least four concealed anchoring passes.
- Attach the green tendril behind the large leaf and leave the curled portion completely free.
- Rotate the pumpkin and compare all six lobes; redistribute stuffing if the floral crown causes the body to lean toward one side.
- Weave every structural yarn tail through at least 5 cm of dense fabric, reverse direction once and trim only after the end retracts beneath the stitches.
The finished pumpkin should display six broad orange lobes beneath a compact crown of three green leaves, three spiral roses and one raised green tendril.
7 Technical Tips
- Body staying too round: Dense stuffing through the center prevents the sculpting strands from pulling inward. Keep the central core approximately 15–20 percent softer and stop stuffing when firm pressure still creates around 15 mm of temporary indentation.
- Lobes becoming unequal: Tightening six channels in one direction displaces stuffing toward the final section. Work one groove and then its exact opposite, keeping the markers approximately 60 degrees apart.
- Grooves cutting into stitches: Excess shaping pressure can bury the yarn into the orange surface. Stop when each channel sits approximately 15–20 mm below the fullest adjacent lobe.
- Floral crown tilting forward: Three roses attached only through green leaves place too much load on flexible pieces. Pass every flower attachment through the leaf base and into the orange pumpkin body.
- Leaves becoming flat: Sewing around the full leaf perimeter removes the raised crown structure. Attach only the lower 15–25 mm and leave the tips and side edges free.
- Spiral roses opening: A rolled flower secured only through its center can unwind along the outside turn. Make three or four stitches across different bottom layers before sewing the flower to the pumpkin.
- Pumpkin leaning after assembly: The floral crown can shift the balance of a lightly stuffed base. Test the finished piece on a level surface and move stuffing into the opposite lower lobe until at least three bottom sections share the weight.
Conclusion
Check the crown balance before securing the final rose because the floral cluster adds more visual and physical weight than a conventional pumpkin stem. Next, rotate the body on a level surface and compare all six groove depths, then pin the three leaves before deciding the final flower positions. Keep the lavender and blush roses toward the front so their smaller scale does not disappear behind the green crown. Share the finished large crochet pumpkin pattern project on Pinterest with a three-quarter photograph, then post a crown close-up on Instagram using #FloralCrownCrochetPumpkin. For this pumpkin specifically, would you keep the cream, lavender and blush rose combination or make all three flowers ivory?









