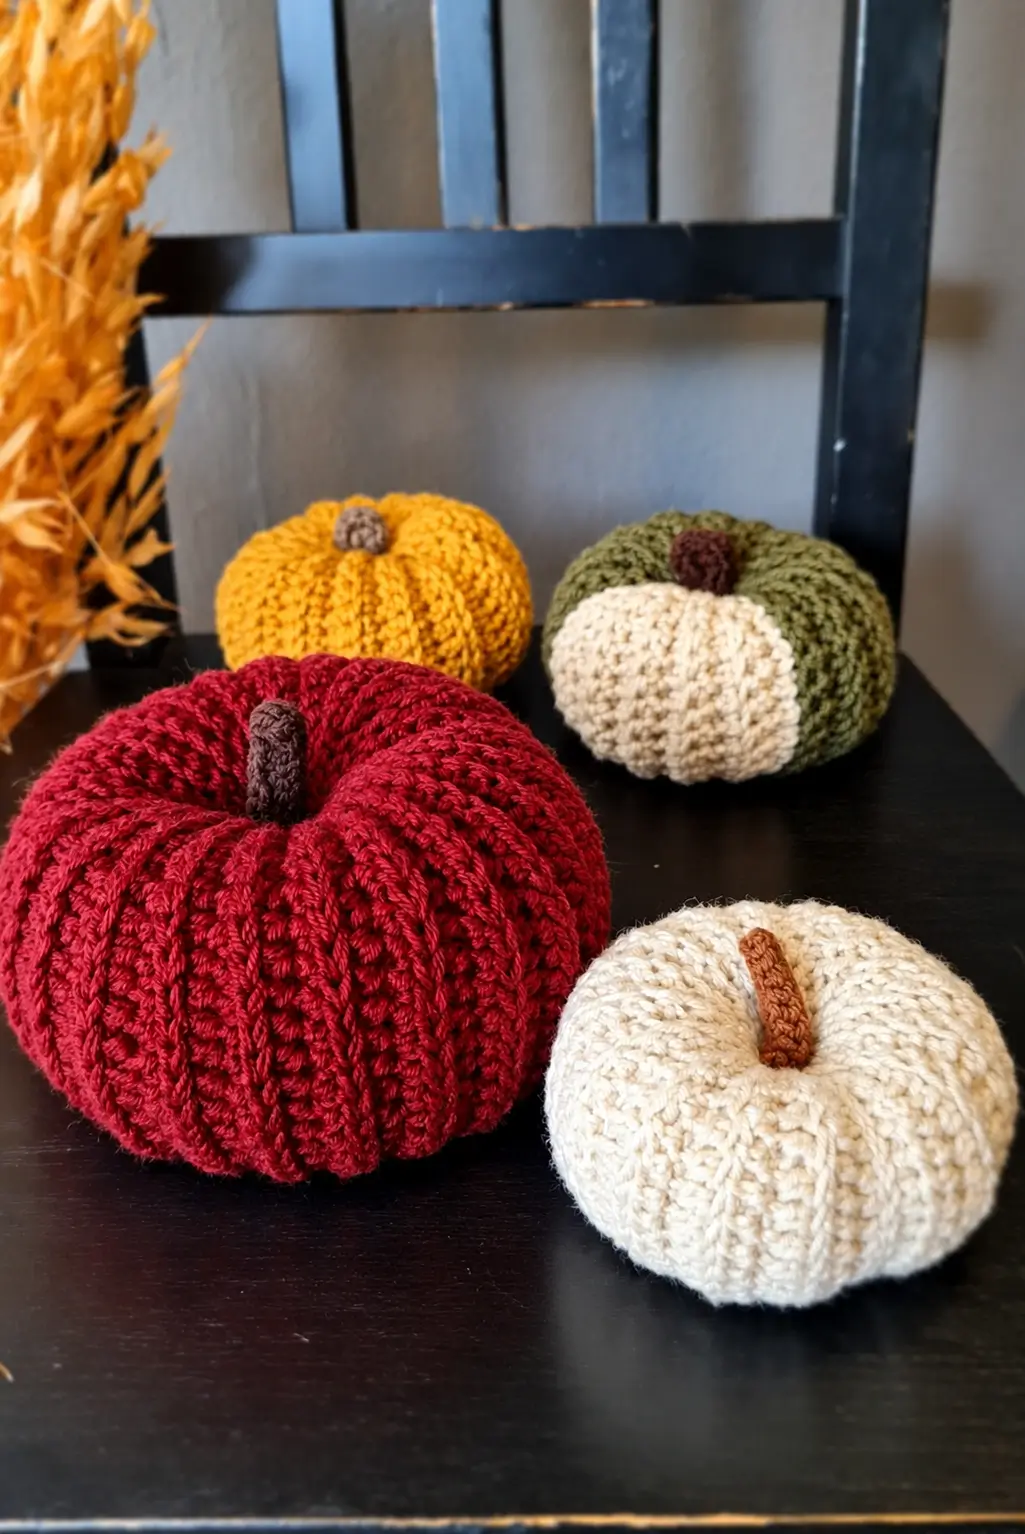
A pumpkin rib should run from the stem depression to the bottom center, which is why the direction of the crochet rows matters here. This ribbed crochet pumpkin pattern uses flat rectangles, vertical BLO texture, firm stuffing, and narrow crocheted stems. Work the pumpkins in worsted or Aran yarn with a 5 mm hook. The adjustable construction covers small shelf pumpkins, a larger centerpiece, and the distinctive green-and-cream color-block version shown in the reference.
What Makes These Crochet Pumpkins Different
The body begins as a rectangle rather than a sphere worked in continuous rounds. Once the short ends are joined, every raised crochet row turns into a vertical pumpkin rib. That construction also makes the two color crochet pumpkin possible: changing yarn for several complete rows produces a clean cream panel without interrupting the rib direction. The third structural decision is proportion. Each body rectangle needs considerably more length than height so the stuffed form becomes broad and squat instead of cylindrical. A frequent mistake in a BLO crochet pumpkin is making the rectangle nearly square. After gathering, that ratio produces a tall ball with weak side curvature rather than the flattened pumpkin profile visible in the photograph.
Project Info at a Glance
| Skill Level | Construction | Published Size Reference | Hook | Best For |
|---|---|---|---|---|
| Confident beginner | Worked flat, seamed and stuffed | 8 cm small-pumpkin benchmark | 5 mm | Fall shelves, tables and centerpiece sets |
Materials and Tools
Yarn
- Deep cranberry worsted/Aran yarn — large pumpkin.
- Warm cream worsted/Aran yarn — cream pumpkin and contrast panel.
- Mustard gold worsted/Aran yarn — small pumpkin.
- Olive green worsted/Aran yarn — medium color-block pumpkin.
- Chocolate brown yarn — red and green pumpkin stems.
- Cinnamon brown yarn — cream pumpkin stem.
- Taupe yarn — mustard pumpkin stem.
- Polyester fiberfill — stuffing.
A published 8 cm Aran/DK pumpkin uses approximately 25 m of body yarn. Treat that quantity as a small-pumpkin benchmark rather than multiplying it directly for the large red version. Crochet and weigh one rectangle when exact purchasing quantities are required.
Tools
- 5 mm crochet hook
- Yarn needle
- Scissors
- Locking stitch markers
- Tape measure
- Polyester stuffing
Abbreviations
- MR — magic ring
- ch — chain
- sc — single crochet
- hdc — half double crochet
- sl st — slip stitch
- BLO — back loop only
- st/sts — stitch/stitches
- RS — right side
- WS — wrong side
An invisible decrease is worked through the front loops of two neighboring stitches; the pumpkin bodies below are rectangles and therefore do not require decrease rounds.
Pattern — Step by Step
Each pumpkin body is worked flat. The short ends are joined to create a tube, the lower opening is gathered, the body is stuffed, and the upper opening is cinched around the stem.
The turning chain does not count as a stitch.
Small Mustard Pumpkin Body
Yarn: mustard gold.
Foundation: Ch 15.
Row 1: Hdc in second ch from hook and in every remaining chain. Ch 1, turn. (14)
Row 2: Hdc BLO in every stitch. Ch 1, turn. (14)
Rows 3–28: Repeat Row 2. (14 each row)
Do not fasten off with a short tail. Leave approximately 60 cm for seaming and gathering.
Lay the rectangle flat. The rib lines should run across the short dimension now; after the tube is formed, they will run vertically.
Small Cream Pumpkin Body
Yarn: warm cream.
Foundation: Ch 17.
Row 1: Hdc in second ch from hook and across. Ch 1, turn. (16)
Row 2: Hdc BLO across. Ch 1, turn. (16)
Rows 3–32: Repeat Row 2. (16 each row)
Fasten off with approximately 70 cm remaining for assembly.
This slightly longer rectangle produces a wider cream pumpkin while keeping the height relatively low.
Medium Olive and Cream Pumpkin Body
Yarn: olive green and warm cream.
Foundation: With olive, ch 18.
Row 1: Hdc in second ch from hook and across. Ch 1, turn. (17)
Rows 2–10: Hdc BLO across. Ch 1, turn. (17 each row)
Change to cream at the end of Row 10.
Rows 11–18: With cream, hdc BLO across. Ch 1, turn. (17 each row)
Change back to olive.
Rows 19–36: Hdc BLO across. Ch 1, turn. (17 each row)
Fasten off with a long olive tail.
The eight cream rows form one continuous vertical panel after the rectangle is seamed. Position the final seam toward the back of the pumpkin so the cream section remains visually centered on the front.
Large Cranberry Pumpkin Body
Yarn: deep cranberry.
Foundation: Ch 25.
Row 1: Hdc in second ch from hook and across. Ch 1, turn. (24)
Row 2: Hdc BLO in every stitch. Ch 1, turn. (24)
Rows 3–46: Repeat Row 2. (24 each row)
Fasten off with approximately 90 cm remaining.
Before assembly, compare the long and short dimensions. The long edge should be substantially greater than the height so the pumpkin has enough circumference to become broad and squat after stuffing.
Seaming the Pumpkin Body
Fold the rectangle so the first and final rows meet.
Keep the rib direction aligned.
Whipstitch or slip stitch the two short edges together.
Match one row to one row as you move across the seam.
A shifted seam creates a diagonal interruption in the vertical rib pattern.
Turn the resulting tube so the cleaner seam surface faces inward.
Closing the Bottom
Thread a long matching yarn tail onto a yarn needle.
Run the needle in and out around one open edge of the tube at intervals of approximately 8–10 mm.
Return to the starting point.
Pull gradually until the opening closes.
Pass through the gathered center several times.
Knot securely on the inside.
Do not trim the yarn immediately if additional shaping is required.
Stuffing the Pumpkin
Turn the body RS out.
Add polyester fiberfill in small pieces.
Fill the outside perimeter first, then the center.
Keep the stuffing firm enough to support the ribs but soft enough for the top and bottom centers to compress.
Rotate the pumpkin while filling it.
Check the silhouette from the side.
If the body becomes taller than intended, move some stuffing outward toward the perimeter rather than packing more directly into the center.
Closing the Top
Thread the remaining long tail around the upper opening using the same 8–10 mm running-stitch spacing.
Pull the opening partly closed.
Add the final amount of stuffing before the gap becomes too narrow.
Pull firmly.
Pass the needle through opposite sides of the gathered center several times.
Do not cut the yarn yet.
Creating the Deep Center Depression
Push the threaded needle from the top center through the pumpkin and out through the bottom center.
Pull the yarn until the top compresses.
Return the needle from bottom to top.
Repeat once or twice.
Stop when the body develops the squat profile shown in the reference.
Excessive tension can collapse the middle and produce a doughnut-shaped pumpkin, so compare the side profile after every pass.
Optional Extra Segment Shaping
The BLO fabric already creates vertical ribs. Additional sculpting yarn can deepen selected grooves on a large pumpkin.
Thread matching yarn through the top center.
Wrap it externally along one existing rib valley.
Pass through the bottom center and return to the top.
Repeat at evenly spaced positions.
Pull only until the groove becomes more visible.
The crochet texture should remain the primary rib structure.
Crochet Stem — Make 4
Yarn: chocolate, cinnamon, or taupe.
R1: Work 6 sc in MR. (6)
R2: Sc around. (6)
R3: Sc around. (6)
R4: Sc around. (6)
R5: Sc around. (6)
Fasten off with a 20 cm sewing tail.
Leave the stem unstuffed for a narrow appearance. Flatten it slightly before attaching it to the gathered top.
Stem Length Variations
For the small mustard pumpkin, stop after Round 3.
Use four rounds for the medium green pumpkin.
Five rounds suit the cream pumpkin.
The large cranberry pumpkin can use five or six rounds if a more prominent dark stem is preferred.
Keep the diameter at six stitches throughout. Increasing the stem creates a bulbous cap that does not match the narrow stems in the photograph.
Attaching the Stem
Position the stem over the gathered top opening.
Thread its tail onto a yarn needle.
Sew through the bottom edge of the stem and the surrounding pumpkin stitches.
Work around the complete stem circumference.
Pull the final stitches firmly enough to seat the stem inside the center depression.
Pass the tail through the stuffed body and bring it out several centimeters away.
Pull lightly and trim. The cut end will retract into the pumpkin.
Making the Green-and-Cream Pumpkin
The contrast panel should follow the same rib direction as the rest of the body.
Change color only at the end of a complete row.
Do not carry cream yarn across the green rows because long floats can become visible when the rectangle stretches around the stuffing.
Cut and secure each color instead.
After joining the rectangle, rotate the tube before gathering so the cream panel sits opposite the seam.
Center the stem over the entire pumpkin rather than over the cream section.
Adjusting Pumpkin Size
The foundation-chain length primarily controls pumpkin height.
The number of rows controls circumference.
For a wider pumpkin, add rows without increasing the foundation length.
For a taller pumpkin, increase the foundation chain.
A useful rectangle target is a long edge approximately 2.3–2.5 times the short edge. Increase that ratio toward 2.6–2.8 for a particularly flat, broad pumpkin.
Always judge the actual rectangle rather than relying exclusively on row numbers because yarn thickness and personal gauge alter the dimensions.
Yarn Planning
Make the smallest pumpkin first if using an unfamiliar yarn.
Weigh the completed body before adding stuffing.
Record the rectangle dimensions and yarn weight.
That sample provides a better basis for scaling the remaining pumpkins than generic yardage from a different gauge.
Keep extra yarn from every body color for gathering and optional sculpting.
Those long finishing strands consume more yarn than ordinary woven ends.
Assembly
- Crochet each pumpkin body as a flat ribbed rectangle, keeping the stitch count constant from the first row to the last.
- For the green pumpkin, work the cream panel as complete rows so its ribs remain parallel to the green sections.
- Join the first and final body rows to make a tube, matching the ribs across the seam.
- Gather and secure the bottom opening before turning the body RS out.
- Add fiberfill around the perimeter first and then fill the central area.
- Gather the upper opening, adding the final stuffing before pulling it completely closed.
- Pass matching yarn through the top and bottom centers to compress the body into a squat pumpkin shape.
- Add optional sculpting strands only where existing rib valleys need stronger definition.
- Crochet the narrow six-stitch stem and sew it securely into the top depression.
- Shape the ribs by hand, hide every finishing tail inside the body, and check that the pumpkin rests level.
The completed pumpkins should have continuous vertical ribs, a compressed center, rounded sides, and a narrow stem seated firmly at the top.
7 Technical Tips
- Count every body row before turning. Losing even one edge stitch makes the rectangle taper and creates an uneven pumpkin after seaming.
- Work every ribbed row through the same loop. Accidentally working beneath both loops creates a flat stripe that remains visible after stuffing.
- Keep the long rectangle edge about 2.3–2.5 times the short edge for a standard squat pumpkin. A near-square rectangle produces a taller cylindrical body.
- Space gathering stitches roughly 8–10 mm apart. Very wide gaps produce large pleats that are difficult to close at the center.
- Stop adding stuffing when the ribs remain visible without stretched stitch holes. Overstuffing flattens the BLO ridges and exposes fiberfill between stitches.
- Pull the top-to-bottom shaping strand in small increments. Compressing the center too far creates a doughnut profile instead of a shallow stem depression.
- Leave at least 20 cm of sewing tail on each stem. A short tail makes it difficult to stitch around the full six-stitch base and bury the end inside the body.
Finishing the Pumpkin Set
Place all four pumpkins on a level surface.
Check that the gathered bottom of each pumpkin is centered.
Redistribute stuffing by hand where one side appears flatter than the other.
Rotate the green pumpkin so its cream panel faces forward and its body seam faces backward.
Keep the large cranberry pumpkin slightly flatter than the smaller pieces to reproduce the proportional contrast visible in the reference.
If one stem leans excessively, add a hidden stitch from the stem base into the opposite side of the center depression.
Conclusion
The rectangle proportions and uninterrupted vertical ribs determine the final shape of this ribbed crochet pumpkin pattern. Make the mustard or cream version first, record the finished rectangle dimensions, and use that sample to scale the larger cranberry pumpkin. For the color-block design, change yarn only between complete rows so the cream panel follows exactly the same rib direction as the olive body. Arrange the finished set with the largest pumpkin forward and the smaller colors behind it. Share the project on Pinterest and Instagram with #RibbedCrochetPumpkin. For the green pumpkin specifically, would you keep the single cream panel or add a second cream section on the opposite side?