Introduction
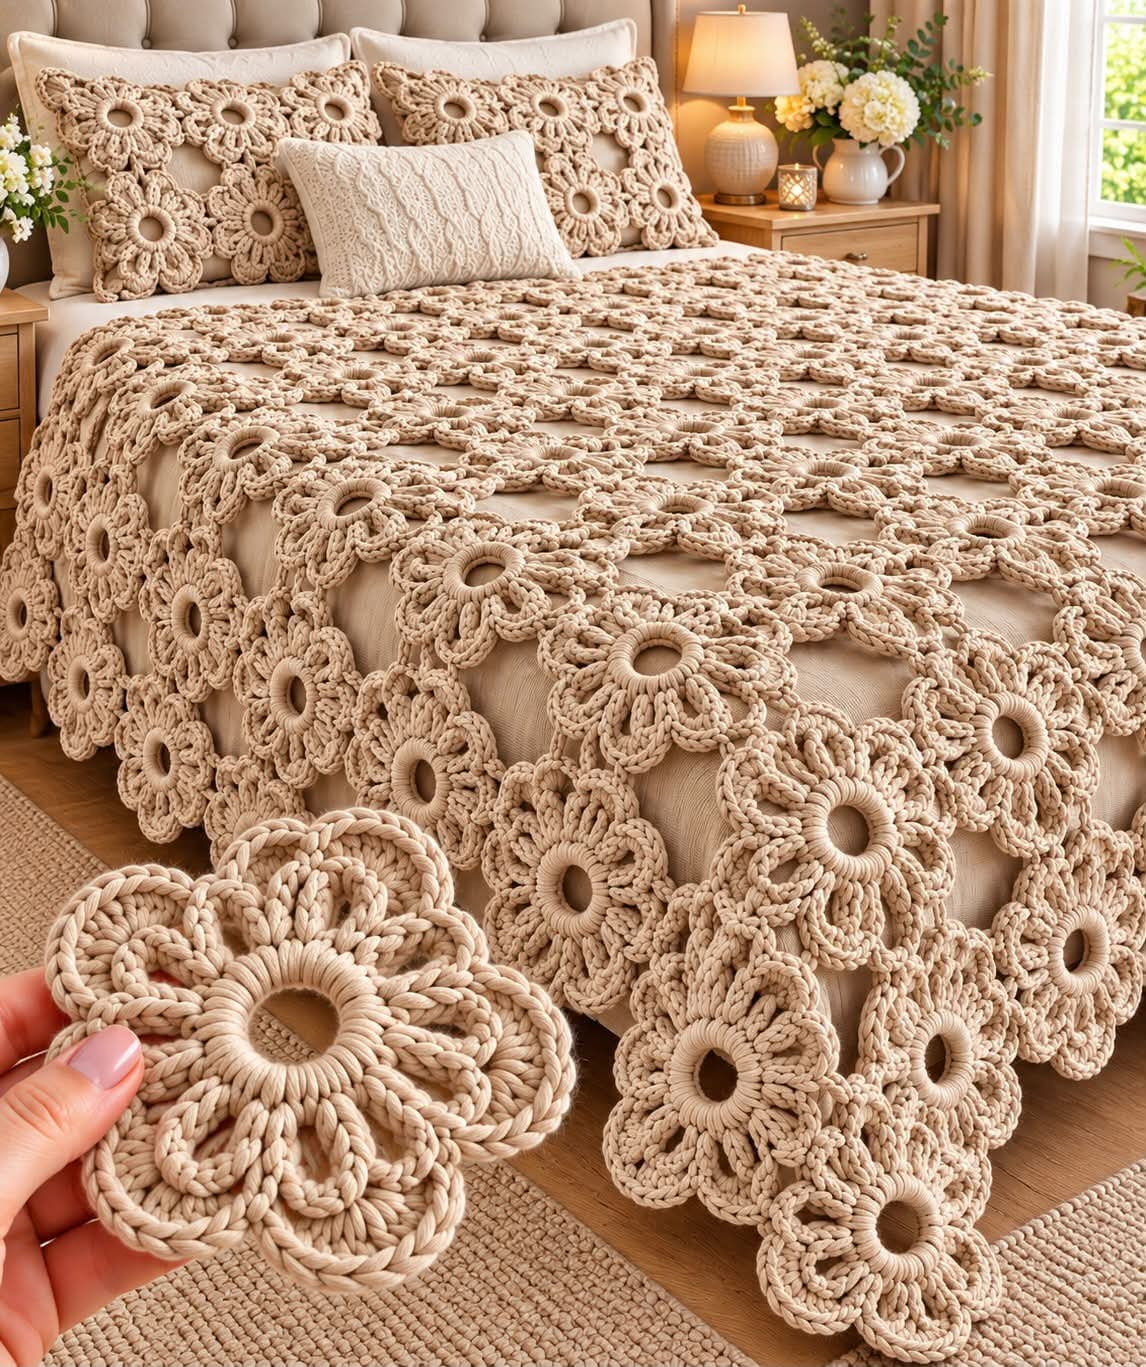
The open ring at the center has to remain circular after six heavy petals are attached around it. This crochet flower motif bedspread pattern uses warm beige yarn, raised looped petals and direct motif-to-motif joining to create the floral lace surface shown in the reference. Work one large flower repeatedly with medium-weight cotton or cotton-blend yarn and a 4.5–5.0 mm hook for an intermediate modular bedspread and matching pillow fronts.
The Design: What Makes This Flower Bedspread Different
This bedspread has no conventional granny-square background. The flowers themselves form the fabric. Each unit starts with a firm open center, then expands into six broad dimensional petals whose outer tips become joining points. Small negative spaces remain between neighboring motifs, giving the finished coverlet a lace structure even though the yarn is relatively substantial.
Scale is the second important decision. Published flower motifs vary widely: examples made with worsted yarn range from roughly 9.5 cm to 18 cm depending on construction, yarn and hook. For this photo-inspired joined crochet flower blanket, target approximately 14–16 cm across each blocked flower. The most common construction failure is tightening the petal-tip joins; that pulls the flowers toward one another and turns the open centers into ovals.
Project Info at a Glance
| Skill Level | Construction | Motif Target | Hook | Best For |
|---|---|---|---|---|
| Intermediate | Six-petal joined flower motifs | 14–16 cm | 4.5–5.0 mm | Bedspreads, throws and pillow fronts |
The motif dimensions are working targets for this original photo-inspired construction. Make one complete flower, wash it and block it before calculating the number required for a bedspread.
Materials and Tools
Yarn
- Warm beige / natural linen — medium #4 cotton or cotton-blend yarn — main flower motifs
- Warm beige / natural linen — same yarn and dye lot — joining and perimeter motifs
A smooth yarn is preferable because the design depends on clearly separated strands around the center ring and strongly defined petal outlines. Cotton gives the flowers a firm architectural shape. A cotton-acrylic blend reduces the total weight when making a bed-size version.
Do not assign a fixed gram quantity before sampling. Complete one flower, weigh it and multiply its weight by the planned motif count, then add an allowance for joining, edge motifs and swatching.
Tools
- 4.5–5.0 mm crochet hook
- Medium #4 beige cotton or cotton-blend yarn
- Yarn needle
- Scissors
- Locking stitch markers
- Tape measure
- Blocking mats
- Rust-resistant pins
Abbreviations
- MR — magic ring
- ch — chain
- sl st — slip stitch
- sc — single crochet
- hdc — half double crochet
- dc — double crochet
- tr — treble crochet
- dtr — double treble crochet
- sp — space
- st/sts — stitch/stitches
- FO — fasten off
Pattern — Six-Petal Flower Motif
This is an original construction based on the structural features visible in the reference image. It is not a transcription of a published pattern.
The motif is built in four sections: a permanent open center, six petal foundations, a dimensional inner petal layer and a firm outer outline used for joining.
Open Center Ring
Ch 24.
Join with sl st into the first chain, taking care not to twist the chain.
Round 1: Ch 1. Work 30 sc evenly around the chain ring rather than into individual chain loops.
Join with sl st to first sc. (30)
Round 2: Ch 1, sc in each stitch around. (30)
Join.
The center opening should remain clearly visible and approximately circular.
Dividing the Ring into Six Petals
Thirty stitches divide into six equal five-stitch sections.
Place a stitch marker after every 5 stitches.
You should have six equally spaced markers around the ring.
Each five-stitch section becomes the anchor for one petal.
Petal 1
Ch 12.
Working back along the chain:
Sl st in second chain from hook.
Sc in next chain.
Hdc in next chain.
Dc in next 2 chains.
Tr in next 3 chains.
Dc in next 2 chains.
Hdc in final chain.
Sl st into the fifth stitch of the same center-ring section.
This creates one long petal foundation arch.
Petal 2–6 Foundations
Move to the next marked five-stitch section.
Repeat the same ch-12 petal construction.
Continue until six equally spaced petal foundations surround the center ring.
At this stage the motif should resemble a six-point framework rather than a finished flower.
Building the First Dimensional Petal
Work around the first petal foundation rather than only into its top loops.
Along the first side work:
2 sc, 2 hdc, 3 dc, 3 tr.
At the petal tip work:
(2 tr, ch 3, 2 tr)
Along the opposite side work:
3 tr, 3 dc, 2 hdc, 2 sc.
Sl st into the center ring at the petal base.
The ch-3 space at the top becomes the main joining point.
Complete All Six Outer Petals
Repeat the same sequence around each remaining foundation:
2 sc, 2 hdc, 3 dc, 3 tr, (2 tr, ch 3, 2 tr), 3 tr, 3 dc, 2 hdc, 2 sc.
Anchor each petal at the center ring before moving to the next.
Count the six ch-3 tips before continuing.
Inner Raised Petal Layer
The reference flower has a second looped structure inside each broad petal.
Join yarn near the base of the first petal.
Ch 9.
Sl st back into the opposite side of the same petal base.
This forms an inner loop.
Turn the work slightly.
Around the ch-9 loop work:
2 sc, 2 hdc, 3 dc, 2 hdc, 2 sc.
Sl st at the base.
FO or move carefully to the next petal.
Inner Petals 2–6
Repeat the ch-9 inner loop inside every large petal.
Keep all six loops at the same tension.
Each inner petal should remain slightly raised above the broader outer petal.
Do not stretch these loops during blocking.
Petal Outline
Join yarn at the base of one outer petal.
Work surface sl st or regular sc around its outside edge.
Continue toward the ch-3 tip.
Into the tip work:
(sc, ch 2, sc)
Continue down the opposite edge.
Repeat around all six petals.
This extra outline strengthens the motif and produces the corded appearance visible in the reference.
Reinforcing the Center Ring
If the central opening stretches after the petals are added, join yarn to Round 1 of the ring.
Work one round of surface slip stitch around the inside circumference.
Keep the stitches loose enough that the ring remains flat.
Do not reduce the circumference.
The finished opening should remain circular rather than becoming a tight buttonhole.
Blocking the Master Flower
Dampen the completed motif according to the yarn care instructions.
Place it on a blocking mat.
Pin the six petal tips first.
Measure from one tip to the opposite tip.
Rotate the ruler and repeat across the other two opposing pairs.
Target approximately 14–16 cm across.
The three measurements should be within approximately 5 mm of one another.
Adjust the petals before the motif dries.
Joining Two Flower Motifs
The reference does not use solid background squares. Flowers meet directly at selected petal tips.
Make the first motif completely.
Work the second motif until reaching a petal that will touch the first.
At the ch-3 tip, work:
ch 1, sl st into the corresponding ch-3 space of the completed flower, ch 1.
Continue down the petal normally.
This creates a flexible join rather than a rigid seam.
Joining Along Two Adjacent Petals
For greater stability, neighboring motifs can connect at two points.
Join the first matching petal tips.
Continue around the working flower.
At the next adjacent tip, repeat:
ch 1, sl st into neighboring motif, ch 1.
Two joins reduce rotation while preserving the lace openings between flowers.
Four-Motif Intersection
When several flowers meet, do not force every petal into one central stitch.
Connect each new motif to the existing neighboring tips individually.
Leave a small open space between the flower bodies.
This negative space is part of the lace structure and prevents the bedspread from becoming excessively dense.
Alternative Sewn Join
Make and block every motif separately.
Lay two flowers side by side.
Thread a yarn needle with matching beige yarn.
Sew through the ch-3 tip of the first flower and the corresponding tip of the second.
Repeat the pass once.
Secure on the reverse.
Do not pull the yarn until the petal tips overlap.
They should touch while retaining their original shape.
Planning the Bedspread Layout
Arrange blocked motifs before permanent joining.
Because the flowers are round rather than square, adjacent rows can be slightly offset.
This staggered layout reduces large empty spaces and produces the continuous floral field visible in the reference.
Begin with one central row.
Place the next row so each flower sits between two flowers in the first row.
Repeat the arrangement across the bedspread.
Example Motif Counts
Exact counts depend on the blocked flower size and overlap created by joining. The following figures are planning examples rather than fixed bed dimensions.
| Approximate Layout | Motif Count | Suggested Use |
|---|---|---|
| 6 × 8 | Approx. 48 | Small throw |
| 8 × 10 | Approx. 80 | Large throw |
| 10 × 12 | Approx. 120 | Bed cover |
| 12 × 14 | Approx. 168 | Large bedspread |
Staggered rows may contain different numbers of flowers, so lay out actual blocked motifs before committing to the final count.
Estimating Finished Width
Measure the distance from the center of one blocked flower to the center of the next after joining.
This repeat measurement is more useful than the full flower diameter because neighboring petals may overlap slightly.
For example, if the joined repeat measures 14 cm and ten motifs span the main row:
14 cm × 10 = approximately 140 cm.
Add the width contributed by the outer half-motifs or edge petals separately.
Estimating Yarn
Weigh one completed blocked flower.
Suppose one motif weighs 22 g.
For 120 motifs:
22 × 120 = 2,640 g.
Add approximately 10–15% for sampling, joining, replacement motifs and edge finishing.
The example is a calculation method, not a fixed yarn requirement. Yarn construction, hook size and motif dimensions can change consumption substantially.
Making a Straight Bedspread Edge
A field of circular flowers naturally creates an irregular perimeter.
The reference uses the floral outline as part of the decorative edge, so a perfectly rectangular border is unnecessary.
At the sides, position the final flower row so complete petals project outward.
At the corners, rotate the terminal motif slightly until two petals define the corner.
Block these outer motifs carefully after assembly.
Optional Half Flower for Straighter Edges
If a straighter edge is preferred, make half motifs.
Begin with a semicircular center rather than the full ring.
Create three petals instead of six.
Join the three-petal unit into gaps along the perimeter.
Use this method only after the main blanket is assembled so the exact edge gaps are known.
Simple Outer Chain Edge
For a restrained finish, join yarn to the tip of an outer petal.
Ch 5.
Sc into the next available petal tip.
Ch 5 again.
Continue around the complete bedspread.
At wider spaces, use ch 6 or ch 7 as required to prevent pulling.
Scalloped Outer Border
After completing the chain foundation edge, work a second round.
Into each ch-5 space work:
sc, hdc, 3 dc, hdc, sc.
Repeat around.
The resulting shells echo the rounded petals without adding another heavy flower layer.
Matching Pillow Front
The reference repeats the flower construction across two rectangular pillow shams.
Make enough complete motifs to cover the front dimensions of the pillow insert.
For a standard rectangular sham, arrange two horizontal rows of flowers.
Offset the second row slightly if necessary.
Join the petal tips using the same method as the bedspread.
Block the completed floral panel before adding the back.
Fabric-Backed Pillow Cover
A fabric backing is practical because the floral crochet contains large open spaces.
Cut a fabric panel slightly larger than the blocked crochet front.
Turn under the raw edges.
Hand-sew the fabric to the solid outer sections of the crochet motifs.
Do not stitch through the dimensional inner petals.
Add an envelope or zipper closure to the fabric back if a removable cover is required.
Crocheted Pillow Back
For an all-crochet sham, make a dense rectangle.
Chain to the required width.
Row 1: Hdc in third chain from hook and across.
Row 2: Ch 2, turn, hdc across.
Repeat Row 2 until the panel matches the floral front.
Block both pieces.
Join around three sides with sc.
Insert the pillow form and close the final side, or add buttons for a removable cover.
Maintaining the Open Center
The center ring is one of the most visible elements in this design.
Measure its inside diameter on the master motif.
Check every fifth flower against that measurement.
If the ring becomes progressively smaller, the Round 1 sc stitches are being worked too tightly.
If it expands, reduce the looseness of the foundation chain or use the smaller end of the recommended hook range.
Making the Petals More Dimensional
The inner ch-9 petal can be lifted slightly after blocking.
Do not pin the inner layer flat.
Block only the outer petal.
Once dry, pull the inner loop gently toward the center ring.
This creates the raised corded appearance visible in the hand-held motif.
Alternative Eight-Petal Version
If a denser flower is preferred, divide a suitable center ring into eight equal sections rather than six.
Shorten each petal slightly so neighboring petals do not overlap excessively.
Make a complete sample before using the variation in a blanket.
Do not mix six- and eight-petal motifs in the same joined grid because their joining angles differ.
Making a Smaller Flower
Use DK #3 yarn with a 3.5–4.0 mm hook.
Reduce the center chain from 24 to approximately 18–20 chains.
Shorten the outer petal foundation from ch 12 to ch 9 or ch 10.
Keep six petals.
Block the finished sample and use its actual measurement for all layout calculations.
Making a Larger Flower
Use the same medium yarn with a 5.5 mm hook or select a slightly thicker yarn.
Increase the petal foundation by one or two chains.
Do not enlarge only the center ring. A disproportionately large opening makes the petals look narrow and disconnected.
The center, petal length and petal width should increase together.
Assembly
- Crochet one complete beige flower with its open center, six outer petals and six raised inner petals.
- Block the master flower to approximately 14–16 cm and record all three opposite-tip measurements.
- Make the remaining motifs while comparing every fifth flower with the blocked master for center and diameter consistency.
- Lay the flowers across a bed or large flat surface and establish the staggered row arrangement before joining.
- Join neighboring flowers at corresponding ch-3 petal tips without pulling the tips into overlapping positions.
- Complete one row at a time, then attach each new row to the existing floral field at multiple matching points.
- Check the assembled section after every two rows and correct any motif that rotates or pulls the surrounding flowers inward.
- Fill only genuine structural gaps with additional full or half motifs rather than tightening existing joins.
- Add the optional chain-and-scallop perimeter while maintaining the natural floral outline of the outer row.
- Block the complete bedspread flat, align the flower centers and lift the inner petals after the outer layer has dried.
The finished coverlet should form one continuous field of beige flowers with round open centers, raised inner petals and small lace spaces between joined motifs.
7 Technical Tips
- Measure the center opening on every fifth motif. A diameter change greater than about 5 mm becomes obvious when identical flowers are placed beside one another.
- Keep all six petal-tip ch-3 spaces equal. One shortened tip rotates the motif after joining and shifts the neighboring row out of alignment.
- Compare three opposite-tip measurements before joining. A difference greater than 5–7 mm indicates that one petal is longer or tighter than the others.
- Leave the joining slip stitch slightly loose. A tight connection pulls two petals together and can distort both center rings into oval shapes.
- Block only the outer petal layer flat. Pinning the ch-9 inner petals removes the raised texture that gives the flower its dimensional appearance.
- Weave tails through at least 5 cm of the solid center or petal stitches. The large openings between motifs provide too few contact points for short tails.
- Weigh one finished flower before buying yarn for the full bedspread. A difference of only 3 g per motif becomes 360 g across a 120-flower project.
Choosing the Beige Yarn
The reference uses a warm natural beige rather than stark white. This color keeps the dimensional stitches visible because shadows form inside the center rings and between the raised petal layers.
Look for shades described as linen, oatmeal, natural, sand or light beige.
A tightly twisted cotton produces crisp petal outlines. Softer cotton blends produce more drape but may need firmer blocking around the center rings.
Avoid very fuzzy yarn. The motif contains several adjacent strands and open spaces, and excessive halo can blur the boundaries between the petal layers.
Care and Final Blocking
Follow the care instructions for the selected yarn.
Support the complete bedspread when wet. A large cotton motif blanket can become substantially heavier after washing.
Lay it flat.
Align the central openings into visually consistent rows.
Check that the joining points are not pulling.
Shape the six outer petals of each edge motif.
Allow the bedspread to dry.
After drying, lift and separate the inner petal loops by hand rather than pressing them flat.
Conclusion
The open center is the measurement that controls this crochet flower motif bedspread pattern. Make one six-petal flower first, block it to the 14–16 cm target and record both its center diameter and opposite-tip measurements before producing the full set. Join flowers only at matching petal tips, keep those connections flexible and allow small spaces to remain between neighboring motifs. Your next step is to crochet and weigh one complete beige sample so the bedspread dimensions and yarn quantity can be calculated from actual results. Save the finished project to Pinterest or share it on Instagram with #BeigeFlowerMotifBedspread. Would you keep the entire bedspread in natural beige or add a darker center ring to each flower?