Introduction
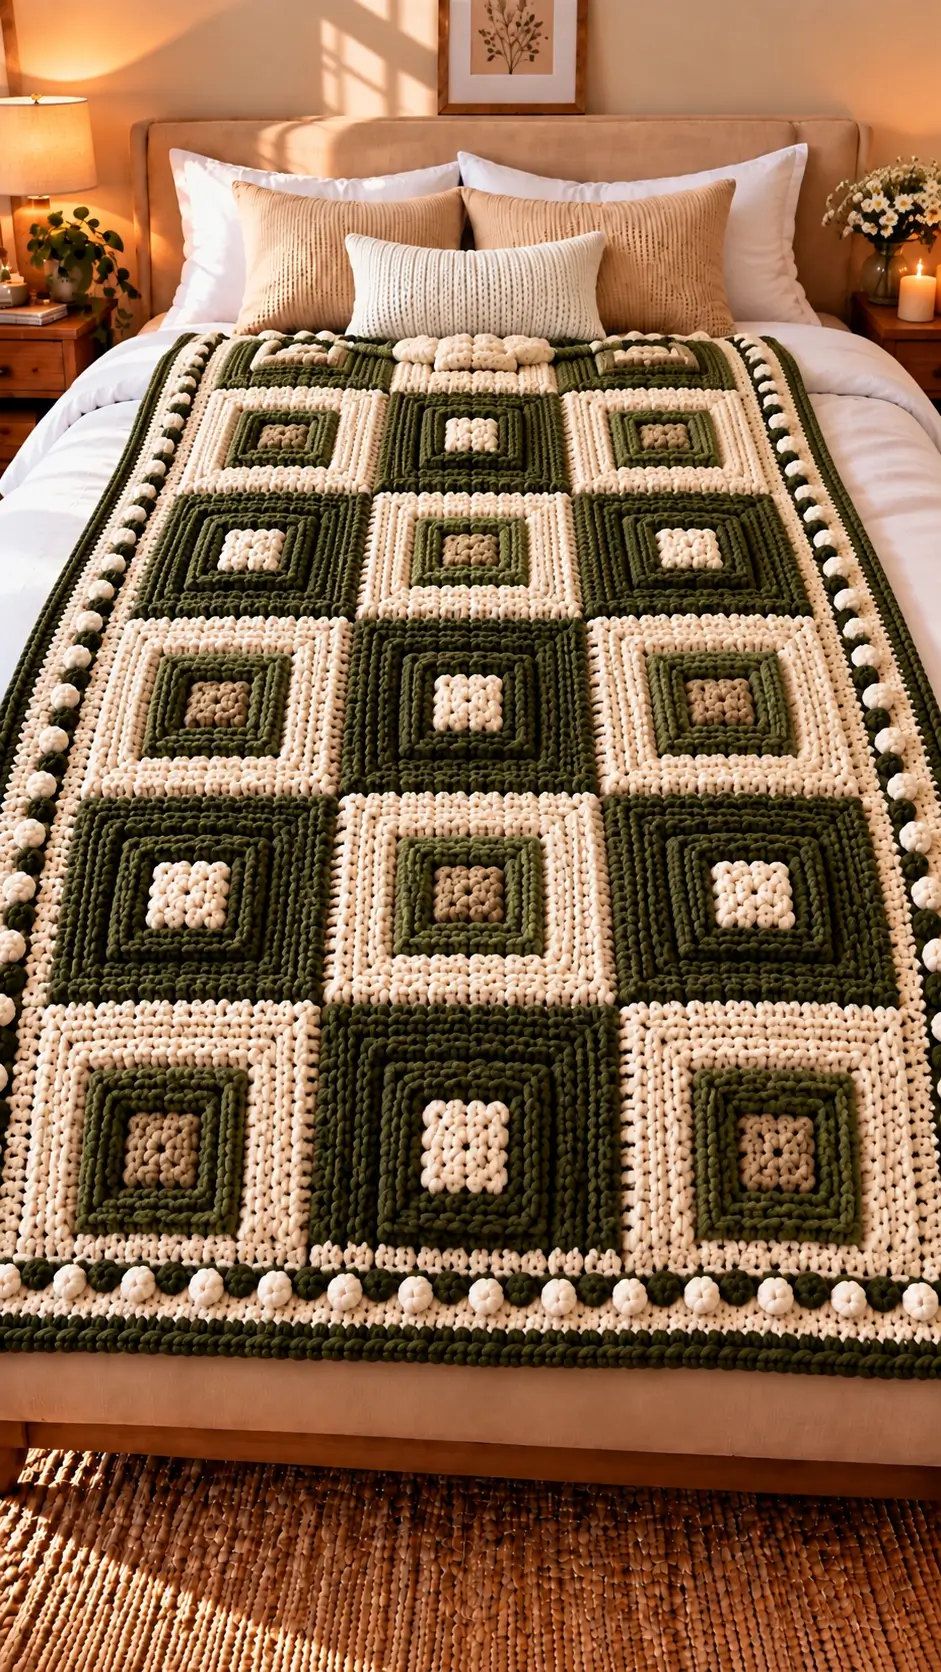
Fifteen concentric squares give this olive-and-cream blanket its checkerboard geometry. This olive green crochet blanket pattern reconstructs the visible layout using seven-round solid motifs, raised accent lines, and a bobble-edged perimeter. Plan for super-bulky chenille yarn, an 8 mm hook, and a target throw measuring approximately 106 × 170 cm if each finished square measures 32 cm. Intermediate crochet skills are needed, particularly for color changes and joining. The modular construction allows damaged squares to be repaired individually.
The Design: What Makes This Blanket Different
The photograph uses three columns and five rows rather than an all-over stitch repeat. Alternating olive-dominant and cream-dominant blocks creates a structured grid, while small taupe centers prevent the high-contrast squares from appearing disconnected.
This chunky square blanket uses a solid-granny foundation because closely spaced double crochets keep the background more opaque than open cluster motifs. Back-loop rounds expose narrow ridges; surface slip stitches can increase the relief without changing the counted base stitches.
A separate bobble border follows the assembled rectangle, so raised details stay aligned across seams. For this geometric crochet afghan, the main failure is inconsistent motif size: even a 5 mm difference per square can produce a visible 25 mm error down a five-square column. Make two test squares, measure both after resting, then settle on one hook and tension before proceeding.
Project Info at a Glance
| Project Detail | Specification |
|---|---|
| Skill Level | Intermediate |
| Estimated Time | Multiple crochet sessions |
| Target Finished Size | Approximately 106 × 170 cm |
| Crochet Hook | 8 mm |
| Yarn Weight | Super Bulky #6 |
| Yarn Texture | Chenille or velvet-style |
| Construction | 15 joined crochet squares |
| Best For | Sofa throw or foot-of-bed blanket |
Important sizing note: The measurements are calculated targets for this photo-inspired design, not dimensions measured from the photograph. Actual sizing depends on yarn, hook, tension, and the finished size of each square.
Materials and Tools
Yarn
Choose super-bulky #6 chenille yarn in coordinated earthy colors. Using the same yarn line for every shade helps maintain consistent thickness and square measurements.
Bernat Blanket yarn is one suitable example. A standard ball contains approximately 300 g and 201 m, and the manufacturer recommends an 8 mm crochet hook.
- Dark olive green: Super Bulky #6 chenille yarn, provisional budget 1,500 g (5 balls).
- Warm ivory or cream: Super Bulky #6 chenille yarn, provisional budget 1,200 g (4 balls).
- Muted sage green: Super Bulky #6 chenille yarn, provisional budget 300 g (1 ball).
- Sand or taupe: Super Bulky #6 chenille yarn, provisional budget 300 g (1 ball).
Yarn quantity note: The 3,300 g total is a preliminary purchasing allowance, not tested consumption. Crochet and weigh one sample square of each color arrangement before purchasing the full quantity. Decorative ridges and bobbles may increase yarn usage.
Yarn specifications: Bernat Blanket Yarn — Yarnspirations.
Tools
- 8 mm crochet hook
- Large-eye tapestry needle
- Locking stitch markers
- Sharp scissors
- Measuring tape
- Kitchen scale for yarn measurements
- Blocking mat or flat measuring surface
Crochet Abbreviations
- MR: Magic ring
- sc: Single crochet
- dc: Double crochet
- ch: Chain
- sl st: Slip stitch
- BLO: Back loop only
- RS: Right side
- WS: Wrong side
- sp: Space
- bo: Five-double-crochet bobble
- rep: Repeat
Bobble stitch: Work five unfinished double crochets into the same stitch. Yarn over and pull through all six loops on the hook. Make one securing chain. The completed bobble counts as one stitch, while the securing chain does not count as an additional stitch.
Bobbles project away from the working side. Work them with the wrong side facing when the raised texture needs to appear on the right side.
Olive Green Crochet Blanket Pattern — Step by Step
This blanket is assembled from 15 solid square motifs arranged in three columns and five rows. Each square is crocheted separately, embellished with raised details, and joined before adding the continuous bobble border.
Construction note: Use US crochet terminology. Work in joined rounds, not a continuous spiral. The beginning chain 3 counts as one double crochet. Joining slip stitches and corner chains are excluded from the double crochet totals.
Color Plan and Square Arrangement
Make eight cream-dominant squares (C) and seven olive-dominant squares (O).
| Column 1 | Column 2 | Column 3 |
|---|---|---|
| Cream | Olive | Cream |
| Olive | Cream | Olive |
| Cream | Olive | Cream |
| Olive | Cream | Olive |
| Cream | Olive | Cream |
Cream-dominant squares: Use taupe for R1, sage for R2, olive green for R3–R4, and cream for R5–R7.
Olive-dominant squares: Use cream for R1, sage for R2, and dark olive green for R3–R7.
These combinations create the alternating geometric arrangement. Maintain the same stitch counts regardless of color changes.
Solid Concentric Crochet Square (Make 15)
Yarn: Follow the color arrangement above.
R1: In MR, ch 3 (counts as dc), 2 dc, ch 2; repeat (3 dc, ch 2) three times. Join to the first ch-3. (12 dc; 4 corner spaces)
R2: Attach yarn in one corner space. Ch 3, dc, ch 2, 2 dc in the same corner. Work 1 dc in each of the next 3 dc. Repeat [(2 dc, ch 2, 2 dc) in the next corner, 1 dc in each of the next 3 dc] three times. Join. (28 dc; 4 corner spaces)
R3: Work in BLO of the straight-side stitches. Make (2 dc, ch 2, 2 dc) in every corner space, with 7 dc between successive corners. Join. (44 dc; 4 corner spaces)
R4: Work (2 dc, ch 2, 2 dc) in every corner space, with 11 dc between successive corners. Join. (60 dc; 4 corner spaces)
R5: Work in BLO of straight-side stitches. Make standard corners, with 15 dc between successive corners. Join. (76 dc; 4 corner spaces)
R6: Work standard corners and 19 dc between successive corners. Join. (92 dc; 4 corner spaces)
R7: Work standard corners and 23 dc between successive corners. Join. (108 dc; 4 corner spaces)
Fasten off after Round 7, leaving approximately 20 cm of yarn for sewing or 12 cm if joining with separate yarn.
Every finished square contains four corner spaces. The seventh round has 27 double crochets along each side between adjacent corner spaces, including the stitches positioned beside the corners.
Check all four sides before joining. If the side measurements differ by more than 5 mm, inspect the corner stitches for missed or duplicated stitches.
Raised Concentric Ridges (Make on 15 Squares)
Yarn: Dark olive for cream-dominant squares; cream or sage for olive-dominant squares.
Surface slip stitches create the dimensional concentric lines visible in the blanket design without changing the base square’s stitch counts.
Ridge 1: With the square facing right side up, attach the accent yarn to an exposed front loop left behind when Round 3 was worked in BLO.
Work loose surface slip stitches around the exposed loops of Round 2. Skip corner chain spaces. (28 surface sl st)
Ridge 2: Attach yarn to the exposed front loops left behind by Round 5. Work surface slip stitches around the 60 double crochet stitches of Round 4, skipping the corner chain spaces. (60 surface sl st)
Fasten off after each ridge and weave the ends into matching color sections on the wrong side.
Technical note: Do not tighten the surface slip stitches. Decorative ridges that are shorter than the underlying square perimeter will pull the fabric inward and create unwanted cupping.
Raised Bobble Center Patches (Make 15)
Yarn: Cream for olive-dominant squares; taupe for cream-dominant squares.
Each patch contains four raised bobbles arranged in a compact two-by-two formation.
Row 1 (RS): Ch 5. Work sc in the second chain from the hook and in each remaining chain. Turn. (4 sc)
Row 2 (WS): Ch 1, sc, bo, bo, sc. Turn. (4 sts)
Row 3 (RS): Ch 1, work 1 sc in each stitch. Turn. (4 sc)
Row 4 (WS): Ch 1, sc, bo, bo, sc. Turn. (4 sts)
Row 5 (RS): Ch 1, work 1 sc in each stitch. (4 sc)
Fasten off, leaving a 25 cm sewing tail.
Position each patch over the central section of its square. Sew the perimeter securely, keeping the raised bobbles facing outward.
A flatter version can be made by omitting the patches and leaving the original square centers visible.
Joining the Crochet Squares
Yarn: Dark olive or cream to coordinate with the visible joining edges.
Place the completed squares in the planned three-column, five-row arrangement.
Photograph the layout before joining to preserve the checkerboard sequence.
- Place two adjacent squares with right sides facing each other.
- Match their corresponding corner chain spaces.
- Insert the hook through the back loops of both matching edge stitches.
- Work a loose slip stitch through the paired loops.
- Continue across the edge, matching 27 double crochet stitches against 27 double crochet stitches.
- Connect the corner chain spaces without creating extra edge stitches.
- Repeat until each horizontal row contains three connected squares.
- Join the five completed rows together using the same method.
Keep seam tension even. Tight slip-stitch joins restrict the movement of bulky chenille fabric and can create ridges or puckering at the intersections.
Decorative Bobble Border — Five Rounds
Yarn: Cream for B1 and B3, dark olive for B2 and B5, with alternating olive and cream bobbles for B4.
The assembled blanket has 16 exposed square sides around its outer perimeter. Each side contributes 27 double crochet stitches from Round 7.
B1: With RS facing, work one sc into every exposed R7 double crochet stitch around the blanket. Do not place extra stitches into interior seam junctions. Work 3 sc in each of the four outer blanket corners, marking the center stitch at each corner. Join. (444 sc)
B2: Work 1 sc in each stitch around, making 3 sc into each marked corner stitch. Move markers to the new center corner stitches. Join. (452 sc)
B3: Repeat the same corner increase pattern, making 3 sc in each marked corner and 1 sc in every other stitch. Join and turn the blanket so WS faces. (460 sc)
B4: With WS facing, work around the border, replacing approximately every seventh regular sc with one five-dc bobble. Work 3 regular sc into each marked corner stitch. Alternate cream and olive bobble colors at selected intervals, avoiding long carried yarn strands. Join and turn back to RS. (468 stitches, with each bobble counting as one stitch)
B5: With RS facing, work 1 sc in each stitch and 3 sc in every marked outer corner. Join to the first sc and fasten off. (476 sc)
The raised bobbles should project on the right side of the blanket because Round B4 was worked with the wrong side facing.
Border note: This reconstruction uses integrated crochet bobbles rather than individual sewn-on balls. The method produces a similar dimensional effect while reducing the number of separate attachments.
Gauge, Finished Size, and Yarn Calculations
The target finished square measures approximately 32 × 32 cm after resting and measuring.
With three columns and five rows, the joined central blanket would measure approximately 96 × 160 cm before the final border, assuming no measurable size is lost at the seams.
If the border adds approximately 5 cm around every outer edge, the planned finished dimensions become 106 × 170 cm.
These are design targets rather than guaranteed measurements. Seven rounds may produce a smaller or larger square depending on the yarn and crochet tension.
How to Check the Gauge
- Crochet one complete cream-dominant square.
- Make a second square using the olive-dominant arrangement.
- Leave both samples flat overnight.
- Measure each square horizontally, vertically, and through the center.
- Compare the dimensions and adjust hook size or tension if necessary.
- Record the yarn consumption of each sample using a kitchen scale.
If a finished square measures 29 cm instead of 32 cm, the assembled three-column width will be approximately 87 cm before the border, and the five-row length approximately 145 cm.
An optional eighth round increases the double crochet total from 108 to 124, with 31 double crochets between adjacent corner spaces. Adding this round also requires the border stitch counts to be recalculated.
Calculating the Required Yarn
For more accurate purchasing, weigh the two completed sample square styles, including their decorative ridges and center patches.
Multiply the measured mass of one cream-dominant square by eight and one olive-dominant square by seven.
Then estimate the joining and border yarn separately, allowing an additional 10–15% for ends, corrections, and repairs.
Do not substitute a lighter yarn weight without preparing a new gauge sample. A change from super-bulky chenille to worsted-weight yarn can substantially reduce the final measurements.
Assembly Instructions
- Verify the first square. Confirm that the seventh round contains 108 double crochets and four corner spaces. Use the completed sample as the dimensional reference for the remaining pieces.
- Complete the color variations. Crochet eight cream-dominant squares and seven olive-dominant squares, keeping the same hook and tension throughout.
- Arrange the design. Position the 15 squares in a three-column and five-row checkerboard layout, alternating the dominant colors.
- Add the raised ridges. Work the surface slip-stitch lines on each square before joining, allowing access to the wrong side for securing yarn tails.
- Attach the center patches. Position the 15 bobble patches consistently and sew securely around their edges.
- Join the horizontal rows. Connect three squares per row using back-loop slip stitches, aligning all corresponding stitches and corners.
- Connect the rows. Join the five completed rows, checking that the intersections remain aligned and the blanket lies flat.
- Crochet the foundation border. Work border rounds B1 through B3, marking the four outer corners and maintaining the calculated stitch counts.
- Complete the decorative edging. Work the bobble round from the wrong side, then finish with the final single crochet round on the right side.
- Finish and measure. Weave yarn tails securely, trim excess ends, spread the blanket on a flat surface, and record the final width and length.
The blanket is complete when all 15 squares, decorative details, joining seams, and five border rounds have been checked.
7 Technical Tips for a Professional Finish
- 1. Prevent missing corner stitches. Mark each chain-2 corner space before beginning Round 2, because skipping one stitch changes the next side count. Recount the double crochets after completing every round.
- 2. Maintain consistent square dimensions. A 5 mm variation repeated across five rows can produce a 25 mm alignment error. Measure the squares flat and compare them after the same resting period.
- 3. Check hidden stitches in chenille yarn. Plush fibers can conceal the first double crochet beside a corner. Confirm the complete 108-stitch count of Round 7 before fastening off.
- 4. Control the direction of bobbles. Bobbles project away from the side being worked. Crochet border Round B4 with the wrong side facing so the raised details appear on the front.
- 5. Avoid tight raised ridges. Surface slip stitches that are shorter than their underlying loops pull the square inward. Maintain a loose, even tension and check that every completed block lies flat.
- 6. Pin square edges before joining. Misaligned seams can shift neighboring motifs by one or more stitches. Mark both ends and the midpoint of every 27-stitch edge before crocheting the seam.
- 7. Secure chenille yarn tails. Short ends can work loose when the blanket is washed or stretched. Leave 20–25 cm where practical and weave each end through several nearby stitches in two directions.
Cleaning and Care
Follow the washing instructions provided on the selected yarn label. For polyester chenille, avoid treating the photographed texture as proof of a specific brand or care requirement.
Check the security of all raised center patches and border stitches before washing. Use a gentle laundering method permitted by the yarn manufacturer, and avoid excessive heat that could damage synthetic fibers.
Dry the blanket according to the yarn label, then arrange the square edges flat while the fabric settles. Heavy stretching can distort the joined sections and produce uneven border measurements.
Conclusion
The olive green crochet blanket pattern combines 15 counted solid squares, two deliberately different color arrangements, four-bobble center patches, and a five-round raised border. It is a reconstruction of the photograph rather than the original maker’s documented design. Before cutting yarn for all 15 blocks, complete one sample in each color arrangement, measure their sides, and weigh them to revise the material budget. Record your final size and hook choice in the project notes.
Share a flat-lay photograph on Pinterest and a seam close-up on Instagram with #OliveGreenTexturedBlanket.
Which olive-to-cream transition should be most prominent: the narrow inner ring or the broad outside band?