Introduction
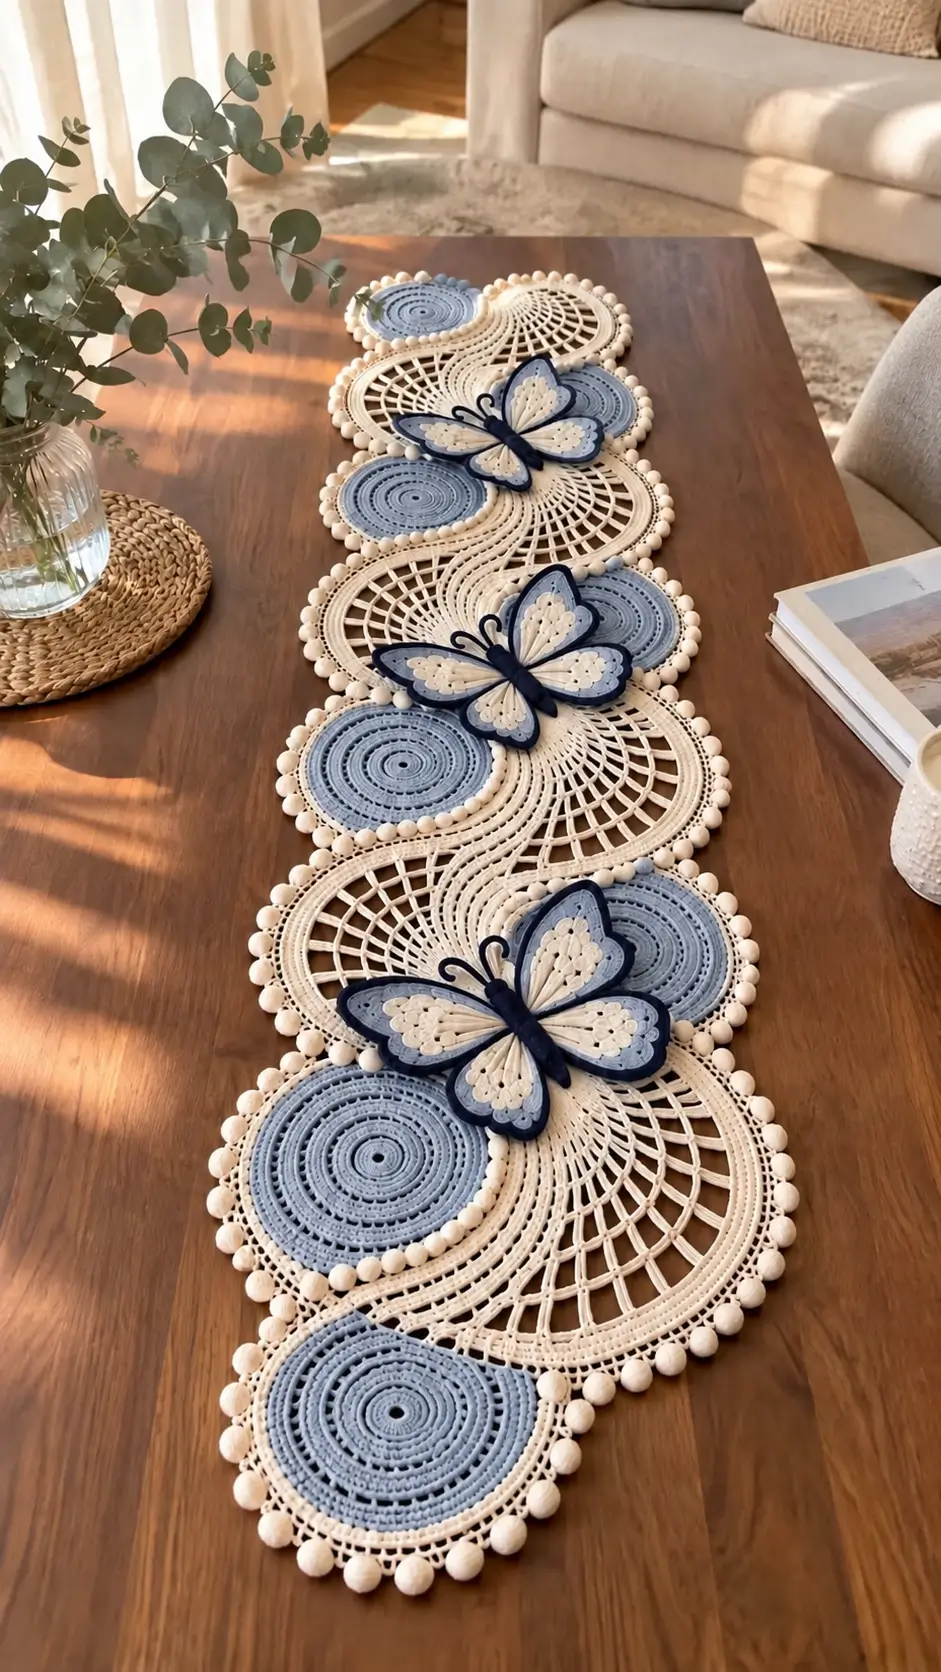
The butterflies sit exactly where a blue spiral disc meets an open cream fan, turning each overlap into part of the design. This crochet butterfly table runner pattern combines circular motifs, radiating lace sections, dimensional butterflies and a bobble-style cream edge. DK cotton with a 3.5–4.0 mm hook gives the runner enough definition for an intermediate table-decoration project while keeping the open sections flat.
The Design: What Makes This Butterfly Runner Different
The runner is built as a chain of overlapping circular units rather than one long rectangle. Each repeat combines a dense dusty-blue spiral circle with a larger cream openwork circle. Part of the cream motif stays solid near the center, then opens into radiating chain spaces that create the fan effect visible in the photograph.
The butterflies form a second dimensional layer. Separate cream and blue wing pieces make it easier to control their symmetry and keep the bodies centered over the joins. Published butterfly appliqués demonstrate that DK yarn with a 3.5 mm hook can produce wingspans around 9–11 cm, while worsted yarn and larger hooks can reach approximately 15 cm. For this runner, target a 12–14 cm butterfly. The main failure mode is tightening the cream mesh, which makes the circular units cup instead of lying flat.
Project Info at a Glance
| Skill Level | Construction | Finished Size | Hook | Best For |
|---|---|---|---|---|
| Intermediate | Overlapping circles + 3D butterfly appliqués | Approx. 120–150 × 28–34 cm | 3.5–4.0 mm | Coffee tables, dining tables and consoles |
The finished dimensions are targets for this original photo-inspired construction. Published butterfly appliqués made with DK yarn and a 3.5 mm hook can measure roughly 9–11 cm, while changing yarn and hook can increase the wingspan considerably. Complete one blocked runner repeat before determining the final length.
Materials and Tools
Yarn
- Warm cream — DK #3 cotton — approximately 250–350 g for the openwork motifs, edging and butterfly wing details
- Dusty blue — DK #3 cotton — approximately 120–180 g for spiral circles and butterfly wings
- Deep navy — DK #3 cotton — approximately 40–60 g for butterfly outlines, bodies and antennae
The quantities above are project estimates for a medium-length runner. Weighing one complete repeat gives a more accurate figure because the amount of open mesh changes yarn consumption substantially.
Tools
- 3.5–4.0 mm crochet hook
- DK #3 cotton yarn
- Yarn needle
- Scissors
- Stitch markers
- Tape measure
- Blocking mats and pins
Abbreviations
- MR — magic ring
- ch — chain
- sl st — slip stitch
- sc — single crochet
- hdc — half double crochet
- dc — double crochet
- tr — treble crochet
- inc — increase
- sp — space
- st/sts — stitch/stitches
- FO — fasten off
Pattern — Dusty Blue Spiral Circle
This is an original construction inspired by the visual arrangement in the reference image. The blue discs should remain dense and relatively flat so they contrast with the open cream mesh.
Center
With dusty blue, make a MR.
Round 1: 12 dc in MR. Join. (12)
Round 2: Ch 3, 2 dc in each stitch around. Join. (24)
Round 3: Ch 3, (dc in next st, 2 dc in next st) ×12. Join. (36)
Round 4: Ch 3, (dc in next 2 sts, 2 dc in next st) ×12. Join. (48)
Round 5: Ch 3, (dc in next 3 sts, 2 dc in next st) ×12. Join. (60)
The gradual increase creates a conventional flat circle.
Textured Blue Rings
Round 6: Ch 1, sc in each stitch around. (60)
Round 7: Ch 3, (dc in next 4 sts, 2 dc in next st) ×12. (72)
Round 8: Ch 1, sc around. (72)
Round 9: Ch 3, (dc in next 5 sts, 2 dc in next st) ×12. (84)
Round 10: Ch 1, sc around. (84)
FO.
Alternating sc and dc rounds creates the concentric ridges visible in the blue sections.
Optional Raised Spiral Detail
Join dusty blue near the center.
Work loose surface slip stitches in a spiral path across the motif.
Follow the boundaries between existing rounds.
Stop approximately 8 mm before the outside edge.
FO on the reverse.
Keep the surface stitches loose. Tight surface crochet will turn the flat circle into a shallow bowl.
Blocking the Blue Circle
Block to approximately 15–18 cm diameter.
Measure across the motif in three directions.
The measurements should differ by no more than approximately 5 mm.
Make all subsequent blue circles to the blocked master measurement.
Pattern — Cream Openwork Circle
The cream component is larger and more open than the blue disc. It begins with a compact center and gradually converts into radiating mesh.
Cream Center
With cream, make a MR.
Round 1: 12 dc in MR. (12)
Round 2: 2 dc in each stitch. (24)
Round 3: (Dc, inc) ×12. (36)
Round 4: (Dc in next 2 sts, inc) ×12. (48)
Round 5: (Dc in next 3 sts, inc) ×12. (60)
First Openwork Round
Round 6: Ch 4.
Skip 1 stitch, dc in next stitch.
Repeat:
ch 1, skip 1, dc in next st
around.
Join.
This introduces the first narrow openings without weakening the center.
Radiating Mesh Round
Round 7: Sl st into first ch-1 space.
Ch 4.
Dc in next ch-1 space.
Repeat:
ch 2, dc in next space
around.
Expanding the Fan
Round 8: Ch 4, dc into next dc.
Continue with:
ch 3, dc in next dc
around.
Round 9: Repeat using ch 4 between dc posts.
Round 10: Repeat using ch 5 between dc posts.
The increasing chain lengths allow the outer circumference to expand while keeping the posts aligned radially.
Structural Outer Ring
Round 11: Work 5 sc into each ch-5 space around.
Join.
Round 12: Ch 1, sc around, increasing evenly only if required for a flat circle.
FO.
Block to approximately 23–27 cm diameter.
Creating the Partial-Fan Appearance
The photograph visually hides part of each cream circle beneath the blue disc and neighboring repeats. You do not need to crochet an incomplete circle.
Make the complete cream motif.
Place a blue circle over approximately one-third of it.
The uncovered cream section then reads as a broad radiating fan.
This method is structurally more stable and makes the runner easier to assemble.
Cream Bobble Edge
The outside of the runner has a sequence of rounded cream details.
A crochet bobble can approximate this edge without adding separate beads.
Join cream to the exposed perimeter of a cream circle.
Work:
sc in next 2 sts, bobble in next st.
Repeat around the exposed edge.
Bobble Stitch
In the indicated stitch:
Yarn over, insert hook, pull up a loop, yarn over and pull through 2 loops.
Repeat this partial dc 5 times in the same stitch.
Yarn over and pull through all remaining loops.
Ch 1 to close.
Push the bobble toward the right side.
Alternative Puff Edge
If a softer rounded edge is preferred, replace each bobble with a puff.
Insert the hook into the stitch and pull up an elongated loop five times.
Yarn over and pull through all loops.
Ch 1 to secure.
Test both versions on one sample. The edge should remain flat instead of curling upward.
Layered Butterfly — Overview
The reference butterflies use four distinct wings, a narrow dark body and curled antennae. Cream forms the inner wing panels, dusty blue forms the middle layer and navy defines the perimeter.
Published butterfly appliqués use a wide range of constructions. DK examples made with a 3.5 mm hook can finish around 9–11 cm, while scaling to a 4 mm hook can produce approximately 12–14 cm. This project targets the larger range so each butterfly can cover a runner intersection.
Upper Butterfly Wing — Make 2
With cream, ch 8.
Row 1: Sc in second ch from hook and across. (7)
Row 2: Ch 1, 2 sc in first st, sc in next 5, 2 sc in final st. (9)
Row 3: Ch 2, 2 hdc in first st, hdc across, 2 hdc in final st. (11)
Row 4: Ch 3, 2 dc in first st, dc in next 9, 2 dc in final st. (13)
Row 5: Ch 3, dc across. (13)
Row 6: Ch 2, hdc2tog, hdc in next 9, hdc2tog. (11)
Row 7: Ch 1, sc2tog, sc in next 7, sc2tog. (9)
FO cream.
Dusty Blue Upper-Wing Border
Join dusty blue at the lower inside edge.
Work sc evenly around the wing.
At the broad outer curve, work approximately one increase every 4–5 stitches as required.
FO.
The wing should remain flat with a rounded outer edge and a narrower attachment end.
Navy Upper-Wing Outline
Join navy.
Work one round of sc around the dusty-blue border.
At the outermost curve, add a small picot every few stitches if desired:
ch 2, sl st into second ch from hook.
FO leaving a sewing tail.
Lower Butterfly Wing — Make 2
With cream, ch 6.
Row 1: Sc in second ch from hook and across. (5)
Row 2: Increase at both ends. (7)
Row 3: Ch 2, hdc across. (7)
Row 4: Increase at both ends in hdc. (9)
Row 5: Hdc across. (9)
Row 6: Hdc2tog, hdc in next 5, hdc2tog. (7)
Row 7: Sc2tog, sc in next 3, sc2tog. (5)
FO.
Lower-Wing Color Borders
Join dusty blue and work sc around each lower wing.
FO.
Join navy and add a second sc outline.
The finished lower wings should be smaller and rounder than the upper pair.
Wing Interior Texture
To reproduce the cream teardrop details visible in the reference, work short surface-slip-stitch lines inside each cream wing panel.
Begin near the butterfly body.
Follow the wing direction outward.
Stop approximately 8 mm before the blue border.
Make two or three parallel lines on each upper wing and one or two on each lower wing.
Keep the surface stitches loose enough that the wings remain flat.
Butterfly Body
With navy, ch 13.
Beginning in second chain from hook:
Sc in next 2 chains.
Hdc in next 7 chains.
Sc in remaining 3 chains.
Ch 1.
Turn and work back along the opposite side of the foundation chain:
Sc in 3, hdc in 7, sc in 2.
Join at the top.
FO leaving a 30 cm sewing tail.
This produces a narrow padded-looking body without requiring stuffing.
Butterfly Antennae
Join navy at the top of the body.
Ch 10.
Sl st loosely back through the first 7 chains.
Leave the final chains slightly curved.
Secure at the head.
Repeat for the second antenna.
Shape the antennae into gentle outward curls after blocking.
Assembling the Butterfly
Place the two upper wings behind the body.
Angle them upward approximately 30–40 degrees from horizontal.
Place the lower wings beneath them.
Pin all four pieces.
Sew only the inner 2–3 cm of each wing to the body.
Leave the outer sections free.
This creates the dimensional butterfly effect without making the appliqué unstable.
Blocking the Butterfly
Block the wing pieces before final assembly when possible.
Target a complete wingspan of approximately 12–14 cm.
After sewing the butterfly together, lightly shape the wings again.
Do not press them completely flat.
The navy outline should remain visible around every wing.
Building One Runner Repeat
Place one cream openwork circle on a flat surface.
Overlap one dusty-blue circle across approximately one-third of the cream motif.
Allow the blue disc to cover the cream center partially.
Pin the overlap.
Sew through approximately 4–6 cm of the overlapping area.
Do not sew around the complete blue circumference.
A partial join keeps the layered construction flexible.
Adding the Next Cream Circle
Position the second cream circle so it overlaps the first repeat and touches the blue disc.
Rotate the openwork fan slightly to the opposite side.
This alternating orientation creates the flowing S-shaped rhythm visible down the runner.
Pin and sew through the dense outer rounds.
Avoid sewing through large chain spaces.
Alternating the Repeats
Repeat the sequence:
cream fan → blue circle → cream fan → blue circle.
Rotate successive cream fans left and right.
Keep the blue circles close to the center line.
The final runner should appear continuous without becoming a perfectly straight stack of circles.
Butterfly Placement
Do not add a butterfly to every circle.
Place one butterfly approximately every second major overlap.
Center its body along the runner’s length.
Allow the wings to extend across both cream and blue sections.
For a 120–150 cm runner, 3–4 large butterflies create a proportion similar to the reference.
Attaching the Butterflies
Sew the butterfly body firmly to the dense crochet underneath.
Add one hidden tack beneath each upper wing approximately 2 cm from the body.
Leave the lower and outer wing edges free.
Do not sew into an unsupported chain-space intersection.
The body should carry most of the appliqué’s weight.
Creating the Rounded Perimeter
After all circular units are joined, inspect the outside edge.
Add cream bobbles only along exposed perimeter sections.
Skip areas hidden beneath neighboring motifs.
This reduces bulk at the joins.
Maintain approximately the same bobble spacing from one circle to the next.
Optional Separate Crochet Balls
If a more pronounced pom-pom appearance is wanted, make small stuffed crochet balls instead of flat bobbles.
Round 1: 6 sc in MR. (6)
Round 2: Inc ×6. (12)
Round 3: Sc around. (12)
Round 4: Dec ×6. (6)
Add a tiny amount of stuffing.
Close and sew to the perimeter.
For a table runner, use these sparingly because very large balls can make the edge difficult to block flat.
Recommended Runner Lengths
| Runner Length | Cream Motifs | Blue Motifs | Butterflies |
|---|---|---|---|
| 80–90 cm | 4–5 | 4 | 2 |
| 120–130 cm | 6–7 | 6 | 3 |
| 140–160 cm | 7–9 | 7–8 | 4 |
| 180 cm+ | 10+ | 9+ | 5 |
These are layout estimates. The actual repeat length depends on how deeply neighboring circles overlap.
Recommended Width
Target approximately 28–34 cm across the widest openwork sections.
The butterfly wings can extend slightly beyond that measurement.
For a dining table, check that plates and glasses still have a level surface beside the runner.
The three-dimensional butterflies are decorative and should remain outside normal place-setting zones.
Estimating Yarn from a Sample
Make one cream motif, one blue circle and one butterfly.
Weigh the three components separately.
For example, assume:
- Cream circle: 32 g
- Blue circle: 18 g
- Butterfly: 14 g total
For a runner with seven cream circles, six blue circles and three butterflies:
7 × 32 g = 224 g
6 × 18 g = 108 g
3 × 14 g = 42 g
Sample-based total = 374 g
Add approximately 10% for bobbles, joins, swatching and gauge variation.
The numbers demonstrate the calculation method rather than a fixed yarn requirement.
Making a Short Coffee-Table Version
Use four cream circles and three or four blue discs.
Add two butterflies.
Target approximately 75–90 cm in length.
Finish both ends with blue circles or small cream fan sections depending on the desired symmetry.
Making a Long Dining-Table Version
Extend the center rather than adding all extra repeats to one end.
Separate two existing repeats.
Insert one cream fan and one blue circle.
Add another butterfly only if the distance between neighboring butterflies exceeds approximately 35–45 cm.
This maintains the rhythm of the original arrangement.
Matching Round Placemats
The circular components can be adapted into matching placemats.
Make one large cream circle and continue the outer rounds until it reaches approximately 32–36 cm.
Add a dusty-blue center or partial overlay.
Finish with cream bobbles.
Omit the raised butterfly from the plate area. Place a small butterfly near one outer edge if decoration is wanted.
Matching Coasters
Use the dusty-blue circle pattern but stop after Round 5 or 6.
Block to approximately 10–12 cm.
Add one cream sc round around the edge.
Keep the coaster flat and omit bobbles from the section where a cup will rest.
Assembly
- Crochet one dusty-blue circle, block it to approximately 15–18 cm and record its finished diameter.
- Make one cream openwork circle, block it to approximately 23–27 cm and confirm that all radiating mesh sections lie flat.
- Produce the remaining blue and cream motifs while comparing every third piece with the blocked master measurements.
- Arrange the circles along the table, alternating the cream fan orientation left and right while keeping the blue discs near the center line.
- Sew neighboring circles together through dense crochet sections, using 4–6 cm attachment zones rather than stitching around entire overlaps.
- Crochet the cream, dusty-blue and navy butterfly components, then block the wing pieces before sewing the four wings to each body.
- Position one butterfly over selected major intersections and attach the body firmly while leaving most of each wing free.
- Add hidden support stitches approximately 2 cm from the body beneath the upper wings if the appliqué moves excessively.
- Work cream bobbles or puffs along the exposed runner perimeter, skipping sections concealed by overlapping motifs.
- Block the complete runner flat, align the blue circles, reshape the cream fans and lift the butterfly wings after drying.
The finished runner should form a flexible chain of overlapping blue and cream circles with dimensional butterflies positioned over selected intersections.
7 Technical Tips
- Keep blue-circle diameters within 5 mm of the master motif. Different circle sizes disrupt the alternating rhythm even when the overall runner length is correct.
- Increase the cream mesh chain length gradually from ch 1 to ch 5. Using the same short chain in every outer round causes the openwork circle to cup upward.
- Attach circular overlaps through 4–6 cm of dense crochet. One tiny joining point allows the units to rotate whenever the runner is moved.
- Keep the butterfly wingspan near 12–14 cm for 23–27 cm cream motifs. A much larger butterfly hides the open fan structure instead of marking the intersection.
- Sew only the inner 2–3 cm of each butterfly wing to its body. Stitching the entire wing flat removes the dimensional effect visible in the reference.
- Stop surface details at least 8 mm before a motif edge. Tight surface crochet close to the perimeter is a common cause of curled blue discs and distorted butterfly wings.
- Keep the main runner width near 28–34 cm. Wider dimensional sections can interfere with plates, glasses and serving dishes on a dining table.
Color Balance
Cream should occupy the largest visual area because it defines both the lace fans and the runner perimeter. Dusty blue supplies the circular counterweight and should repeat consistently from one end to the other.
Navy works best as a narrow accent. Restrict it primarily to butterfly bodies and wing outlines. Using navy for entire circular motifs would change the light visual balance of the reference.
Before final sewing, photograph the runner from directly above. Check that blue circles alternate evenly and that no two butterflies accidentally point at noticeably different angles.
Care and Final Blocking
Follow the care instructions for the selected cotton yarn.
Support the runner fully when wet.
Place it on a large blocking surface and align the circular motifs first.
Shape the cream openwork sections next.
Check that the bobble edge does not pull inward.
Allow the base to dry before shaping the butterflies. Lift the upper wings slightly, separate the lower wings and curve the navy antennae outward.
Avoid pressing the butterflies under a heavy iron because their raised construction is part of the design.
Conclusion
The alternating solid circles and open cream fans establish the structure of this crochet butterfly table runner pattern, while the layered butterflies turn selected overlaps into focal points. Begin with one 15–18 cm blue circle and one 23–27 cm cream motif, block both and test their overlap before producing the full set. Keep the mesh chains relaxed, attach the circular units through dense sections and sew only the inner portions of the butterfly wings. Your next step is to make one complete repeat and place it on the intended table to confirm the 28–34 cm width. Share the finished runner on Pinterest or Instagram with #BlueButterflyCrochetRunner. Would you keep every butterfly blue and cream, or reverse one butterfly so dusty blue becomes the inner wing color?