Introduction
Pumpkins need vertical furrows deep enough to survive stuffing without turning into a plain ball. This crochet pumpkin amigurumi pattern builds those divisions into a ribbed rectangle, then reinforces them during shaping. Use DK yarn, a 3.5 mm hook, stuffing, stem yarn and twine to make a medium 13 × 8 cm pumpkin. The project suits an advanced beginner and works well for coordinated tabletop sets.
The Design: What Makes This Ribbed Pumpkin Different
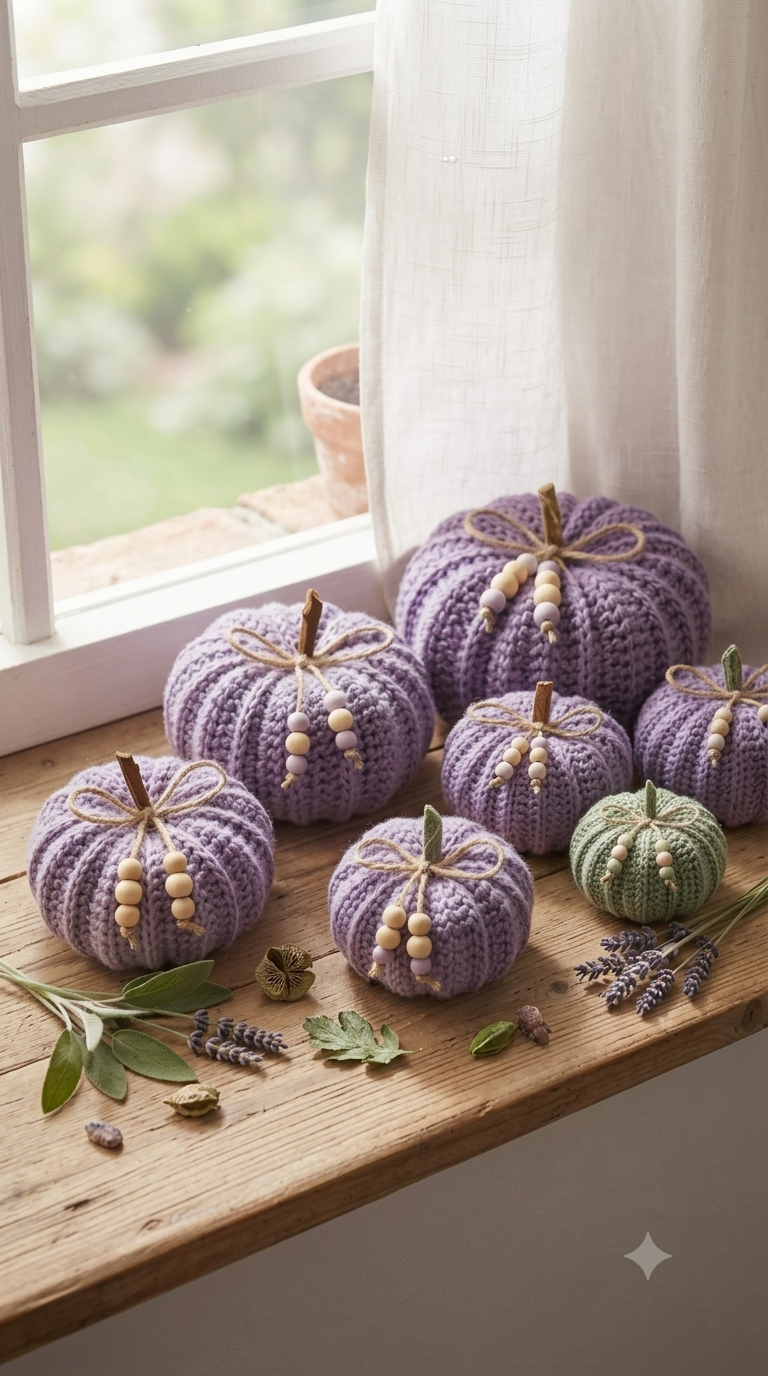
The photograph depends on three structural decisions. First, the pumpkin is wider than it is tall; that compressed proportion separates a convincing pumpkin from a stuffed sphere. Second, vertical crochet ridges run from the recessed top to the base, giving the ribbed crochet pumpkin its segmented surface before any shaping thread is added. Third, the center is pulled inward after stuffing so the stem sits inside a shallow depression rather than on top of a dome.
The lavender and sage palette also moves this fall crochet pumpkin away from conventional orange while preserving recognizable pumpkin geometry. A common mistake is overstuffing the center. Excess filling pushes the top upward and erases the indentation that makes the ribs visually converge. Firm outer edges with slightly lighter center stuffing produce a better profile.
Project Info at a Glance
| Skill Level | Time | Finished Size | Hook | Best For |
|---|---|---|---|---|
| Advanced beginner | 2–3 hours | Medium: approx. 13 × 8 cm | 3.5 mm | Tabletop autumn décor |
The 13 × 8 cm target is based on a medium crochet pumpkin size. Exact dimensions can vary depending on gauge, yarn choice and stuffing density.
Materials and Tools
Yarn
- Dusty lavender — DK/#3 — approximately 50 g.
- Sage green — DK/#3 — approximately 50 g when making the alternate color.
- Brown or olive — DK/#3 — approximately 5 g for the stem.
- Natural jute or twine — approximately 80–100 cm for the bow and bead drops.
Tools
- 3.5 mm crochet hook
- Polyester stuffing — approximately 35–50 g
- Yarn needle
- Stitch markers
- Scissors
- Six wooden beads — approximately 10–12 mm
- Long tapestry or doll needle for shaping
- Optional cinnamon stick or clean twig — 5–7 cm
No safety eyes are required because this is a decorative crochet pumpkin rather than a character amigurumi.
Abbreviations
- MR — magic ring
- sc — single crochet
- inc — 2 sc in one stitch
- dec — single crochet decrease
- sl st — slip stitch
- ch — chain
- BLO — back loop only
- st/sts — stitch/stitches
- RS — right side
- WS — wrong side
An invisible decrease is made through the front loops of the next two stitches before completing one single crochet, reducing the visible bulk of a standard decrease.
Pattern — Step by Step
The photographed pumpkin is reproduced as a ribbed flat panel rather than a conventional head-and-body amigurumi sphere. The main section is worked in rows. The crocheted stem is worked in rounds.
Pumpkin Body — Medium
Yarn: dusty lavender or sage DK.
Ch 37.
Row 1: Starting in second ch from hook, sc across. (36)
Row 2: Ch 1, turn, BLO sc across. (36)
Row 3: Ch 1, turn, BLO sc across. (36)
Row 4: Ch 1, turn, BLO sc across. (36)
Rows 5–42: Repeat Row 2. (36)
Do not stuff at this stage.
The 36-stitch width creates the medium-size body, while repeated BLO rows produce the strong vertical ribs visible in the reference design.
Measure the rectangle before seaming. A substantial difference in gauge will change the finished dimensions even when the stitch count is correct.
Fasten off. Leave a 70 cm tail for seaming and gathering.
Pumpkin Body — Small
Yarn: dusty lavender or sage DK.
Ch 31.
Row 1: Starting in second ch from hook, sc across. (30)
Row 2: Ch 1, turn, BLO sc across. (30)
Rows 3–34: Repeat Row 2. (30)
The small version uses a 30-stitch width to produce a compact pumpkin suitable for the front of a grouped display.
Fasten off. Leave a 60 cm tail.
Pumpkin Body — Large
Yarn: dusty lavender or sage DK.
Ch 43.
Row 1: Starting in second ch from hook, sc across. (42)
Row 2: Ch 1, turn, BLO sc across. (42)
Rows 3–50: Repeat Row 2. (42)
The 42-stitch version creates the large pumpkin used at the back of the display.
Fasten off. Leave an 80 cm tail.
Side Seam
Yarn: matching main color.
Fold the panel so the first row meets the final row. Keep the raised ribbed surface facing outward.
Seam 1: Slip stitch through the corresponding loops of both short edges. For the medium pumpkin, make 36 joins.
Seam 2: Check that the first and final ribs meet without twisting the tube.
Keep the long yarn tail attached if it will be used for gathering.
Bottom Closure
Yarn: matching main color.
Thread the long yarn tail onto a tapestry needle. Pass the needle through approximately one stitch at the end of every second rib around the entire lower opening.
Pull the yarn gradually. Do not close the opening with one hard tug because that can distort the rib spacing.
When the opening reaches approximately 1.5 cm, pass the yarn across the remaining gap two or three times. Pull firmly and secure the yarn on the inside.
Stuffing and Top Closure
Stuffing: polyester fiberfill.
Fill the lower outer edge first. Add small portions of stuffing around the inside wall of the pumpkin while keeping the central area slightly less dense.
Continue until the crochet ribs are supported but the body can still be compressed with a finger. Too much stuffing in the center makes the final indentation difficult to form.
Thread a separate 70 cm strand through the top edge using the same alternating-rib sequence used at the base.
Draw the opening inward until approximately 2 cm remains. Add the final amount of stuffing, then pull the opening completely closed.
Secure the yarn firmly.
Deep Rib Shaping
Yarn: matching lavender or sage yarn, or strong matching thread.
Insert a long needle through the bottom center of the pumpkin and bring it out through the top center.
Pull the strand until both centers become recessed. Return the needle through the center and secure the yarn.
For stronger pumpkin segmentation, wrap the shaping strand externally along an existing crochet valley. Pass the needle through the center and repeat at evenly spaced intervals.
Create 8 sections around the circumference.
Keep every shaping strand inside an existing crochet valley. A strand positioned over a raised rib will flatten the texture and create uneven segments.
Crocheted Stem
Yarn: brown or olive DK.
R1: 6 sc in MR. (6)
R2: sc around. (6)
R3: sc around. (6)
R4: sc around. (6)
R5: sc around. (6)
R6: sc around. (6)
R7: sc around. (6)
R8: inc ×6. (12)
R9: (sc, inc) ×6. (18)
Fasten off. Leave a 25 cm sewing tail.
Lightly stuff only the upright portion of the stem. Keep the 18-stitch base relatively flat so it sits neatly over the recessed center of the pumpkin.
For a closer match to the natural stems in the photograph, a clean dried twig or short cinnamon stick can replace the crocheted stem.
Jute Bow
Material: natural jute or twine.
Cut approximately 45 cm of twine for a medium pumpkin.
Wrap the twine once around the base of the stem. Tie a secure knot, then form two loops approximately 4–5 cm long.
Tighten the bow without pulling the stem away from the center.
The bow should extend farther than the width of the stem but should not cover several pumpkin segments.
Beaded Drops — Make 2
Material: natural jute or twine with wooden beads.
Cut approximately 25 cm of twine for each strand.
Thread three wooden beads onto each piece of twine. For a lavender pumpkin, combine cream, blush and lavender beads. For the sage version, use cream, blush and pale green.
Tie an overhand knot approximately 1 cm beneath the final bead.
Leave 5–8 mm of twine below the knot. The end can be lightly separated into individual fibers to reproduce the photographed finish.
Attach both strands underneath the center of the bow.
Position one strand approximately 1 cm lower than the other. This prevents all six beads from forming a rigid horizontal row.
Optional Natural Stem
Material: cinnamon stick or clean dry twig.
Cut the stem to approximately 5–7 cm.
Insert only 1–1.5 cm into the recessed top center. Use matching yarn to stitch securely around the base rather than depending on friction to hold the stem.
For decorations intended for homes with small children, use the soft crocheted stem and omit loose wooden beads.
Five-Pumpkin Display Set
The reference arrangement uses several sizes rather than five identical pumpkins. A similar display can be produced with the following combination:
- 1 large lavender pumpkin — 42 stitches × 50 rows
- 1 medium lavender pumpkin — 36 stitches × 42 rows
- 1 medium sage pumpkin — 36 stitches × 42 rows
- 2 small lavender pumpkins — 30 stitches × 34 rows
Change the bead order between pumpkins while retaining the same natural jute on every piece. Repeating one accessory material connects the different sizes and colors visually.
Assembly
- Seam the first and final body rows together, keeping the crochet ribs vertical.
- Gather the lower opening, pull it completely closed and secure the yarn inside the pumpkin.
- Add stuffing around the outer wall first, keeping the central portion slightly softer.
- Gather the top opening until only enough space remains to adjust the final stuffing.
- Pass a long shaping strand from the bottom center to the top center and pull until both surfaces form shallow depressions.
- Divide the circumference into eight sections and position external shaping strands inside the existing rib valleys if stronger segmentation is required.
- Sew the crocheted stem over the top center, or securely attach a 5–7 cm natural stem.
- Tie the jute bow around the stem base and adjust both loops to approximately equal widths.
- Attach two bead-drop strands beneath the bow, using three wooden beads on each strand.
- Weave the remaining yarn tails through several interior stitches before trimming, then redistribute the stuffing if any segment appears larger than its neighbors.
The completed pumpkin should rest on a broad, slightly flattened base with the vertical ribs converging toward recessed top and bottom centers.
7 Technical Tips for Better Crochet Pumpkins
- Prevent a shrinking row count: Place a stitch marker in the first stitch of every BLO row. Missing one edge stitch changes a 36-stitch panel to 35 stitches and produces a diagonal seam.
- Avoid an overstuffed center: Keep the central 3–4 cm of the medium pumpkin slightly softer than its perimeter. Excess stuffing prevents the center shaping strand from producing a deep top depression.
- Control visible decrease bulk: If you use the same colors for a round-based pumpkin variation, work invisible decreases through the front loops. Standard decreases can create raised bumps in a tightly stuffed surface.
- Position the stem after shaping: Complete the center pull before attaching the stem. Attaching it earlier can move the stem 1–2 cm away from the final center as the pumpkin compresses.
- Check rib tension: BLO single crochets must be dense enough to conceal the stuffing. If fiberfill becomes visible when the fabric is lightly stretched, reduce the hook size by approximately 0.5 mm.
- Mark all eight sections: Mark or pin the eight shaping valleys before tightening the first external strand. Estimating each position individually can leave the final segments noticeably narrower.
- Leave long structural tails: Allow at least 15 cm for ordinary seams and 25–70 cm for gathering and shaping. Short tails can pull free when the stuffed pumpkin is compressed during final shaping.
Conclusion
Finish one medium pumpkin first and check its approximate 13 × 8 cm dimensions before cutting yarn for the complete five-piece set. That sample establishes how your yarn, gauge, stuffing density and 3.5 mm hook affect the flattened proportions. Afterward, alternate the 30-, 36- and 42-stitch versions to reproduce the graduated arrangement in the reference image. Photograph the finished pumpkins slightly from above so the recessed centers, stems and bead drops remain visible. Save this crochet pumpkin amigurumi pattern to Pinterest and share the lavender or sage version on Instagram with #RibbedLavenderPumpkin. Which stem will you use on the sage pumpkin: crocheted olive yarn or a natural twig?









