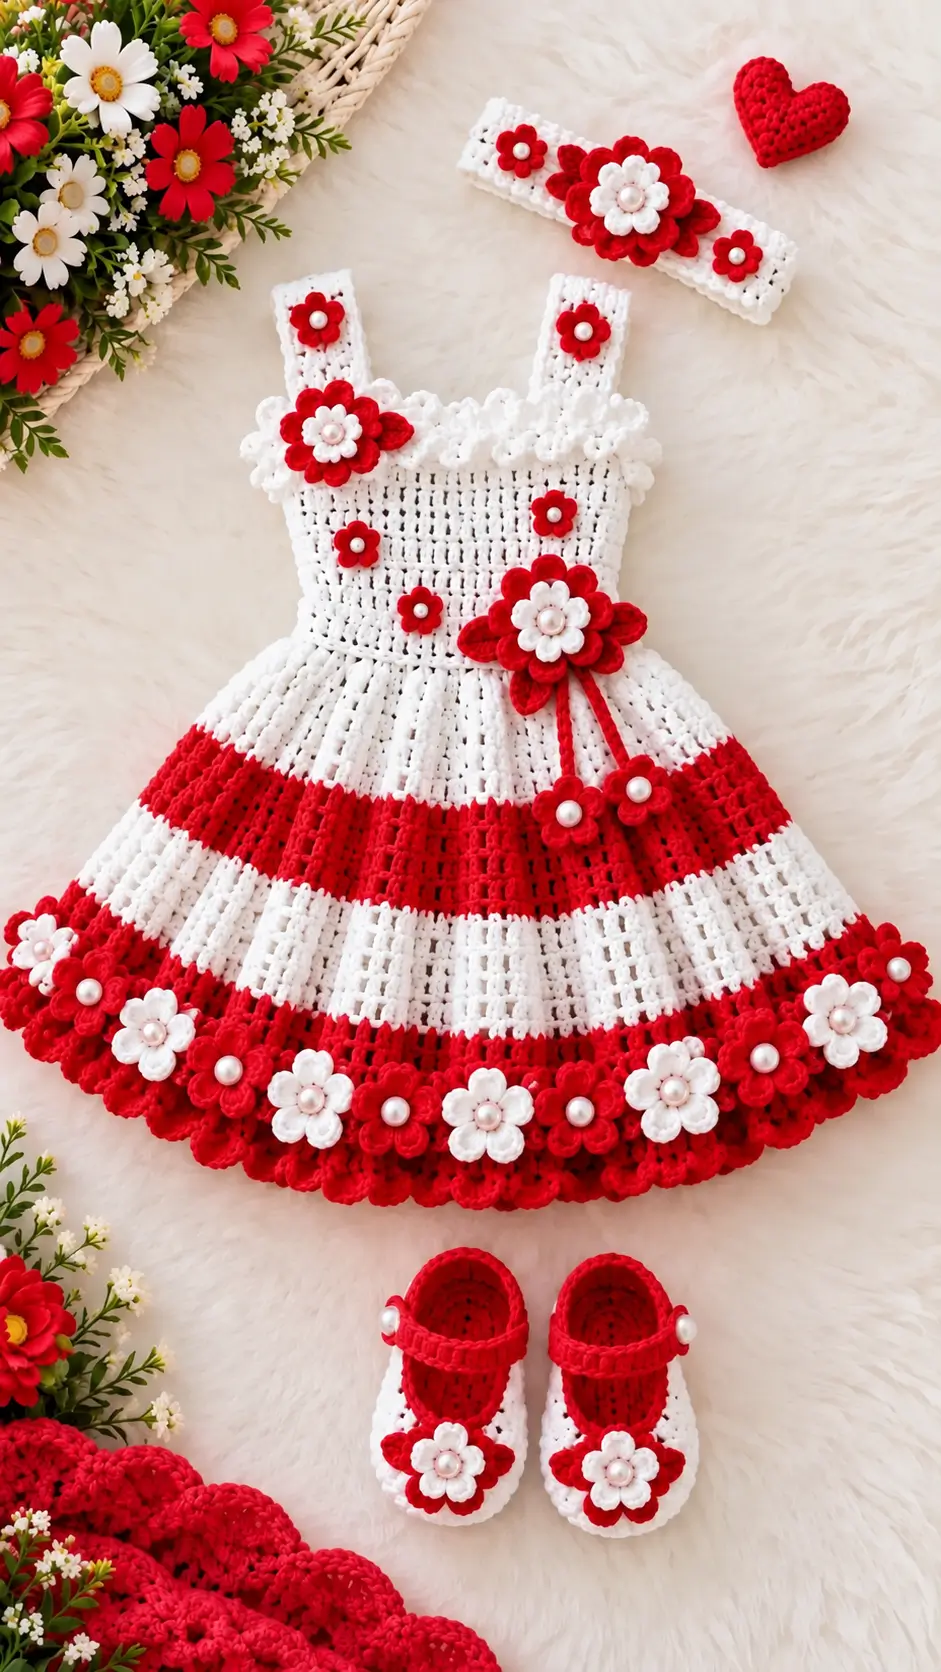
Red and White Crochet Baby Dress Pattern with Flowers
Introduction
A red flower border changes this dress twice: first into a striped skirt, then into a ring of appliqués at the hem. This red and white crochet baby dress pattern is best treated as an intermediate DK garment project using a 4 mm reference hook. A comparable 6–12-month size measures 48 cm around the finished chest and 38 cm long. The coordinated headband and shoes turn one construction plan into a complete set.
The Design: What Makes This Red and White Dress Different
Three decisions define this design. The bodice is relatively dense because multiple raised flowers need a stable background; loose lace can distort under their weight. The skirt changes direction at the waist and expands sharply, giving the crochet flower baby dress enough circumference for broad horizontal stripes and a heavily decorated hem.
Finally, the floral elements repeat on the bodice, waist, headband and shoes, connecting otherwise separate pieces into one crochet baby dress with headband set. A frequent error with this type of dress is increasing the skirt before establishing the finished bodice circumference. That can produce a wide waist while the chest remains undersized. Garment dimensions should be controlled by gauge and measurements rather than amigurumi-style fixed stitch mathematics.
Project Info at a Glance
| Skill Level | Time | Finished Size | Hook | Best For |
|---|---|---|---|---|
| Intermediate | Multi-session garment project | Reference: 48 cm chest × 38 cm length | 4 mm DK reference | Floral baby outfit |
The measurements are based on a published 6–12-month baby-dress reference. Always check the intended wearer’s measurements and your crochet gauge before establishing the final stitch count.
Materials and Tools
Yarn
- White — DK/light-worsted reference weight — quantity determined by gauge and size — washable baby cotton or cotton blend.
- Red — same yarn weight as white — quantity determined after swatching — matching-fiber accent yarn.
- White flower yarn — small quantity — same or slightly finer yarn for the inner flower petals.
Yarn consumption changes substantially with garment size, stitch pattern, fiber and gauge. Buy enough yarn from the same dye lot to complete the main white sections and enough matching red for the stripes, border, flowers and accessories.
Tools
- 4 mm crochet hook as a DK reference
- Stitch markers
- Flexible tape measure
- Blunt yarn needle
- Scissors
- Washable sewing thread when needed for securely attached decorations
The photographed decorations have pearl-like centers. For clothing intended for a baby, securely embroidered centers can be substituted for detachable bead-like components.
Abbreviations
- ch — chain
- sl st — slip stitch
- sc — single crochet
- hdc — half double crochet
- dc — double crochet
- tr — treble crochet
- st/sts — stitch/stitches
- sp — space
- rep — repeat
- RS — right side
- BLO — back loop only
Invisible decrease is primarily an amigurumi shaping technique and is not required for the main dress construction shown here.
Gauge Before Stitch Counts
A baby dress must be sized according to gauge and body measurements rather than fixed amigurumi stitch mathematics.
For a 6–12-month reference size, target approximately 48 cm finished chest circumference and approximately 38 cm total length. A useful published gauge benchmark is approximately 18 double crochet stitches and 10 rows per 10 cm.
Make a swatch with the actual red and white yarn before establishing the foundation width. Wash and dry the swatch in the same manner planned for the finished garment, then measure it without stretching.
Pattern — Construction Plan
Bodice
Yarn: white.
Work a gauge swatch first. For the 6–12-month reference size, target approximately 48 cm finished chest circumference.
The bodice is sleeveless and approximately rectangular below the arm openings. Work the front and back densely enough that the sewn flowers do not pull the fabric out of shape.
Begin at the lower bodice edge and work upward in double crochet or a comparable solid garment stitch. Maintain an even width through the torso. Shape the arm openings at the upper section rather than increasing outward.
Finish the upper edge cleanly with single crochet.
Because the photograph does not expose the back of the garment, the exact closure construction should be adapted to the intended size and fit.
Shoulder Straps — Make 2
Yarn: white.
Make two rectangular straps using the same stitch family as the bodice. Their final length should be fitted to the intended wearer rather than estimated solely from the flat garment.
The straps are broad rather than cord-like. Maintain enough width to resist stretching and place them symmetrically before final sewing.
Pin both straps before attachment. Measure from the center line so their spacing matches at the front and back.
Waist Transition
Yarn: white.
Join the skirt at the lower bodice edge. The design changes from the relatively narrow torso into a much fuller skirt.
Distribute increases evenly around the first skirt section instead of concentrating them at the side seams. Continue increasing over subsequent rounds until the fabric hangs in a clear A-line.
The exact increase count depends on the achieved gauge, yarn and required finished circumference.
Upper White Skirt
Yarn: white.
Work downward in rounds. The skirt uses vertically defined openwork columns, producing more drape than the compact bodice.
Maintain the established increase rhythm until the skirt has enough circumference to lie correctly without cupping. Stop increasing once the required flare is established, then continue in the selected stitch pattern.
First Red Stripe
Yarn: red.
Change to red at the round join. Carrying unused white yarn through several wide rounds can add unnecessary bulk, so fasten it off when working a deep stripe.
Work an uninterrupted red band while preserving the skirt stitch pattern and circumference.
Central White Stripe
Yarn: white.
Rejoin white and work the next broad band. The central white area is wider than a narrow separator stripe, which keeps the two major red sections visually distinct.
Maintain the same stitch pattern and tension so the skirt does not change width when the yarn color changes.
Lower Red Stripe
Yarn: red.
Work another red band below the central white section. Check the skirt circumference before proceeding to the final white area.
If the hem begins pulling inward, compare the red and white stitch gauge. A tighter tension after a color change can reduce the circumference even when the stitch count has remained unchanged.
Lower White Section
Yarn: white.
Work the final major white band. This area forms the mounting surface for the repeated flowers around the hem.
Stop the openwork before beginning the red edging so the final border has a stable row for attachment.
Red Scalloped Hem
Yarn: red.
Join red around the lower edge.
A practical scallop repeat can be built from grouped double crochet stitches separated by anchoring single crochet stitches. Test one complete repeat before working around the entire skirt.
Adjust the spacing when necessary rather than forcing an incomplete scallop into the final gap. The red hem is a substantial design feature and should be treated as a visible border rather than a single narrow edging round.
Small Five-Petal Flowers
Yarn: red or white.
Form a small center ring, then create five evenly spaced petal groups. Each petal can be formed from a short combination of taller stitches worked into the same center space.
Close the motif and leave a sufficiently long sewing tail.
Make enough flowers to repeat them across the bodice and around the lower skirt. Alternate red and white motifs where required instead of making every flower identical.
Large Layered Flower
Yarn: red and white.
The focal flower uses multiple visual layers. Begin with a larger red base flower. Work broad petals with enough height to remain visible behind the upper layer.
Create a smaller contrasting white flower separately and position it concentrically over the red base.
Stitch through the center and selected inner petal points so the outer petals remain dimensional. Use the same construction principle for the main waist flower and the centerpiece on the matching headband.
Waist Leaves or Side Petals
Yarn: red.
The focal waist motif extends horizontally beyond the circular flower. Crochet two or more elongated leaf or petal shapes and attach them behind the flower before sewing the complete unit onto the dress.
This assembly order keeps most attachment stitches hidden behind the central flower.
Hanging Flower Ties — Make 2
Yarn: red.
Crochet two narrow cords from the lower area of the waist flower. Make one slightly longer than the other to reproduce the staggered arrangement.
Attach a small crochet flower to the end of each cord. For garments intended for an infant, keep decorative cords short and securely attached.
Flower Headband
Yarn: white and red.
The matching headband uses a wide white crochet band rather than a thin chain.
Work a rectangle long enough for the required head circumference while accounting for the stretch of the chosen yarn. Seam the short edges or add an appropriate closure.
Position one large layered red-and-white flower at the center. Add one smaller red flower to each side, measuring from the central motif to maintain symmetrical spacing.
Mary Jane-Style Shoes — Make 2
Yarn: white and red.
The matching shoes use white for the sole and lower exterior with red for the upper interior and strap.
A precise shoe stitch count requires the baby’s foot length and the crocheter’s gauge. Construct each sole to the required foot measurement, build the sides upward and shape the toe consistently on both shoes.
Add a red Mary Jane-style strap across each opening. Complete the design by sewing a layered red-and-white flower centrally over each toe.
Assembly
- Block the bodice and skirt lightly to the required dimensions before adding the heavier floral decorations.
- Join the skirt to the bodice with the color transition positioned consistently at the back.
- Pin both shoulder straps and verify equal spacing before sewing them permanently.
- Attach the small bodice flowers without pulling the garment fabric inward.
- Assemble the layered waist flower and its red side petals as one unit.
- Sew the focal flower to the waist and attach the two hanging flower cords beneath it.
- Arrange all lower flowers around the skirt before permanently sewing any individual motif.
- Finish the headband, center its large flower and attach the two smaller side flowers.
- Complete both shoes to identical measurements before adding their floral decorations.
- Weave yarn tails through several stitches on the wrong side, trim them and inspect every applied component for secure attachment.
The finished set consists of one striped floral crochet dress, one matching flower headband and two coordinated Mary Jane-style crochet shoes.
7 Technical Tips
- Mark every color-change join. A drifting join creates a visible diagonal break through the red and white skirt bands. Keep the marker in the first stitch of each round and check its position after every stripe.
- Measure the bodice before starting the skirt. A 6–12-month reference size uses approximately a 48 cm finished chest. An incorrectly sized bodice cannot be corrected simply by adding more skirt increases.
- Check tension after every yarn-color change. Tighter red stitches can pull the skirt inward even when the stitch count remains unchanged. Measure the circumference before and after completing the first red band.
- Pin the large waist flower before sewing it. A center shifted by even 1–2 cm becomes noticeable because the hanging cords and horizontal stripes provide strong alignment references.
- Do not attach the flowers before blocking. Blocking after the appliqués are installed can flatten layered petals or change their spacing. Complete the principal garment shaping first.
- Match both shoe soles before constructing the uppers. A difference of even 5 mm is visible when the shoes are positioned side by side. Count the rows and measure each sole before continuing.
- Secure yarn tails through dense fabric. A tail woven only through open mesh has less material holding it in position. Change weaving direction at least once through a denser crochet section.
Finishing the Red and White Crochet Baby Dress
Finish the garment measurements before permanently positioning the flowers because the striped skirt, centered waist motif and repeated hem appliqués depend on accurate alignment. For a 6–12-month reference, approximately 48 cm around the finished chest and 38 cm shoulder-to-hem provide useful starting dimensions, but the intended wearer’s measurements and your gauge swatch take priority.
Make one complete layered flower next and test its scale against the bodice before producing the remaining motifs for this red and white crochet baby dress pattern. Photograph the finished dress, headband and shoes together for Pinterest or Instagram and use #RedWhiteFlowerBabyDress. For the hem, decide whether alternating red-and-white flowers or a predominantly red floral border works better with your stripe placement.









