Introduction
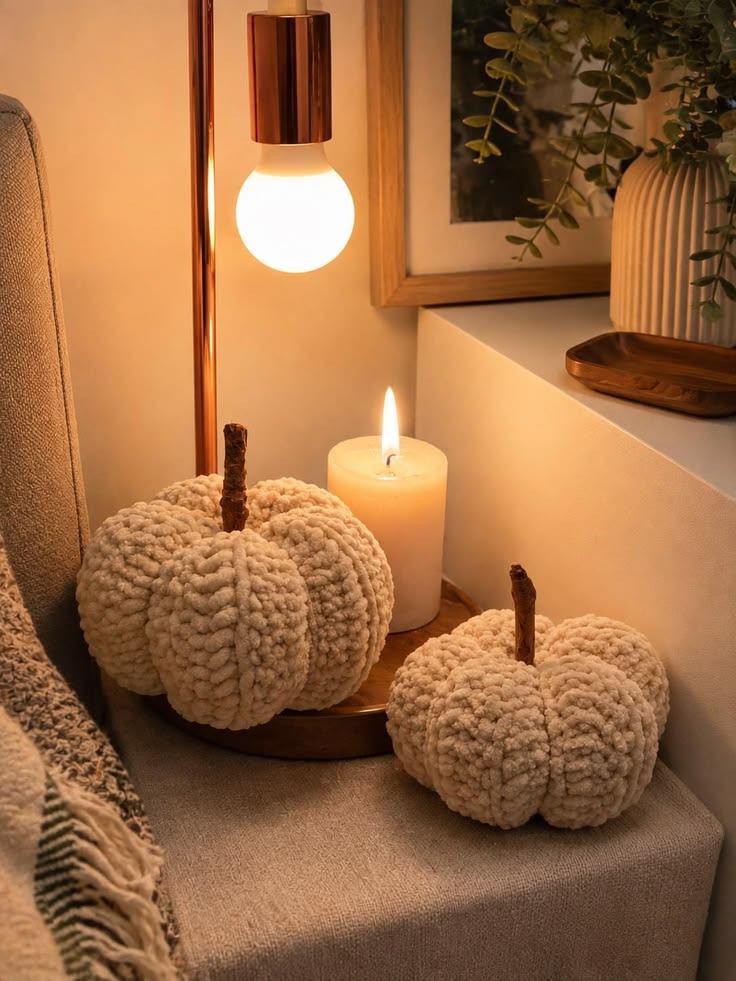
Eight deep vertical ribs turn these cream pumpkins from simple stuffed balls into the segmented shape shown in the photograph. This chunky cream crochet pumpkin pattern uses #6 super-bulky yarn, a 9 mm hook, fiberfill, and natural-looking brown stems. The reconstruction makes approximately 18 cm and 27 cm pumpkins at an advanced-beginner level, suitable for freestanding autumn displays.
The instructions below are an original photo-inspired reconstruction based on visible structure; published patterns cited later are used only for sizing, gauge, and material benchmarks.
The Design: What Makes These Chunky Pumpkins Different
The photograph depends on exaggerated segmentation rather than complicated surface stitches. Each pumpkin starts as a ribbed rectangle worked through the back loop, which creates parallel raised columns before any stuffing is added. After the short edges are joined, the tube is cinched at both ends and shaped with eight external sculpting strands. That combination gives a ribbed crochet pumpkin more depth than either technique produces alone. The larger pumpkin is deliberately broad and moderately compressed; the smaller one has nearly the same proportions at reduced scale. A second structural choice is using a narrow center opening for a separate brown stem instead of crocheting the stem directly into the body. The common failure with a chunky crochet pumpkin is excessive stuffing. A rigid sphere resists the sculpting strands and loses the deep valleys visible in the reference.
Project Info at a Glance
| Skill Level | Time | Finished Size | Hook | Best For |
|---|---|---|---|---|
| Advanced Beginner | Reconstruction estimate: 2–3 hours each | Small: about 17–19 cm wide; Large: about 25–28 cm wide | 9 mm body; 5 mm stem | Fall shelves, side tables, mantels, neutral seasonal decor |
Published chunky-pumpkin patterns support super-bulky yarn and large hooks for this type of project. Louise Bollanos specifies #6 super-bulky yarn, a 9 mm hook, about 50 g, and a finished pumpkin around 13 inches in circumference by 6 inches high. Crafting Each Day also uses #6 yarn with a 9 mm hook for a wide-ribbed pumpkin. The Unraveled Mitten specifies Wool-Ease Thick & Quick with a 9 mm hook and publishes three rectangle sizes for scalable pumpkins.
Materials and Tools
Yarn
- Warm cream — #6 super bulky — large reconstruction estimate: 150–190 g
- Warm cream — #6 super bulky — small reconstruction estimate: 90–120 g
- Dark brown — #5 bulky or doubled worsted — 10–15 g for two stems
A chenille-style #6 yarn gives the closest visual match to the photograph. Bernat Blanket is an appropriate yarn family for this look; current Bernat Blanket varieties are #6 super bulky, while Yarnspirations also publishes a chunky pumpkin specifically for its heavier chenille-style Blanket Big yarn.
Tools
- 9 mm crochet hook for both pumpkin bodies
- 5 mm crochet hook for crocheted stems
- Polyester fiberfill — reconstruction estimate: 250–350 g total
- Extra-strong cream yarn or matching cotton cord for sculpting
- Large tapestry needle
- Stitch markers
- Scissors
- Measuring tape
Abbreviations
- ch — chain
- sc — single crochet
- hdc — half double crochet
- sl st — slip stitch
- BLO — back loop only
- st/sts — stitch/stitches
- MR — magic ring
An invisible decrease is worked through the front loops of two neighboring stitches before completing one single crochet; this rectangle-based construction does not require decreases.
Gauge and Construction
Target approximately 7–8 hdc through BLO = 10 cm after the fabric is relaxed. Gauge can vary with chenille yarn, so the measured rectangle is the controlling specification.
The body is not crocheted as a sphere. Each size begins as a flat ribbed rectangle. The first and last rows are joined to create a tube, both openings are gathered, and eight sculpting strands divide the stuffed form into lobes.
This approach also agrees with published chunky pumpkin construction. The Unraveled Mitten works its pumpkins in rows, seams the fabric, and cinches the ends; its published rectangles range from 5 × 11 inches for the small size to 10 × 22 inches for the large.
Pattern — Step by Step
Large Pumpkin Body
Yarn: warm cream #6 super bulky. Hook: 9 mm. Reconstruction target: approximately 25–28 cm wide after shaping.
Ch 18.
Row 1: Hdc in second ch from hook and in every chain across. (17)
Row 2: Ch 1, turn. Hdc BLO in every st across. (17)
Rows 3–40: Repeat Row 2. (17)
Do not fasten off.
Measure the relaxed rectangle. Target approximately 22–24 cm high × 52–56 cm long. Chenille gauge varies substantially; add or remove pairs of rows if required to reach the measured length.
The 40-row count provides 20 complete two-row rib units. The eight final pumpkin lobes are created during sculpting rather than by assigning one rib to each segment.
Large Body Seam
Bring Row 40 against the foundation edge with the right sides facing outward.
Insert the hook through one loop of the final row and one corresponding foundation-chain loop.
Sl st across all 17 positions.
Fasten off with a 70 cm tail.
Turn the tube so the seam sits on the inside.
Close the Large Pumpkin Bottom
Thread a long doubled strand of strong cream yarn through the tapestry needle.
Run the needle under one edge stitch at the end of every second row around the tube. This gives approximately 20 gathering points.
Pull the opening closed gradually.
Pass through the gathered center twice and knot securely on the inside.
Do not trim the tail until the closure has been tested under tension.
Stuff the Large Pumpkin
Turn the closed end downward.
Add small handfuls of fiberfill around the outside wall first.
Fill the center afterward.
Target a broad form approximately 24–26 cm across before sculpting.
Keep the upper center slightly softer than the perimeter so the opening can be closed without producing a pointed top.
Close the Large Pumpkin Top
Repeat the gathering method used for the bottom.
Pull until the opening measures approximately 1.5–2 cm rather than closing it completely.
Knot securely.
The remaining opening accepts the stem.
Large Pumpkin Sculpting
Cut four strong cream strands approximately 130 cm long. Each strand creates two opposing valleys.
Thread the first strand through the bottom center, bring it up the outside of the pumpkin, pass through the top center, and return down the opposite side.
Pull until the first pair of opposite valleys is approximately 2–3 cm deep.
Tie securely at the bottom.
Add the second strand at 90 degrees to the first. The pumpkin now has four principal divisions.
Add the third and fourth strands halfway between the existing divisions.
The finished body has eight lobes.
Adjust all strands incrementally rather than tightening one completely before the others. Final reconstruction target: approximately 25–28 cm wide × 18–20 cm high before the stem.
Small Pumpkin Body
Yarn: warm cream #6 super bulky. Hook: 9 mm. Reconstruction target: approximately 17–19 cm wide.
Ch 14.
Row 1: Hdc in second ch from hook and in every chain across. (13)
Row 2: Ch 1, turn. Hdc BLO in every st. (13)
Rows 3–30: Repeat Row 2. (13)
Do not fasten off.
Target rectangle dimensions are approximately 16–18 cm high × 37–41 cm long. Add or remove two-row rib units if your yarn produces a substantially different length.
Small Body Seam
Bring the final row against the foundation edge.
Sl st through both edges across all 13 positions.
Fasten off with a 60 cm tail.
Turn the seam inward.
Close and Stuff the Small Pumpkin
Gather one end by passing strong cream yarn beneath an edge stitch at approximately every second row.
Pull closed and knot securely.
Add fiberfill in small portions until the form is firm enough to stand but still compressible under your fingers.
Gather the top to a 1–1.5 cm opening.
Knot securely.
Sculpt the Small Pumpkin
Cut four cream sculpting strands approximately 90 cm long.
Apply the first strand vertically through the center and around opposite sides.
Add the second at 90 degrees.
Position the third and fourth halfway between the first four valleys.
Tighten gradually until eight rounded lobes appear.
Target approximately 17–19 cm wide × 13–15 cm high before adding the stem.
Brown Stem — Make 2
The photograph shows narrow, irregular brown stems. A short crocheted stem works if a natural twig is not being used.
Yarn: dark brown bulky yarn. Hook: 5 mm.
R1: 6 sc in MR. (6)
R2: BLO sc around. (6)
R3: Sc around. (6)
R4: Sc around. (6)
R5: Sc around. (6)
R6: Sc around. (6)
For the large pumpkin only, add:
R7: Sc around. (6)
R8: Sc around. (6)
Fasten off with a 30 cm tail.
Insert a tightly rolled scrap of brown yarn or a small amount of fiberfill if the stem needs additional rigidity.
Textured Stem Surface
For the bark-like appearance visible in the photograph, surface slip stitch irregularly around the finished stem with a slightly darker brown yarn.
Do not make a continuous spiral.
Work short sections of two to four slip stitches, leaving small gaps between them.
The large stem should finish approximately 7–8 cm above the pumpkin. The small stem should finish approximately 5–6 cm high.
Natural Twig Stem Option
A dry hardwood twig produces the closest match to the photographed stems.
Use a clean, fully dry piece approximately 1–1.5 cm in diameter.
Cut about 9–10 cm for the large pumpkin and 7–8 cm for the small pumpkin, allowing roughly 2 cm to sit inside the body.
Round any sharp cut edges before insertion.
Do not use a brittle twig that splinters under light pressure.
Installing the Stem
Push the lower 2 cm of the crocheted or natural stem into the top opening.
Thread the body yarn through the gathered top edge.
Take four evenly spaced stitches through the stem base or around it.
Pull the opening firmly against the stem.
Knot underneath a neighboring lobe and bury the yarn tail inside the pumpkin.
Refining the Pumpkin Shape
Set the pumpkin on a flat surface.
Press downward gently with both palms while supporting the sides.
Rotate one eighth of a turn and repeat.
The large pumpkin should become broader without losing the eight distinct valleys.
For the smaller version, use less downward pressure so its profile remains slightly taller relative to its diameter.
Correcting Uneven Lobes
If one lobe is visibly narrower, locate the two sculpting strands bordering it.
Loosen the tighter strand by approximately 5–10 mm.
Redistribute stuffing into the narrow section with your fingers.
Retighten only until its depth matches the neighboring valleys.
A sculpting strand should define the form without cutting deeply enough to hide the ribbed crochet surface.
Using Chenille Yarn
Chenille yarn can obscure individual loops, particularly along the starting chain and final seam.
Count stitches rather than relying on visual identification alone.
Place a locking marker in the first and last stitch of every row.
When joining the rectangle, align all 17 large-body positions or all 13 small-body positions before making the first seam stitch.
This prevents the seam from drifting diagonally.
Assembly
- Crochet the large cream rectangle to 17 stitches across and approximately 52–56 cm long, then crochet the small rectangle to 13 stitches across and approximately 37–41 cm long.
- Join each rectangle’s first and final rows with a slip-stitch seam, matching all 17 positions on the large pumpkin and all 13 positions on the small pumpkin.
- Gather and close the bottom of each tube with strong cream yarn, distributing the gathering points evenly around the complete circumference.
- Stuff each body from the outer wall inward, keeping the center slightly softer and stopping before the pumpkin becomes rigid.
- Gather each top opening to approximately 1.5–2 cm on the large pumpkin and 1–1.5 cm on the small pumpkin.
- Add four external sculpting strands to each body, positioning them at equal angular intervals to produce exactly eight visible lobes.
- Compress the large pumpkin gently to approximately 25–28 cm wide and the small pumpkin to approximately 17–19 cm wide, then correct any uneven stuffing.
- Crochet two brown stems or prepare two clean dry twigs, making the visible stem approximately 7–8 cm high for the large pumpkin and 5–6 cm for the small one.
- Insert each stem approximately 2 cm into its center opening and secure the gathered body around the base with four evenly distributed attachment stitches.
- Weave every tail into the stuffed interior, set both pumpkins on a level surface, and make final 5–10 mm sculpting adjustments until all eight lobes sit evenly.
The completed set contains two freestanding cream pumpkins with eight deep lobes each, chunky ribbed surfaces, and narrow brown stems.
7 Technical Tips
- The pumpkin becomes spherical: stop adding fiberfill while the body still compresses approximately 2–3 cm under firm finger pressure. Overstuffing prevents the external strands from creating the deep valleys visible in the reference.
- The rectangle seam twists: place markers at the quarter points before slip stitching the edges together. A displacement of even two rows becomes visible after the body is cinched.
- The top forms a cone: keep the central 4–5 cm of stuffing softer than the outside wall. A densely packed center pushes upward when the gathering strand is tightened.
- One lobe is narrower than the others: loosen one bordering sculpting strand by 5–10 mm before moving stuffing. Adding fiberfill without correcting strand tension usually shifts the problem into the neighboring lobe.
- Chenille loops disappear while crocheting: mark the first and last stitch of every row. Missing one edge stitch repeatedly changes a 17-stitch rectangle into a tapered panel that cannot seam cleanly.
- The stem leans after handling: insert approximately 2 cm of its base into the stuffed center and attach it at four points. Sewing only around the surface opening allows a 7–8 cm stem to pivot.
- The bottom rocks instead of standing flat: distribute stuffing away from the exact bottom center and press a shallow 3–4 cm indentation into the closure. A protruding center knot acts like a small foot beneath the pumpkin.
Why a Ribbed Rectangle Fits the Photograph
The visible stitch direction runs vertically through the pumpkin lobes. That makes a ribbed rectangle particularly effective: once its ends are joined, every back-loop ridge travels from the gathered bottom toward the gathered top.
External sculpting strands then deepen selected valleys without requiring a very high stitch count. This is different from a conventional amigurumi sphere, where increases and decreases determine the complete body shape.
Rectangle construction is also well established for chunky crochet pumpkins. Published patterns from Louise Bollanos, Crafting Each Day, and The Unraveled Mitten use flat ribbed or textured pieces that are joined and cinched into three-dimensional forms.
Published Chunky Pumpkin Benchmarks
Louise Bollanos’ Chunky Pumpkin specifies Lion Brand Wool-Ease Thick & Quick, a 9 mm hook, and approximately 50–60 yards. The published rectangle is about 5 × 8 inches, producing a pumpkin approximately 13 inches in circumference × 6 inches high. The listed gauge is 6.6 stitches × 8 rows per 4 inches in single crochet.
Crafting Each Day’s wide-ribbed pumpkin also uses #6 super-bulky yarn and a 9 mm hook. Its published pumpkin is approximately 13 inches in circumference × 3 inches high, with about 30 yards of yarn and a gauge of 8 stitches × 8 rows per 4 inches in single crochet.
Published Multi-Size Benchmark
The Unraveled Mitten publishes three chunky pumpkin sizes in #6 Wool-Ease Thick & Quick with a 9 mm hook. Its starting rectangles measure approximately 5 × 11 inches, 7.5 × 16 inches, and 10 × 22 inches for small, medium, and large.
The listed yarn requirements are approximately 53 yards for small, 64 yards for medium, and 141 yards for large. Those measurements are particularly useful for confirming that large decorative pumpkins need substantially more circumference than small 30–42-stitch amigurumi spheres.
Chenille-Yarn Benchmark
Yarnspirations publishes a Bernat Chunky Crochet Pumpkin designed by Tamara Kelly using Bernat Blanket Big, an extra-heavy chenille-style yarn, with a 25 mm hook. Moogly notes that regular Bernat Blanket can instead be paired with approximately an 8 mm hook.
A September 2026 Repeat Crafter Me pumpkin uses Bernat Blanket Matte & Shiny #6 super bulky yarn. That yarn is listed at 300 g / 173 m per ball. These examples support chenille-style #6 yarn as a practical material family for the plush texture visible in the supplied photograph.
Alternative Smaller Published Size
Crochet 365 Knit Too’s Chunky Pumpkin uses super-bulky yarn with an 8 mm hook and lists 55–60 yards. Its published large size measures approximately 4.5 inches wide × 4.25 inches tall, while the small version is approximately 3.5 × 3 inches.
Those dimensions are much smaller than the photo-inspired large reconstruction here. They demonstrate why yarn category alone does not determine finished scale; rectangle dimensions, gauge, stuffing, and sculpting all affect the result.
Changing the Large Pumpkin Size
For a broader pumpkin, add rows to the rectangle rather than making it much taller. Four additional rows add one section to each side of the seam and increase circumference without altering body height.
For a taller pumpkin, add foundation chains. Two additional body stitches increase the flat panel height by roughly 2.5 cm at the reconstruction gauge.
Keep the rectangle substantially longer than it is tall. A nearly square panel produces a narrow upright pumpkin instead of the broad shape shown in the photograph.
Making a More Compressed Pumpkin
Use the same rectangle but reduce the amount of stuffing by approximately 10–15%.
After the eight sculpting strands are installed, pass one additional strong strand vertically through the exact center from bottom to top.
Pull the two centers toward one another by approximately 2 cm and knot underneath.
This creates a flatter top and bottom without increasing the depth of the eight external valleys.
Making a Natural-Wool Version
Substitute a #6 wool or wool-blend yarn such as Wool-Ease Thick & Quick and retain the 9 mm hook as a starting point.
The surface will appear more defined and less plush than chenille. Because the published Bollanos pumpkin uses this yarn family successfully at a 9 mm gauge, it is a useful alternative when individual stitches should remain visible.
Measure the rectangle rather than assuming the same row count will reproduce the chenille dimensions.
Yarn Planning
For an unfamiliar #6 yarn, crochet the first ten rows of the large rectangle and weigh them.
Multiply that weight by four to estimate the 40-row body, then add approximately 10% for the seam, gauge variation, and finishing.
Repeat the calculation separately for the 30-row small pumpkin.
The reconstruction allowances of 150–190 g and 90–120 g intentionally leave room for yarns with different meterage per gram. Published chunky patterns range from roughly 30 yards for compact pumpkins to 141 yards for substantially larger rectangles.
Care and Storage
Follow the yarn manufacturer’s washing instructions. For chenille pumpkins, spot cleaning is preferable when the stem is a natural twig.
If a full wash is required, remove a detachable natural stem first and support the pumpkin while wet. Reshape the eight valleys before drying.
Store the pumpkins without heavy objects on top. Long-term compression can flatten chenille ribs and permanently shift the stuffing away from the sculpted valleys.
Sources
Ravelry — Chunky Pumpkin by Louise Bollanos — #6 super-bulky yarn, 9 mm hook, 50–60 yards, published gauge and finished measurements.
Handy Little Me — Chunky Crochet Pumpkin — free version of Louise Bollanos’ ribbed pumpkin construction and sizing reference.
Crafting Each Day — Free Chunky Crochet Pumpkin — #6 yarn, 9 mm hook, 30-yard wide-ribbed pumpkin benchmark.
The Unraveled Mitten — Chunky Crochet Pumpkin Pattern — three rectangle sizes, #6 yarn, 9 mm hook, and published yardage for small through large pumpkins.
Yarnspirations — Bernat Chunky Crochet Pumpkin — published chenille-style pumpkin using Bernat Blanket Big.
Moogly — Chunky Crochet Pumpkins — construction tutorial and hook guidance for Bernat Blanket yarns.
Repeat Crafter Me — Bernat Blanket Matte & Shiny Crochet Pumpkin — current #6 chenille pumpkin reference and yarn specifications.
Ravelry — Chunky Pumpkin by Crochet 365 Knit Too — super-bulky yarn, 8 mm hook, 55–60 yards, and published small/large dimensions.
Conclusion
The eight sculpted valleys determine the photographed silhouette, so test the shaping on the small pumpkin before finishing the larger body. Keep the stuffing compressible, position four sculpting strands at equal intervals, and adjust each valley in 5–10 mm increments until the lobes match. Your next step is to crochet the 13-stitch small rectangle and confirm that its relaxed length reaches roughly 37–41 cm before seaming. Save this chunky cream crochet pumpkin pattern to Pinterest or share your finished pair on Instagram with #ChunkyCreamPumpkins. For this specific set, would you use the crocheted bark-texture stems or the natural twig stems shown in the photograph?









