Introduction
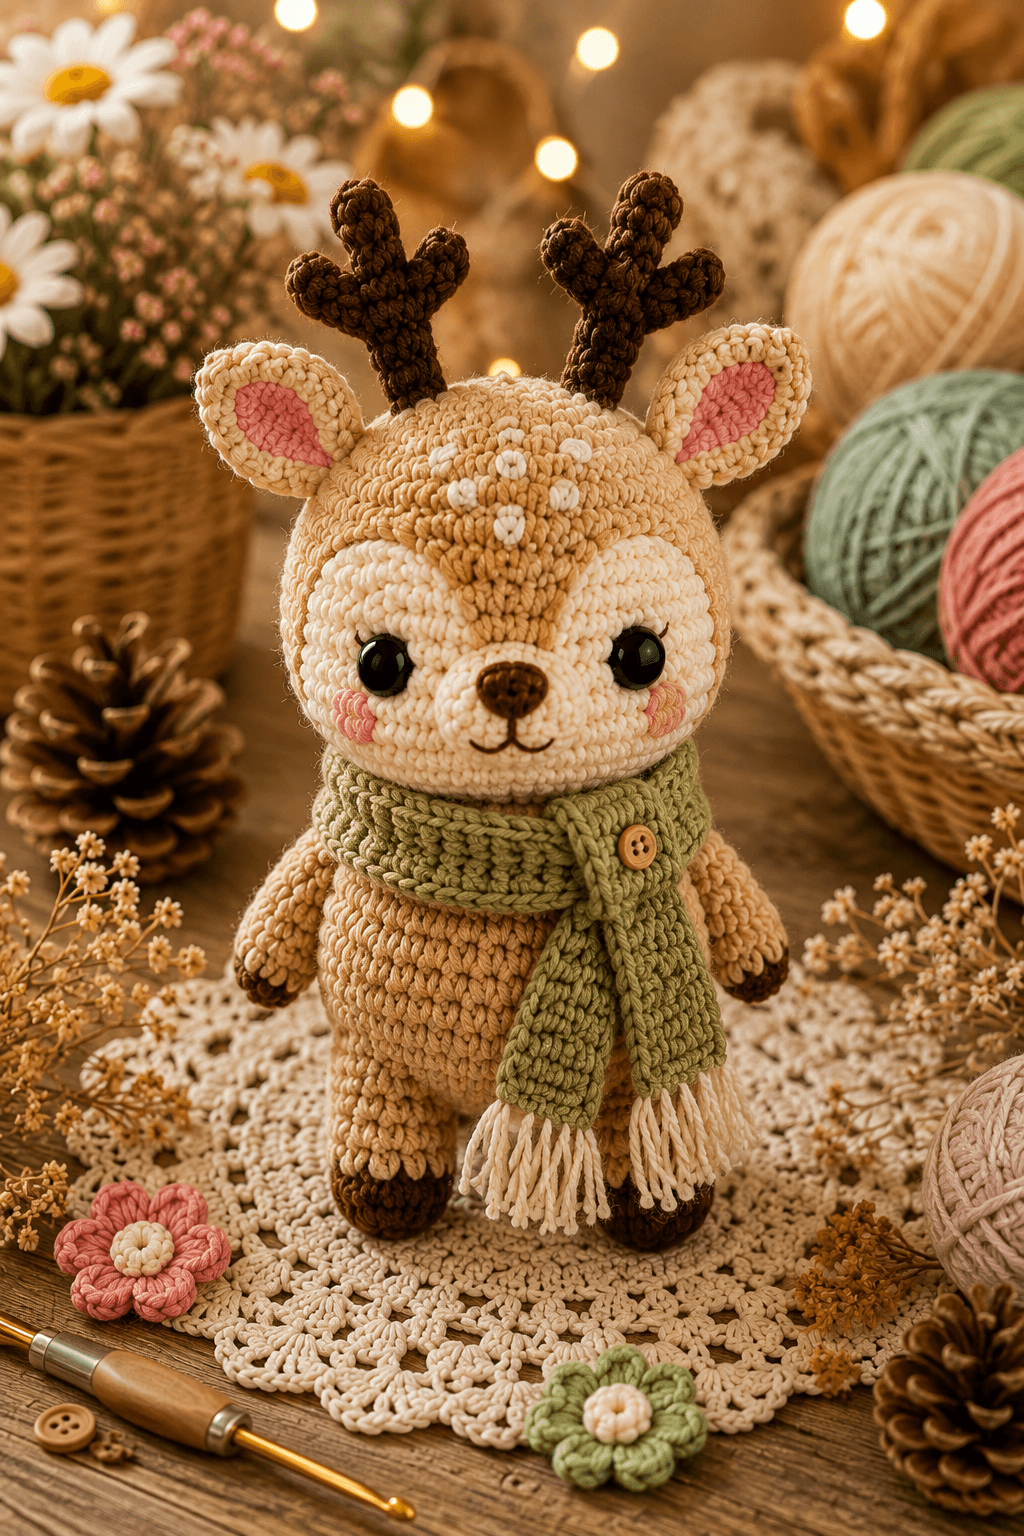
A reindeer’s antlers cannot be treated like oversized ears; each branch needs its own narrow support or the crown collapses sideways. This reindeer amigurumi crochet pattern uses sport-weight yarn, a 2.5 mm hook and structured three-pronged antlers to produce a figure about 25 cm tall. The project uses intermediate amigurumi techniques and includes a cream facial mask, fitted muzzle, spotted forehead and olive scarf with fringe.
The Design: What Makes This Scarf Reindeer Different
The head reaches a 42-stitch plateau so the cream face patches, large eyes and central forehead blaze have enough width to remain separate. By contrast, the body stops at 36 stitches, producing the narrow upright torso visible beneath the scarf. Each antler uses a crocheted central stem with two attached tines rather than a single flat appliqué; that choice gives the crochet reindeer antlers enough height to remain visible behind the ears. The cream facial area is also split structurally between eye patches and muzzle instead of being worked as one oversized oval. A frequent mistake in a deer amigurumi pattern is positioning the ears too close to the antlers. Leave a visible gap between those pieces or the upper silhouette becomes one continuous mass and the branching shape disappears.
Project Information at a Glance
| Skill Level | Time | Finished Size | Hook | Best For |
|---|---|---|---|---|
| Intermediate | 10–12 hours | About 25 cm including antlers | 2.5 mm | Winter display figures and detailed gift projects |
A published sport-weight reindeer made with YarnArt Jeans measures approximately 25 cm using a 2.5 mm hook. The same reference specifies sport-weight yarn and 8 mm safety eyes, making that construction a useful technical benchmark for this photo-matched version.
Materials and Tools
Yarn
- Camel tan — sport weight — approximately 40 g — YarnArt Jeans or similar cotton-acrylic blend
- Cream — sport weight — approximately 15 g — face patches, muzzle, ear borders and fringe
- Dark brown — sport weight — approximately 10 g — antlers, hooves and nose
- Olive green — sport weight — approximately 15–20 g — scarf
- Dusty pink — sport weight scrap — approximately 2 g — inner ears and cheeks
Tools
- 2.5 mm crochet hook
- Two 8 mm black safety eyes
- Polyester toy stuffing
- Yarn needle
- Locking stitch marker
- Dressmaking pins
- Scissors
- One 10–12 mm wooden-look button
- Black or dark-brown embroidery thread for the mouth
Replace plastic safety eyes and the decorative button with embroidered details when the finished figure is intended for a young child who may detach small components.
Abbreviations
- MR — magic ring
- sc — single crochet
- inc — two single crochet stitches in one stitch
- dec — decrease over two stitches
- sl st — slip stitch
- ch — chain
- hdc — half double crochet
- BLO — back loop only
- FLO — front loop only
For an invisible decrease, insert the hook through the front loops of the next two stitches, yarn over and complete both loops together as one single crochet.
Pattern — Step by Step
Work in continuous spiral rounds unless rows are specified. Place a marker in the first stitch of each round and confirm every bracketed total before moving the marker.
Head
Yarn: camel tan — standard six-stitch sphere calculation.
R1: 6 sc in MR (6)
R2: inc × 6 (12)
R3: (sc, inc) × 6 (18)
R4: (2 sc, inc) × 6 (24)
R5: (3 sc, inc) × 6 (30)
R6: (4 sc, inc) × 6 (36)
R7: (5 sc, inc) × 6 (42)
R8–R15: sc around (42)
R16: (5 sc, dec) × 6 (36)
R17: (4 sc, dec) × 6 (30)
Pin the cream face patches before installing the eyes. Insert the safety-eye stems between R12 and R13 with approximately eight stitches between them. Begin stuffing firmly around the washers.
R18: (3 sc, dec) × 6 (24)
R19: (2 sc, dec) × 6 (18)
R20: (sc, dec) × 6 (12)
R21: dec × 6 (6)
Fasten off. Thread a 20 cm tail through the six front loops, pull the opening closed and hide the yarn inside the head.
Body
Yarn: camel tan.
R1: 6 sc in MR (6)
R2: inc × 6 (12)
R3: (sc, inc) × 6 (18)
R4: (2 sc, inc) × 6 (24)
R5: (3 sc, inc) × 6 (30)
R6: (4 sc, inc) × 6 (36)
R7–R12: sc around (36)
R13: (4 sc, dec) × 6 (30)
R14–R15: sc around (30)
R16: (3 sc, dec) × 6 (24)
R17: sc around (24)
R18: (2 sc, dec) × 6 (18)
Pack the lower half firmly enough to support the head. Reduce stuffing density through the shoulder section so the neck seam does not form a hard ridge.
R19: (sc, dec) × 6 (12)
R20: dec × 6 (6)
Fasten off and leave a 40 cm tail for joining the body to the head.
Front Legs — Make Two
Yarn: dark brown and camel tan.
R1: with dark brown, 6 sc in MR (6)
R2: inc × 6 (12)
R3: sc around (12)
R4: change to camel tan, sc around (12)
R5: (2 sc, dec) × 3 (9)
R6–R10: sc around (9)
Stuff the hoof and lower half only. The upper four rounds should remain flexible enough to lie against the body.
Flatten the opening and crochet 4 sc through both layers (4). Fasten off and leave a 25 cm sewing tail.
Back Legs — Make Two
Yarn: dark brown and camel tan.
R1: with dark brown, 6 sc in MR (6)
R2: inc × 6 (12)
R3: (sc, inc) × 6 (18)
R4: sc around (18)
R5: change to camel tan, sc around (18)
R6: (sc, dec) × 6 (12)
R7–R9: sc around (12)
R10: dec × 6 (6)
Stuff each leg to medium firmness and flatten the hoof slightly against the work surface.
Fasten off. Close the opening and leave a 30 cm sewing tail.
Outer Ears — Make Two
Yarn: cream.
R1: 6 sc in MR (6)
R2: inc × 6 (12)
R3: (sc, inc) × 6 (18)
R4: (2 sc, inc) × 6 (24)
R5: sc around (24)
Do not stuff. Flatten each circle into an elongated oval and pinch the lower edge.
Fasten off and leave a 25 cm tail.
Inner Ears — Make Two
Yarn: dusty pink.
R1: 6 sc in MR (6)
R2: inc × 6 (12)
R3: (sc, inc) × 6 (18)
Fasten off and leave a 15 cm tail. Stretch the pieces into narrow ovals and sew one onto each cream outer ear, leaving a cream border of approximately one stitch.
Face Patches — Make Two
Yarn: cream.
R1: 6 sc in MR (6)
R2: inc × 6 (12)
R3: (sc, inc) × 6 (18)
R4: (2 sc, inc) × 6 (24)
Fasten off and leave a 25 cm tail. Stretch each patch vertically so the outer edge rises beside the eye while the inner edge points toward the muzzle.
Muzzle
Yarn: cream.
R1: 6 sc in MR (6)
R2: inc × 6 (12)
R3: (sc, inc) × 6 (18)
R4: sc around (18)
Add a thin layer of stuffing during sewing. Keep the piece wider than it is deep.
Fasten off and leave a 30 cm tail.
Nose
Yarn: dark brown.
R1: 6 sc in MR (6)
R2: inc × 6 (12)
R3: sc around (12)
Fasten off and leave a 20 cm tail. Flatten the nose into a horizontal oval before attaching it to the muzzle.
Cheek Patches — Make Two
Yarn: dusty pink.
R1: 6 sc in MR (6)
R2: inc × 6 (12)
Slip stitch into the next stitch. Fasten off and leave a 15 cm tail. Pull each circle into a shallow oval while sewing.
Antler Main Stems — Make Two
Yarn: dark brown.
R1: 6 sc in MR (6)
R2–R12: sc around (6)
Add a very narrow column of stuffing through R1–R8. Leave the upper section flexible enough to bend slightly outward.
Fasten off and leave a 30 cm attachment tail.
Large Antler Tines — Make Two
Yarn: dark brown.
R1: 6 sc in MR (6)
R2–R6: sc around (6)
Fasten off and leave a 20 cm sewing tail.
Small Antler Tines — Make Four
Yarn: dark brown.
R1: 6 sc in MR (6)
R2–R4: sc around (6)
Fasten off and leave a 20 cm sewing tail. Do not stuff the smallest branches.
Forehead Spots — Make Four
Yarn: cream.
R1: 6 sc in MR (6)
Slip stitch into the next stitch and fasten off. Pull each six-stitch disc into a tiny oval during attachment. For smaller markings, replace the discs with two or three cream embroidery stitches.
Scarf
Yarn: olive green. Work in rows.
Row 1: ch 76, sc in second ch from hook and across (75)
Row 2: ch 1, turn, sc across (75)
Row 3: ch 1, turn, sc across (75)
Row 4: ch 1, turn, sc across (75)
Row 5: ch 1, turn, sc across (75)
Row 6: ch 1, turn, sc across (75)
Fasten off and weave the working ends through several rows.
Scarf Fringe
Yarn: cream.
Cut sixteen strands measuring 12 cm each. Fold strands in pairs and attach four fringe bundles to each scarf end with lark’s-head knots.
Trim the completed fringe to approximately 4 cm below the scarf edge.
Assembly
- Centre the head above the body and pin it at four points. Sew around the 12-stitch neck area twice with the long body tail.
- Position both cream face patches across Head R10–R16, leaving a camel-tan strip between their upper inner edges for the forehead blaze.
- Insert the 8 mm eyes through the cream patches between Head R12 and R13. Attach the muzzle below them, then sew the dark-brown nose to its centre and embroider a short Y-shaped mouth.
- Sew the pink cheek patches beside the lower outer edges of the cream mask. Add three or four cream forehead spots above the muzzle along the central tan blaze.
- Attach each pink inner ear to a cream outer ear, pinch the bases and sew the finished ears across Head R5–R9.
- Sew one large and two small tines to each antler stem. Attach the finished antlers behind the ears with approximately 3 cm between the two stem bases.
- Position the front legs at Body R12–R17. Angle their hooves slightly inward and keep both shoulders at the same height.
- Attach the back legs across Body R4–R9. Test the reindeer on a flat surface before tightening either seam so both hooves carry equal weight.
- Wrap the olive scarf once around the neck, cross the ends toward the reindeer’s left side and secure the upper layer with the decorative button or hidden yarn stitches.
- Straighten the fringe, check both antlers from the front and side, then weave structural tails through at least three stitch directions before trimming.
The completed reindeer should stand or sit upright with both antlers visible outside the ear line and the scarf resting below the muzzle.
7 Technical Tips
- Antler rotation: A stem attached through only one small section can twist until the tines point backward. Sew each antler base around at least six head stitches and add one hidden anchor stitch 2 cm above the base.
- Face-mask drift: Moving one cream patch by two stitches makes the central tan blaze visibly crooked. Pin both patches simultaneously and measure the eye stems from the head’s round marker before sewing.
- Visible decrease ridges: Standard decreases produce bars across the 42-stitch head. Work every head and body reduction through the front loops of the next two stitches.
- Late eye installation: Safety-eye washers are difficult to reach once the head opening falls below 24 stitches. Lock both 8 mm eyes before completing Head R18.
- Overstuffed antlers: Packing a 6-stitch tube firmly makes the branches bulky and difficult to angle. Use a stuffing strand no wider than approximately 4 mm inside the main stems.
- Uneven leg pinning: A 5 mm height difference between the back legs makes the body lean beneath the scarf. Pin both legs, place the reindeer on a hard surface and adjust them before sewing.
- Loose scarf tails: Fringe knots can work loose when strands are cut too short. Begin with 12 cm strands and trim only after every pair has been tightened against the scarf edge.
Shaping the Face Mask
The cream face mask controls most of the expression in this reindeer amigurumi crochet pattern. Each side begins as a 24-stitch circle, but it should not remain circular once attached. Stretch the upper portion toward the corresponding ear and pull the lower inside edge toward the muzzle. That creates the tapered white region shown around each eye.
Keep a narrow strip of camel yarn exposed between the two patches. The strip should measure approximately three stitches wide near the forehead and narrow toward the muzzle. This exposed section becomes the darker central blaze and provides a background for the cream forehead spots.
Install the eyes only after both patches are pinned. Passing the safety-eye stems through the patch and head at the same time locks the layered construction and stops the cream circles from shifting later.
Building Balanced Antlers
The antlers are the highest structural components and the first place small alignment errors become obvious. Make both 12-round main stems before sewing any tines. Lay them side by side and compare length; a difference of one full round can make one branch appear lower after assembly.
Attach the large tine near R7–R8 of each stem. Place the two smaller tines around R4 and R9, changing their angle slightly so the silhouette looks branched instead of forked. Mirror the second antler rather than repeating the first one in the same direction.
Pin the stems behind the ears and view the head directly from the front. The outermost antler tips should extend slightly beyond the ear tips. From the side, tilt both stems backward by roughly 10 degrees so they do not fall over the forehead.
Scarf Fit and Fringe Placement
The scarf should wrap around the neck without compressing the lower head. Six rows create enough width to cover the head-to-body seam while leaving the muzzle unobstructed. If the scarf pushes upward against the cheeks, move the wrap one body round lower instead of tightening it.
Cross the ends off-centre to reproduce the photographed asymmetry. The longer end should fall approximately halfway down the body, while the shorter section remains closer to the shoulder. Position the button near the crossing point and sew it only through the upper scarf layer if the scarf needs to remain removable.
Attach cream fringe after the final scarf position is established. Four bundles per end provide a full edge without making the accessory heavier than the neck can support.
Size and Yarn Adjustments
A verified sport-weight reindeer pattern using YarnArt Jeans and a 2.5 mm hook finishes at approximately 25 cm, which is a practical target for this winter reindeer crochet pattern. Another published DK version reaches about 13 cm with a 3.5 mm hook because its underlying stitch construction is smaller, showing why yarn weight alone does not determine finished dimensions.
If you substitute a different sport yarn, crochet the head first and measure its diameter across R11–R13. Use the same yarn and hook for the antlers so the six-stitch stems remain proportional. Thickening only the antler yarn can make the branches dominate the head.
For a smaller figure, retain the written stitch counts and use a thinner cotton with a 2.0–2.25 mm hook. Recheck eye size before installation. The black eye dome should remain fully within each cream patch with at least one visible row of cream stitches around it.
Finishing Checks
Place the reindeer on a level surface before hiding the final tails. Both back hooves should contact the surface, while the front legs hang at equal heights beside the body. Rotate the head slightly if the scarf appears uneven even though its ends measure the same length.
Examine the antlers against a plain background. Correct branch angles with hidden stitches between adjacent antler sections rather than pulling harder on the head attachment seam. Tightening the base excessively can dent the top of the head.
Finally, compare the cream forehead spots. Their irregular arrangement is intentional, but they should stay inside the central tan blaze rather than crossing onto the white eye patches.
Conclusion
Measure the completed figure from the lowest hoof to the tallest antler tip and record the result before changing yarn for another version. Photograph the head directly from the front as the next technical check; that angle exposes unequal antler height, asymmetrical eye patches and a muzzle that has shifted off the forehead blaze. Save this reindeer amigurumi crochet pattern to Pinterest, then share the finished project on Instagram with #OliveScarfReindeer. Keep the scarf crossing below the chin so the cream face remains unobstructed. For another version, would you keep the natural dark-brown nose shown here or replace it with a red Rudolph-style nose?
Sources
- Ravelry — Reindeer Amigurumi by Hang Pham: 25 cm, sport yarn, 2.5 mm hook and 8 mm safety eyes.
- Ravelry — Christmas Reindeer Amigurumi by Imelda Liputri: 12 cm, sport yarn, 2.5 mm hook and 10 mm eyes.
- Ravelry — Rudolph Reindeer Amigurumi by Li Howell: DK yarn, 3.5 mm hook and approximately 13 cm finished size.
- PlanetJune — Reindeer/Caribou: worsted-weight technical reference for antlers, hook and eye sizing.









