Introduction
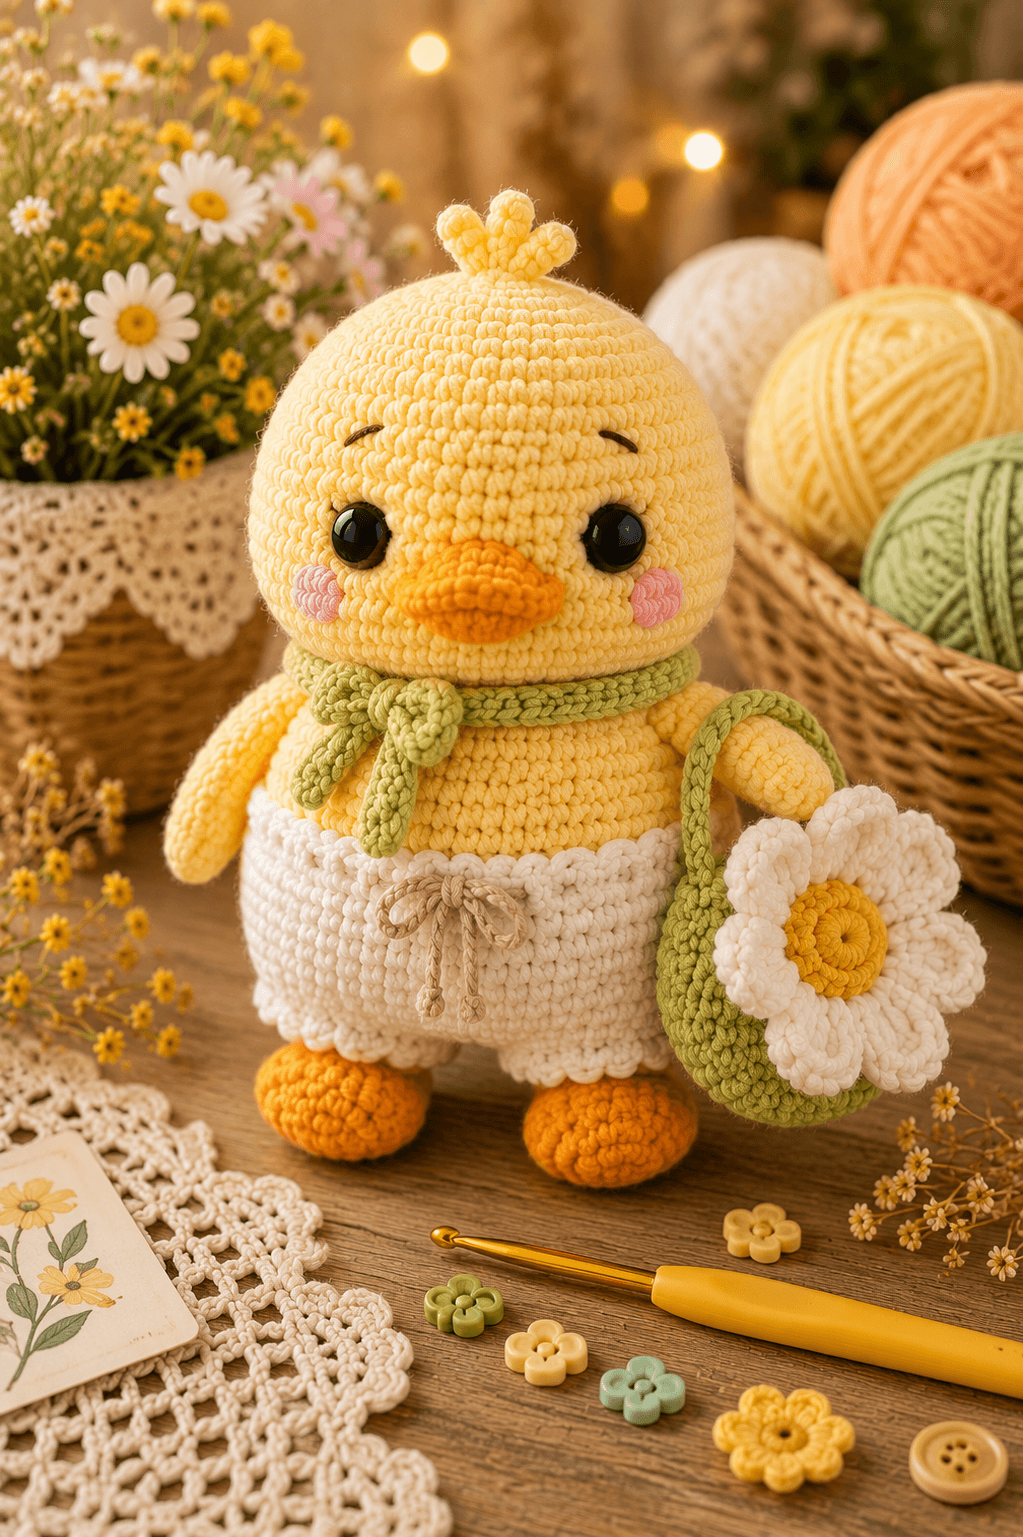
A duck’s bill projects horizontally, but this duckling’s oversized spherical head leaves only two crochet rounds for placing it without crowding the eyes. This duck amigurumi crochet pattern uses sport-weight cotton, a 2.5 mm hook and 12 mm safety eyes to make an approximately 18 cm figure. The intermediate project includes a scarf, drawstring shorts and a separate daisy shoulder bag for a fully dressed display doll.
The Design: What Makes This Duck Different
The head reaches a 36-stitch plateau and stays there for six rounds, producing the broad cheek area visible around the small orange bill. Its body also reaches 36 stitches, but fewer straight rounds keep the torso shorter than the head and preserve the photographed duckling proportions. Wings are flattened rather than heavily stuffed, allowing the green bag strap to cross one shoulder without pushing the arm away from the body. A common mistake in a yellow duck crochet pattern is positioning the bill too high; once the safety eyes are fitted, a high bill compresses the forehead and makes the face read more like a generic bird. Here, the bill sits below the eye centers. The separate shorts and scarf also make this crochet duckling doll structurally different from one-piece dressed designs.
Project Info at a Glance
| Skill Level | Time | Finished Size | Hook | Best For |
|---|---|---|---|---|
| Intermediate | 7–9 hours | About 18 cm | 2.5 mm | Spring displays, handmade collections and product photography |
Materials and Tools
Yarn
- Butter yellow — sport or fine cotton/cotton blend — approximately 50 g — YarnArt Jeans or a comparable tightly spun yarn.
- Orange — sport cotton — approximately 8–10 g — used for the beak, feet and daisy center.
- Cream white — sport cotton — approximately 12–15 g — used for the shorts and flower petals.
- Olive green — sport cotton — approximately 12–15 g — used for the scarf, bag and strap.
- Blush pink — sport cotton or embroidery floss — approximately 2 g — used for the cheeks.
- Tan — thin cotton or embroidery yarn — approximately 2 g — used for the shorts drawstring.
- Dark brown or black — embroidery floss — less than 1 g — used for the eyebrows.
Tools
- 2.5 mm crochet hook
- 12 mm safety eyes
- Polyester stuffing, approximately 25–30 g
- Yarn needle
- Embroidery needle
- Locking stitch markers
- Dressmaking pins
- Scissors
For a toy intended for a child under three, replace plastic safety eyes with securely embroidered eyes because detachable components can present a choking hazard.
Abbreviations
- MR — magic ring
- sc — single crochet
- inc — two single crochet stitches in one stitch
- dec — invisible single crochet decrease
- sl st — slip stitch
- ch — chain
- hdc — half double crochet
- dc — double crochet
- BLO — back loop only
- FLO — front loop only
An invisible decrease is made by inserting the hook through the front loops of the next two stitches before completing one single crochet through them together.
Pattern — Step by Step
Work in a continuous spiral unless a joined round is specified. Mark the first stitch and move the marker after every completed round.
Head
Yarn: butter yellow — Source: Standard amigurumi math.
R1: 6 sc in MR (6)
R2: inc ×6 (12)
R3: (sc, inc) ×6 (18)
R4: (2 sc, inc) ×6 (24)
R5: (3 sc, inc) ×6 (30)
R6: (4 sc, inc) ×6 (36)
R7–R12: sc around (36)
R13: (4 sc, dec) ×6 (30)
R14: (3 sc, dec) ×6 (24)
R15: (2 sc, dec) ×6 (18)
R16: (sc, dec) ×6 (12)
R17: dec ×6 (6)
Insert the 12 mm safety eyes between R9 and R10 with approximately eight visible stitches between the posts. Stuff after R13, adding small pieces around each washer to keep the eye area rounded.
Fasten off. Leave a 20 cm tail and close the remaining six stitches through the front loops.
Body
Yarn: butter yellow — Source: Standard amigurumi math.
R1: 6 sc in MR (6)
R2: inc ×6 (12)
R3: (sc, inc) ×6 (18)
R4: (2 sc, inc) ×6 (24)
R5: (3 sc, inc) ×6 (30)
R6: (4 sc, inc) ×6 (36)
R7–R11: sc around (36)
R12: (4 sc, dec) ×6 (30)
R13–R15: sc around (30)
R16: (3 sc, dec) ×6 (24)
R17–R18: sc around (24)
R19: (2 sc, dec) ×6 (18)
R20: sc around (18)
Fill the lower body firmly. Use slightly less stuffing in the final three rounds so the neck seam remains flat.
Fasten off. Leave a 30 cm tail for head attachment.
Wings (Make 2)
Yarn: butter yellow — Source: Standard amigurumi limb math.
R1: 6 sc in MR (6)
R2: inc ×6 (12)
R3: (sc, inc) ×6 (18)
R4–R6: sc around (18)
R7: (sc, dec) ×6 (12)
R8–R10: sc around (12)
Add a small amount of stuffing to R1–R5 only. Flatten the final opening so each wing hangs downward against the torso.
Fasten off. Leave a 22 cm sewing tail.
Feet (Make 2)
Yarn: orange — Source: Standard amigurumi math.
R1: 6 sc in MR (6)
R2: inc ×6 (12)
R3: (sc, inc) ×6 (18)
R4–R6: sc around (18)
R7: (sc, dec) ×6 (12)
R8: sc around (12)
R9: dec ×6 (6)
Stuff through R6, concentrating the filling toward the toe end. Flatten the rear third slightly before closing.
Fasten off. Leave a 25 cm tail and close the opening.
Beak
Yarn: orange — Source: Original oval shaping based on standard amigurumi increases.
R1: 6 sc in MR (6)
R2: inc ×6 (12)
R3: (sc, inc) ×6 (18)
R4: sc around (18)
R5: (sc, dec) ×6 (12)
Add only enough stuffing to keep the bill rounded. Flatten the final opening into an oval about 3 cm wide.
Fasten off. Leave a 22 cm sewing tail.
Cheek Patches (Make 2)
Yarn: blush pink — Source: Standard flat-circle math.
R1: 6 sc in MR (6)
R2: inc ×6 (12)
Join with a sl st. Fasten off and leave a 15 cm tail.
Head Tuft — Center Feather
Yarn: butter yellow — Source: Original narrow-tube shaping.
R1: 6 sc in MR (6)
R2–R5: sc around (6)
Do not stuff. Flatten lightly so the feather curves toward the front.
Fasten off. Leave a 16 cm tail.
Head Tuft — Side Feathers (Make 2)
Yarn: butter yellow — Source: Original narrow-tube shaping.
R1: 6 sc in MR (6)
R2–R4: sc around (6)
Do not stuff. Pin the two shorter feathers at slight outward angles beside the center feather.
Fasten off. Leave a 16 cm tail on each piece.
Scarf
Yarn: olive green — Source: Original accessory construction.
Row 1: ch 48, sc in second ch from hook and across (47)
Row 2: ch 1, turn, sc across (47)
Row 3: ch 1, turn, sc across (47)
Test the strip around the neck before cutting the yarn. Add or remove chains when yarn tension changes the required circumference.
Fasten off. Weave in both ends.
Scarf Ends (Make 2)
Yarn: olive green.
Row 1: ch 12, sc in second ch from hook and across (11)
Row 2: ch 1, turn, sc across (11)
Fasten off. Leave a 12 cm tail for attaching each end behind the scarf knot.
Shorts
Yarn: cream white — Source: Original removable-look garment construction.
R1: ch 37, join without twisting, sc around (36)
R2: sc around (36)
R3: BLO sc around (36)
R4–R7: sc around (36)
R8: (4 sc, dec) ×6 (30)
R9–R10: sc around (30)
Fit the shorts over the lower body before the feet are attached. The upper edge should sit just below the widest part of the torso.
Fasten off and weave in the tail.
Shorts Drawstring
Yarn: tan.
Ch 45. Fasten off. Thread the chain through alternating stitches of R2 at the center front and tie a small bow.
Keep both drawstring ends close to the body rather than leaving long hanging loops.
Shoulder Bag — Front and Back (Make 2)
Yarn: olive green — Source: Standard flat-circle math.
R1: 6 sc in MR (6)
R2: inc ×6 (12)
R3: (sc, inc) ×6 (18)
R4: (2 sc, inc) ×6 (24)
R5: (3 sc, inc) ×6 (30)
Fasten off the first circle. Do not cut the yarn after the second circle.
Bag Joining Round
Yarn: olive green.
Place both circles together with wrong sides facing inward. Sc through both layers for 22 stitches, leaving eight stitches open across the top edge (22 joined stitches).
Add a thin layer of stuffing only if a rounded bag profile is wanted. The photographed version remains relatively flat beneath the flower.
Fasten off and weave the yarn through the inside.
Bag Strap
Yarn: olive green.
Row 1: ch 61, sc in second ch from hook and across (60)
Row 2: ch 1, turn, sc across (60)
Measure the strap diagonally from one shoulder to the opposite hip before sewing it to the bag.
Fasten off. Leave a 20 cm tail at each end.
Daisy Center
Yarn: orange — Source: Standard flat-circle math.
R1: 6 sc in MR (6)
R2: inc ×6 (12)
R3: (sc, inc) ×6 (18)
Join with a sl st. Fasten off and leave a 20 cm sewing tail.
Daisy Petals (Make 7)
Yarn: cream white — Source: Original petal shaping.
R1: 6 sc in MR (6)
R2: inc ×6 (12)
R3–R5: sc around (12)
R6: dec ×6 (6)
Do not stuff heavily. Flatten each petal before sewing so it spreads around the flower center rather than projecting forward.
Fasten off. Leave an 18 cm tail on every petal.
Eyebrows
Yarn: dark brown or black embroidery floss.
Place each eyebrow approximately two rounds above its safety eye. Work one shallow curved stitch spanning about three crochet stitches, with the inner end slightly lower than the outer end.
Secure the floss inside the head and bury the ends within the stuffing.
Assembly
- Center the head above the body and pin the 18-stitch neck opening to the lower head before sewing the seam with mattress stitches.
- Position the beak between head R10 and R12, centered between the safety eyes, and sew around its flattened back edge.
- Attach the two pink cheek patches beside the beak, keeping each patch approximately two stitches from the nearest eye.
- Sew the wings to body R11–R15, leaving enough movement on the bag side for the strap to pass over the shoulder.
- Fit the shorts over the lower body, center the drawstring bow and secure the back waistband with two hidden stitches if it shifts.
- Attach the feet across body R2–R6 and place the figure on a flat surface before tightening the final sewing stitches.
- Sew the three crest feathers around the head’s starting point, with the longest feather centered and the shorter two angled outward.
- Wrap the scarf around the neck, overlap the front ends and stitch the two short scarf tails beneath the overlap to form the pictured knot.
- Sew seven white petals evenly around the orange daisy center, attach the finished flower to the bag and secure the strap ends to opposite upper corners.
- Place the bag diagonally across the duck, weave every remaining tail through at least 3 cm of dense fabric, reverse direction once and trim the hidden ends.
The completed duck should stand on both orange feet with the bag resting beside the body rather than pulling the shoulder downward.
7 Technical Tips
- Rotated head shaping: A misplaced round marker can shift the decrease line toward one eye. Count all 36 stitches at the end of R12 before working the first head decrease.
- Flattened head: Under-stuffing leaves a dent beside the eye washers and changes the spherical silhouette. Add stuffing in pieces no larger than about 2 cm and distribute them behind the cheeks before closing R16.
- Decrease holes: Working through all four loops of two stitches can leave visible gaps around the final head rounds. Use the invisible decrease through the two front loops and match its tension to the neighboring single crochet stitches.
- Incorrect eye timing: Waiting until after R14 leaves too little room to seat the washers evenly. Install both 12 mm eyes after R12 and compare their height before locking either washer.
- Twisted shorts: Joining the initial chain with a half-turn creates a permanent spiral around the body. Lay all 36 chains flat before making the first joining slip stitch and inspect the lower edge again after R2.
- Off-center accessories: Sewing the scarf and bag without pins can pull the visual center away from the beak. Pin the scarf knot directly below the bill and test the strap at roughly a 45-degree diagonal before stitching.
- Loose woven tails: Bag and foot attachments receive more movement than the facial components. Weave those tails through at least 3 cm of fabric, reverse through an adjacent row and cut only after the yarn retracts beneath the stitches.
Conclusion
Check the feet, scarf and shoulder strap together before making the last permanent attachment because all three affect the duck’s balance. The next practical step is to stand the figure on a level surface and photograph the front and both side views; mismatched feet, a rotated bill or an uneven bag strap become easier to identify from those angles. Share the completed duck amigurumi crochet pattern project on Pinterest with a full vertical image, then post the finished front view on Instagram using #DaisyBagDuck. For this specific duck, would you keep the seven-petal white daisy or change the bag flower to match another spring bloom?









