Introduction
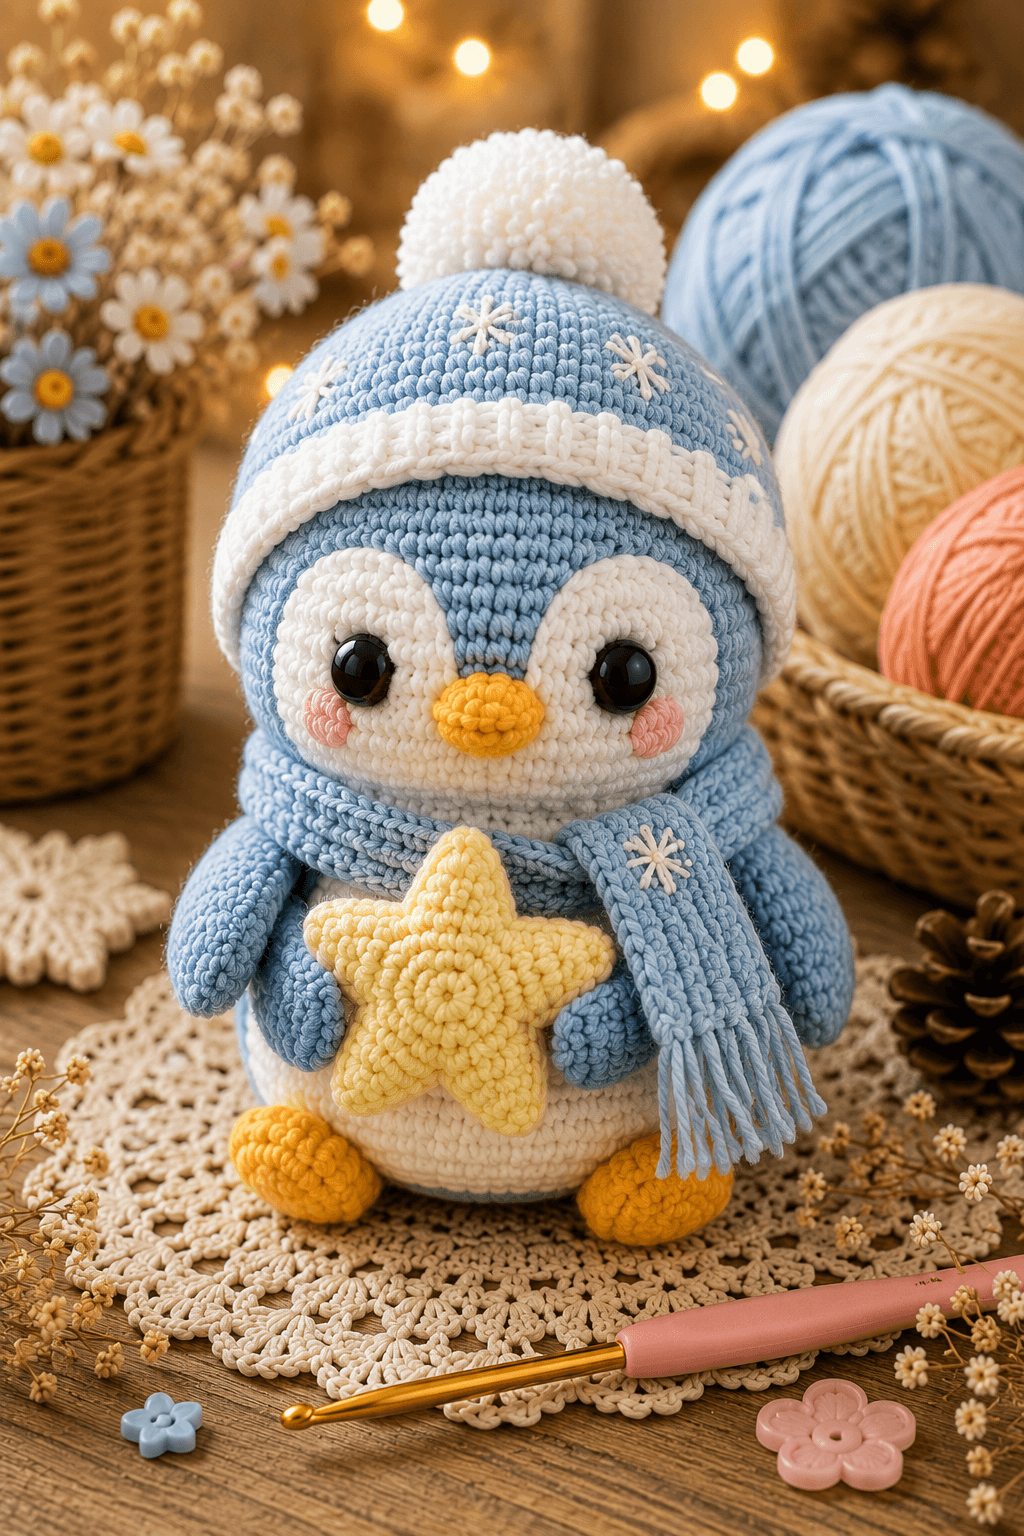
Penguins have no visible external ears, so this winter hat has to create its silhouette without ear openings. This penguin amigurumi crochet pattern combines a 42-stitch head, oval body, white facial mask, scarf, pompom beanie and stuffed yellow star. Worked in sport-weight yarn with a 2.75 mm hook, the finished figure measures about 27 cm including the hat. The construction suits makers comfortable with shaping, color placement and sewn assembly.
The Design: What Makes This Winter Penguin Different
The head and body both reach 42 stitches, but their proportions differ: the head holds its full circumference longer while the body begins reducing sooner to create the egg-shaped penguin profile. Two overlapping white face patches form the mask instead of one flat oval, leaving a pointed blue section between the eyes that copies the photographed forehead marking. The winter penguin crochet pattern also treats the star as a structural accessory. Its stuffed centre fills the space between the wings and helps fix their final angle. A common mistake with a crochet penguin with scarf is placing the facial mask too low. That compresses the beak area and makes the eyes appear high on the forehead. Pin both white patches first, check the blue centre point, and only then install the eyes through the layered pieces.
Project Information at a Glance
| Skill Level | Time | Finished Size | Hook | Best For |
|---|---|---|---|---|
| Intermediate | 10–12 hours | About 27 cm including hat | 2.75 mm | Winter display figures and detailed gift projects |
The 27 cm reference size comes from a published sport-weight penguin with a pompom hat and scarf. Finished measurements still change with yarn construction, stuffing density and individual tension, so measure the head before permanently joining the hat.
Materials and Tools
Yarn
- Powder blue — sport weight — approximately 40 g — YarnArt Jeans or similar cotton blend
- White — sport weight — approximately 30 g — YarnArt Jeans or similar
- Pale yellow — sport weight — approximately 15 g — for the star
- Orange-gold — sport weight — approximately 5 g — for the beak and feet
- Pink — sport weight scrap — approximately 2 g — for cheek patches
Tools
- 2.75 mm crochet hook
- Two 12 mm black safety eyes
- Polyester toy stuffing
- Yarn needle
- Locking stitch markers
- Dressmaking pins
- Scissors
- White embroidery yarn for snowflakes
- Pompom maker or fingers for the hat pompom
Plastic safety eyes should be replaced with embroidered eyes when the finished penguin is intended for a young child who may pull or chew attached components.
Abbreviations
- MR — magic ring
- sc — single crochet
- inc — two single crochet stitches in one stitch
- dec — decrease over two stitches
- sl st — slip stitch
- ch — chain
- hdc — half double crochet
- dc — double crochet
- BLO — back loop only
- FLO — front loop only
For an invisible decrease, insert the hook through the front loops of the next two stitches and complete them together as one single crochet.
Pattern — Step by Step
Work in a continuous spiral unless rows or joined rounds are specified. Move the stitch marker after every completed round and verify each bracketed stitch count before proceeding.
Head
Yarn: powder blue — original six-stitch sphere calculation.
R1: 6 sc in MR (6)
R2: inc × 6 (12)
R3: (sc, inc) × 6 (18)
R4: (2 sc, inc) × 6 (24)
R5: (3 sc, inc) × 6 (30)
R6: (4 sc, inc) × 6 (36)
R7: (5 sc, inc) × 6 (42)
R8–R15: sc around (42)
R16: (5 sc, dec) × 6 (36)
R17: (4 sc, dec) × 6 (30)
Pin the completed face patches and insert the eyes before continuing. Begin stuffing firmly around the eye washers.
R18: (3 sc, dec) × 6 (24)
R19: (2 sc, dec) × 6 (18)
R20: (sc, dec) × 6 (12)
R21: dec × 6 (6)
Fasten off. Close the opening through the front loops and hide the yarn tail inside the head.
Body
Yarn: powder blue.
R1: 6 sc in MR (6)
R2: inc × 6 (12)
R3: (sc, inc) × 6 (18)
R4: (2 sc, inc) × 6 (24)
R5: (3 sc, inc) × 6 (30)
R6: (4 sc, inc) × 6 (36)
R7: (5 sc, inc) × 6 (42)
R8–R13: sc around (42)
R14: (5 sc, dec) × 6 (36)
R15–R16: sc around (36)
R17: (4 sc, dec) × 6 (30)
R18: sc around (30)
R19: (3 sc, dec) × 6 (24)
R20: (2 sc, dec) × 6 (18)
Stuff the lower body firmly so the penguin sits upright. Keep the upper section slightly softer where it meets the head.
R21: (sc, dec) × 6 (12)
R22: dec × 6 (6)
Fasten off and leave a 40 cm tail for attaching the body to the head.
White Belly Patch
Yarn: white. Work in rows.
Row 1: ch 7, sc in second ch from hook and across (6)
Row 2: ch 1, turn, inc, 4 sc, inc (8)
Row 3: ch 1, turn, inc, 6 sc, inc (10)
Row 4: ch 1, turn, inc, 8 sc, inc (12)
Row 5–Row 10: ch 1, turn, sc across (12)
Row 11: ch 1, turn, dec, 8 sc, dec (10)
Row 12: ch 1, turn, dec, 6 sc, dec (8)
Work single crochet evenly around the perimeter. Fasten off and leave a 35 cm sewing tail.
Face Patches — Make Two
Yarn: white. The two circles overlap slightly below the forehead point.
R1: 6 sc in MR (6)
R2: inc × 6 (12)
R3: (sc, inc) × 6 (18)
R4: (2 sc, inc) × 6 (24)
R5: (3 sc, inc) × 6 (30)
Fasten off and leave a 30 cm sewing tail. Flatten each circle and stretch it slightly vertically before pinning.
Beak
Yarn: orange-gold.
R1: 6 sc in MR (6)
R2: (sc, inc) × 3 (9)
R3: sc around (9)
R4: (2 sc, inc) × 3 (12)
R5: sc around (12)
Add a small amount of stuffing, keeping the tip rounded rather than spherical.
Fasten off and leave a 25 cm tail.
Cheek Patches — Make Two
Yarn: pink.
R1: 6 sc in MR (6)
R2: inc × 6 (12)
Slip stitch into the next stitch. Fasten off and leave a 15 cm tail. Shape each circle into a low oval while sewing.
Wings — Make Two
Yarn: powder blue.
R1: 6 sc in MR (6)
R2: inc × 6 (12)
R3: (sc, inc) × 6 (18)
R4–R7: sc around (18)
R8: (sc, dec) × 6 (12)
R9–R11: sc around (12)
R12: dec × 6 (6)
Stuff only R1–R5. Leave the upper section flexible so the wings can wrap around the star.
Fasten off. Leave a 30 cm tail for attachment.
Feet — Make Two
Yarn: orange-gold.
R1: 6 sc in MR (6)
R2: inc × 6 (12)
R3: (sc, inc) × 6 (18)
R4–R5: sc around (18)
R6: (sc, dec) × 6 (12)
R7: sc around (12)
R8: dec × 6 (6)
Stuff to medium firmness and flatten slightly from top to bottom.
Fasten off and leave a 30 cm sewing tail.
Winter Hat
Yarn: powder blue.
R1: 6 sc in MR (6)
R2: inc × 6 (12)
R3: (sc, inc) × 6 (18)
R4: (2 sc, inc) × 6 (24)
R5: (3 sc, inc) × 6 (30)
R6: (4 sc, inc) × 6 (36)
R7: (5 sc, inc) × 6 (42)
R8–R13: sc around (42)
Test the hat on the stuffed head. It should sit above the eyes without stretching the head circumference.
R14: change to white, sc around (42)
R15–R17: sc around (42)
Fasten off. Fold the white band upward and tack it at four points.
Hat Pompom
Yarn: white.
Wrap white yarn around a 4 cm pompom maker approximately 80–100 times. Tie the centre firmly, cut the loops and trim to a sphere about 5 cm across.
Attach the pompom to Hat R1 with multiple passes through the centre knot.
Scarf
Yarn: powder blue. Work in rows.
Row 1: ch 71, sc in second ch from hook and across (70)
Row 2: ch 1, turn, sc across (70)
Row 3: ch 1, turn, sc across (70)
Row 4: ch 1, turn, sc across (70)
Row 5: ch 1, turn, sc across (70)
Fasten off and weave in both working tails. Cut twelve 10 cm strands, fold them in pairs and attach three fringe bundles to each scarf end.
Five-Point Star — Make Two Panels
Yarn: pale yellow.
R1: 6 sc in MR (6)
R2: inc × 6 (12)
R3: (sc, inc) × 6 (18)
R4: (2 sc, inc) × 6 (24)
R5: (3 sc, inc) × 6 (30)
Do not fasten off the second panel. Place both circles together with wrong sides facing.
To form each star point, work across five stitches as follows: sc, hdc, dc, hdc, sc. Repeat the five-stitch point sequence six times around the edge, but pinch and shape five dominant points during joining; use the final section at the lower centre as the attachment area hidden by the wings.
Join the panels with single crochet around the perimeter. Add stuffing before closing the final 5 cm, distributing it into every point.
Fasten off and hide the tail inside the star.
Snowflake Embroidery
Yarn: white embroidery yarn.
On the blue hat, sew one vertical stitch approximately 8 mm long, cross it with a horizontal stitch, then add two diagonal stitches through the same centre point. Add short branch stitches near the ends for the largest snowflakes.
Repeat with three to five snowflakes spaced irregularly around the front half of the hat. Add one small snowflake near the lower end of the scarf.
Assembly
- Centre the head over the body opening and pin it at four points. Sew around the neck twice with the 40 cm body tail.
- Pin the white belly patch from approximately Body R8 to R19. Stitch around its full edge without pulling the body inward.
- Position the two white face circles across Head R8–R16 so their inner upper edges leave a narrow blue point between them.
- Insert the 12 mm safety eyes through the white patches and head between Head R12 and R13, leaving approximately eight stitches between the stems.
- Sew the beak at the centre of the overlapping face patches. Attach the pink cheeks one round below the lower edges of the eyes.
- Attach both feet across Body R4–R8. Place the figure on a level surface before tightening the seams so both feet touch evenly.
- Sew the wings to Body R11–R17, leaving their lower halves free. Angle the tips toward the centre of the belly.
- Place the stuffed star between the wings and sew each wing tip to the rear edge of the star with two or three hidden stitches.
- Fit the hat over the upper head, tack it behind the white band at four points, then wrap the scarf once around the neck with one end hanging lower.
- Check the pompom, snowflake embroidery, scarf fringe and star position from the front and both sides. Weave every structural yarn tail through at least three stitch directions before trimming.
The finished penguin should balance on the rounded body and both feet while the star remains centred independently of the scarf.
7 Technical Tips
- Head spiral drift: Losing the round marker moves the facial centre line by one or more stitches. Count all 42 stitches at the end of Head R8, R11 and R15.
- Overstuffed face: Excess filling beneath the white mask pushes the patches apart and widens the blue forehead point. Stop adding stuffing when firm thumb pressure produces an indentation of roughly 3 mm.
- Visible decrease bars: Standard decreases create horizontal lines across the blue head and body. Work every shaping decrease through the front loops of the next two stitches.
- Late eye placement: The washers become difficult to reach once the head opening falls below 24 stitches. Fit and lock both 12 mm eyes before completing Head R18.
- Uneven hat tension: A 42-stitch band that measures more than 1 cm wider than the head will slide over the eyes. Change to a 2.5 mm hook for the hat only when the fabric is visibly looser than the head fabric.
- Unpinned wing angle: A difference of even 5 mm between wing heights makes the star appear tilted. Pin both wings and the star at the same time before sewing any of the three pieces permanently.
- Loose scarf tails: Short woven ends can emerge when the scarf is wrapped repeatedly. Leave at least 15 cm at each finishing point and pass the yarn through three different rows before trimming.
Face Mask and Forehead Shaping
The white mask is the most sensitive visual element in this penguin amigurumi crochet pattern. Each patch begins as a 30-stitch circle, but it should be pinned as a vertical oval. Place the inner upper edges far enough apart to expose a narrow wedge of powder blue running toward the beak. That wedge reproduces the central forehead marking visible in the reference image.
Do not sew the entire perimeter of the first patch before positioning the second. Pin both pieces, install temporary eye markers and compare the head from directly in front. The lower edges should overlap slightly behind the beak while the outer edges remain symmetrical.
The 12 mm eyes sit inside the white sections rather than on their outer borders. If the eyes touch the blue head fabric, move each patch outward by one stitch instead of moving the eye stems closer together.
Hat, Scarf and Snowflake Placement
The hat accounts for several centimetres of the finished 27 cm height, so its crown should remain rounded rather than tall and cylindrical. Rounds 8–13 supply depth; adding more plain rounds changes the silhouette substantially. The white folded band needs enough stiffness to stay horizontal across the forehead.
Position the largest embroidered snowflake above one eye and place smaller motifs around it with unequal spacing. Identical spacing creates a mechanical repeat that differs from the scattered decoration in the photograph. Keep embroidery tension light enough that the blue stitches remain flat.
The scarf wraps once around the neck and crosses near the penguin’s right side. One end should fall to approximately the lower edge of the star. Trim all fringe strands to the same finished length after attaching them, rather than measuring individual strands before knotting.
Constructing the Star Accessory
The star needs more stuffing than a flat appliqué but less than a spherical toy. Push small amounts into the points first, then fill the centre until it reaches approximately 2.5–3 cm thick. Overfilling rounds off the valleys between the points and makes the shape read as a flower.
Before fastening the star to the wings, rotate it until a single point faces upward. The two lower side points should sit just above the penguin’s belly. Attach through the rear layer only when possible so sewing stitches remain hidden from the front.
If a removable star is preferred, leave it unattached and curve the wing tips farther inward. The wings still need enough friction to hold the accessory, so stuffing should stop well above their final three rounds.
Size Adjustments
A published sport-weight winter penguin reaches 27 cm with a 2.5–2.75 mm hook, which makes that scale a useful target for this photo-matched construction. Switching to a thinner sport yarn and a 2.25 mm hook will reduce every component without changing the stitch counts; another published hat-and-scarf penguin measures about 13–14 cm at that smaller scale.
When changing yarn weight, make the head before any accessories. Measure its circumference after R13, then crochet the hat using the same yarn and hook combination. The 42-stitch hat and 42-stitch head are designed as a matched pair.
Scale the safety eyes separately. Large eyes create much of the photographed expression, but the plastic rim should remain fully inside the white face patches. If 12 mm eyes reach the patch edges after downsizing, change to 9 mm rather than enlarging the patches.
Conclusion
Measure the completed figure from the bottom of the body to the top of the white pompom and record the result before changing yarn or hook size. Photograph the face directly from the front next; that view reveals unequal mask placement, a tilted beak or a star sitting off-centre between the wings. Save this penguin amigurumi crochet pattern to Pinterest and share the finished winter penguin on Instagram with #WinterStarPenguin. For a second version, keep the 42-stitch body calculation and change only one decorative variable. Should the next penguin hold the same five-point star, or would a crocheted snowflake fit the blue winter hat more closely?
Sources
- Ravelry — Amigurumi Penguin with Pom Pom Hat and Scarf
- Ravelry — Amigurumi Penguin in the Hat
- Amigurumi.com — Cute Penguin
- Ravelry — Penguin Amigurumi by Mariska Vos-Bolman









