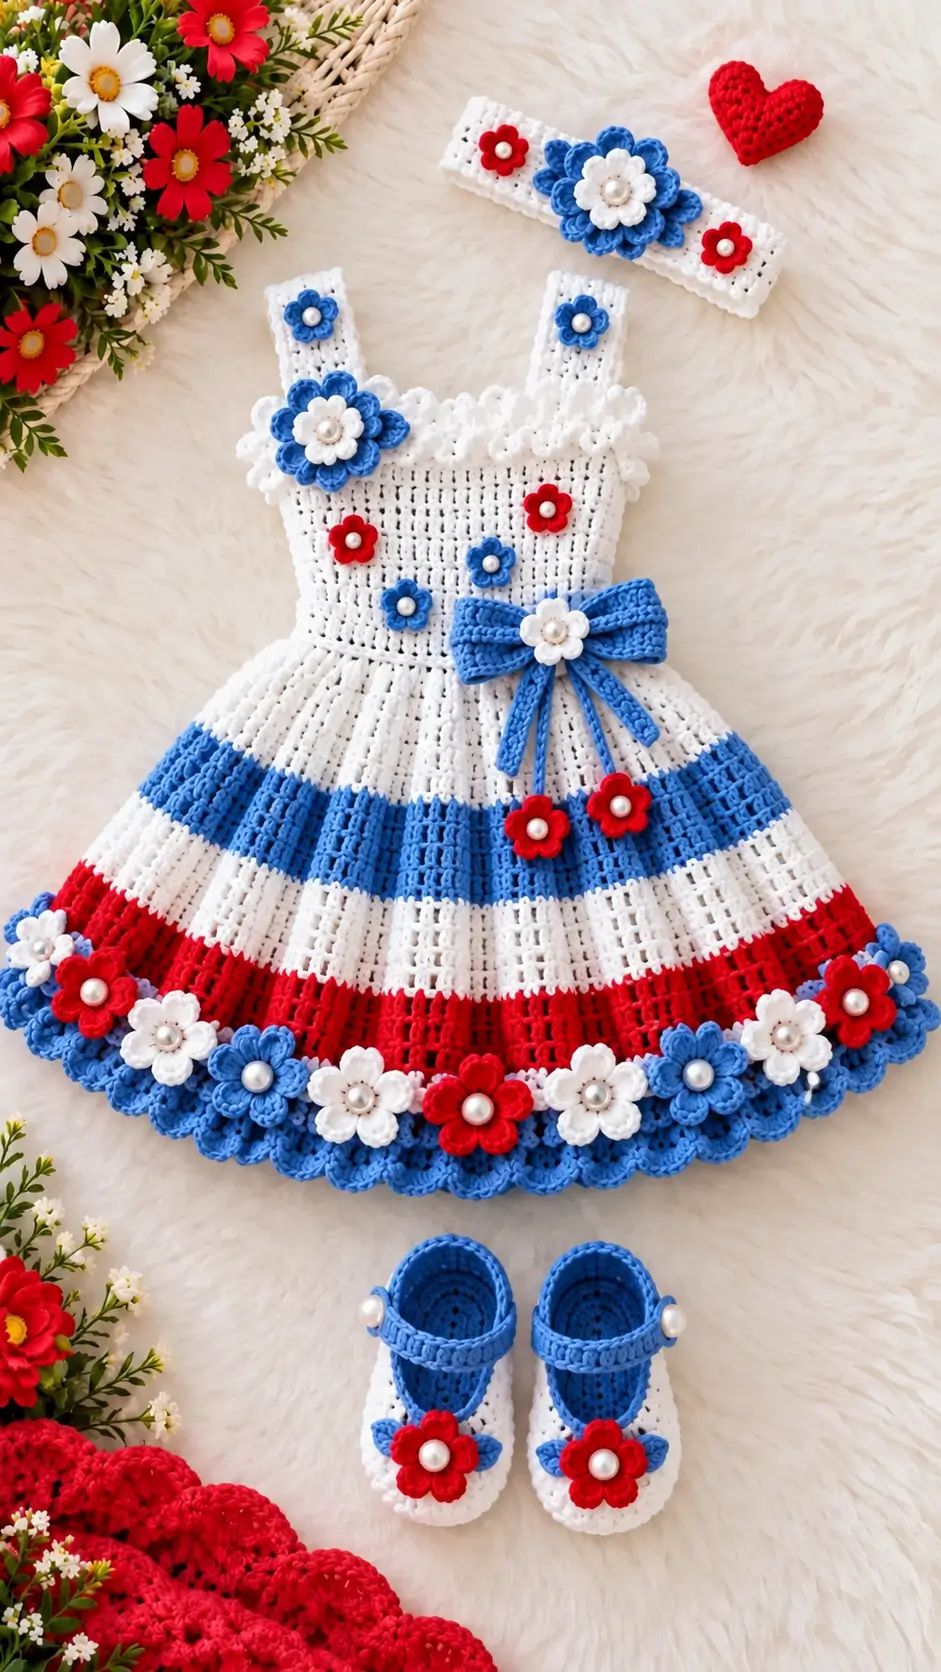
A ring of blue scallops carrying red, white and blue flowers is the feature that controls this dress from the hem upward. This red white blue crochet baby dress pattern reconstructs the photographed set in DK yarn with a 4 mm hook and a measurement-led 6–12-month target. It is an intermediate project comprising a striped dress, layered appliqués, headband and matching shoes, making one construction plan sufficient for a coordinated outfit.
The Design: What Makes This Floral Dress Different
Three structural choices define this crochet dress. First, the white bodice remains comparatively flat while dimensional flowers supply the surface detail; this keeps the upper section from becoming visually congested. Second, substantial skirt expansion begins at the waist. That creates enough circumference for the broad blue, white and red bands without unnecessarily widening the chest.
The third decision is modular decoration. Flowers are made separately and attached after blocking, which allows you to correct spacing across the crochet flower baby dress rather than committing to motifs while working the skirt. The headband and shoes repeat the same palette, producing a coordinated crochet baby dress with headband set.
A common construction problem is adding too much flare directly at the waist. Excessive increases create a thick ridge rather than a controlled transition between the fitted bodice and full skirt.
Project Info at a Glance
| Skill Level | Time | Finished Size | Hook | Best For |
|---|---|---|---|---|
| Intermediate | 12–16 hours | Target 6–12 months; 46–50 cm chest | 4.0 mm | Decorative baby outfit / photography garment |
Published 6–12-month crochet dress patterns show chest measurements around 45.7–50 cm. Check the intended wearer’s measurements before treating the age label as a fit guarantee.
Materials and Tools
Yarn
- White — DK/light #3 — approximately 200–250 g — smooth washable cotton or cotton/acrylic baby yarn.
- Royal blue — DK/light #3 — approximately 70–100 g — use the same fiber family as the white yarn.
- Bright red — DK/light #3 — approximately 50–70 g — use the same yarn weight.
- Flower-center yarn — DK or finer — approximately 5 g for crocheted centers.
Tools
- 4.0 mm crochet hook
- 3.5 mm crochet hook for firmer flower motifs if required
- Yarn needle
- Locking stitch markers
- Flexible tape measure
- Scissors
- Rustproof blocking pins
- Crocheted or embroidered flower centers for an infant version
The reference design uses pearl-like centers. For a baby garment, crocheted or embroidered centers remove the need for small detachable decorative pieces.
Abbreviations
- ch — chain
- sl st — slip stitch
- sc — single crochet
- hdc — half double crochet
- dc — double crochet
- tr — treble crochet
- inc — increase
- dec — decrease
- BLO — back loop only
- sp — space
- st/sts — stitch/stitches
- RS — right side
An invisible decrease is mainly relevant to the shaped shoe sections: insert the hook through the front loops of the next two stitches before completing one single crochet.
Gauge and Sizing
Work a gauge swatch before beginning the bodice.
Target reference gauge: approximately 20 dc = 10 cm after washing and drying.
A finished chest between approximately 46 and 50 cm is the target for this 6–12-month reconstruction. The actual wearer’s chest measurement and your finished gauge take precedence over the age label.
The instructions below assume a finished chest measurement of approximately 48 cm.
Pattern — Step by Step
Bodice
Yarn: white.
The bodice is worked flat from the lower edge upward. Adjust the starting chain when necessary to reach the required finished chest measurement.
Foundation: Ch 97.
Row 1: Dc in 4th ch from hook and each ch across. (95)
Row 2: Ch 3, turn, dc across. (95)
Row 3: Ch 3, turn, dc across. (95)
Row 4: Ch 3, turn, dc across. (95)
Row 5: Ch 3, turn, dc across. (95)
Row 6: Ch 3, turn, dc across. (95)
Row 7: Ch 3, turn, dc across. (95)
Row 8: Ch 3, turn, dc across. (95)
Row 9: Ch 3, turn, dc across. (95)
Row 10: Ch 1, turn, sc across. (95)
Measure the bodice before continuing. Check the width against the intended chest circumference while accounting for the back seam or fastening allowance.
Fasten off. Leave approximately 25 cm of yarn for finishing.
Shoulder Straps — Make 2
Yarn: white.
Foundation: Ch 13.
Row 1: Dc in 4th ch from hook and across. (11)
Rows 2–12: Ch 3, turn, dc across. (11)
Check the strap length against the intended wearer before attaching it.
Edging: Ch 1 and work sc evenly around the entire strap, placing 3 sc at each outer corner where required to keep the edging flat.
Fasten off. Leave approximately 30 cm for sewing.
Neckline Ruffle
Yarn: white.
Join white yarn to the upper edge of the bodice.
Row 1: Ch 1, sc evenly across the neckline.
Row 2: Ch 1, turn, work (sc, hdc, 3 dc, hdc, sc) in the next suitable space, sl st in the next space; repeat across.
Keep each shell approximately 1.5–2 cm deep. The finished ruffle should remain shallow rather than forming a heavy collar.
Fasten off.
Skirt
Yarn: white, royal blue and bright red.
Join white yarn to the lower edge of the bodice. Work in joined rounds after closing the back section according to the chosen fastening method.
Round 1: Ch 3, work dc evenly around the waist and distribute increases until approximately 144 dc are present. (144)
Rounds 2–5: Ch 3, dc around. (144)
Round 6: 11 dc, 2 dc in next st around. (156)
Rounds 7–10: Dc around. (156)
Round 11: 12 dc, 2 dc in next st around. (168)
Rounds 12–14: Dc around. (168)
Change to royal blue.
Rounds 15–20: Dc around. (168)
Change to white.
Rounds 21–26: Dc around. (168)
Change to bright red.
Rounds 27–33: Dc around. (168)
Change to white.
Rounds 34–38: Dc around. (168)
Shorten or extend individual stripe sections when necessary to reach the required shoulder-to-hem measurement. Maintain the red, white and blue sequence while making length adjustments.
Fasten off.
Blue Scalloped Hem
Yarn: royal blue.
Join blue yarn to the final white skirt round.
Round 39: Ch 1, sc around. (168)
Round 40: Skip 2 sts, 7 dc in next st, skip 2 sts, sl st in next st; repeat around.
Adjust the final repeat slightly if necessary so the shells remain evenly distributed around the circumference.
Round 41: Add a second shallow shell layer only when the first border remains flat and flexible. Stop after Round 40 if additional stitches cause the hem to ripple.
Fasten off. Weave the yarn tail through at least 5 cm of reverse-direction stitches.
Small Five-Petal Flowers — Make 12–16
Yarn: red, royal blue and white as required.
Round 1: Make an adjustable ring, work 5 sc into the ring, sl st to first sc. (5)
Round 2: In each stitch work (sl st, ch 2, 2 dc, ch 2, sl st). (5 petals)
Use red, blue and white flowers in alternating positions around the dress.
Fasten off. Leave approximately 20 cm for sewing.
Large Layered Flowers — Make 3–5
Yarn: royal blue and white.
Begin with royal blue.
Round 1: 6 sc in adjustable ring. (6)
Round 2: 2 sc in each st around. (12)
Round 3: Work sl st, ch 3, 3 dc in next st, ch 3, sl st in next st around to form six outer petals.
Fasten off blue.
Attach white yarn through the inner structure.
Inner petals: Repeat six times: sl st into an inner attachment point, ch 2, 2 dc, ch 2, sl st.
Finish the center with a small crocheted circle or embroidered knot. The center should be securely integrated into the flower when the garment is intended for a baby.
Waist Bow
Yarn: royal blue.
Bow panel: Ch 35.
Row 1: Hdc in 2nd ch from hook and across. (34)
Rows 2–10: Ch 1, turn, hdc across. (34)
Fasten off and weave in the tails. Pinch the rectangle at its center and wrap blue yarn around the middle approximately 10–12 times. Secure the wrap on the reverse.
Bow Tails — Make 2
Foundation: Ch 26.
Row 1: Hdc in 2nd ch from hook and across. (25)
Rows 2–4: Ch 1, turn, hdc across. (25)
Fasten off and sew both tails behind the center of the bow at slight outward angles.
Attach one layered white flower to the bow center.
Headband
Yarn: white with red and blue flower decorations.
Measure the intended wearer’s head before making the foundation chain. The finished circumference must be based on the child’s measurement and the amount of stretch in the selected yarn.
Chain to the required length.
Row 1: Dc in 4th ch from hook and across.
Rows 2–4: Ch 3, turn, dc across.
Join the short ends securely.
Work one round of sc around each long edge. Attach one large blue-and-white layered flower at the center front. Position one small red flower toward each side to reproduce the red, white and blue arrangement.
Baby Shoes — Make 2
Yarn: royal blue and white.
Begin with royal blue.
Round 1: Ch 10. Sc in 2nd ch from hook, sc in next 7 ch, 5 sc in final ch. Rotate the foundation chain and work along the opposite side: sc in next 7, 2 sc in final space. Join. (22)
Round 2: Ch 1, 2 hdc in first st, hdc in next 7, 2 hdc in each of next 5 sts, hdc in next 7, 2 hdc in each of final 2 sts. Join. (30)
Round 3: Ch 1, hdc around, distributing increases at the toe and heel as required to keep the sole flat.
Change to white.
Round 4: BLO sc around.
Round 5: Sc around.
Round 6: Sc to the toe section. Work controlled decreases across approximately the center 10 toe stitches, then sc around the remainder.
Round 7: Repeat toe shaping until the upper sits flat without puckering.
Change to royal blue.
Round 8: Sc evenly around the shoe opening.
Fasten off.
Shoe Straps — Make 2
Yarn: royal blue.
Join yarn at the outer side of each shoe.
Ch approximately 12–16, adjusting the number to the actual foot width. Return along the chain with sc or sl sts to create a firm strap.
Attach the opposite end securely to the shoe. Replace loose pearl-style side decorations with crocheted details when the shoes are intended for an infant.
Shoe Flowers — Make 2
Yarn: bright red and royal blue.
Work one small five-petal flower in red for each shoe.
A smaller blue petal layer may be positioned behind the red flower to reproduce the layered color effect. Sew each completed flower to the toe through several independent attachment points.
Assembly
- Block the bodice and skirt lightly to the intended measurements before attaching dimensional flowers.
- Close the dress back or install the selected fastening while maintaining the target chest circumference.
- Pin both shoulder straps symmetrically and check the neckline depth before sewing them permanently.
- Sew the neckline ruffle flat so the shells point upward and outward rather than folding toward the chest.
- Position one large layered flower near the left upper waist area and secure the center plus several outer attachment points.
- Place the blue bow toward the right side of the waist and sew the bow tails independently so they remain separated.
- Distribute the small red and blue flowers across the white bodice while leaving visible white space between motifs.
- Arrange alternating red, white and blue flowers immediately above the scalloped hem. Pin every motif before sewing the first one.
- Attach the headband and shoe flowers, then inspect every decorative attachment from the reverse side.
- Weave all yarn tails through multiple stitch directions, trim excess yarn and remeasure the finished garment after final blocking.
The completed set consists of one striped floral dress, one coordinated crochet headband and two matching Mary Jane-style crochet shoes.
7 Technical Tips for a Cleaner Finished Dress
- Control stitch-marker drift. Place a locking marker at the beginning of every skirt round and move it after each completed round. A shift of three or four stitches can make the stripe seam travel diagonally down the back.
- Keep the waist expansion controlled. Do not place all skirt increases into a small section of the waist. Concentrated increases produce a ridge instead of the distributed flare required for this dress.
- Match both shoe toes. Place the decreases in identical positions on both shoes. Unequal decrease placement can rotate one toe opening several stitches away from the center line.
- Avoid detachable flower centers. The dress contains numerous dimensional flowers, so every center needs secure construction. Use crocheted or embroidered centers for a baby version instead of loose pearl-like embellishments.
- Watch stripe tension. Keep the same working tension when changing between white, blue and red yarn. Even a small gauge change across several 168-stitch rounds can alter the skirt circumference visibly.
- Pin the entire hem arrangement first. Mark the center front and quarter points before distributing the flowers. A repeated 1 cm spacing error can produce a large empty section when the final motif is reached.
- Secure every sewing tail. Leave approximately 20–30 cm for appliqué attachment and weave each tail through more than one stitch direction. Short tails following a single path are more likely to work loose during laundering.
Finishing the Red White Blue Crochet Baby Dress
Block the dress before committing to the final flower layout because the finished skirt circumference determines the spacing of every hem motif. After blocking, mark the center front, quarter points and bow position, then distribute the appliqués between those reference points.
Check the shoulder straps, neckline, chest circumference and shoe dimensions against the intended wearer before the final fastening and decorative work. Inspect every flower from the reverse side after sewing to confirm that the attachment points are secure.
Photograph the completed red white blue crochet baby dress pattern from directly above to document the stripe alignment and floral arrangement. Share the finished version on Pinterest or Instagram with #RedWhiteBlueFlowerDress.
For the next version, decide one design variable first: should the hem retain the alternating red, white and blue flower sequence, or use only red flowers against the royal-blue scallops?









