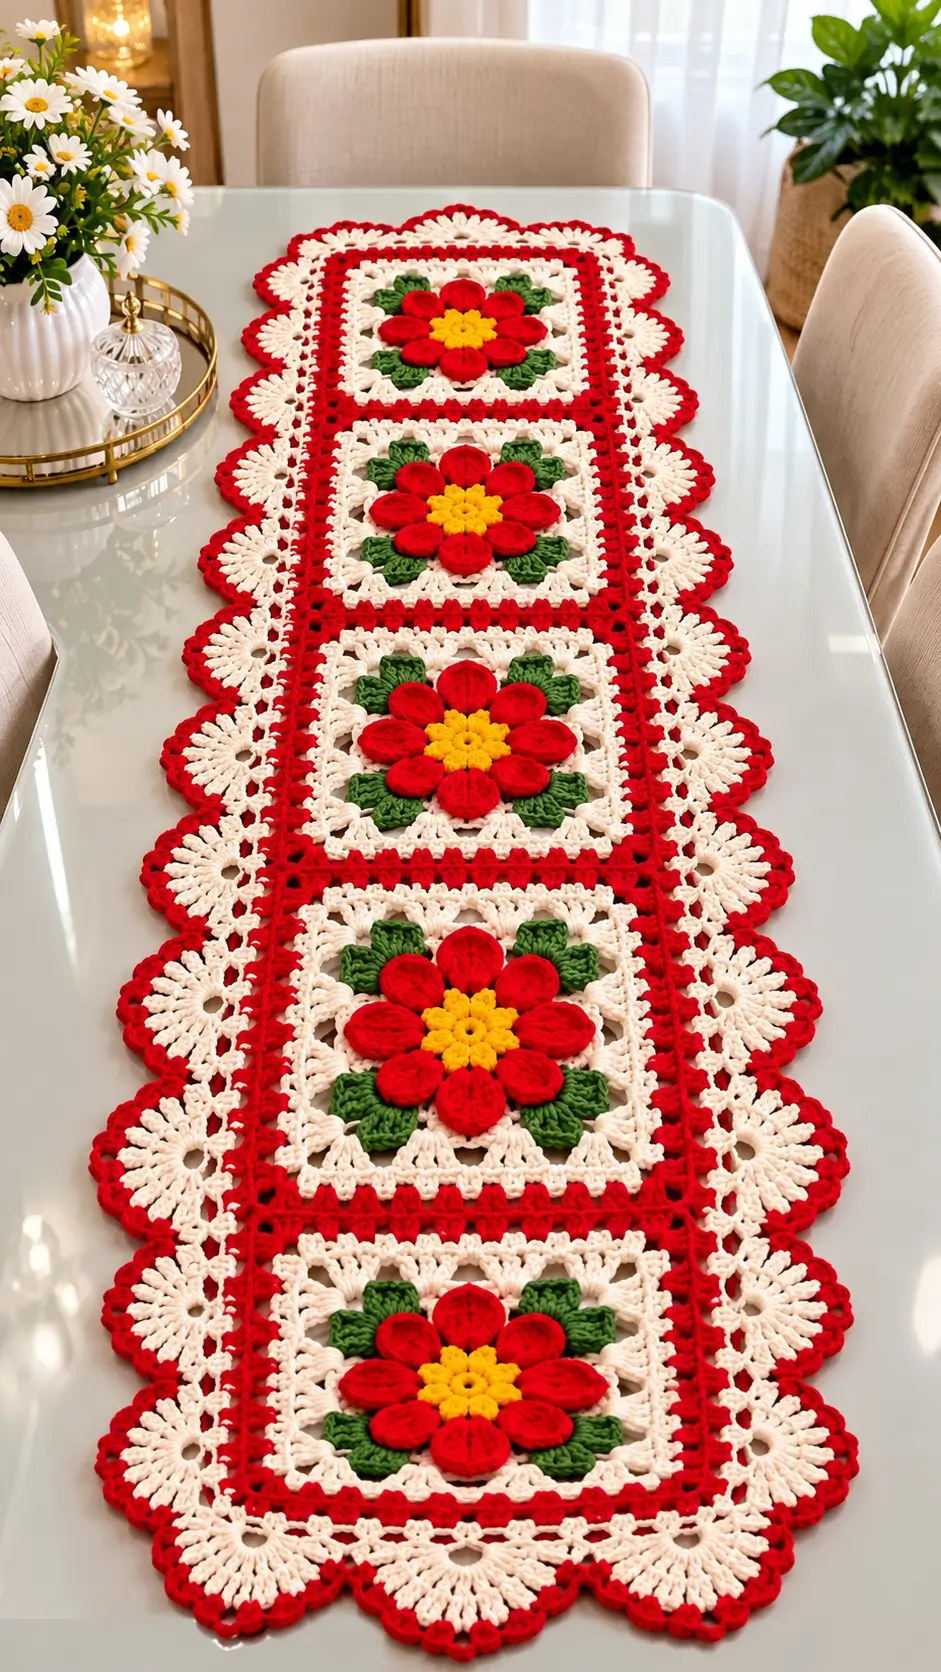
Red Flower Crochet Table Runner Pattern With Scalloped Border
Eight raised red petals dominate every square in this runner, so the flower has to be constructed before the border can control its shape. This floral crochet table runner pattern uses DK cotton, a 4 mm hook and four joined motifs to target roughly 36 × 140 cm. It is an intermediate project. Modular construction also allows you to shorten or lengthen the runner without redesigning the flower.
The Design: What Makes This Floral Runner Different
The runner depends on three structural layers. A dimensional red flower forms the center of each panel, while green leaf groups make the circular blossom read as a square composition. Cream openwork then fills the corners and provides attachment points for the red frame.
That frame matters. Joining four finished motifs without it can make a crochet flower table runner narrow unpredictably at each connection. The red rounds establish consistent panel dimensions before assembly.
Finally, large cream fans interrupt the otherwise rigid rectangular perimeter. A narrow red final round ties those fans visually to the central flowers. The most common mistake with this type of floral granny square runner is joining motifs before blocking them; mismatched square dimensions then accumulate over the full length.
Project Info at a Glance
| Skill Level | Time | Finished Size | Hook | Best For |
|---|---|---|---|---|
| Intermediate | 10–14 hours | Approx. 36 × 140 cm, adjustable | 4 mm | Dining and console tables |
Comparable published flower-motif runners use DK yarn and a 4 mm hook. Finished dimensions vary according to yarn, gauge, border depth and motif count.
Materials and Tools
Yarn
- Red: DK/light-worsted cotton — approximately 120–160 g
- Cream/Ivory: DK/light-worsted cotton — approximately 150–200 g
- Leaf Green: DK/light-worsted cotton — approximately 50–70 g
- Yellow/Gold: DK/light-worsted cotton — approximately 20–30 g
The yarn quantities are working estimates for this photo-inspired construction rather than measurements taken from the photographed runner. Actual consumption changes with yarn thickness, tension and final dimensions.
Tools
- 4 mm crochet hook
- Tapestry needle
- Scissors
- Stitch markers
- Blocking mats
- Rust-resistant blocking pins
- Tape measure
Abbreviations
- MR — magic ring
- sc — single crochet
- hdc — half double crochet
- dc — double crochet
- tr — treble crochet
- sl st — slip stitch
- ch — chain
- sp — space
- sk — skip
- st/sts — stitch/stitches
- inc — two stitches in one stitch
- BLO — back loop only
An invisible decrease is primarily used for three-dimensional shaping and is not required for this flat table-runner construction.
Floral Crochet Table Runner Pattern — Step by Step
This is an original photo-inspired reconstruction. Gauge, yarn choice and blocking will determine the final measurements.
Yellow Flower Center — Make 4
Yarn: yellow/gold.
R1: Work 6 sc in MR; join with sl st. (6)
R2: Ch 1, inc ×6; join. (12)
R3: Ch 1, *(sc, ch 3, sl st into same st), sc in next st* ×6; join. (6 raised bumps)
Fasten off, leaving approximately a 15 cm tail. Keep the center slightly raised rather than blocking it completely flat.
Red Flower — Make 4
Yarn: red.
R1: 6 sc in MR. (6)
R2: Inc ×6. (12)
R3: (sc, inc) ×6. (18)
R4: *(Ch 5, work 3 tr into next st, ch 5, sl st in following st)* repeat around to establish the first petal layer.
R5: Work behind the first layer. *Ch 6, anchor with sc between neighboring petals* around, distributing approximately eight rear loops evenly.
R6: Into each rear loop work *(sc, hdc, 4 dc, 2 tr, 4 dc, hdc, sc)*. Repeat around to form eight dimensional petals.
Fasten off with approximately a 20 cm tail.
Sew one yellow center over the middle of each red flower. Keep the outer portions of the petals free so the flower retains its raised appearance.
Green Leaf Groups — Make 16
Yarn: green.
Foundation: Ch 10.
Row 1: Starting in the second ch from the hook, work sl st, sc, hdc, dc, 2 tr, dc, hdc, sc. Continue around the opposite side of the foundation chain with sc, hdc, dc, 2 tr, dc, hdc, sc, sl st.
Row 2: Ch 1 and sc around the leaf, placing 3 sc into the tip.
Fasten off and leave approximately a 15 cm tail for sewing.
Arrange four leaves around each red flower at approximately 45°, 135°, 225° and 315°. This arrangement changes the circular flower into a balanced composition for the square foundation.
Cream Lace Square — Make 4
Yarn: cream/ivory.
R1: 6 sc in MR. (6)
R2: Inc ×6. (12)
R3: (sc, inc) ×6. (18)
R4: (2 sc, inc) ×6. (24)
R5: (3 sc, inc) ×6. (30)
R6: (4 sc, inc) ×6. (36)
R7: Ch 3, *dc in next 2 sts, ch 2, sk 1* around; join.
R8: Sl st to the next ch-2 sp. Ch 3, *(2 dc, ch 2, 2 dc) in sp, ch 1; 3 dc in next sp, ch 1*. Repeat while positioning four double clusters evenly as corners.
R9: Work 3 dc into each ch-1 space. At each corner work *(3 dc, ch 3, 3 dc)*.
R10: Ch 1, sc in every dc and work *(2 sc, ch 2, 2 sc)* in each corner space.
Fasten off.
Place one completed red flower and four green leaves centrally over each cream foundation. Stitch the flower center securely while leaving the outer sections of the petals free.
Red Square Frame — Make 4
Yarn: red.
Join red in any corner ch-2 space.
R1: Ch 3, 2 dc in corner, *dc evenly across side; (3 dc, ch 2, 3 dc) in next corner*. Repeat around. Complete the first corner with 3 dc, ch 2; join.
R2: Ch 1, sc in each stitch. Work *(sc, ch 2, sc)* in every corner.
R3: Ch 3, dc in each sc around. Work *(2 dc, ch 2, 2 dc)* into each corner space.
Fasten off.
Block every panel to exactly the same dimensions before joining. Depending on tension, yarn and hook size, approximately 26–30 cm per panel is a practical target for this construction.
Joining the Four Flower Squares
Yarn: red.
Place the first two squares with corresponding edges aligned. Join through both panels with slip stitches or single crochet, matching the corners and individual stitches.
Repeat until all four flower squares form one long rectangle.
Do not deliberately skip stitches to compensate for differently sized squares. Correct panel dimensions through blocking before joining.
Inner Cream Openwork Border
Yarn: cream/ivory.
R1: Join cream at one corner. Ch 4, *skip 2 sts, dc in next st, ch 1*. Repeat around, working *(dc, ch 3, dc)* at the corners.
R2: Sl st into the first ch-1 space. Work *(sc, ch 3)* in every ch-1 space. In each corner ch-3 space work *(sc, ch 5, sc)*.
R3: Work 3 sc into each regular ch-3 space. Into every corner ch-5 space work *(3 sc, ch 3, 3 sc)*.
This open section creates the visible separation between the solid red square frames and the larger decorative cream border.
Large Cream Scalloped Fans
Yarn: cream/ivory.
R1: *Skip approximately 3 base stitches, work 9 dc into the next suitable stitch or chain space, skip approximately 3 stitches, sc into the next attachment point.* Repeat around.
Adjust spacing slightly at the corners so the fans remain symmetrical on all four sides.
R2: Over each 9-dc shell work *(sc in first dc, ch 2, dc in next dc)* across the fan, ending with sc.
R3: Work 2 sc into each ch-2 space, placing a small ch-2 point above the center of every fan.
Lay the runner flat before fastening off and check that corresponding fans on the left and right sides align.
Red Outer Scalloped Edge
Yarn: red.
R1: Join red at the beginning of any cream fan. Sc around the complete perimeter, working one sc into each cream stitch and two sc into larger chain spaces.
R2: *Sc in next 3 sts, ch 3, sl st into first ch, sc in next 3 sts.* Repeat around, adjusting the final repeat at each corner.
Fasten off and weave the yarn tail through at least 5 cm of matching red stitches.
The red finishing round should form a narrow outline around the cream fans rather than covering their open structure.
Assembly
- Block all four cream-and-red square foundations to identical dimensions before attaching the dimensional pieces.
- Center one red flower on each square and check that all eight petal tips remain clear of the red frame.
- Position four green leaf groups behind each flower with equal spacing around the center.
- Sew each yellow center through the flower and foundation so the center also anchors the red blossom.
- Tack the inner third of every green leaf to the foundation while keeping the pointed end visible.
- Join the four completed squares in one straight sequence using red yarn.
- Work the cream openwork border around the entire joined rectangle rather than around the individual squares.
- Add the large cream fans, checking both long sides every two or three repeats for matching spacing.
- Crochet the final red perimeter and correct crowded corner repeats before fastening off.
- Wet-block the completed table runner to its target dimensions, shaping the square frames and scallops while leaving the red flower petals raised.
The completed runner consists of four dimensional flower panels surrounded by one continuous red-and-cream lace border.
7 Technical Tips for a Flat, Even Table Runner
- Control motif-size mismatch. Keep every blocked square within approximately 3 mm of the others before joining. A difference of 5–10 mm per panel becomes increasingly visible across four connected motifs.
- Prevent flower-center distortion. Attach the yellow center through an area no wider than approximately 25–30 mm. Sewing through the outer sections of the red petals can flatten the dimensional flower.
- Avoid a loose joining seam. Match the stitches on both red edges before making the seam. Skipping stitches on only one panel can make the finished runner curve toward the shorter edge.
- Control petal crowding. Pin all eight red petals before permanently attaching the flower. Unequal spacing can shift the visual center of an otherwise correctly constructed square.
- Correct border rippling early. If the cream fan round forms waves while lying flat, reduce the number of border stitches or fan repeats. Heavy rippling generally cannot be corrected by blocking alone.
- Prevent corner cupping. Give each corner additional expansion with chain spaces or extra stitches. Too few corner stitches pull the long scalloped edges inward.
- Hide yarn tails correctly. Weave each tail for at least 5 cm through stitches of the same color, then reverse direction once. Avoid carrying red or green tails across the open cream lace.
How to Adjust the Table Runner Length
The modular construction makes the length adjustable without changing the central flower design. Complete and block one square first. Measure that square before crocheting the remaining panels.
For example, if one blocked square measures 28 cm, four panels produce approximately 112 cm before the end-border depth is added. A border extending approximately 12–14 cm from each end can bring the total finished length close to 136–140 cm.
Use three flower squares for a shorter runner. Add a fifth or sixth square for a long dining table. Changing the number of complete motifs preserves the flower proportions better than stretching individual squares.
Yarn and Gauge Adjustments
Smooth cotton works particularly well for this construction because the red petals, green leaves and cream lace need visible stitch definition. DK or light-worsted cotton paired with approximately a 4 mm hook provides a practical starting point.
Do not treat the hook size as fixed if your square misses the target measurement. Crochet one complete sample motif first.
If the sample is substantially larger than planned, move down a hook size or select a finer yarn. If the motif is too small, increase the hook size or add compatible frame rounds rather than changing the dimensional flower disproportionately.
Measure after blocking, not immediately after the motif comes off the hook. Cotton lace can change dimensions noticeably once the stitches are opened and the corners are squared.
Blocking the Scalloped Border
Blocking is a structural part of this runner because the open cream sections and large outer fans need defined spacing.
Measure the runner before wetting it. After washing or thoroughly dampening the cotton, remove excess water without twisting the fabric. Place the runner on blocking mats and establish the center line first.
Pin the four red square frames so their edges form one straight axis. Shape corresponding cream fans on opposite sides in pairs. Each fan should project approximately the same distance from the red frame.
Check the overall width at several points rather than measuring only the center. This identifies a border section that has been stretched farther than its corresponding section on the opposite side.
Do not pin the red flower petals flat against the foundation. The raised flowers are one of the main structural features of this design. Once the runner has dried, reshape the petals and green leaves by hand.
Finishing the Floral Crochet Table Runner
Inspect every joining seam and yarn tail before the final blocking. Place the runner on a flat table and check that all four flower centers follow the same longitudinal line. Correct individual leaves or petals before storing or photographing the finished piece.
The first blocked square remains the most useful reference for future versions because it establishes the actual gauge, yarn consumption and panel dimensions. Record those measurements with the yarn name and hook size.
Save this floral crochet table runner pattern to Pinterest or share your finished red-and-cream version on Instagram with #RedFlowerTableRunner. For this specific runner, would you keep all four flowers red or alternate red and cream petals while retaining the yellow centers?









