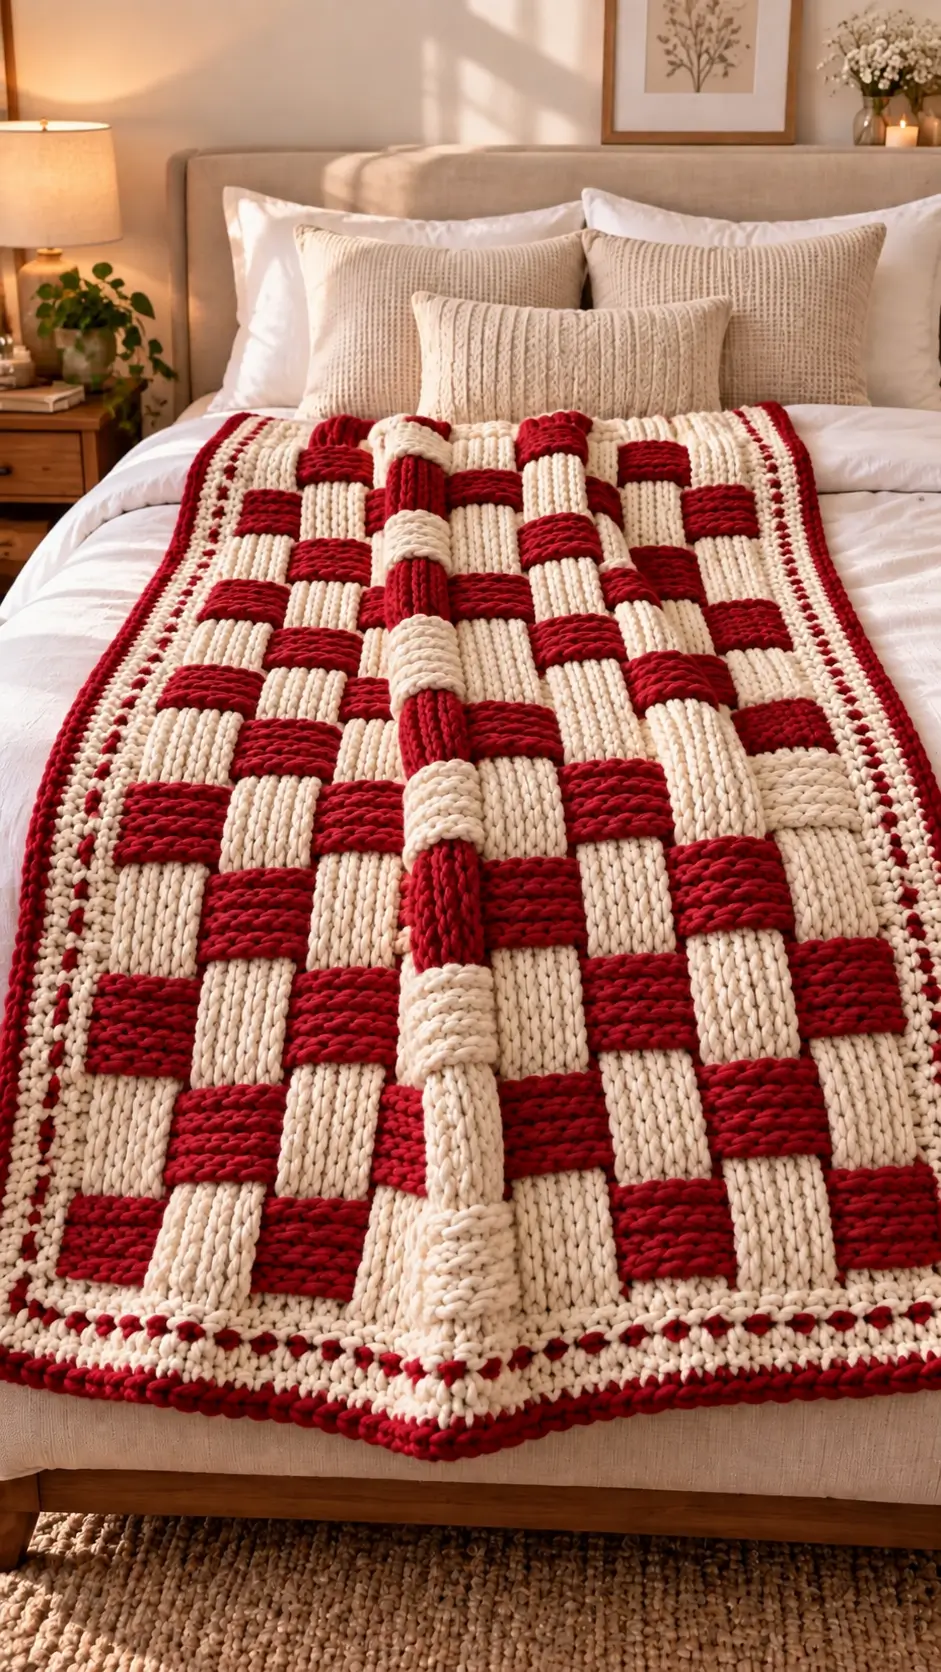
Red blocks crossing cream blocks make this blanket read more like woven strips than ordinary crochet. This chunky basketweave crochet blanket pattern recreates that structure with super-bulky yarn, a 10 mm hook, and an image-inspired target of about 120 × 150 cm. The project suits an intermediate crocheter who can control post stitches and color changes. Its dense construction makes it practical as a bed layer or substantial sofa throw.
The Design: What Makes This Basketweave Blanket Different
The photographed blanket depends on three structural choices. First, the red and cream sections are large enough to read as individual woven bands rather than a fine basketweave texture. Second, alternating vertical and horizontal-looking blocks create the over-under illusion that defines the red and cream crochet blanket. Third, a comparatively narrow perimeter controls the heavy center without obscuring it.
Traditional basketweave crochet commonly relies on front post double crochet (FPdc) and back post double crochet (BPdc). These stitches are worked around the posts of the preceding stitches rather than through the usual top loops, producing raised and recessed groups.
The main failure point is block alignment. If one post-stitch group shifts by even a stitch at a transition, the grid stops lining up although the overall stitch count can still appear correct. Color placement makes that error particularly visible in this textured crochet blanket.
Project Info at a Glance
| Skill Level | Time | Finished Size | Hook | Best For |
|---|---|---|---|---|
| Intermediate | Approx. 18–25 hours | Approx. 120 × 150 cm | 10 mm | Bed layer, sofa throw |
The 120 × 150 cm dimensions are a reconstruction target for the photographed blanket rather than measurements taken from the physical item. Always make a gauge swatch before calculating the final foundation.
Materials and Tools
Yarn
- Deep red — #6 super bulky — approximately 1,000–1,200 g
- Warm cream/ivory — #6 super bulky — approximately 1,200–1,400 g
The quantities above are reconstruction estimates because yarn consumption changes with gauge, yarn composition, block dimensions, and the amount of post-stitch texture.
Purchase enough yarn from matching dye lots whenever possible. Differences between red dye lots can become particularly noticeable because identical colors meet repeatedly across the blanket.
Tools
- 10 mm crochet hook
- Large tapestry needle
- Sharp scissors
- Locking stitch markers
- Tape measure
- Blocking mats, if appropriate for the selected yarn
Abbreviations
- ch — chain
- sc — single crochet
- hdc — half double crochet
- dc — double crochet
- FPdc — front post double crochet
- BPdc — back post double crochet
- sl st — slip stitch
- st/sts — stitch/stitches
- sp — space
- RS — right side
- WS — wrong side
- rep — repeat
Chunky Basketweave Crochet Blanket Pattern
Construction: The blanket is worked flat in rows. The border is added after completing the central panel.
Important: The photograph does not reveal every stitch, the reverse side, exact gauge, starting chain, or the original maker’s construction method. The instructions below are an original photo-inspired reconstruction rather than a stitch-for-stitch reproduction of an unidentified pattern.
Gauge Swatch
Yarn: cream — #6 super bulky
Ch 19.
Row 1: Dc in 4th ch from hook and in each ch across. Turn.
Row 2: Ch 2. FPdc around next 4 posts, BPdc around next 4 posts; repeat across as the swatch permits. Dc in final edge st. Turn.
Row 3: Maintain the established raised and recessed orientation. Turn.
Row 4: Repeat Row 3.
Row 5: Reverse each four-stitch group. Work BPdc over the previous raised group and FPdc over the previous recessed group.
Continue until the swatch contains at least three complete basket blocks.
Lay the swatch flat without stretching it. Measure both width and height before calculating the full blanket foundation.
Main Blanket Field
Yarn: deep red and warm cream
For an image-inspired blanket measuring approximately 120 cm wide after the border is added, establish a foundation that produces roughly 112–115 cm of unbordered width at your measured gauge.
The exact foundation count depends on the yarn and gauge. Use a basketweave repeat compatible with groups of four FPdc and four BPdc.
Foundation: Chain the required repeat until the chain reaches the calculated width.
Row 1: Dc across to create the posts required for the raised basketweave pattern. Turn.
Rows 2–5: Establish alternating groups of 4 FPdc and 4 BPdc. Keep every block equal in width.
Rows 6–9: Reverse the orientation. Work BPdc over the previously raised groups and FPdc over the previously recessed groups.
Rows 10 onward: Continue repeating these two block phases until the central field measures approximately 140–142 cm long, or until it reaches your preferred length before adding the border.
Creating the Red and Cream Block Effect
The photographed blanket differs from a conventional one-color basketweave because color reinforces its woven structure.
Work each planned section in either deep red or warm cream. Avoid carrying super-bulky yarn across long distances behind the work because long floats add unnecessary weight and may catch during use.
Draw the complete color arrangement on graph paper before beginning the full blanket. Treat one square on the chart as one complete basketweave block rather than one crochet stitch.
Begin with alternating red and cream blocks. On the following block row, offset the color sequence so cream appears beneath red and red appears beneath cream.
Color placement and post orientation should support each other. The goal is to create the appearance of thick strips passing over and under neighboring sections rather than producing only a flat checkerboard.
Maintaining the Basketweave Texture
For an FPdc, insert the hook around the post from the front of the fabric. Complete the double crochet around that post.
For a BPdc, insert the hook around the post from the back. The resulting stitch pushes the post toward the opposite face of the blanket.
Check each block boundary before beginning the next group. Count the posts first, then inspect their orientation.
A correct total stitch count does not automatically mean the basketweave pattern is correct. One FPdc worked where a BPdc belongs can distort the visual direction of an entire block.
Cream Inner Border
Yarn: warm cream
Join cream yarn at one corner after completing the central blanket panel.
Round 1: Ch 1. Sc evenly around all four sides. Work 3 sc into each corner. Join with sl st.
Do not automatically place one sc into every row end. The vertical gauge of post stitches can require a different spacing ratio.
Round 2: Ch 1. Sc in each st around, working 3 sc in each corner st. Join with sl st.
Place the blanket on a flat surface before continuing.
If the edge pulls inward, additional border stitches may be required. If the edge develops waves, too many stitches have probably been added.
Red Accent Round
Yarn: deep red
Join red yarn in a corner.
Round 3: Ch 1. Sc evenly around the complete blanket, maintaining 3 sc at each corner.
Join with sl st. Fasten off and weave the tail into neighboring red stitches on the reverse side.
Cream Openwork Border
Yarn: warm cream
Join cream yarn at a corner.
Round 4: Ch 1, sc in corner. Work *ch 1, skip 1 st, sc in next st* across each side. Adjust only at the corners when required to maintain a flat 90-degree turn.
Round 5: Work sc into the sc stitches and appropriate ch-1 spaces around the blanket. Maintain consistent increases at all four corners.
The open spaces create a visual break between the dense basketweave center and the solid outer edging.
Red Outer Edge
Yarn: deep red
Join red yarn at any corner.
Final Round: Ch 1. Work firm sc around the complete perimeter, placing 3 sc in each corner.
For a more pronounced corded edge, reverse single crochet can be substituted for the standard single crochet final round.
Fasten off with a long tail. Weave the tail through several neighboring stitches, change direction, and weave through another section before trimming.
Assembly and Finishing
- Lay the completed blanket on a flat surface with the intended display side facing upward.
- Measure the width at the top, center, and bottom. Large differences indicate tension changes within the basketweave field.
- Measure both long sides and compare them before completing the final border.
- Inspect every red-to-cream transition for loose yarn tails, gaps, or distorted stitches.
- Check each FPdc/BPdc reversal for a block shifted by one stitch.
- Weave red tails into red sections and cream tails into cream sections so contrasting yarn does not show through the front.
- Shape all four corners to approximately 90 degrees while the blanket is lying flat.
- Block according to the care instructions for the selected yarn. Avoid compressing the raised post stitches.
- Trim yarn tails only after checking that every woven end remains secure when the fabric is stretched gently.
- Record the final dimensions, hook size, yarn amounts, gauge, foundation count, and number of basketweave repeats for future versions.
The completed blanket should form a flat rectangle with aligned woven blocks, balanced color placement, and a border that neither pulls nor ripples.
7 Technical Tips for a Better Basketweave Blanket
- Mark every block transition. A one-stitch shift in an FPdc/BPdc group can break the alignment of every block above it. Place a locking marker at major repeat boundaries until the structure becomes easy to identify.
- Watch the foundation edge. A foundation that is 5–10% shorter than the working rows can pull the bottom of the blanket into a curve. Use a larger hook for the foundation chain if your chains are noticeably tighter than your double crochet.
- Avoid long color floats. Carrying super-bulky red yarn behind several cream blocks adds weight and creates strands that can catch. Use separate working balls or cut and rejoin the yarn for distant color sections.
- Check the color chart before each new block row. A misplaced red or cream section changes the over-under appearance into an ordinary checkerboard. Mark completed blocks on the chart as you work.
- Match FPdc and BPdc tension. Tight FPdc combined with loose BPdc can make one set of blocks visibly narrower. Compare the width of several four-stitch groups before completing a large section.
- Monitor every border corner. Missing increases can make the edge cup upward, while excessive increases create waves. Use the same corner treatment at all four corners.
- Leave 10–15 cm yarn tails. Super-bulky stitches create large openings that can allow short tails to work loose. Weave each tail in more than one direction before trimming it.
Conclusion
Measure a complete basketweave swatch before purchasing yarn for the final dimensions because raised post stitches can consume considerably more yarn than flat double crochet. Chart the red and cream blocks next, then record the number of repeats required for the target width. Photograph the completed blanket both flat and draped so the alignment and raised texture are visible from different angles. Share the finished project on Pinterest or Instagram with #RedCreamBasketweaveBlanket and reference this chunky basketweave crochet blanket pattern. For your next version, would you keep these oversized red-and-cream woven blocks or reduce the block size to create a finer basketweave?









