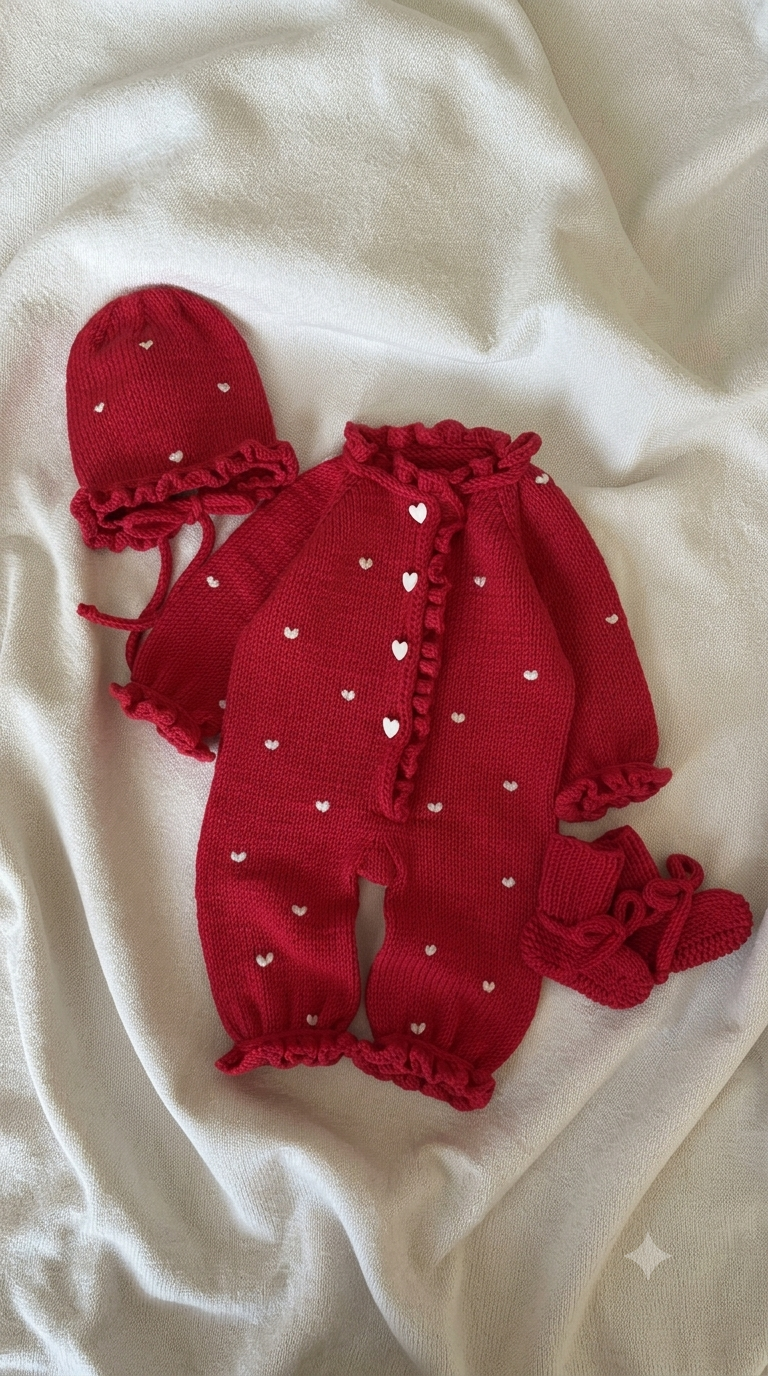
A raspberry-red baby romper needs three carefully controlled ruffle lines to reproduce this distinctive design: one around the neckline and crossover front, one at each sleeve cuff, and one at each leg opening. This crochet baby romper pattern uses DK yarn with a 3.5 mm hook and includes a matching bonnet, booties, and small white embroidered hearts. The construction targets approximately 0–3 months and is intended for intermediate crochet skills.
The Design: What Makes This Red Baby Romper Different
The crossover front is the main structural feature of this crochet baby outfit. Instead of building the upper body as a plain tube, two front sections overlap across the chest and are bordered with a narrow ruffle. The long sleeves balance the full-length legs, while matching ruffles repeat at the wrists and ankles. A crochet baby bonnet uses the same edging, creating a consistent silhouette across the complete set. Small white hearts break up the solid raspberry-red surface without adding bulky appliqués. One common problem with a ruffle baby romper is excessive edging increases. Too many stitches force the trim into tight spirals instead of shallow waves, so the increase rate should remain controlled around the neckline, cuffs, and legs.
Project Info at a Glance
| Skill Level | Time | Finished Size | Hook | Best For |
|---|---|---|---|---|
| Intermediate | 12–18 hours | Approx. 0–3 months; adjust by measurements | 3.5 mm | Baby outfit or photography garment |
Materials and Tools
Yarn
- Deep raspberry-red DK yarn — approximately 250–300 g for the romper, bonnet, booties, ties, and ruffles.
- White DK or embroidery yarn — approximately 10 g for the embroidered hearts.
Choose a smooth DK cotton, cotton-acrylic, or other washable baby-garment yarn. A yarn with clear stitch definition makes the crossover edges and narrow ruffles easier to control.
Tools
- 3.5 mm crochet hook
- Tapestry needle
- Locking stitch markers
- Scissors
- Flexible measuring tape
- Removable pins or clips
No safety eyes are required for this project. Avoid loose decorative components on garments intended for babies.
Gauge and Sizing
Make and wash a gauge swatch before beginning. A useful starting target for this DK version is approximately 20 half double crochet stitches and 14 rows per 10 cm. The finished measurements take priority over the nominal stitch count, so change hook size when necessary to match the required dimensions.
The instructions target approximately 0–3 months. Baby sizing varies considerably. Compare the chest, torso, sleeve, rise, and leg measurements with a correctly fitting garment before completing each major section.
Abbreviations
- ch — chain
- sc — single crochet
- hdc — half double crochet
- dc — double crochet
- sl st — slip stitch
- st/sts — stitch/stitches
- inc — increase
- dec — decrease
- BLO — back loop only
- RS — right side
- WS — wrong side
For a less prominent decrease, work through the front loops of the next two stitches when the stitch construction permits it, then complete the stitch normally.
Pattern — Step by Step
The reference garment has the appearance of a knitted piece. These instructions therefore create an original crochet interpretation of its visible shape, color placement, ruffles, hearts, bonnet, and booties rather than reproducing a knitted pattern.
Romper Leg One
Yarn: deep raspberry red.
Ch 41 loosely. Join with a sl st, taking care not to twist the chain.
Round 1: Ch 1, sc around, join with sl st. (40)
Round 2: Ch 1, sc BLO around, join. (40)
Round 3: Ch 1, sc around, join. (40)
Round 4: Ch 1, hdc around, join. (40)
Rounds 5–7: Hdc around. (40)
Round 8: 19 hdc, inc, 19 hdc, inc. (42)
Rounds 9–11: Hdc around. (42)
Round 12: 20 hdc, inc, 20 hdc, inc. (44)
Rounds 13–15: Hdc around. (44)
Round 16: 21 hdc, inc, 21 hdc, inc. (46)
Rounds 17–20: Hdc around. (46)
Fasten off temporarily. Measure the leg before continuing; the shaping should widen gradually from the lower leg toward the thigh.
Romper Leg Two
Repeat Leg One exactly. Do not fasten off after Round 20.
Joining the Legs and Lower Body
Place the two legs next to each other with their round joins facing toward the back. From Leg Two, ch 2 and join to Leg One.
Body Round 1: Hdc around Leg One, work across the connecting chains, hdc around Leg Two, then work across the opposite side of the connecting chains.
Rounds 2–5: Hdc in every stitch around.
Round 6: Work four evenly distributed decreases around the body.
Rounds 7–9: Hdc evenly around without additional shaping.
Measure the body circumference before proceeding. The lower torso requires adequate room through the diaper area and should not depend on aggressive stretching for fit.
Back Upper Body
Mark the front and back sections. Work the back in turned rows.
Row 1: Ch 1, hdc across the marked back stitches. Turn.
Rows 2–8: Ch 1, hdc across. Turn.
Row 9: Decrease once at each end.
Rows 10–12: Hdc across without further decreases.
Fasten off and leave a 25 cm tail for assembly.
Left Front Crossover Panel
Join raspberry-red yarn at the left front marker.
Row 1: Hdc across approximately half of the front section. Turn.
Rows 2–4: Hdc across. Turn.
Row 5: Decrease once at the neckline edge.
Row 6: Hdc across.
Row 7: Decrease once at the neckline edge.
Row 8: Hdc across.
Rows 9–12: Work evenly to form the shoulder.
Fasten off. Leave approximately 25 cm for sewing.
Right Front Crossover Panel
Repeat the left panel in reverse. Keep every neckline decrease on the inner edge so the two pieces mirror each other.
Place the right and left sections across the chest before sewing. The overlap should lie flat without pulling the lower body upward.
Sleeves — Make Two
Yarn: deep raspberry red.
Ch 31 and join into a ring without twisting.
Round 1: Ch 1, hdc around. (30)
Rounds 2–4: Hdc around. (30)
Round 5: Hdc around with one increase at the underarm. (31)
Rounds 6–8: Hdc around. (31)
Round 9: Increase once at the underarm. (32)
Rounds 10–14: Hdc around. (32)
Round 15: Increase twice, evenly spaced. (34)
Rounds 16–18: Hdc around. (34)
Fasten off with a long sewing tail. Compare both sleeves before attaching them.
Sleeve Ruffles — Make Two
Join raspberry-red yarn around the wrist edge.
Round 1: Sc evenly around.
Round 2: Work 2 dc into each stitch around.
Round 3: Sc loosely around.
Fasten off and weave the yarn tail toward the inside of the sleeve.
Leg Ruffles — Make Two
Join yarn around the lower edge of one leg.
Round 1: Sc evenly around.
Round 2: Alternate 1 dc in the next stitch and 2 dc in the following stitch around.
Round 3: Sc around.
Fasten off. Repeat on the second leg, matching the number and spacing of increases.
Front and Neckline Ruffle
Join raspberry-red yarn at the bottom of the right crossover panel. Work sc evenly up the front edge, around the neckline, and down the opposite crossover edge.
Ruffle Row 1: Sc evenly along the complete decorative edge.
Ruffle Row 2: Repeat 2 dc in one stitch, 1 dc in the next stitch.
Ruffle Row 3: Sc loosely across.
Reduce the increase frequency around tight neckline curves if the trim starts forming a dense spiral.
Bonnet
Yarn: deep raspberry red.
Ch 61.
Row 1: Hdc in the second chain from the hook and across. (60)
Rows 2–14: Ch 1, turn, hdc across. (60)
Fasten off with a long tail. Fold the piece to locate its center and seam the appropriate back edges together to create the bonnet crown. Leave the front completely open for the face.
Bonnet Ruffle
Join raspberry-red yarn at one lower corner of the face opening.
Row 1: Sc evenly around the face edge.
Row 2: Repeat 2 dc in one stitch, 1 dc in the next.
Row 3: Sc across.
Fasten off.
Bonnet Ties — Make Two
Ch 45.
Beginning in the second chain from the hook, sl st into every chain back toward the beginning.
Fasten off with a long sewing tail. Make the second tie in the same way and attach one securely to each lower bonnet corner.
Bonnet cords require direct adult supervision and must not be permitted to wrap around a baby’s neck. Remove the bonnet for sleep.
Booties — Make Two
Yarn: deep raspberry red.
Ch 11.
Round 1: Starting in the second chain, sc in 9 chains, 3 sc in the final chain, continue along the opposite side with 8 sc, then work 2 sc in the last chain.
Round 2: Increase around the toe and heel curves while keeping the side stitches even.
Round 3: Sc around in BLO. This turns the work upward from the sole.
Rounds 4–5: Sc around.
Round 6: Work evenly spaced decreases across the front third of the bootie to shape the toe.
Round 7: Repeat controlled decreases over the toe section.
Rounds 8–10: Sc evenly around the ankle.
Fasten off and secure the yarn tail inside the bootie.
Bootie Ties — Make Two
Ch 55. Sl st back through each chain. Fasten off.
Thread the tie through the upper ankle stitches so both ends emerge at the front. For practical infant wear, avoid excessively long cords or large loops.
White Heart Embroidery
Yarn: white.
Thread a tapestry needle with white yarn. Make each small heart from two short diagonal stitches that meet at a lower central point.
Distribute the hearts irregularly across the front, sleeves, legs, and bonnet rather than placing them in a rigid grid. Keep each motif compact. Secure every yarn end on the wrong side and avoid long floating strands behind the embroidery.
Assembly
- Block the upper-body sections to their planned measurements and check that the two crossover panels are equal in length.
- Join the shoulders while keeping the neckline opening centered.
- Pin each sleeve at the shoulder center, underarm, and quarter points before sewing it into its armhole.
- Secure the upper body to the lower body and check that the crossover front lies flat.
- Position the two front panels symmetrically before completing their permanent attachment.
- Add the neckline and crossover ruffle after all major upper-body seams have been checked.
- Complete both sleeve ruffles and compare their finished depth.
- Finish both leg ruffles, then attach and secure all white heart embroidery.
- Assemble the bonnet and booties and secure their ties individually.
- Inspect every seam, yarn tail, decorative stitch, opening, and tie before the set is worn.
The finished project contains one long-sleeve crossover romper, one ruffled bonnet, and two matching booties with scattered white heart embroidery.
7 Technical Tips
- Marker drift: Put the round marker through the actual first stitch rather than around the working yarn. Moving the marker by one stitch each round can gradually shift a leg or sleeve seam away from the underarm.
- Incorrect body width: Measure the body after joining the legs and again before starting the crossover section. A difference of 2–3 cm is significant on a small baby garment and should be corrected before the upper body is added.
- Visible decrease ridges: Loose decreases produce raised areas at shaping points. Keep the working loops at the same height as neighboring stitches and use a less prominent decrease where the stitch structure allows it.
- Ruffle corkscrewing: Excessive increases can turn a shallow ruffle into a dense spiral. Begin with the stated increase rhythm and reduce the frequency if the trim starts folding completely over itself.
- Loose heart embroidery: Large decorative stitches can snag more easily. Keep each white heart approximately 8–10 mm or smaller and secure both yarn ends on the wrong side.
- Uneven sleeve insertion: Pin each sleeve at four reference points before sewing. If one section requires substantially more stretching than another, redistribute the fabric instead of forcing the excess into a single area.
- Short woven tails: Yarn ends can emerge after repeated washing when they have been woven in only one direction. Run structural tails through several centimeters of fabric in multiple directions before trimming the remainder.
Adjusting the Size
Do not rely on a larger hook alone to grade this crochet baby romper pattern. Changing hook size affects stitch density, circumference, length, armhole depth, and fabric flexibility simultaneously.
For additional leg width, add stitches symmetrically before the legs are joined. Carry the required extra width into the lower body. Length can be adjusted independently by adding plain rounds to the legs or torso.
Sleeves are easiest to lengthen through the rounds that contain no increases. Measure from the underarm to the desired cuff position and add or remove plain rounds before working the ruffle.
The crossover panels need separate checking after any chest adjustment. A wider body requires enough additional panel width to maintain the overlap. Pin both unfinished panels across the chest before adding the front ruffle.
Finishing and Care
Wash the finished crochet baby outfit according to the instructions supplied with the yarn. Lay the pieces flat and shape the neckline, crossover panels, sleeves, legs, and ruffles while damp when the selected fiber permits wet blocking.
Check the measurements again after the garment has dried completely. Both sleeve cuffs should have the same circumference, the two leg openings should match, and the crossover should remain flat without pulling the body sideways.
Inspect the reverse of every embroidered heart. Long floats should not remain behind the motifs. Check the bonnet and bootie ties in the same way, paying particular attention to their attachment points.
Baby garments require inspection as they are washed and worn. Stop using an item if a seam, decorative stitch, tie, or other component becomes loose. Bonnet and bootie cords require direct adult supervision, and the bonnet should not be used for sleep.
Final Notes
The defining features of this crochet baby romper pattern are its deep raspberry-red color, crossover front, narrow ruffled edging, long sleeves, matching leg ruffles, scattered white hearts, bonnet, and coordinated booties. Finish the romper first, then use its actual gauge and dimensions as a reference when completing the accessories. Make and wash a 10 cm gauge swatch before cutting the project yarn. Share the finished set on Pinterest or Instagram with #RedHeartRuffleRomper. Would you keep the tiny scattered hearts across the entire romper, or place one larger white heart on the crossover panel?









