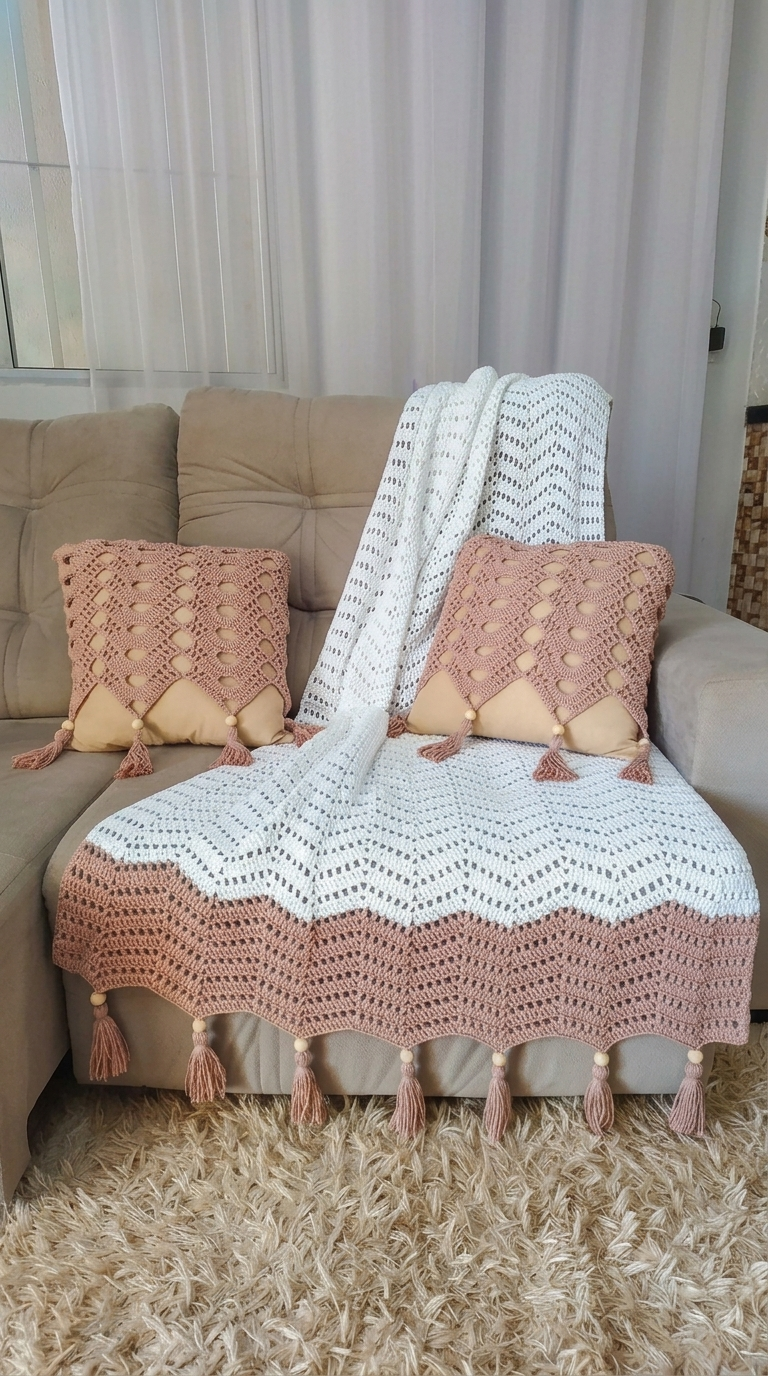
One misplaced valley sends every later chevron peak sideways. This chevron crochet blanket pattern uses controlled increases, decreases, openwork rows, dusty-rose color blocking, and tassels to recreate the structural character of the photographed throw. Plan around worsted yarn, a 5 mm reference hook, and an intermediate skill level; 114 × 141 cm is a documented comparison size. The repeating geometry also makes the design practical to resize.
The Design: What Makes This Chevron Throw Different
Three decisions separate this design from a conventional striped ripple blanket. Open spaces interrupt the solid crochet first, making the V geometry visible through texture rather than color alone. A dusty-rose lower zone then concentrates the secondary color near one edge instead of distributing stripes evenly. Finally, tassels extend selected downward points beyond the crocheted fabric.
Those decisions make the project function as both a crochet chevron throw and a boho crochet blanket without changing its underlying repeat.
Peak and valley placement controls the entire structure. A missed decrease near one valley can shift the following peaks, while an accidental increase at an edge gradually widens the blanket. Similar published chevron constructions rely on precisely repeated increases and decreases or skipped stitches to preserve the zigzag.
Project Info at a Glance
| Skill Level | Time | Finished Size | Hook | Best For |
|---|---|---|---|---|
| Intermediate | Multi-session | Approx. 114 × 141 cm reference size | 5 mm | Sofa throw / decorative blanket |
The finished dimensions are a practical reference for a sofa throw. Your final measurements will depend on yarn, tension, hook size, and the number of complete chevron repeats worked.
Materials and Tools
Yarn
A category 4/worsted yarn works well for this construction. Cotton gives the openwork rows clear definition, while a suitable acrylic can reduce weight and simplify washing.
- White or soft ivory yarn — worsted/category 4 — approximately 750–850 g
- Dusty rose or muted blush yarn — worsted/category 4 — approximately 300–400 g including finishing
- Dusty rose yarn for tassels — reserve approximately 75–100 g from the accent yarn
The quantities are working estimates for a throw of approximately the reference dimensions. Buy additional yarn when changing dimensions, working at a tighter gauge, or making unusually full tassels.
Tools
- 5 mm crochet hook
- Tapestry needle
- Locking stitch markers
- Sharp scissors
- Measuring tape
- Blocking mats and rust-resistant pins
- Natural wooden beads — optional
- Cardboard tassel template — approximately 15–18 cm long
Omit wooden beads when detachable components would be unsuitable for the intended user, particularly when the blanket may be accessible to babies or small children.
Abbreviations
- ch — chain
- sc — single crochet
- dc — double crochet
- dc2tog — double crochet two together
- st/sts — stitch/stitches
- sk — skip
- sl st — slip stitch
- rep — repeat
- ch-sp — chain space
- RS — right side
- WS — wrong side
This project is worked back and forth in rows rather than in amigurumi-style rounds. Controlled skipped stitches or decreases form the valleys, while increases or chain spaces establish the peaks.
Chevron Crochet Blanket Pattern — Step by Step
This construction is inspired by the visible characteristics of the photographed blanket: a white openwork field, a dusty-rose lower section, pronounced zigzag points, wooden beads, and tassels. Exact stitch counts may be adjusted according to the finished width and chosen chevron repeat.
Foundation and Gauge Swatch
Yarn: white or soft ivory.
Before making the full foundation chain, crochet at least one complete chevron repeat as a gauge sample. This establishes the actual width produced by your yarn, hook, and tension.
Row 1: Establish the chevron repeat using double crochet stitches, peak spaces, slopes, and two skipped stitches or an equivalent decrease at each valley.
Row 2: Repeat the established geometry. Place every new peak directly into the previous peak space and every new valley directly above the preceding valley.
Rows 3–6: Repeat Row 2.
Measure the repeat without stretching the fabric. Multiply that measurement by the number of repeats required for your target blanket width.
The exact starting chain depends on the chevron formula. Do not combine the starting multiple from one pattern with the peak and valley instructions from another, because different chevron systems distribute their stitches differently.
White Main Panel
Yarn: white or soft ivory.
Make the foundation chain required for the chosen number of complete chevron repeats. A 121-chain foundation is one established option for a medium-width chevron construction, but the chain should be recalculated when changing the repeat or blanket width.
Row 1: Dc in the appropriate starting chain according to the chosen turning-chain method. Work across using the established peak, downward slope, valley, upward slope, and next-peak sequence.
Row 2: Turn. Work the same chevron sequence across, positioning every peak directly over a previous peak and every valley directly over a previous valley.
Rows 3–6: Repeat Row 2.
Lay the work on a flat surface after Row 6. The peaks should form vertical columns when viewed from the foundation toward the working edge.
Rows 7–12: Continue the established chevron sequence.
Do not add stitches at the side simply because the turning edge appears narrower than the center. An unnecessary edge stitch repeated across several rows gradually changes the blanket width.
Openwork Chevron Band
Yarn: white or soft ivory.
The photographed throw combines solid crochet with open sections. These openings can be created by replacing selected double crochet stitches with chain spaces while leaving the structural peaks and valleys unchanged.
Openwork Row 1: Follow the established slopes. At evenly spaced positions between the structural stitches, work ch 1, sk 1 to create openings.
Openwork Row 2: Work double crochet into the required stitches and chain spaces while preserving the established peak and valley locations.
Openwork Row 3: Work one solid chevron row.
Repeat this three-row treatment wherever another openwork band is required.
Avoid adding decorative chain spaces directly inside a structural valley unless the repeat has been calculated for that modification. The valley must continue reducing or skipping the correct number of stitches.
Continue the White Section
Alternate solid chevron rows with openwork bands until the white portion reaches approximately two-thirds to three-quarters of the desired blanket depth.
Check the work every six to eight rows rather than waiting until the entire white section is complete.
Place the blanket flat and inspect the vertical alignment of every peak. Repeat the check for the valleys.
If a peak shifts one stitch sideways, find the first row where the displacement occurred. Correcting the source of the error gives a cleaner result than adding an unrelated increase or decrease several rows later.
Dusty-Rose Color Change
Yarn: dusty rose or muted blush.
Work the final white stitch until the last yarn-over remains. Complete that yarn-over using dusty-rose yarn. The next row will then begin in the accent color without requiring a separate knot on the visible edge.
Rose Row 1: Work one complete solid chevron row using the same peak and valley positions.
Rose Row 2: Repeat the established shaping.
Rose Row 3: Add an openwork treatment corresponding to the spacing used in the white field.
Rose Row 4: Return to solid double crochet construction.
Rows 5–8: Continue the same peak and valley alignment.
Row 9: Work another openwork band.
Continue the dusty-rose section until it occupies approximately one quarter to one third of the blanket depth, or adjust the proportion to suit the intended finished dimensions.
The color boundary should change only the yarn color. It should not alter the location of peaks, valleys, or edge stitches.
Final Pointed Edge
Yarn: dusty rose.
The lower edge works best when the natural chevron points remain visible. Filling the valleys to create a straight rectangular border would remove one of the strongest characteristics of this design.
Final Row: Work one complete solid chevron row across the blanket.
Count the stitches or structural sections in each repeat separately. Inspect every final peak before fastening off.
Each point should sit on the same vertical axis as the peaks above it. The valleys also need consistent depth because the tassels make small alignment errors more noticeable.
Fasten off, leaving approximately a 15 cm yarn tail. Weave the tail through several stitches, reverse direction, and pass through another section before trimming.
Tassels
Yarn: dusty rose.
The lower edge uses tassels at selected chevron points rather than continuous fringe. Making every tassel from the same template keeps the finished fringe consistent.
Cut approximately 14–16 yarn strands for each tassel using a rigid cardboard template measuring about 15–18 cm long.
Fold the strands together at the midpoint.
Cut a separate attachment cord approximately 30 cm long and tie it firmly around the folded center.
If wooden beads are being used, thread both ends of the attachment cord through one bead.
Attach the tassel to the selected downward-facing chevron point. Keep the bead close to the crocheted edge without pulling so tightly that the point curls upward.
Cut another strand of dusty-rose yarn. Wrap it several times around the tassel approximately 2–2.5 cm below the top.
Tie firmly and weave the ends into the tassel body.
Do not perform the final fringe trim yet. Attach every tassel first, hang or spread the blanket naturally, then trim all tassels to a consistent length.
Optional Coordinating Cushion Cover
The photograph also includes dusty-rose cushion covers. Their lace motif differs from the blanket’s primary chevron construction, so a coordinating cushion is best treated as a separate project that repeats the same colors and finishing details.
Measure the cushion insert before starting.
For a nominal 40 × 40 cm insert, crochet the front panel until the blocked dimensions correspond to the actual cushion measurements rather than relying on a fixed stitch count.
Use dusty-rose yarn for the front panel and incorporate openwork rows to connect the cushion visually with the blanket.
Make a solid back panel for a fully seamed cover, or crochet two overlapping back panels for an envelope closure.
Block all pieces to their final dimensions before joining them.
Join the front and back with mattress stitch or a neat slip-stitch seam.
Small dusty-rose tassels can be added along selected lower points. Keep their dimensions proportional to the cushion rather than copying the full-size blanket tassels.
Assembly and Finishing
- Lay the blanket flat and verify that every central peak forms a continuous vertical line.
- Weave white yarn tails through white stitches and dusty-rose tails through matching accent stitches.
- Block the white field without pulling individual chain spaces wider than neighboring openings.
- Align the dusty-rose valleys with the white valleys before pinning the lower section.
- Mark every planned tassel position with removable stitch markers.
- Cut all tassels using the same rigid template so their unfinished lengths remain consistent.
- Add optional wooden beads before permanently fixing the tassels to the blanket.
- Attach the center tassel first, then work symmetrically toward the two side edges.
- Allow the blanket to hang naturally before making the final fringe trim.
- Inspect woven tails, tassel attachments, seams, and optional beads before regular use.
The finished blanket should maintain one continuous chevron grid through the white and dusty-rose sections.
7 Technical Tips for a Cleaner Chevron Blanket
- Mark every valley. Moving a valley by even one stitch makes the next peak drift horizontally. Keep a removable marker at each structural valley until the repeat becomes easy to track.
- Measure after the first two rows. A foundation chain that is significantly tighter than the working rows can pull the starting edge inward by several centimeters. Measure before completing a large section of the blanket.
- Keep peak spaces consistent. One oversized ch-2 space produces a wider V than neighboring peaks. Maintain the same chain tension at every peak.
- Check the width every 8–10 rows. Repeated accidental edge increases can remain difficult to detect while the project is being held. Place the blanket flat and measure between the same two edge points.
- Reserve 75–100 g of accent yarn for finishing. Making tassels before completing the dusty-rose panel can consume yarn needed for the final rows. Finish the crochet fabric first.
- Use a 15–18 cm rigid tassel template. Cutting strands individually produces inconsistent fringe lengths. One template gives every tassel the same starting measurement.
- Pin every tassel location before attaching it. A tassel positioned beside the intended chevron point instead of directly on it creates visible asymmetry. Mark all positions and inspect the spacing from a distance before fastening them permanently.
Adjusting the Blanket Size
The safest way to resize a chevron blanket is by complete pattern repeats. First crochet one full repeat and measure its blocked width. Divide the desired blanket width by that measurement to determine approximately how many repeats are required.
Do not simply add an arbitrary number of chains to the foundation. Extra chains that do not form a complete repeat can leave one edge with an incomplete slope.
Length is easier to modify. Continue the established rows until the white section reaches the required depth, make the color change, then work the dusty-rose section to the planned proportion.
For a longer sofa throw, increasing row count changes yarn consumption considerably. Weigh the yarn before and after several representative rows to estimate how many grams each row consumes.
Keeping the Chevron Edges Straight
A ripple blanket can have straight side edges even though the top and bottom contain points. The key is treating the first and last stitches consistently on every row.
Count edge stitches separately from the central repeats. If the pattern begins with a partial slope, that same partial slope must remain at the edge throughout the project.
Turning chains also need consistent treatment. Decide whether the turning chain counts as a stitch according to the selected repeat and apply that rule to every row.
Do not alternate between counting and ignoring the turning chain. That small change can gradually alter the side profile.
Blocking the Openwork Chevron
Blocking helps the lace openings settle into a consistent shape and makes the peak alignment easier to evaluate.
Check the yarn label before choosing a blocking method. Cotton and acrylic fibers respond differently to heat and moisture.
Spread the blanket on a sufficiently large surface. Start by pinning the central axis, then position the outer edges.
Shape each lower point individually without stretching it farther than neighboring points. Measure several corresponding peaks from the foundation edge to confirm that the blanket has not been pulled diagonally.
Allow the fabric to settle fully before removing the pins. Attach or perform the final trimming of decorative tassels only after the blanket has reached its finished blocked dimensions.
Final Checks
Measure a completed chevron repeat before calculating the final width; copying another project’s chain count is unreliable when yarn, hook, tension, or repeat structure changes. Once the white field is established, mark the intended color-change row and reserve enough dusty-rose yarn for the lower section and fringe.
Resize this chevron crochet blanket pattern by adding or removing complete repeats while preserving every peak and valley. Before regular use, inspect the fringe attachments and any wooden beads, then photograph the blocked blanket for Pinterest or Instagram using #DustyRoseChevronBlanket.
For the final variation, choose between wooden beads above each selected tassel or plain dusty-rose fringe for a simpler pointed edge.









