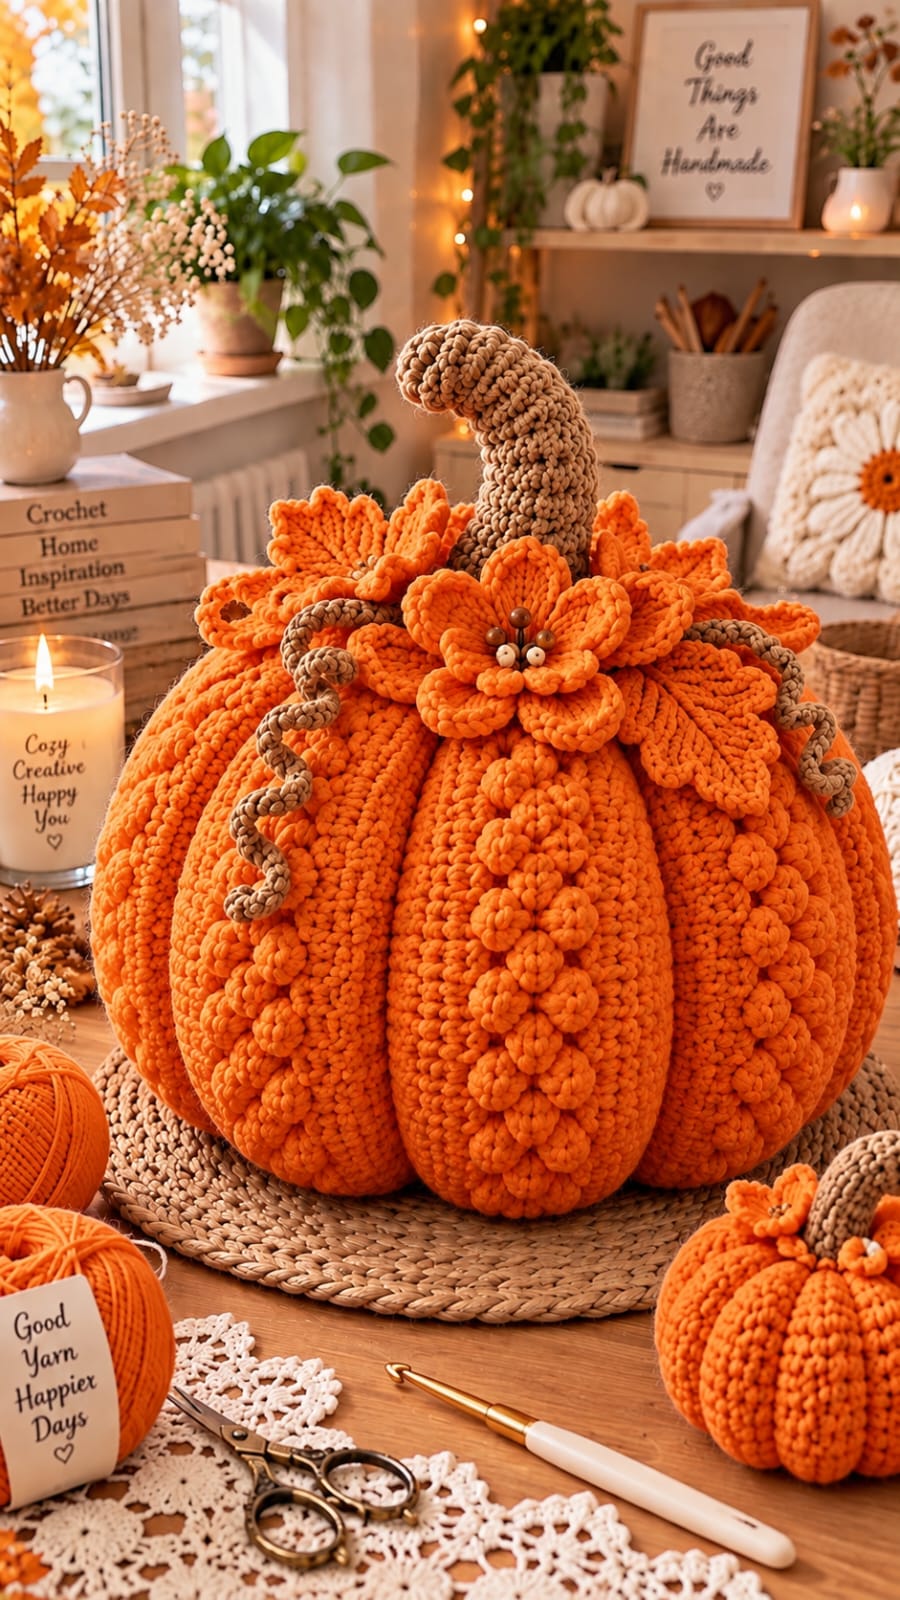
A pumpkin this wide needs deep ribs or the orange body reads as a sphere beneath its oversized curved stem. This large crochet pumpkin pattern uses super-bulky orange yarn, dense stuffing, external sculpting, layered flowers, pointed leaves and curled brown vines. The photo-inspired version targets approximately 35–40 cm across and 45–50 cm overall including the stem. Intermediate crochet skills are appropriate.
The Design: What Makes This Crochet Pumpkin Different
The reference pumpkin combines three distinct structures. First, the body has approximately ten pronounced lobes, with deep channels running from the crown to the base. Those channels need physical shaping rather than surface color changes.
Second, the crown is unusually detailed. Orange flowers and pointed leaves spread around a tall brown stem while narrow spiral vines fall across the pumpkin sides. Small raised flower clusters continue vertically down several ribs.
The third feature is scale. This is not a palm-sized autumn ornament. The giant crochet pumpkin is designed as a substantial freestanding centerpiece. A common construction error is packing the body until it becomes rigid. Overstuffing prevents the sculpting strands from sinking deeply enough to create the segmented silhouette.
Project Info at a Glance
| Skill Level | Time | Finished Size | Body Hook | Yarn |
|---|---|---|---|---|
| Intermediate | 9–13 hours | Approx. 35–40 cm wide; 45–50 cm including stem | 9 mm | Super Bulky #6 |
The dimensions above are targets for this photo-inspired reconstruction rather than measurements taken directly from the photograph. Published large plush pumpkin patterns provide useful construction benchmarks, including super-bulky yarn, large hooks and heavily stuffed three-dimensional bodies.
Materials and Tools
Yarn
- Bright pumpkin orange — Super Bulky #6 — approximately 500–650 g for the body
- Bright pumpkin orange — Super Bulky #6 — approximately 100–150 g for flowers and leaves
- Warm brown — Super Bulky #6 — approximately 100–130 g for the stem and large vines
- Warm brown — bulky or worsted yarn — approximately 30–50 g for smaller tendrils and flower centers
Allow approximately 750–950 g total for the photo-inspired version. Yarn consumption depends heavily on final diameter, yarn density and stuffing firmness.
Tools
- 9 mm crochet hook — pumpkin body
- 6.5 mm crochet hook — stem
- 5 mm crochet hook — flowers, leaves and smaller vines
- Polyester fiberfill — approximately 900–1,300 g
- Large tapestry needle
- Long upholstery needle — useful for sculpting
- Locking stitch markers
- Sharp scissors
- Tape measure
Abbreviations
- MR — magic ring
- ch — chain
- sc — single crochet
- hdc — half double crochet
- dc — double crochet
- tr — treble crochet
- inc — 2 sc in one stitch
- dec — invisible single crochet decrease
- sl st — slip stitch
- BLO — back loop only
- st/sts — stitch/stitches
For an invisible decrease, insert the hook through the front loops of the next two stitches, yarn over, pull through both front loops, then complete the single crochet.
Gauge and Finished Size
A useful starting gauge is approximately 8 stitches per 10 cm with super-bulky yarn. Published chunky pumpkin patterns commonly pair category 6 yarn with a 9 mm hook, making that combination a practical benchmark for this reconstruction.
The finished body should measure approximately 35–40 cm across after sculpting. The curved stem adds roughly 15–20 cm above the crown, depending on how strongly it is bent.
Gauge is less important than fabric density. Stretch the swatch between your fingers. If large holes expose the stuffing, move down one hook size.
Large Crochet Pumpkin Pattern — Step by Step
Work the pumpkin body in a continuous spiral. Place a stitch marker in the first stitch of every round.
Pumpkin Body
Yarn: bright pumpkin orange.
R1: 6 sc in MR. (6)
R2: inc ×6. (12)
R3: (sc, inc) ×6. (18)
R4: (2 sc, inc) ×6. (24)
R5: (3 sc, inc) ×6. (30)
R6: (4 sc, inc) ×6. (36)
R7: (5 sc, inc) ×6. (42)
R8: (6 sc, inc) ×6. (48)
R9: (7 sc, inc) ×6. (54)
R10: (8 sc, inc) ×6. (60)
R11: (9 sc, inc) ×6. (66)
R12: (10 sc, inc) ×6. (72)
R13–R27: Sc around. (72)
The long 72-stitch plateau creates the broad center required for the oversized body. Do not add the external ribs yet.
R28: (10 sc, dec) ×6. (66)
R29: (9 sc, dec) ×6. (60)
R30: (8 sc, dec) ×6. (54)
R31: (7 sc, dec) ×6. (48)
Begin stuffing. Fill the lower outer edges first, then work toward the center.
R32: (6 sc, dec) ×6. (42)
R33: (5 sc, dec) ×6. (36)
Add more stuffing. Keep the body firm enough to stand but compressible enough for sculpting.
R34: (4 sc, dec) ×6. (30)
R35: (3 sc, dec) ×6. (24)
R36: (2 sc, dec) ×6. (18)
Finish stuffing. Leave the center slightly softer than the outer circumference.
R37: (sc, dec) ×6. (12)
R38: dec ×6. (6)
Fasten off. Leave a long tail and close the remaining opening securely.
How to Sculpt the Pumpkin Ribs
The smooth stuffed body now needs external shaping to reproduce the deep vertical channels visible in the reference.
- Cut a strong orange yarn strand approximately 180–220 cm long.
- Thread it through a long upholstery or tapestry needle.
- Insert the needle through the bottom center and bring it out through the crown.
- Run the yarn externally down the side of the pumpkin.
- Insert the needle into the bottom center and return through the crown.
- Pull gradually until a distinct channel forms.
- Repeat around the pumpkin to divide the body into approximately ten lobes.
- Check the spacing before tightening the final channels.
- Adjust the stuffing manually if one lobe appears substantially narrower than its neighbors.
- Knot the sculpting yarn securely beneath the future stem and conceal the ends.
The completed body should be broad and compressed rather than spherical. Each channel should remain visible from the crown to the lower edge.
Tall Curved Crochet Stem
Yarn: warm brown. Use a 6.5 mm hook.
R1: 6 sc in MR. (6)
R2: inc ×6. (12)
R3: (sc, inc) ×6. (18)
R4: BLO sc around. (18)
R5–R8: Sc around. (18)
R9: 13 sc, sl st in remaining 5 sts. (18)
R10: Sc around. (18)
R11: 12 sc, sl st in remaining 6 sts. (18)
R12: Sc around. (18)
R13: 11 sc, sl st in remaining 7 sts. (18)
R14–R15: Sc around. (18)
The uneven-height rounds begin forcing the stem toward one side.
R16: (sc, dec) ×6. (12)
R17–R21: Sc around. (12)
R22: 8 sc, sl st in remaining 4 sts. (12)
R23–R25: Sc around. (12)
R26: dec ×6. (6)
Fasten off and close the tip.
Stuff the lower two-thirds firmly. Use much less stuffing near the tip so the stem can bend into the hooked profile visible in the photograph.
Leave a 35 cm tail for attaching the stem to the pumpkin crown.
Large Pointed Pumpkin Leaves — Make 6
Yarn: orange. Use a 5 mm hook.
Row 1: Ch 13.
Beginning in the second chain from the hook, work:
Sl st, sc, hdc, dc, tr in next 4 chains, dc, hdc, sc, then 3 sc in the final chain.
Rotate the work and crochet along the opposite side of the foundation chain.
Work sc, hdc, dc, tr in next 4 loops, dc, hdc, sc, sl st.
Row 2: Ch 1 and sc around the leaf. At the tip work (sc, ch 2, sc).
Row 3: Sl st along the center foundation to create a raised vein.
Fasten off. Leave a 25 cm tail.
Large Layered Flower — Make 1
Yarn: orange with brown center.
R1: With brown, 6 sc in MR. (6)
R2: inc ×6. (12)
R3: Change to orange. Work *(sl st, ch 3, 3 dc, ch 3, sl st)* into every second stitch to form six inner petals.
R4: Work behind the first petal layer. *Ch 5 and anchor with sl st between adjacent petals.* Repeat around.
R5: Into each ch-5 space work (sc, hdc, 4 dc, hdc, sc).
R6: Work another set of ch-6 loops behind the second layer.
R7: Into each ch-6 loop work (sc, hdc, dc, 3 tr, dc, hdc, sc).
Fasten off. Leave a 30 cm tail for sewing.
The layered construction should produce a prominent crown flower rather than a flat appliqué.
Small Raised Flowers — Make 12–16
Yarn: orange.
R1: 6 sc in MR. (6)
R2: In each stitch work (sl st, ch 2, 2 hdc, ch 2, sl st).
Fasten off. Leave a 15 cm sewing tail.
These flowers form the raised vertical trails visible on selected pumpkin lobes.
Brown Curly Vines — Make 4
Yarn: brown. Use a 5 mm hook.
Ch 36.
Beginning in the second chain from the hook, work 3 sc in every chain.
The excessive stitch density forces the chain into a corkscrew.
For a tighter curl, work 4 sc in selected chains near the end of the vine.
Fasten off. Leave a 20 cm attachment tail.
Long Curly Vine — Make 1
Ch 50.
Work 3 sc into every chain from the second chain onward.
Allow the spiral to twist naturally rather than manually winding it around an object. Attach only the upper 3–4 cm so the remainder can hang freely across the pumpkin.
Optional Flower Center Details
The reference flower includes small rounded brown and cream center details. These should be treated as decorative elements rather than safety eyes.
For an all-yarn version, make three small knots or tiny crochet bobbles and sew them securely into the center.
Avoid loose beads if the pumpkin will be accessible to young children or pets.
Assembly
- Complete and sculpt the stuffed orange body before attaching any decorative pieces.
- Center the brown stem over the top closure and pin its base in place.
- Sew around the stem base twice with brown yarn, passing through dense body stitches rather than only the surface fibers.
- Arrange the six large orange leaves around the stem. Allow some leaves to overlap the upper pumpkin lobes.
- Position the large layered flower slightly off-center at the front of the stem rather than directly in front of it.
- Sew the small raised flowers in vertical groups down two or three selected pumpkin ribs.
- Attach the short brown curly vines around the crown, placing their upper ends beneath leaves or flowers.
- Attach the long vine near the front or side of the crown and allow the spiral to descend naturally.
- Reshape the stem curve by hand after all crown components have been attached.
- Hide every remaining yarn tail inside the pumpkin or beneath a securely sewn decoration.
The finished pumpkin should have approximately ten deep orange lobes, a tall curved brown stem and an asymmetrical crown of flowers, leaves and spiral vines.
7 Technical Tips for a Large Crochet Pumpkin
- Visible stuffing: Check the fabric before completing the first ten rounds. If white fiberfill can be seen through stretched stitches, reduce the hook by approximately 0.5–1 mm.
- Weak pumpkin ribs: Leave the central stuffing slightly compressible. A rigidly packed body prevents the sculpting strands from sinking far enough to create deep channels.
- Uneven segmentation: Mark all ten intended channel positions around the crown before tightening any sculpting strand fully. Incorrect spacing becomes increasingly difficult to correct after several channels are tensioned.
- Stem collapse: Stuff the bottom two-thirds more firmly than the hooked tip. Equal stuffing density from base to tip produces a straight stem or an abrupt fold rather than a controlled curve.
- Flat flowers: Attach the large crown flower only through its center and inner petal bases. Sewing around the complete outer edge crushes the layered construction.
- Loose embellishments: Use at least three attachment points for every large leaf. A single central stitch allows super-bulky leaves to rotate and expose their reverse side.
- Distorted curls: Do not stretch the finished spiral vines during assembly. Pulling a 36-chain corkscrew straight can permanently reduce its curl and alter its finished length.
How to Make a Smaller Crochet Pumpkin
The same construction can be reduced without changing the overall design. Stop the body increases at 48 stitches for a medium pumpkin or 36 stitches for a smaller version. Work a shorter plateau before beginning the corresponding six-stitch decrease sequence.
Reduce the flowers and leaves at the same time. An oversized crown on a substantially smaller pumpkin hides the rib structure and shifts the visual weight toward the top.
For a small pumpkin, shorten the stem by removing several plain rounds. The hooked tip should remain because it is one of the defining features of this design.
How to Make the Pumpkin Ribs Deeper
External sculpting controls most of the final silhouette. After the first pass around all ten sections, place the pumpkin on a flat surface and inspect it from above.
If the channels remain shallow, tighten each sculpting strand incrementally rather than pulling one section substantially tighter than the others. Work around the body several times.
For an exceptionally deep channel, run a second strand through the same path. Avoid excessive tension at the center opening because concentrated pressure can distort or damage the crochet stitches around the crown.
Choosing Yarn for the Photo-Inspired Texture
The photograph shows thick, rounded stitches with substantial surface definition. A smooth category 6 yarn reproduces that scale more effectively than standard worsted yarn.
Chenille-style polyester produces a plush body but can make stitch identification more difficult. A tightly spun super-bulky acrylic or wool blend gives clearer stitch definition and makes the small decorative flowers easier to shape.
Published chunky pumpkin designs frequently pair super-bulky yarn with 8–10 mm hooks. For this large crochet pumpkin pattern, a 9 mm body hook provides a practical starting point, but the finished fabric should determine the final hook selection.
Stuffing a Giant Crochet Pumpkin
Add fiberfill in several stages rather than inserting one large mass. Begin around the lower perimeter and push smaller pieces outward against the crocheted fabric.
Continue filling the side walls before packing the middle. This technique gives the lobes enough volume while preserving a slightly softer core for sculpting.
Before closing the final rounds, place the pumpkin on a flat surface. The base should settle without rolling heavily to one side. Correct uneven areas by moving stuffing through the opening before it becomes too small to reach comfortably.
Do not judge the final silhouette until the external ribs have been added. The unsculpted body is intentionally much rounder than the completed pumpkin.
Finishing and Display
After assembly, place the pumpkin on its intended surface and rotate it until the flower cluster faces forward. Adjust the large leaves so they occupy the gaps between the stem and outer pumpkin lobes.
Keep the longest curly vine asymmetrical. Matching vines on both sides would make the crown more formal than the irregular botanical arrangement visible in the reference.
Check every sewn decoration by gently lifting it. If a flower or leaf pulls away more than approximately 10 mm from the body at its attachment point, add another hidden stitch.
Store the pumpkin without placing heavy objects on the stem. The tall curved structure can develop a permanent crease if compressed for long periods.
Conclusion
Crochet the body and sculpt all ten ribs before making the crown decorations. That sequence reveals the true diameter of the top opening and shows exactly how much space is available for the stem, leaves and layered flower. Next, make one large leaf and hold it against the finished body before producing the remaining five; adjust its chain length if the proportion is too large or small. Save this large crochet pumpkin pattern to Pinterest or share the completed centerpiece on Instagram with #FloralGiantCrochetPumpkin. For your version, would you keep the flowers orange or use cream flowers against the orange pumpkin?









