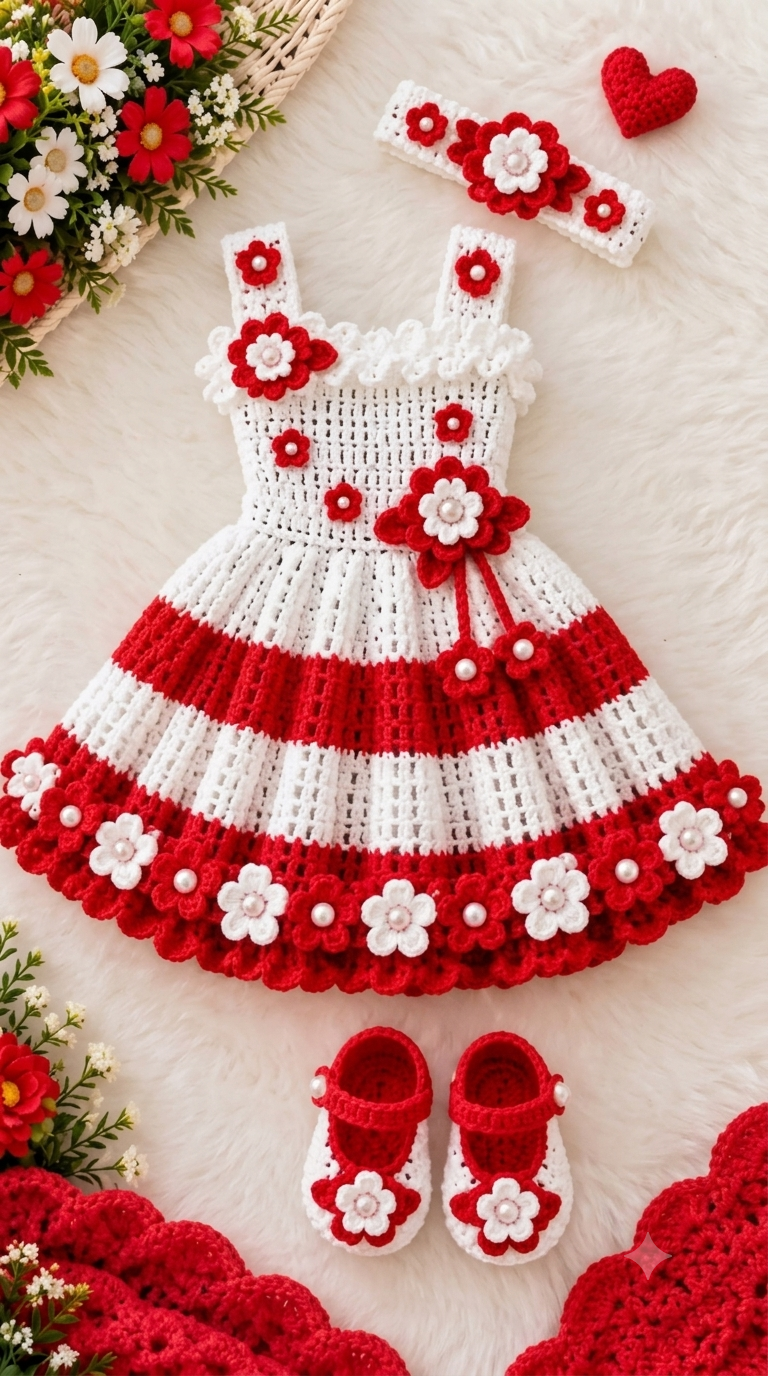
A ring of red flowers around this dress has to follow the hem without forcing the skirt edge inward. This red and white crochet baby dress pattern uses DK yarn, a 4 mm reference hook and a 48 cm chest reference for a 6–12-month garment. It is an intermediate project combining garment shaping, color changes and appliqué work. The coordinated headband and shoes allow one construction plan to produce a complete set.
The Design: What Makes This Red and White Dress Different
Three structural choices control this design. First, the bodice remains comparatively dense so the raised flowers have enough fabric behind their attachment stitches. Second, the skirt expands sharply below the waist; that extra circumference provides room for the broad red and white bands without making the chest oversized. Third, the crochet flower baby dress repeats the same layered motif on the waist, hem, headband and shoes.
The crochet baby dress with headband therefore works as a coordinated design rather than several unrelated pieces.
A frequent mistake is establishing the skirt width before checking the finished bodice measurement. That can leave an oversized waist attached to a tight chest. For a wearable garment, gauge and the intended baby’s measurements control the foundation count rather than fixed amigurumi stitch mathematics.
Project Info at a Glance
| Skill Level | Time | Finished Size | Hook | Best For |
|---|---|---|---|---|
| Intermediate | Multi-session project | 48 cm chest × 38 cm length reference | 4 mm | Coordinated floral baby outfit |
The measurements above provide a 6–12-month reference. Measure the intended wearer and check the crochet gauge before treating these dimensions as final.
Materials and Tools
Yarn
- White — DK/light-worsted — quantity depends on gauge and final size — washable baby cotton or cotton-blend suggested.
- Red — DK/light-worsted — quantity depends on stripe depth, flowers and accessories — use the same fiber family as the white yarn.
- White flower yarn — DK or slightly finer — small quantity for contrasting inner petals.
An exact gram figure cannot be determined reliably from the photograph alone. Yarn consumption changes with garment size, gauge, yarn construction, stripe depth and the number of flower motifs.
Tools
- 4 mm crochet hook
- Stitch markers
- Flexible measuring tape
- Blunt yarn needle
- Scissors
- Pins
- Washable sewing thread, if required for appliqués
The photographed design uses pearl-like centers. For clothing intended for babies, embroidered centers can replace detachable bead-like decorations, particularly when the garment may be pulled or mouthed.
Abbreviations
- ch — chain
- sl st — slip stitch
- sc — single crochet
- hdc — half double crochet
- dc — double crochet
- tr — treble crochet
- st/sts — stitch/stitches
- sp — space
- rep — repeat
- RS — right side
- BLO — back loop only
Invisible decrease is primarily an amigurumi shaping technique and is not required for the principal garment sections of this design.
Gauge and Sizing Before the Pattern
The photographed object cannot provide an exact stitch count by itself. Yarn thickness, hook size, tension and the baby’s measurements all affect the required number of stitches.
Use approximately 48 cm finished chest circumference and 38 cm total length as a working 6–12-month reference.
Make at least a 12 × 12 cm gauge swatch. A useful starting benchmark for this type of construction is approximately 18 dc and 10 rows per 10 cm. Measure the central 10 cm of the blocked swatch rather than including distorted edge stitches.
If 18 stitches equal 10 cm, a 48 cm circumference corresponds mathematically to approximately 86 stitches before accounting for stitch-repeat requirements, closures and ease:
48 ÷ 10 × 18 = 86.4 stitches
Round the resulting number to a stitch count compatible with the selected pattern repeat and required fit.
Pattern — Step by Step
Bodice
Yarn: white — gauge-based construction.
Work the bodice toward approximately 48 cm finished circumference for the 6–12-month reference size.
Foundation: Establish the required width from the washed and blocked gauge swatch.
Row 1: dc across.
Row 2: ch 2, turn, dc across.
Repeat Row 2 until the work reaches the lower armhole position.
The photographed bodice is substantially denser than the skirt. Keep this section firm enough to support the flower appliqués without causing the fabric to sag.
Shape the armholes symmetrically on the front and back sections. The photograph does not show the back of the garment, so the exact closure construction cannot be determined from the image.
Finish exposed upper edges with sc.
Fasten off, leaving adequate sewing tails where shoulder assembly is required.
Shoulder Straps — Make 2
Yarn: white.
Ch to the measured strap length.
Row 1: dc in the appropriate starting chain and across.
Rows 2–4: ch 2, turn, dc across.
Add or remove rows until the strap width visually matches the broad rectangular straps shown in the design.
Fasten off. Leave approximately 20 cm of yarn for sewing.
Pin both straps before permanent attachment. Their front and back spacing should match.
Waist Transition
Yarn: white.
Join yarn around the lower bodice.
Round 1: Work evenly around the waist.
Round 2: Distribute increases evenly around.
Round 3: Continue increases where required to establish the pronounced skirt flare.
The exact stitch total depends on gauge and garment circumference. Avoid concentrating increases at the side seams because this can create two visible points rather than an evenly flared skirt.
Upper White Skirt
Yarn: white.
Work downward in rounds using an open dc-based mesh or column pattern.
Continue controlled increases until the skirt hangs in an A-line shape rather than cupping inward.
Once the required circumference has been established, stop increasing and maintain the stitch count through the principal stripe sections.
The open vertical construction visible in the photographed skirt gives this section more drape than the denser bodice.
First Red Stripe
Yarn: red.
Change color at the back of the skirt.
Work the established skirt pattern without changing the circumference.
Continue until the red stripe reaches the required depth.
Fasten off the red yarn rather than carrying white yarn through the complete broad stripe.
Central White Stripe
Yarn: white.
Rejoin white yarn at the back.
Continue in the established skirt pattern.
The central white section should remain broad enough to create a clear separation between the two major red bands.
Measure the circumference after two rounds. Changes in hand tension during color transitions can alter the physical diameter even when the stitch count remains unchanged.
Lower Red Stripe
Yarn: red.
Join red yarn at the back.
Continue the same skirt repeat without additional increases unless fitting measurements show that more flare is required.
Work until the lower red stripe reaches the required depth.
Fasten off.
Lower White Section
Yarn: white.
Rejoin white and continue downward.
This section provides the contrasting background immediately above the decorative red hem and flower appliqués.
Finish the openwork before beginning the final red border so the edging has a stable attachment round.
Red Scalloped Hem
Yarn: red.
Join red yarn at the back.
Round 1: sc evenly around.
Round 2: Repeat [sc, skip appropriate spacing, 5 dc in next anchor position, skip spacing] around, adjusting the spacing to the established stitch count.
Check the final few repeats before completing the round. The final scallop should meet the first without becoming compressed or noticeably wider.
Fasten off and weave in the yarn tail.
Small Five-Petal Flowers
Yarn: red or white.
R1: Work 5 sc into MR; join. (5)
R2: In each stitch work (sl st, ch 2, 2 dc, ch 2, sl st) to create five petals.
Fasten off and leave approximately 15–20 cm for sewing.
Make enough motifs to reproduce the flower distribution across the bodice, hem, headband and shoes. The photographed hem uses different flower sizes rather than one identical motif throughout.
Large Layered Flower
Yarn: red and white.
Red Base
R1: 6 sc in MR. (6)
R2: Create one broad petal in each stitch using taller grouped stitches. (6 petals)
Fasten off.
White Center Layer
R1: 5 sc in MR. (5)
R2: Make one compact petal in each stitch. (5 petals)
Fasten off.
Center the white flower over the red base. Sew through the center and selected inner petal points while leaving the outer red petals free.
The same construction can be scaled for the prominent waist flower and the central headband flower.
Red Side Petals — Make 4
Yarn: red.
Foundation: ch 8.
Round 1: sc in second ch, hdc, dc in next 3 chains, hdc, 3 sc in final chain; work back along the opposite side with hdc, dc in next 3, hdc, sc.
Join and fasten off.
Position these elongated shapes behind the large waist flower before attaching the complete motif to the dress.
Hanging Flower Ties — Make 2
Yarn: red.
Ch approximately 10–14 cm for the first decorative tie.
Sl st back along the chain.
Make the second tie slightly shorter to reproduce the staggered appearance.
Attach one small flower to each end.
For garments intended for babies, keep decorative cords short and securely attached. Loose cords and detachable decorations require additional safety consideration.
Flower Headband
Yarn: white and red.
Measure the required head circumference rather than estimating the size from the photograph.
With white yarn, make a broad rectangular crochet band. Continue working rows until its width matches the proportions of the photographed headband.
Join the short edges only after checking the stretch and finished circumference.
Make one large layered red-and-white flower and two smaller red flowers.
Center the large flower on the band. Position one small flower on either side at equal distances from the central motif.
Fasten all yarn tails securely on the wrong side.
Mary Jane-Style Shoes — Make 2
Yarn: white and red.
The shoes should be constructed from the baby’s actual foot length rather than a shoe size inferred from the photograph.
With white yarn, crochet an oval sole to the required measurement.
Work around the sole edge to establish the shoe wall.
Change to red yarn for the upper section.
Shape the toe by reducing stitches symmetrically across the front while preserving the heel opening.
For the Mary Jane strap, join red yarn at one side, chain across the opening and secure the strap on the opposite side according to the required fit.
Make the second shoe using the same measurements and row counts as the first.
Attach one layered red-and-white flower centrally over each toe.
Assembly
- Block the bodice and skirt to the intended measurements before installing the raised flower motifs.
- Join the skirt to the lower bodice with all color-change seams aligned toward the back.
- Pin and sew both shoulder straps at equal distances from the center of the garment.
- Position the small bodice flowers and sew them down without pulling the white fabric inward.
- Assemble the large waist flower with its red side petals positioned behind the central motif.
- Attach the waist flower and secure the two staggered hanging flower ties beneath it.
- Arrange every hem flower before sewing the first motif so spacing remains consistent around the entire circumference.
- Complete the white headband and center its large flower before adding the smaller side flowers.
- Match both shoe soles by length and width, finish the uppers, then attach the toe flowers.
- Weave each yarn tail through several wrong-side stitches, reverse direction once, trim and inspect every applied component.
The completed project consists of one striped floral crochet dress, one matching flower headband and two coordinated Mary Jane-style crochet shoes.
7 Technical Tips for Better Results
- Mark every stripe join. An unmarked joining point can drift diagonally through the red and white bands. Place a marker in the first stitch and check its position after every round.
- Check the 48 cm reference chest before starting the skirt. An undersized bodice cannot be corrected by adding extra skirt increases. Measure the blocked bodice without stretching it.
- Measure the skirt after changing colors. Different hand tension can produce a tighter red stripe even with an identical stitch count. Compare the circumference after the first two rounds of each color.
- Pin the waist flower on the center line. A displacement of 1–2 cm becomes noticeable because the horizontal stripes provide a strong visual reference.
- Block before adding the layered flowers. Blocking the complete decorated garment can flatten raised petals and change the apparent spacing between the hem motifs.
- Match the two shoe soles within approximately 5 mm. Complete both soles before beginning either upper so a length discrepancy can be corrected before additional rows are added.
- Reverse direction when weaving yarn tails. A tail passed only once through an open mesh row can work loose. Pass it through a denser section and reverse direction before trimming.
Conclusion
Finish the garment dimensions before permanently attaching the floral border. For the 6–12-month reference, approximately 48 cm around the chest and 38 cm total length provide useful working targets, but the intended wearer’s measurements and a washed gauge swatch should determine the final fit. Make one complete layered flower and position it against the bodice before producing the remaining motifs for this red and white crochet baby dress pattern. Photograph the finished dress, headband and shoes together for Pinterest and Instagram using #RedWhiteFlowerBabyDress. For this specific skirt, would you alternate red and white flowers around the entire hem or keep the border predominantly red?









