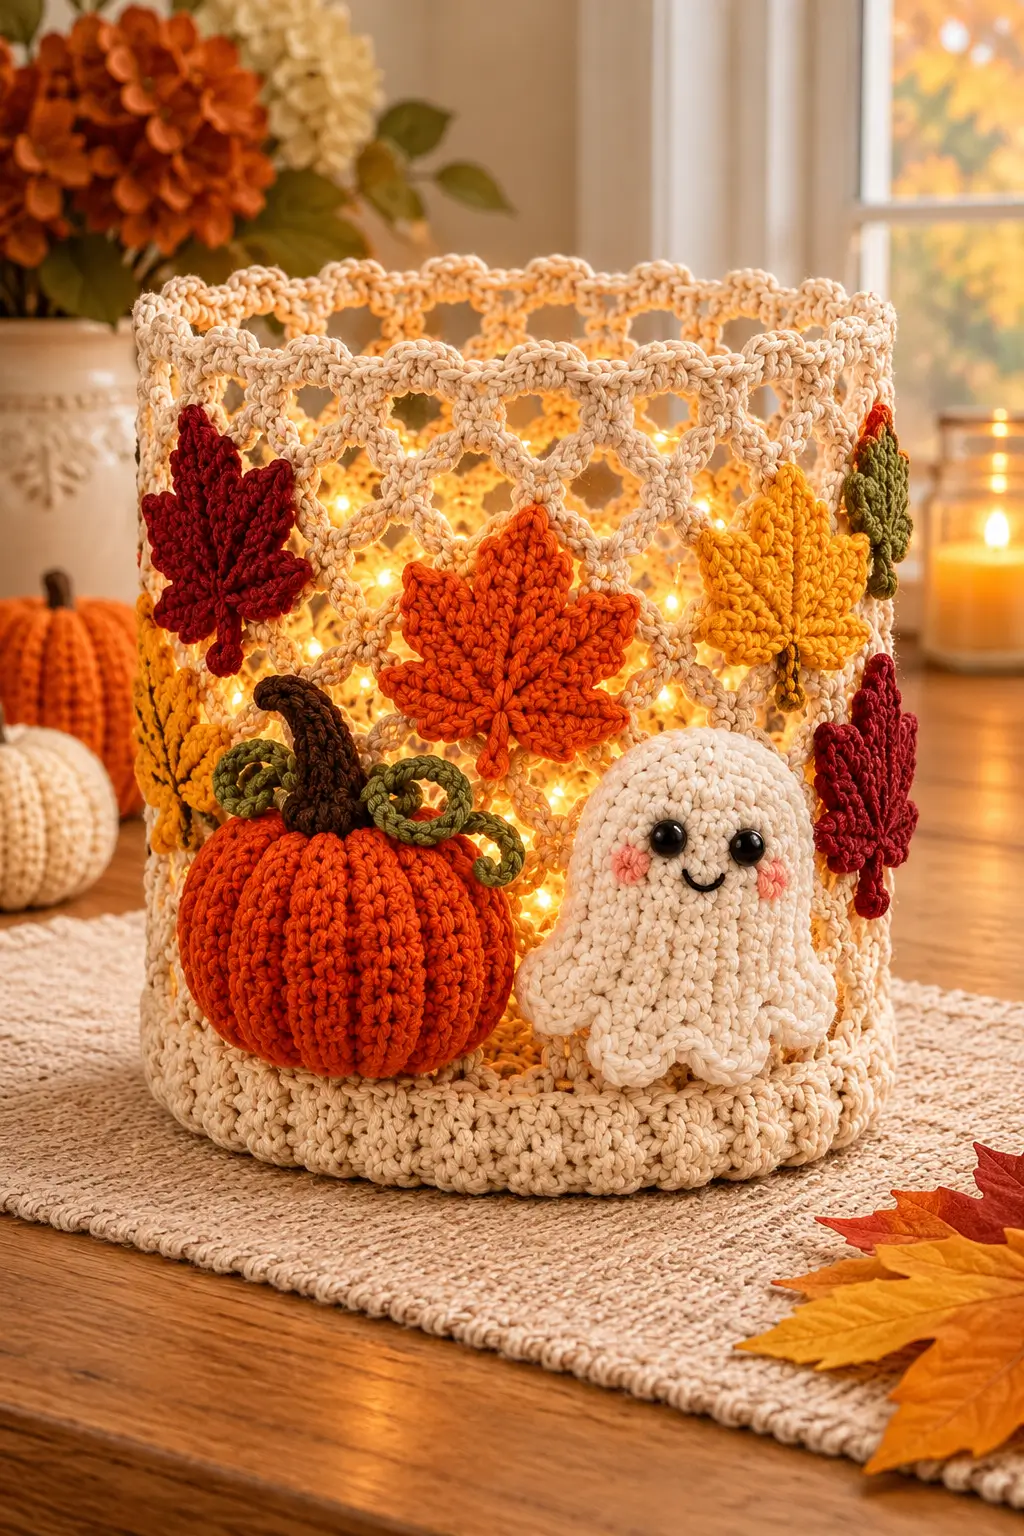
A ghost has no legs, so its hem has to do all the structural work. This ghost amigurumi crochet pattern builds a 36-stitch body above six shaped points that keep the figure upright while preserving the sheet-like outline. Use worsted yarn, a 4 mm hook and 12 mm eyes for an approximately 11 cm figure. The skill level is confident beginner. Its flat base makes it practical for shelf and table displays.
The Design: What Makes Autumn Boo Different
Three structural decisions define this crochet ghost pattern. First, the head reaches a 36-stitch plateau rather than becoming an oversized sphere. That keeps the upper silhouette compact enough to match the photographed figure. Second, the torso widens again below the neck, shifting weight toward the base so the ghost can stand without legs. Third, six lower lobes break up the circular body into the characteristic hanging-sheet outline.
The arms sit below the face rather than directly beside the eyes. This creates visible separation between facial features and limbs while preserving the broad torso of a Halloween amigurumi figure. A common mistake in a cute ghost crochet pattern is overstuffing the lower body. Too much fiberfill pushes the base into a ball, removing the flattened profile that allows the ghost to stand.
Project Info at a Glance
| Skill Level | Time | Finished Size | Hook | Best For |
|---|---|---|---|---|
| Confident beginner | 3–4 hours estimated | Approx. 11 cm | 4 mm | Autumn and Halloween display |
The 11 cm target is based on comparable published ghost patterns. Final measurements can vary according to yarn, hook size and individual crochet tension.
Materials and Tools
Yarn
- Cream or warm white — worsted/medium #4 — allow up to 70 g.
- Blush pink — worsted yarn or embroidery yarn — small scrap quantity for the cheeks.
- Black — embroidery floss or fine yarn — small quantity for the mouth.
- Pumpkin orange — worsted yarn — approximately 20–30 g for the optional pumpkin.
- Dark brown — worsted yarn — scrap quantity for the pumpkin stem.
- Olive green — worsted yarn — scrap quantity for the pumpkin vines.
Tools
- 4 mm crochet hook
- 12 mm black safety eyes
- Polyester fiberfill
- Tapestry needle
- Stitch markers
- Straight pins
- Scissors
Safety note: Safety eyes are not suitable for toys intended for children under three. Embroidered eyes remove the detachable plastic component.
Abbreviations
- MR — magic ring
- sc — single crochet
- inc — two sc in one stitch
- dec — single crochet decrease
- sl st — slip stitch
- ch — chain
- BLO — back loop only
- FLO — front loop only
- hdc — half double crochet
- dc — double crochet
For an invisible decrease, insert the hook through the front loops of the next two stitches, yarn over, draw through both front loops, then complete the single crochet.
Ghost Amigurumi Pattern — Step by Step
Work the ghost in a continuous spiral unless a section says otherwise. Use a stitch marker to identify the first stitch of each round.
Head
Yarn: cream or warm white.
R1: 6 sc in MR (6)
R2: inc ×6 (12)
R3: (1 sc, inc) ×6 (18)
R4: (2 sc, inc) ×6 (24)
R5: (3 sc, inc) ×6 (30)
R6: (4 sc, inc) ×6 (36)
R7: 36 sc (36)
R8: 36 sc (36)
R9: 36 sc (36)
R10: 36 sc (36)
R11: 36 sc (36)
R12: 36 sc (36)
R13: 36 sc (36)
Place the 12 mm safety eyes between R9 and R10, approximately six stitches apart. Check their alignment before attaching the washers.
R14: (4 sc, dec) ×6 (30)
R15: (3 sc, dec) ×6 (24)
Stuff the crown firmly but leave the lower section flexible enough to continue directly into the torso.
Do not fasten off. Continue into the body.
Body
Yarn: cream or warm white.
R16: 24 sc (24)
R17: (3 sc, inc) ×6 (30)
R18: (4 sc, inc) ×6 (36)
R19: 36 sc (36)
R20: 36 sc (36)
R21: 36 sc (36)
R22: 36 sc (36)
R23: 36 sc (36)
R24: 36 sc (36)
Stuff progressively. Keep the bottom 2 cm slightly less firm than the head so the base can flatten.
R25: BLO 36 sc (36)
R26: (4 sc, dec) ×6 (30)
R27: (3 sc, dec) ×6 (24)
R28: (2 sc, dec) ×6 (18)
R29: (1 sc, dec) ×6 (12)
R30: dec ×6 (6)
Finish stuffing before R30. Fasten off and thread the yarn tail through the front loops of the final six stitches. Pull the opening closed.
Keep the unused front loops from R25 accessible because they form the attachment line for the decorative ghost hem.
Arms — Make 2
Yarn: cream or warm white.
R1: 6 sc in MR (6)
R2: 6 sc (6)
R3: 6 sc (6)
R4: 6 sc (6)
R5: 6 sc (6)
Add only a small amount of stuffing to the rounded end. Heavy stuffing makes the arms project outward instead of hanging beside the body.
Flatten the opening and work 3 sc through both layers (3).
Fasten off. Leave approximately 20 cm of yarn for sewing.
Ghost Hem — Six Floating Points
Yarn: cream or warm white.
Join the yarn to any unused front loop from R25.
R1: 36 sc around (36)
The next round divides the hem into six equal six-stitch sections.
R2: Repeat: sl st, sc, hdc, dc, hdc, sc. Work the sequence six times around.
The taller center stitch extends each section downward and forms the pointed sheet-like edge. If the hem curls strongly upward, check the tension before fastening off.
Sl st into the first stitch. Fasten off and weave the yarn tail into the body.
Cheek Patches — Make 2
Yarn: blush pink.
R1: 6 sc in MR (6)
R2: inc ×6 (12)
Sl st into the first stitch. Fasten off with approximately 15 cm of yarn for sewing.
Do not stuff the cheek patches.
For smaller cheeks closer to the photographed version, substitute each circle with three or four horizontal pink embroidery stitches.
Embroidered Mouth
Yarn: black embroidery floss or fine black yarn.
The mouth is embroidered rather than crocheted. Insert the needle below one eye, carry the floss across the centerline and anchor it below the opposite eye to create a shallow U shape.
Add one small couching stitch at the lowest point when needed to hold the curved shape against the crochet fabric. Secure the yarn ends inside the head.
Optional Crochet Pumpkin
The orange pumpkin shown beside the ghost is a separate accessory. Add it when reproducing the complete autumn display.
Pumpkin Body
Yarn: pumpkin orange.
R1: 6 sc in MR (6)
R2: inc ×6 (12)
R3: (1 sc, inc) ×6 (18)
R4: (2 sc, inc) ×6 (24)
R5: (3 sc, inc) ×6 (30)
R6: (4 sc, inc) ×6 (36)
R7: 36 sc (36)
R8: 36 sc (36)
R9: 36 sc (36)
R10: 36 sc (36)
R11: 36 sc (36)
R12: 36 sc (36)
R13: (4 sc, dec) ×6 (30)
R14: (3 sc, dec) ×6 (24)
R15: (2 sc, dec) ×6 (18)
Stuff the pumpkin firmly.
R16: (1 sc, dec) ×6 (12)
R17: dec ×6 (6)
Fasten off, leaving approximately 70 cm of yarn. Pass the long yarn tail vertically around the pumpkin six times at equal intervals. Pull each strand firmly enough to create six defined pumpkin ribs without crushing the stuffing.
Pumpkin Stem
Yarn: dark brown.
R1: 6 sc in MR (6)
R2: 6 sc (6)
R3: 6 sc (6)
R4: 6 sc (6)
Fasten off with approximately 20 cm of yarn. No stuffing is required. Sew the stem into the center of the pumpkin.
Pumpkin Vines — Make 2
Yarn: olive green.
Foundation: Ch 16.
Row 1: Starting in the second chain from the hook, work 2 sc into every chain across (30).
The doubled stitches cause the strip to curl into a spiral. Fasten off with approximately 15 cm of yarn and sew each vine beside the stem.
Assembly
- Check that the head remains centered directly above the body. Redistribute the stuffing through the neck if the head tilts.
- Flatten the lower body against a hard surface. The ghost should rest on the closed underside while the decorative hem falls around the base.
- Check the 12 mm eyes. The suggested placement is between R9 and R10 with approximately six stitches between the eye stems.
- Place the pink cheek patches one round below the eyes and slightly outside their centers. Sew around each patch with matching pink yarn.
- Embroider the shallow black mouth between the cheeks. Position its lowest point approximately one to two rounds below the eye line.
- Pin each arm around R18–R20. Angle the rounded ends slightly downward to reproduce the short hanging arms visible on the reference ghost.
- Sew the arm openings securely to the torso. Pass the needle through complete stitches rather than individual surface fibers.
- Shape all six hem points by hand. Every point should occupy the same six-stitch section so one side does not become visually heavier.
- For the optional pumpkin, attach the brown stem and two green vines after sculpting the six orange ribs. Position the pumpkin beside the ghost rather than attaching it permanently.
- Weave every yarn tail into the stuffed interior and change direction at least once before trimming. The completed ghost should have a rounded 36-stitch head, compact arms and six evenly distributed lower points.
7 Technical Tips for a Cleaner Crochet Ghost
- Control stitch-marker drift. Move the marker after every completed round. Losing the true starting point by two or three stitches can rotate the face and arm positions around the body.
- Watch stuffing firmness. Keep the head firm while leaving the lowest 2 cm of the torso slightly softer. Excess fiberfill at the bottom creates a spherical base that will not sit flat.
- Use invisible decreases. Work through the front loops during the decrease rounds. Conventional decreases can leave paired openings that become visible once pressure from the stuffing increases.
- Check eye placement before locking the washers. Position the 12 mm eyes approximately six stitches apart. Inspect the face from both the front and directly above before securing them permanently.
- Adjust for velvet or chenille yarn. Make a six-round test dome before substituting a plush yarn for worsted yarn. Loose stitches in plush yarn can create openings large enough for stuffing to show.
- Pin both arms before sewing. Count rounds from the neck and match the attachment points within one stitch horizontally. Sewing one arm before positioning the second can produce an uneven silhouette.
- Secure finishing tails deeply. Weave each tail at least 4–5 cm through the stuffed body and change direction once. A short straight tail can migrate back through the crochet fabric when the figure is handled.
Finishing the Autumn Boo Ghost
Check the six hem sections before weaving the final tail. Each point should occupy the same share of the 36-stitch circumference, and the ghost should remain upright when placed on a flat surface.
The next practical step is to crochet one test figure in inexpensive worsted yarn, measure its finished height, then adjust the hook size if a larger or smaller ghost is required. Save this ghost amigurumi crochet pattern to your Pinterest project board and share the finished version on Instagram with #AutumnBooGhost.
For a complete autumn arrangement, place the ribbed orange pumpkin and green spiral vines beside the finished ghost. Which lower edge would you use for your version: six defined ghost points or a softer continuous scalloped hem?









