Introduction
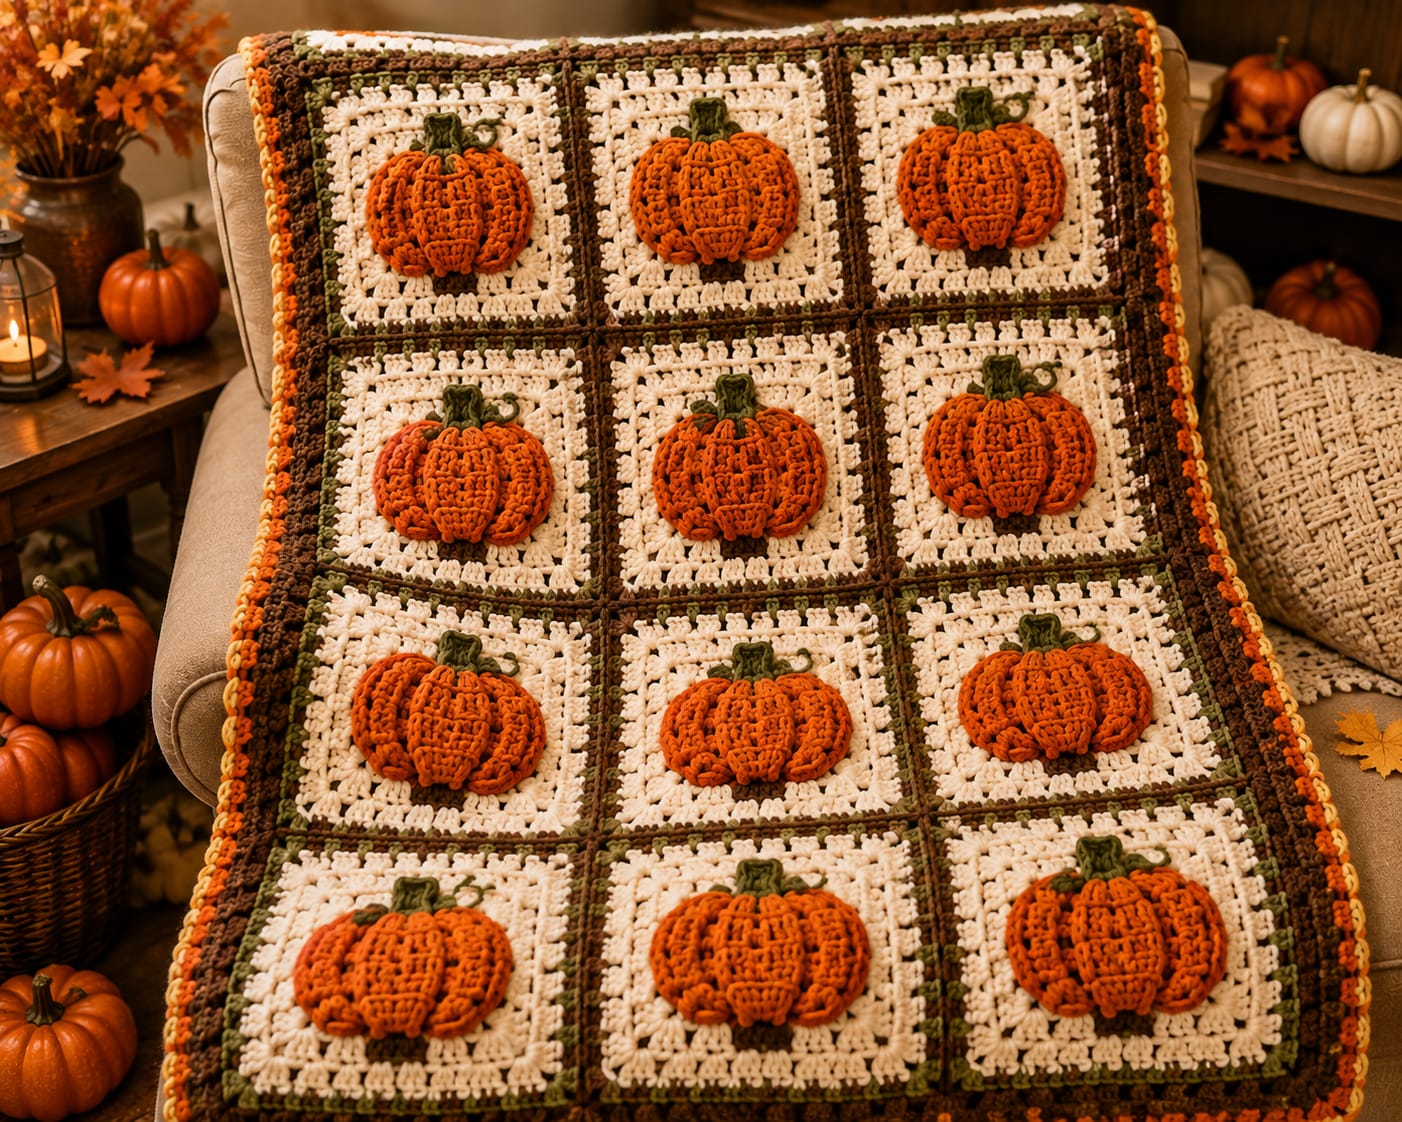
Twelve orange pumpkins cannot hide one overstuffed center when every lobe sits inside the same dark-brown grid. This raised pumpkin granny square blanket pattern uses worsted yarn with 5 mm and 4 mm hooks to make an approximately 100 × 132 cm throw. Large cream squares, dimensional pumpkins, olive stems and chocolate-brown seams create an intermediate modular construction for a structured fall blanket.
The Design: What Makes This Pumpkin Blanket Different
The blanket is organized as twelve large cream blocks arranged three across and four down. Every square carries one orange pumpkin, so consistency matters more than color variation. The pumpkin bodies use back-loop half double crochet to create narrow ribs, then shallow filling and selected shaping strands build the broader lobes visible in the photograph. Olive rounds frame the cream blocks while dark brown joins create a strong grid between them. A wide brown perimeter makes the cream centers appear lighter and ties the blanket to the pumpkin shadows. This dimensional pumpkin crochet square construction also uses a small curled vine beside several stems. One frequent mistake is making the pumpkin as firm as a tabletop ornament. That creates excess weight and causes the cream granny square to cup inward after attachment.
Project Info at a Glance
| Skill Level | Time | Finished Size | Hooks | Best For |
|---|---|---|---|---|
| Intermediate | 30–40 hours | Approx. 100 × 132 cm | 5.0 mm squares / 4.0 mm appliqués | Fall sofa throws, armchair blankets and pumpkin-themed seasonal displays |
Materials and Tools
Yarn
- Warm cream / ivory — worsted or Aran #4 — approximately 650–800 g — twelve openwork squares and light border accents.
- Pumpkin orange — worsted or Aran #4 — approximately 280–340 g — twelve dimensional pumpkins and narrow outer accent.
- Chocolate brown — worsted or Aran #4 — approximately 150–190 g — visible joining seams and broad border.
- Moss / olive green — worsted or Aran #4 — approximately 90–120 g — inner square edging, pumpkin stems, curls and border detail.
Keep all four colors close in thickness. The blanket depends on twelve matching blocks, and a heavier olive yarn can shrink the apparent cream center when the framing round is worked.
Tools
- 5.0 mm crochet hook for cream squares and border
- 4.0 mm crochet hook for pumpkin bodies and stems
- Polyester fiberfill — approximately 120–170 g
- Long tapestry needle
- Standard yarn needle
- Stitch markers
- Dressmaking pins
- Blocking mats
- Rust-resistant pins
- Scissors
- Measuring tape
Abbreviations
- MR — magic ring
- ch — chain
- sc — single crochet
- hdc — half double crochet
- dc — double crochet
- sl st — slip stitch
- inc — increase
- dec — decrease
- BLO — back loop only
An invisible decrease is worked through the front loops of two neighboring stitches before completing one single crochet through both loops.
Pattern — Step by Step
Make and block all twelve cream squares before producing the complete pumpkin batch. The square measurement determines the correct appliqué scale.
Cream Openwork Square — Make 12
Yarn: warm cream — original reconstruction based on standard granny-square geometry.
R1: Make an MR. Ch 3, 2 dc, ch 2. Work (3 dc, ch 2) three more times. Join with sl st.
R2: Sl st to a corner. Work (3 dc, ch 2, 3 dc) in the corner, ch 1. Repeat in the remaining three corners. Join.
R3: Work (3 dc, ch 2, 3 dc) in every corner. Work one 3-dc cluster into each side space. Ch 1 between neighboring clusters. Join.
R4: Repeat standard granny-square construction, adding one cluster to every new side space.
R5: Repeat R4.
R6: Repeat R4.
R7: Repeat R4.
R8: Repeat R4.
R9: Repeat R4.
Fasten off.
Target approximately 24–26 cm before the framing rounds.
Olive Framing Round
Yarn: moss / olive green.
Join in any corner.
Work (3 dc, ch 2, 3 dc) in each corner.
Work one 3-dc group in every side space with ch 1 between groups.
Join and fasten off.
Cream Finishing Round
Join cream in one corner.
Ch 1.
Sc in every dc and once in every ch-1 side space.
At each corner work (sc, ch 1, sc).
Join and fasten off.
Target blocked square: approximately 27–29 cm.
Block the Twelve Squares
Use 28 cm as the working target.
Pin all four corners first.
Measure each side.
Then measure both diagonals.
Keep every square within approximately 5 mm of the target.
Do not attach pumpkins before the squares are standardized.
Raised Pumpkin — Make 12
Make one complete test pumpkin before beginning the remaining eleven. Target approximately 15–17 cm of finished width so enough cream remains visible around the motif.
Ribbed Pumpkin Panel
Yarn: pumpkin orange — original reconstruction based on standard BLO pumpkin construction.
Foundation: ch 15.
Row 1: Starting in the second chain, hdc across. (14)
Row 2: ch 1, turn, hdc BLO across. (14)
Row 3: ch 1, turn, hdc BLO across. (14)
Row 4: ch 1, turn, hdc BLO across. (14)
Row 5: ch 1, turn, hdc BLO across. (14)
Row 6: ch 1, turn, hdc BLO across. (14)
Row 7: ch 1, turn, hdc BLO across. (14)
Row 8: ch 1, turn, hdc BLO across. (14)
Row 9: ch 1, turn, hdc BLO across. (14)
Row 10: ch 1, turn, hdc BLO across. (14)
Row 11: ch 1, turn, hdc BLO across. (14)
Row 12: ch 1, turn, hdc BLO across. (14)
Row 13: ch 1, turn, hdc BLO across. (14)
Row 14: ch 1, turn, hdc BLO across. (14)
Row 15: ch 1, turn, hdc BLO across. (14)
Row 16: ch 1, turn, hdc BLO across. (14)
Row 17: ch 1, turn, hdc BLO across. (14)
Row 18: ch 1, turn, hdc BLO across. (14)
Row 19: ch 1, turn, hdc BLO across. (14)
Row 20: ch 1, turn, hdc BLO across. (14)
Row 21: ch 1, turn, hdc BLO across. (14)
Row 22: ch 1, turn, hdc BLO across. (14)
Row 23: ch 1, turn, hdc BLO across. (14)
Row 24: ch 1, turn, hdc BLO across. (14)
Row 25: ch 1, turn, hdc BLO across. (14)
Row 26: ch 1, turn, hdc BLO across. (14)
Fasten off with approximately 70 cm of orange yarn remaining.
Target relaxed rectangle: approximately 10–11 cm high × 29–32 cm long.
Seam the Pumpkin Body
Bring Row 1 and Row 26 together.
Match all fourteen stitch positions.
Use mattress stitch to close the short edges.
Pull only until the sides touch.
The seam should blend into the BLO texture rather than producing one unusually deep groove.
Gather the Lower Opening
Thread matching orange yarn through every row end around one open side.
Pull gradually.
Pause when the opening reaches approximately 20 mm.
Spread the folds evenly around the circumference.
Continue pulling until approximately 8 mm remains.
Cross the center once and push the gathering point inward about 4 mm.
Add Shallow Stuffing
Place a thin ring of fiberfill around the outer wall.
Keep the middle section soft.
Support every rib without packing the motif solid.
The pumpkin should still compress readily when the top and bottom are pushed together.
Maximum blanket projection will later be approximately 12–16 mm.
Gather the Upper Opening
Thread orange yarn through all remaining row ends.
Pull to approximately 20 mm first.
Add a small amount of fiberfill behind any collapsed rib.
Continue gathering until the opening reaches about 8 mm.
Secure temporarily.
Compress the Pumpkin
Pass a long orange strand through the upper gathering point, through the center and out through the lower gathering.
Return along the same axis.
Pull in several small stages.
Target approximately 15–17 cm of width and 10–12 cm of height.
Stop before the ribs flatten.
Create the Broad Pumpkin Lobes
The twenty-six BLO rows produce many fine vertical ribs. The reference also shows approximately five to seven broader raised sections.
Mark six major valleys around the pumpkin.
Anchor matching yarn at the rear center.
Carry it over one selected BLO valley to the opposite gathered center.
Return through the pumpkin.
Pull until the chosen groove deepens by approximately 3–4 mm.
Work the next groove on the opposite side.
Continue in opposing pairs.
Olive Stem — Make 12
Yarn: moss / olive green.
R1: 6 sc in MR (6)
R2: sc around (6)
R3: sc around (6)
R4: sc around (6)
R5: (2 sc, inc) ×2 (8)
R6: sc around (8)
Fasten off with a 20 cm tail.
Keep the stem unstuffed or add only a trace of fiberfill to the lower portion.
Flatten the bottom 10 mm before attachment.
Curled Vine — Make 12
Yarn: moss / olive green.
Ch 14.
Starting in the second chain, work 3 sc in each chain.
The fabric curls automatically.
Fasten off with a 12 cm sewing tail.
Attach Stem and Curl to Pumpkin
Place the stem over the upper gathering point.
Sew the flattened 8-stitch base through several neighboring pumpkin ribs.
Position the curl beside the stem.
Attach only its first approximately 10 mm.
Leave the remaining spiral free.
Standardize the Pumpkin Batch
Finish three pumpkins before producing the complete set.
Measure their widths without compressing them.
Keep those measurements within approximately 6–8 mm.
Place each motif beside a vertical ruler and compare depth.
Remove a small amount of fiberfill from any pumpkin more than approximately 4 mm deeper than the others.
Place a Pumpkin on Each Cream Square
Lay one blocked square flat.
Center the pumpkin horizontally.
Position it slightly below the exact vertical center so the green stem remains within the cream field.
Keep approximately 5–6 cm of cream visible at the widest side points.
Pin the pumpkin at top, bottom, left and right.
Attach the Raised Pumpkin
Use orange yarn.
Begin at the lower rear perimeter.
Pass the needle through the rear pumpkin edge and corresponding cream stitches.
Place attachment points approximately 10–12 mm apart.
Leave the center completely unsewn.
Stop after half the perimeter.
Place the square flat before continuing.
Check the Square for Puckering
All four corners should remain in contact with the table.
If one corner lifts more than approximately 5 mm, loosen the nearest pumpkin stitches.
The pumpkin should project from the square while the cream fabric underneath remains almost flat.
Continue sewing only when the first half passes that test.
Finish Pumpkin Attachment
Sew the remaining half with matching tension.
Add one relaxed tack beneath the upper center if the pumpkin tilts forward.
Do not sew through the main raised lobe surfaces.
Knot on the reverse.
Weave the orange tail through at least 4 cm of matching stitches.
Prepare the 3 × 4 Layout
Lay all twelve completed pumpkin blocks on a floor or large table.
Arrange three squares across each row.
Build four rows.
Rotate any square whose pumpkin stem is not pointing toward the intended top edge.
Compare pumpkin heights before stacking the blocks for joining.
Brown Square Join
Yarn: chocolate brown.
The visible dark seam is part of the design rather than something to conceal.
Place two squares side by side with the right sides facing up.
Join brown yarn through corresponding edge loops.
Slip stitch loosely along the complete seam.
Do not pull the squares on top of one another.
Join the Horizontal Rows
Join the three blocks in Row 1.
Repeat for Rows 2, 3 and 4.
Measure every strip.
Keep the four row widths within approximately 10 mm.
Correct a tight seam before connecting the strips vertically.
Join the Four Rows
Align Row 1 and Row 2.
Match the first internal vertical seam.
Pin that intersection.
Repeat at the second intersection.
Slip stitch the rows together in brown.
Continue through all four rows.
Reinforce the Grid Intersections
At each point where four cream squares meet, inspect the brown seams.
Pass one brown reinforcing stitch through the center if a small opening remains.
Do not cinch the intersection closed.
The seam should remain flat rather than forming a dark knot.
Border Round 1 — Olive
Yarn: moss / olive green.
Join at one blanket corner.
Sc evenly around the full perimeter.
Skip duplicated loops where brown joins meet the edge.
At each corner work (2 sc, ch 2, 2 sc).
Join.
Border Round 2 — Chocolate Brown
Join brown.
Hdc in every stitch around.
At corners work (2 hdc, ch 2, 2 hdc).
Join.
Border Round 3 — Chocolate Brown
Ch 1.
Sc around once.
At corners work (sc, ch 2, sc).
Join.
Border Round 4 — Chocolate Brown Texture
Repeat:
sc in next 3 stitches, ch 1, skip 1.
Continue along each side.
Adjust the final repeat before the corner so the edge remains flat.
Work (sc, ch 2, sc) at each corner.
Border Round 5 — Olive
Join olive.
Sc in every stitch and ch-1 space.
Work (sc, ch 2, sc) in each corner.
Join.
Border Round 6 — Pumpkin Orange
Join orange.
Hdc around the complete perimeter.
At each corner work (2 hdc, ch 2, 2 hdc).
Join.
Final Cream Edge
Join cream.
Sc once in every stitch.
At the four corners work (sc, ch 1, sc).
Keep this round narrow so the dark brown frame remains dominant.
Fasten off.
Assembly
- Crochet twelve nine-round cream granny squares, add the olive framing round and cream finishing round, then block every square to approximately 28 cm.
- Make twelve pumpkin rectangles using 14 hdc across and 26 BLO rows, checking that finished rectangle lengths stay within approximately 6–8 mm.
- Seam, gather and minimally stuff every pumpkin, then compress each body to approximately 15–17 cm wide and 10–12 cm high.
- Add up to six broader shaping channels to each pumpkin while preserving the finer built-in BLO rib texture.
- Crochet twelve olive stems and twelve curled vines, attaching one stem-and-curl pair to every pumpkin crown.
- Center one pumpkin on every cream block and sew through the rear perimeter at approximately 10–12 mm intervals.
- Arrange the completed blocks three across by four down and verify that every pumpkin stem points toward the same blanket edge.
- Join three blocks into each horizontal row with visible chocolate-brown seams, then connect all four rows and reinforce the intersections.
- Work the olive, brown, brown, brown-texture, olive, orange and cream border sequence around the complete blanket.
- Block the grid and perimeter without compressing the pumpkins, then reshape every raised lobe and olive curl by hand.
The completed blanket should contain twelve equally spaced orange pumpkins on cream blocks, a clearly defined chocolate-brown grid and an earthy multicolor frame.
7 Technical Tips
- Pumpkin block becomes bowl-shaped: The perimeter sewing is shorter than the cream fabric underneath. Keep attachment stitches approximately 10–12 mm apart and loosen them if any square corner rises more than 5 mm.
- One pumpkin projects farther than the others: Fiberfill quantity is inconsistent. Compare completed motifs beside a ruler and keep depth variation below approximately 4 mm before sewing them to the squares.
- Brown joining lines become wavy: Slip stitches are being worked tighter than the granny-square edges. Join with the blocks lying flat and stop if the seam shortens either edge by more than approximately 5 mm.
- Pumpkin seam becomes the deepest rib: The Row 1-to-Row 26 mattress seam is overtightened. Match all fourteen stitch positions and pull only until the edges meet.
- Olive square frame pulls inward: The framing yarn or hook tension is tighter than the cream center. Block the first complete test square to 28 cm before working the other eleven.
- Raised lobes lose definition: The body contains too much filling. Keep the center soft enough that crown-to-base compression of roughly 10–15 mm remains possible before attachment.
- Outer brown border flares: Extra stitches have accumulated where block joins meet the perimeter. Skip duplicate seam loops and use only the stated corner additions in each round.
Why the Dark Brown Grid Matters
The dark join is one of the strongest structural elements in this raised pumpkin granny square blanket pattern. Cream squares alone would blend into a continuous pale field, but brown seams divide the blanket into twelve deliberate frames.
That grid also matches the depth of the pumpkin shadows.
Orange remains the focal color, olive supplies a botanical accent, and brown gives the construction enough contrast to stay visible from several feet away.
A cream join can be substituted, but the result will read more like one openwork blanket with floating pumpkins and less like a collection of framed pumpkin blocks.
Why the Pumpkins Are Separate Appliqués
Separate construction gives much more control over relief than crocheting the pumpkin directly into the granny square.
You can measure every pumpkin before attachment.
Stuffing can be removed from an oversized motif.
Shaping channels can also be corrected while the pumpkin is still held in the hand.
Most importantly, the cream block remains structurally independent.
If one appliqué is not centered correctly, its seam can be reopened without dismantling the square itself.
Scaling the Pumpkin
For a smaller motif, work 11 hdc across and continue BLO rows until the rectangle measures approximately 23–25 cm long.
For a larger pumpkin, use 17 hdc and work until the panel reaches roughly 35–38 cm.
Do not scale only by row number after changing yarn weight.
The finished rectangle measurements control the pumpkin proportions more reliably.
On a 28 cm square, aim for a pumpkin width of about 55–65 percent of the block width.
Scaling the Blanket
A three-by-three layout produces nine pumpkin squares and a more compact throw.
Four columns by four rows require sixteen pumpkins and create a nearly square blanket.
For a bed runner, use two columns and five or six rows.
Keep individual block dimensions constant when the goal is to retain the same pumpkin-to-background relationship.
Add border rounds only after all expanded rows have been joined.
Changing the Pumpkin Palette
The supplied blanket uses orange consistently across every motif.
That repetition makes the dark-brown grid particularly effective.
For more color variation, replace four pumpkins with mustard and another four with rust.
Olive pumpkins can be added, but use a different stem shade so the crown does not disappear into the body.
Keeping one color for all twelve is technically simpler because every motif can be batched from the same yarn and gauge.
Changing the Join Color
Chocolate brown gives the strongest resemblance to the image.
Olive produces a softer botanical grid.
Rust creates a warmer frame but competes more directly with the pumpkins.
Cream produces the least visible structure.
If the seam color changes, repeat that same shade at least once in the outer border so it looks intentional rather than isolated.
Batching Twelve Pumpkins
Production becomes more consistent when the same stage is repeated across the batch.
Crochet all twelve rectangles first.
Measure them before seaming.
Next close all twelve tubes, then gather their lower openings.
Stuff and compress them in groups of three.
Finally add stems and curls.
This method makes it much easier to spot one pumpkin whose width or depth has drifted away from the others.
Controlling the Cream Negative Space
The pumpkin should not fill the entire square.
A 15–17 cm motif centered on a 28 cm block leaves enough cream to expose the granny construction.
If the pumpkin expands beyond about 18 cm, the side lobes approach the olive frame and the block begins to look crowded.
Remove filling or tighten the crown-to-base compression slightly before reducing the square itself.
Final Blocking
Pin the four blanket corners first.
Add pins at the outer ends of every brown internal seam.
Do not press through the pumpkin centers.
Shape the grid until the horizontal and vertical joins are visually straight.
After drying, lift each orange rib by hand and arrange the small green curls.
Inspect the blanket from several feet away; inconsistent pumpkin depth and crooked brown joins are easier to detect at that distance.
Conclusion
Standardize the first cream square and first pumpkin before batching the remaining pieces because this design repeats one motif twelve times with almost no visual distraction. Your next step is to block a 28 cm test square, make one 15–17 cm pumpkin and test the 10–12 mm attachment spacing before continuing. Keep the pumpkin center lightly filled and the dark joins relaxed. Share the finished raised pumpkin granny square blanket pattern on Pinterest with the full three-by-four grid visible, then post a pumpkin close-up on Instagram using #RaisedPumpkinGrannyBlanket. For this blanket specifically, would you keep the chocolate-brown grid or change it to olive green?









