Introduction
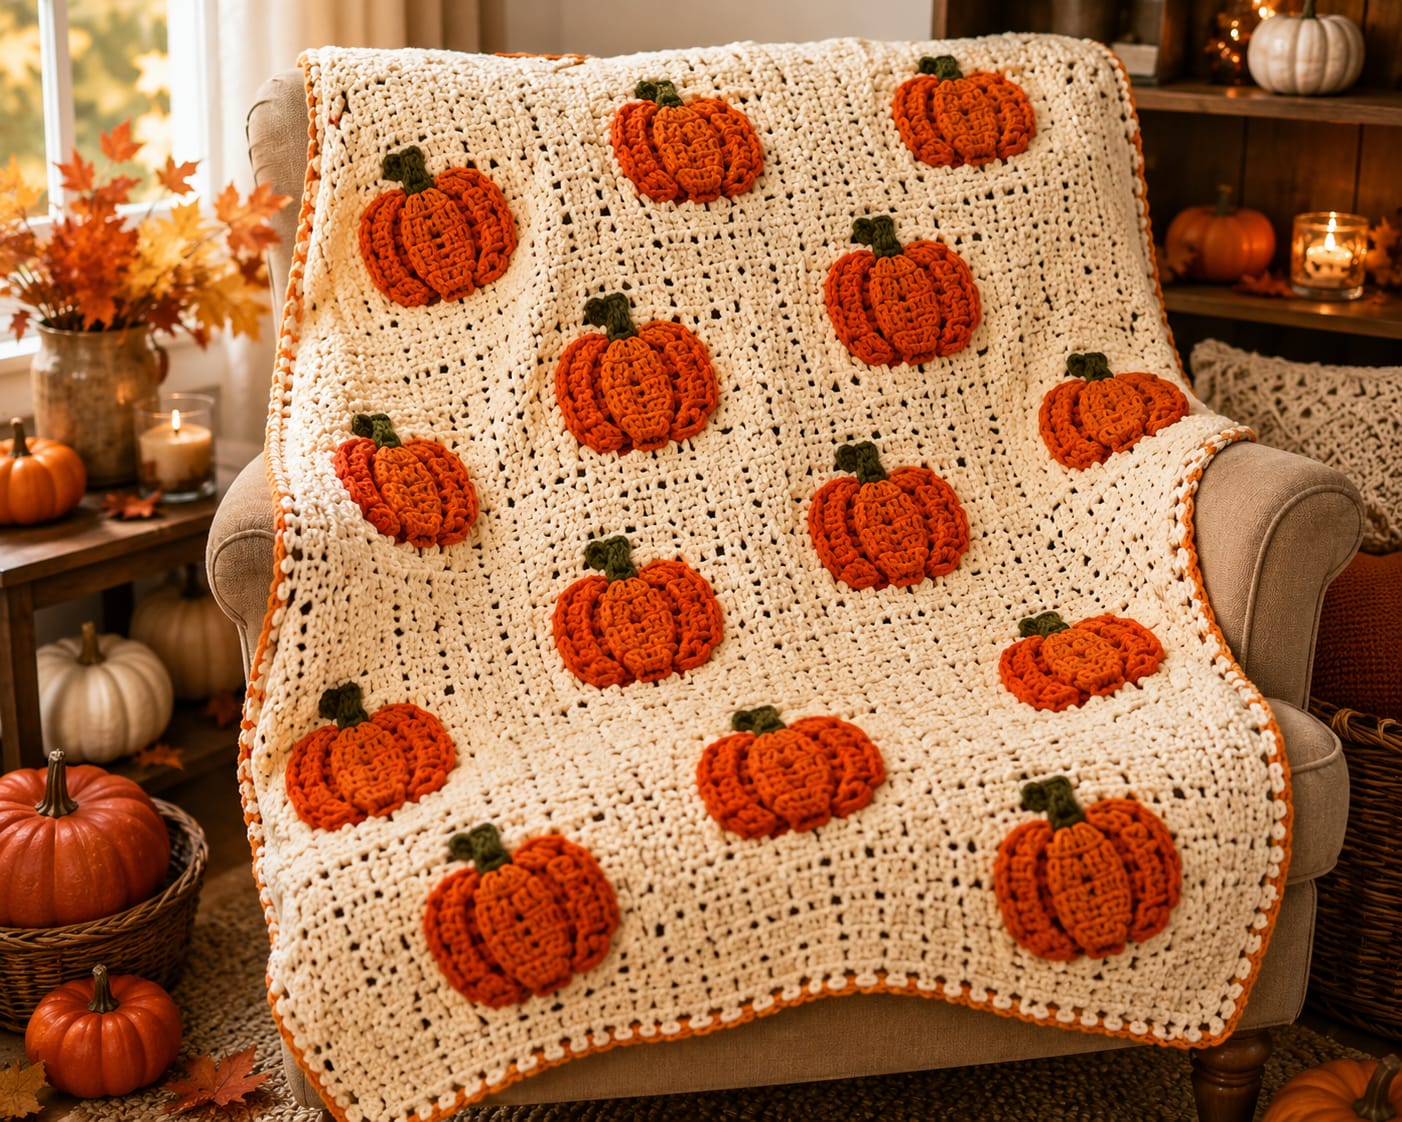
Twelve pumpkin centers must rise the same distance from the cream field or the middle row will look heavier than the outer rows. This raised pumpkin crochet blanket pattern uses worsted yarn with 5 mm and 4 mm hooks to make an approximately 110 × 142 cm throw. A cream openwork base, ribbed orange pumpkins and olive stems create an intermediate appliqué construction.
The Design: What Makes This Pumpkin Blanket Different
The blanket gives nearly all of its background area to cream yarn, then places twelve orange pumpkins in a regular three-by-four arrangement. That large amount of negative space matters because every pumpkin projects above the surface. Back-loop half double crochet supplies narrow vertical ribs, while minimal filling and several broader shaping channels produce the rounded lobes. Dark olive stems introduce the only strong secondary color, so the pumpkins remain the dominant elements. The background is divided into large openwork sections rather than small motif squares, which keeps the grid visually quiet. A common failure in a pumpkin applique crochet blanket is attaching the appliqué while it is overstuffed. The perimeter then pulls against the cream mesh, producing a shallow crater around a motif that should appear to sit on top of the fabric.
Project Info at a Glance
| Skill Level | Time | Finished Size | Hooks | Best For |
|---|---|---|---|---|
| Intermediate | 32–42 hours | Approx. 110 × 142 cm | 5.0 mm blanket / 4.0 mm pumpkins | Fall sofa throws, armchair blankets and seasonal home display |
Materials and Tools
Yarn
- Warm cream / natural ivory — worsted or Aran #4 — approximately 850–1,050 g — background sections, joins and outer border.
- Pumpkin orange — worsted or Aran #4 — approximately 300–370 g — twelve raised pumpkins and narrow border accent.
- Dark olive green — worsted or Aran #4 — approximately 30–45 g — twelve pumpkin stems.
Choose cream and orange yarn with similar thickness and recovery. A softer orange yarn can stretch several millimeters farther than the cream field even when both labels identify the same yarn weight.
Tools
- 5.0 mm crochet hook for the background
- 4.0 mm crochet hook for pumpkin appliqués and stems
- Polyester fiberfill — approximately 150–220 g
- Yarn needle
- Long tapestry needle
- Stitch markers
- Dressmaking pins
- Blocking mats
- Rust-resistant blocking pins
- Scissors
- Measuring tape
Abbreviations
- MR — magic ring
- ch — chain
- sc — single crochet
- hdc — half double crochet
- dc — double crochet
- inc — increase
- dec — decrease
- sl st — slip stitch
- BLO — back loop only
An invisible decrease is worked through the front loops of two neighboring stitches before completing one single crochet through both loops.
Pattern — Step by Step
Complete the cream field before making the full pumpkin batch. The blocked background dimensions determine the spacing between the twelve raised appliqués.
Large Cream Openwork Square — Make 12
Yarn: warm cream — original reconstruction based on standard granny-square geometry.
R1: Make an MR. Ch 3, 2 dc, ch 2. Work (3 dc, ch 2) three more times in the ring. Join with sl st.
R2: Sl st to the first corner. Work (3 dc, ch 2, 3 dc) in that corner. Ch 1. Repeat in the remaining three corners. Join.
R3: Work (3 dc, ch 2, 3 dc) in every corner. Place one 3-dc group in each side space with ch 1 between neighboring groups. Join.
R4: Repeat the standard granny construction, adding one 3-dc group in every new side space.
R5: Repeat R4.
R6: Repeat R4.
R7: Repeat R4.
R8: Repeat R4.
R9: Repeat R4.
R10: Repeat R4.
Fasten off.
Target approximately 31–33 cm before the finishing edge.
Square Finishing Edge
Join cream yarn in any corner.
Ch 1.
Sc in each dc and once in each ch-1 side space.
Work (sc, ch 1, sc) in each corner.
Continue around.
Join and fasten off.
Target blocked measurement: approximately 32–34 cm.
Block All Twelve Background Squares
Choose one target measurement before pinning the batch.
A practical target is 33 cm.
Measure every side and both diagonals.
Keep each square within approximately 5 mm of the target.
Three blocks across magnify a 10 mm error to 30 mm before the border is added.
Join the Cream Field
Arrange the twelve blocks in three columns and four rows.
Join the three squares in Row 1 with cream yarn using mattress stitch.
Repeat for the remaining three horizontal strips.
Lay all four strips on a level surface.
Compare their finished widths.
Join Row 1 to Row 2, then continue until all four strips form one rectangle.
Match every square intersection before tightening the neighboring seam.
Check the Joined Background
Measure the top, center and bottom widths.
Keep the three measurements within approximately 10–15 mm.
Measure both long sides.
Any difference larger than about 15 mm should be corrected during blocking before pumpkin placement begins.
Raised Ribbed Pumpkin — Make 12
All twelve motifs use the same dimensions. Make the first two pumpkins completely before batching the remaining ten so the final width and depth can be checked against the cream blocks.
Pumpkin Panel
Yarn: pumpkin orange — original reconstruction using BLO half double crochet.
Foundation: ch 15.
Row 1: starting in the second chain, hdc across. (14)
Row 2: ch 1, turn, hdc BLO across. (14)
Row 3: ch 1, turn, hdc BLO across. (14)
Row 4: ch 1, turn, hdc BLO across. (14)
Row 5: ch 1, turn, hdc BLO across. (14)
Row 6: ch 1, turn, hdc BLO across. (14)
Row 7: ch 1, turn, hdc BLO across. (14)
Row 8: ch 1, turn, hdc BLO across. (14)
Row 9: ch 1, turn, hdc BLO across. (14)
Row 10: ch 1, turn, hdc BLO across. (14)
Row 11: ch 1, turn, hdc BLO across. (14)
Row 12: ch 1, turn, hdc BLO across. (14)
Row 13: ch 1, turn, hdc BLO across. (14)
Row 14: ch 1, turn, hdc BLO across. (14)
Row 15: ch 1, turn, hdc BLO across. (14)
Row 16: ch 1, turn, hdc BLO across. (14)
Row 17: ch 1, turn, hdc BLO across. (14)
Row 18: ch 1, turn, hdc BLO across. (14)
Row 19: ch 1, turn, hdc BLO across. (14)
Row 20: ch 1, turn, hdc BLO across. (14)
Row 21: ch 1, turn, hdc BLO across. (14)
Row 22: ch 1, turn, hdc BLO across. (14)
Row 23: ch 1, turn, hdc BLO across. (14)
Row 24: ch 1, turn, hdc BLO across. (14)
Row 25: ch 1, turn, hdc BLO across. (14)
Row 26: ch 1, turn, hdc BLO across. (14)
Fasten off with approximately 70 cm of orange yarn remaining.
Target relaxed rectangle: approximately 10–11 cm high × 29–33 cm long.
Check the Pumpkin Rectangle
Lay the panel flat without stretching the ribs.
Measure the short edge first.
Target approximately 10–11 cm.
Then measure the long edge.
Target approximately 29–33 cm.
If the panel is too narrow, add BLO rows in pairs.
If it exceeds 33 cm substantially, remove two rows and test again.
Seam the Pumpkin Tube
Bring Row 1 and Row 26 together.
Match all fourteen stitch positions.
Use mattress stitch through corresponding row edges.
Pull only until the edges touch.
The finished seam should resemble another rib instead of forming the deepest groove.
Gather the First Pumpkin Edge
Thread approximately 60 cm of orange yarn onto a long needle.
Pass through all 26 row ends around one open edge.
Pull in stages.
Pause when the opening reaches approximately 20 mm and spread the gathers evenly.
Continue until the hole measures about 8 mm.
Cross the center once.
Push the gathered point approximately 4–5 mm inward.
Add Minimal Pumpkin Filling
Place a thin ring of fiberfill around the outer wall.
Keep the middle significantly softer.
Add small pieces rather than one dense mass.
The ribbed exterior should round outward, but the top and bottom centers must still compress toward one another.
Stop before the motif becomes spherical.
Gather the Second Edge
Thread a second orange strand through the opposite row ends.
Pull until the opening reaches approximately 15–20 mm.
Check the stuffing.
Add only enough fiberfill to support any collapsed outer rib.
Continue gathering to about 8 mm.
Secure temporarily.
Compress the Pumpkin
Run a long orange strand from one gathered center through the complete body and out through the opposite center.
Return through the same axis.
Pull gradually until the two centers move toward one another.
Target a finished body around 9–11 cm high and 15–18 cm wide.
Maximum depth above the blanket should remain about 12–18 mm after attachment.
Define the Broad Lobes
The BLO rows supply many narrow ribs. The image also shows several broader pumpkin sections.
Mark six major valleys around the circumference.
Space them as evenly as possible.
Use matching orange yarn to deepen those selected valleys.
Work opposing channels as pairs.
Pull each additional groove approximately 3–5 mm below the neighboring surface.
Olive Pumpkin Stem — Make 12
Yarn: dark olive green.
R1: 6 sc in MR (6)
R2: sc around (6)
R3: sc around (6)
R4: sc around (6)
R5: (2 sc, inc) ×2 (8)
R6: sc around (8)
Fasten off with a 20 cm sewing tail.
Do not pack the stem with stuffing.
Flatten approximately the lower 10 mm.
Sew it behind the upper pumpkin center so 2.5–3.5 cm remains visible.
Check All Twelve Pumpkins
Arrange the completed motifs in three rows of four on a flat surface.
Measure every width.
Keep the set within approximately 8 mm of one another.
Compare the depth by placing a ruler vertically beside each pumpkin.
A motif more than about 5 mm deeper than its neighbors should have some filling removed before blanket attachment.
Plan the Three-by-Four Pumpkin Layout
Spread the joined cream field flat.
Place one pumpkin at the center of every background section.
The top row contains three motifs.
Repeat through all four rows for twelve pumpkins.
Keep the stems pointing upward.
Measure from each pumpkin center to the nearest internal seam rather than relying only on visual placement.
Center Each Pumpkin
On a 33 cm background square, a 16 cm pumpkin leaves about 8.5 cm of total horizontal space on either side when perfectly centered.
Pin the pumpkin at its top, bottom and two widest points.
Check the stem against the vertical center line.
Then step back and compare the three pumpkins within the complete row.
Attach Each Pumpkin
Use orange yarn.
Begin at the lower rear edge.
Sew through the pumpkin perimeter and cream field at approximately 10–12 mm intervals.
Do not pass attachment stitches through the raised central ribs.
Leave most of the front surface completely free.
Stop after half the perimeter and lay the blanket flat.
Check for Background Puckering
Run one hand over the cream fabric surrounding the half-sewn motif.
The background should remain flat.
If the square corner rises more than approximately 5 mm, loosen the most recent stitches.
If the pumpkin moves freely by more than approximately 8 mm, add one additional relaxed tack near each lower side.
Finish the Pumpkin Attachment
Continue around the remaining perimeter.
Keep the final sewing tension equal to the first half.
Knot on the rear side.
Weave the tail through at least 4 cm of matching orange or cream stitches.
Repeat for all twelve motifs.
Check the Complete Motif Grid
Spread the blanket on a floor or large table.
View each three-pumpkin row from the front.
Stems should form roughly parallel vertical reference points.
Check the four horizontal rows as well.
If one pumpkin sits more than approximately 10 mm higher than its neighbors, move the entire appliqué rather than bending its stem downward.
Border Round 1 — Cream
Yarn: warm cream.
Join in one corner.
Sc evenly around the full perimeter.
Skip duplicated loops where internal joining seams reach the outside edge.
At every corner work (2 sc, ch 2, 2 sc).
Join.
Border Round 2 — Pumpkin Orange
Yarn: pumpkin orange.
Sc once in every stitch.
At each corner work (sc, ch 2, sc).
Join.
Border Round 3 — Cream Eyelet Round
Join cream yarn.
Repeat sc, ch 1, skip 1 around each straight side.
At every corner work (sc, ch 2, sc).
Join.
Border Round 4 — Pumpkin Orange Accent
Join orange in a ch-1 space.
Sc in each sc and each ch-1 space around.
Work (sc, ch 2, sc) in every corner.
Join.
Final Cream Border
Join cream.
Hdc evenly around the complete perimeter.
At each corner work (2 hdc, ch 2, 2 hdc).
Join and fasten off.
If a slightly more decorative finish is wanted, add one final relaxed sc round without changing the stitch count.
Assembly
- Crochet twelve large cream openwork squares, add the finishing edge and block every section to approximately 32–34 cm.
- Arrange the squares in three columns by four rows, join horizontal strips first and then connect all four rows with cream yarn.
- Make twelve pumpkin panels using 14 hdc across and 26 BLO rows, keeping panel widths within approximately 8 mm of one another.
- Seam and gather every pumpkin, add minimal outer-wall filling and compress each body to approximately 15–18 cm wide by 9–11 cm high.
- Add six broad shaping valleys to each pumpkin only where stronger lobe definition is needed, keeping additional groove depth around 3–5 mm.
- Crochet twelve dark olive stems and sew one behind the crown of every pumpkin before the motifs are attached to the blanket.
- Center one pumpkin on every cream background section, pinning top, bottom and both widest sides before sewing.
- Attach each pumpkin around its rear perimeter at approximately 10–12 mm intervals while leaving the raised center completely free.
- Work the cream, orange, cream, orange and cream border sequence around the full joined blanket.
- Block only the cream field and outer border, reshape every pumpkin lobe by hand and weave all remaining yarn tails into matching fabric.
The finished throw should display twelve equally sized orange pumpkins in a three-by-four layout while the cream background remains flat between every raised motif.
7 Technical Tips
- Pumpkin creates a circular crater: The appliqué seam is tighter than the cream field. Keep attachment stitches approximately 10–12 mm apart and loosen them if the surrounding fabric sinks more than about 5 mm.
- Twelve pumpkins finish at different depths: Fiberfill quantity is inconsistent. Compare the first two finished motifs beside a ruler and keep maximum pre-attachment depth within approximately 5 mm across the batch.
- One background row becomes shorter: Individual cream blocks were joined before their dimensions matched. Keep each blocked section within approximately 5 mm of the chosen 33 cm target.
- Pumpkin ribs disappear after stuffing: The outer wall has been stretched too far. Stop adding fiberfill while the body can still compress vertically by approximately 15 mm.
- Stem tilts after blanket attachment: The pumpkin has rotated off its original center line. Mark the square midpoint before pinning and keep the stem within approximately 5 mm of that axis.
- Mattress seam becomes one deep pumpkin groove: The rectangle seam has been overtightened. Match all fourteen stitch positions and pull only until the two short edges touch.
- Orange border develops waves: Extra stitches are collecting at joined-square transitions. Skip duplicated edge loops and use only the stated corner stitches before beginning the next round.
Why Twelve Large Pumpkins Work on This Throw
The motif count is low enough to preserve a large amount of cream background but high enough to establish a visible pumpkin repeat. Three motifs across form a broad row without forcing the appliqués close to the edges.
Four rows provide the longer throw proportion visible in the reference.
The pumpkins are also large compared with many published appliqués. A common pumpkin appliqué benchmark is under 10 cm, while these reconstructed motifs reach approximately 15–18 cm.
That larger scale makes separate stuffing and rib shaping worthwhile.
Why the Pumpkins Need Minimal Stuffing
Depth is useful only until it starts interfering with drape.
A pumpkin attached to a blanket does not need the density of a freestanding decoration.
Place most fiberfill behind the outside ribbed wall.
Leave the central axis softer.
After gathering both sides, press the centers together before deciding whether more filling is required.
This movement spreads the circumference outward and creates width without adding unnecessary weight.
Changing the Pumpkin Size
For smaller motifs, work 11 hdc across and continue BLO rows until the panel measures approximately 23–25 cm long.
For larger pumpkins, work 17 hdc across and continue until the rectangle reaches approximately 35–38 cm long.
Measure the finished background section before changing motif scale.
A pumpkin should generally occupy about half of the square width while leaving generous cream space around its side ribs.
Changing the Blanket Size
This raised pumpkin crochet blanket pattern can be reduced to nine background sections arranged three by three.
A larger bed throw can use four columns by five rows for twenty pumpkins.
Keep the 33 cm background-section target unchanged when you want the same motif proportions.
Increase the total border only after every additional section has been joined and blocked.
Changing the Pumpkin Color
Uniform orange creates the strongest resemblance to the reference.
For more color variation, make four pumpkins rust, four mustard and four orange.
Muted sage can replace several warm motifs for a botanical fall palette.
A cream pumpkin would lose contrast against the background unless its rib edges were outlined with another color.
Keep all stems dark olive when the pumpkin colors vary so one repeated feature ties the motif set together.
Keeping the Grid Aligned
Complete the three-pumpkin rows one at a time.
Measure from every pumpkin center to the horizontal square seam.
Then compare the corresponding measurement in the next row.
A small shift is easier to correct before the complete appliqué perimeter has been sewn.
Do not use the outer pumpkin edge as the alignment reference because slight differences in stuffing can change apparent width.
Controlling the Rib Texture
Twenty-six BLO rows create a dense sequence of narrow ribs.
Those ribs should remain the primary surface texture.
External shaping strands are only for broader lobe separation.
If every valley receives an extra strand, the pumpkin becomes heavily segmented and the original crochet texture disappears.
Use six major shaping positions at most and keep their tension balanced in opposing pairs.
Finishing and Blocking
Do not press directly through the pumpkin centers.
Pin the four outside corners first.
Add pins at the points where internal seams meet the border.
Shape the cream field until the joins lie flat.
After the blanket dries, lift each orange rib with your fingertips and straighten each olive stem.
Check all twelve motifs from several feet away so differences in width, tilt and spacing become easier to detect.
Conclusion
Standardize the first two pumpkins before making the remaining ten because inconsistent filling is more visible than small stitch differences across this repeated layout. Your next step is to block one 33 cm cream section, make one 15–18 cm pumpkin and test the perimeter seam before batching the full set. Keep the center lightly filled and the attachment stitches relaxed. Share the finished raised pumpkin crochet blanket pattern project on Pinterest with all twelve motifs visible, then post a ribbed appliqué close-up on Instagram using #TwelvePumpkinCrochetThrow. For this blanket specifically, would you keep all twelve pumpkins orange or alternate orange with mustard?









