Introduction
A pumpkin only reads correctly on a flat blanket when its vertical ribs remain visible after the appliqué is sewn down. This crochet pumpkin blanket pattern uses worsted yarn, modular cream squares, raised autumn motifs, and a 5 mm hook, with a target throw scale based on current published pumpkin blankets. It suits an intermediate crocheter and separates every motif from the background so damaged or distorted appliqués can be replaced independently.
The Design: What Makes This Harvest Blanket Different
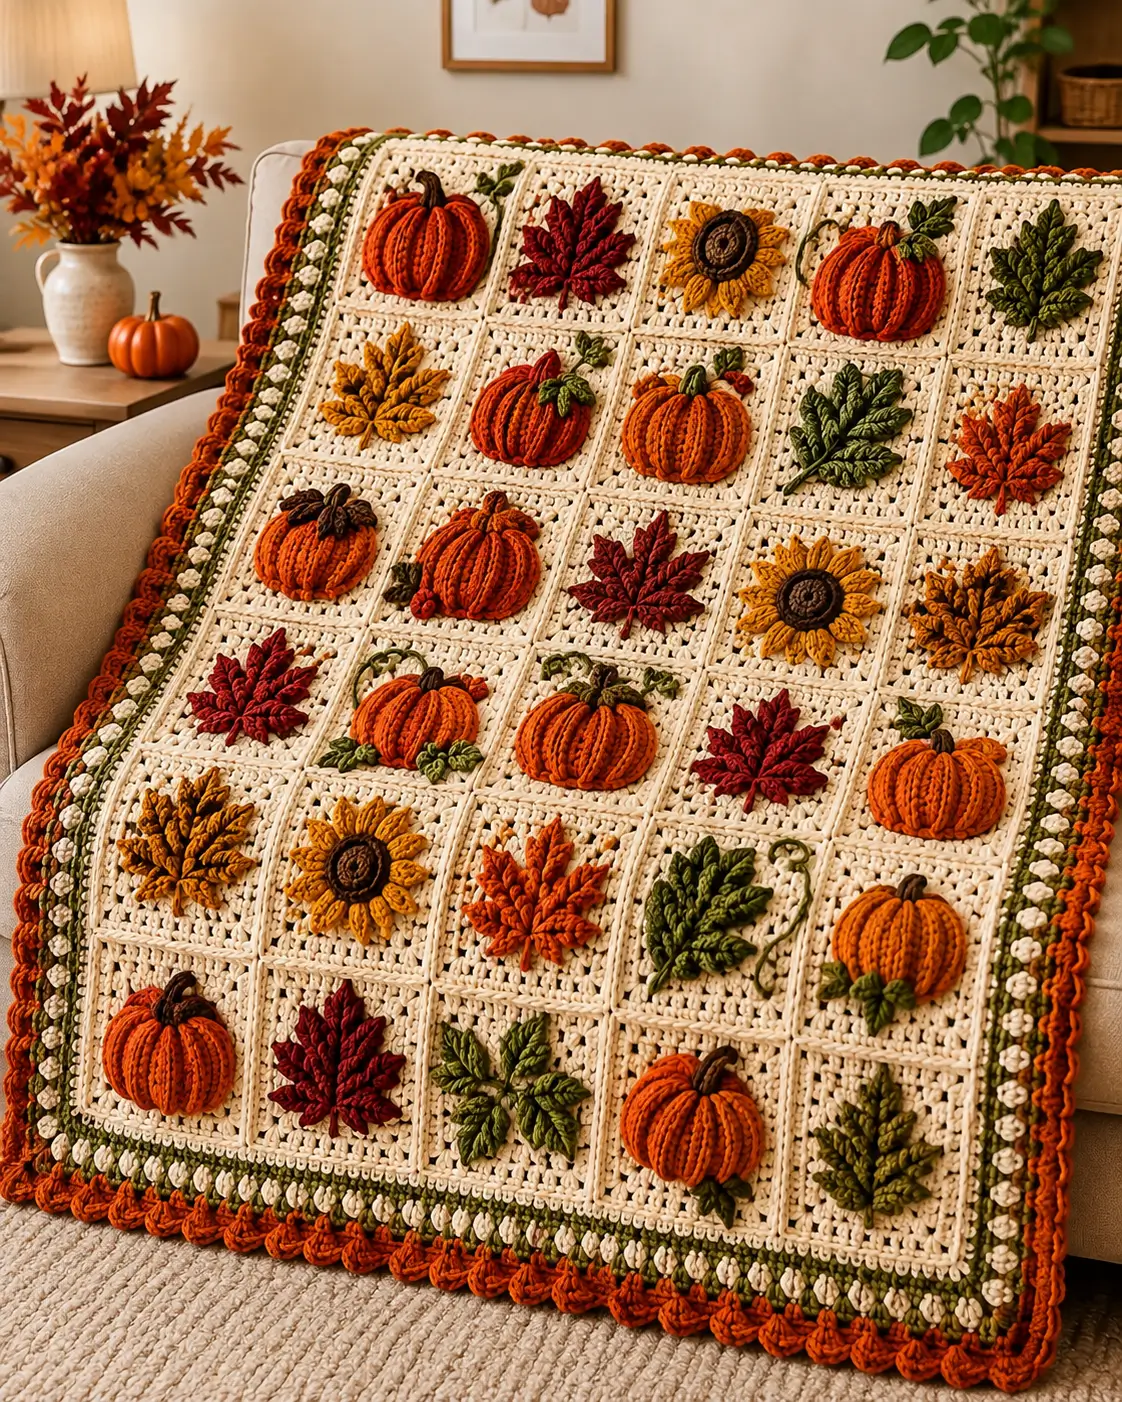
The photograph depends on depth rather than colorwork alone. Pumpkins sit above the cream squares, so their ribs can cast narrow structural shadows instead of disappearing into a flat graph. Maple and foliage motifs use pointed lobes for contrast; rounded pumpkins beside rounded flowers would otherwise make the grid visually repetitive.
The second decision concerns spacing. Each motif occupies roughly two-thirds of its square, leaving a cream margin around the edges so seams remain readable. That spacing is particularly useful in a fall crochet blanket pattern containing several unrelated botanical shapes.
Finally, the sunflower centers are dark and compact while the petals project outward. A common error in an autumn crochet blanket of this type is making every appliqué the full width of its square. Once joined, the motifs collide visually and the modular structure disappears.
Project Info at a Glance
| Skill Level | Time | Finished Size | Hook | Best For |
|---|---|---|---|---|
| Intermediate | Approx. 30–45 hours | Adjustable; published pumpkin throws range from 84 × 97 cm to 117 × 168 cm | 5.0 mm | Fall sofa throw, seasonal display, wall textile |
Published size and hook benchmark: The Knotted Nest Pumpkin Squares Throw.
Materials and Tools
Yarn
For a photograph-inspired throw, choose category 4 worsted yarn. Published pumpkin blanket designs also commonly specify worsted yarn.
- Cream / natural — worsted weight — approximately 900–1000 g — acrylic or cotton-acrylic with firm stitch definition
- Burnt orange — worsted weight — approximately 450–650 g for pumpkins and outer edging
- Olive green — worsted weight — approximately 180–250 g
- Burgundy — worsted weight — approximately 100–150 g
- Mustard — worsted weight — approximately 150–200 g
- Dark brown — worsted weight — approximately 60–100 g
- Rust / copper — worsted weight — approximately 100 g
These quantities are project estimates for the multi-appliqué interpretation. As a benchmark, a 46 × 66 inch worsted pumpkin throw uses 1770 yd cream, 1700 yd orange, and 120 yd green. Source: Pumpkin Squares Throw.
Tools
- 5.0 mm crochet hook
- 4.0 mm crochet hook for firmer appliqués
- Yarn needle
- Locking stitch markers
- Sharp scissors
- Blocking mats and rustproof pins
- No safety eyes required
Abbreviations
- MR = magic ring
- sc = single crochet
- inc = 2 sc in same stitch
- dec = single crochet decrease
- sl st = slip stitch
- ch = chain
- hdc = half double crochet
- dc = double crochet
- tr = treble crochet
- BLO = back loop only
- st / sts = stitch / stitches
- RS = right side
For an invisible decrease, insert the hook through the front loops of the next two stitches, yarn over, draw through both front loops, then complete one sc.
Pattern — Step by Step
The photographed blanket reads as a grid of approximately 30 cream blocks. This version uses 30 squares arranged 5 across × 6 down. Make each square to the same blocked measurement; 20 cm squares produce a body near 100 × 120 cm before the border.
Cream Background Square — Make 30
Yarn: cream.
Ch 33.
Row 1: sc in second ch from hook and in each ch across (32).
Rows 2–31: ch 1, turn, sc in each st across (32).
Row 32: ch 1, turn, sc in each st across (32).
Fasten off. Leave a 25 cm joining tail where useful.
Block every square to an identical dimension before applying motifs. The exact centimetre measurement matters less than consistency across all 30 blocks.
Ribbed Pumpkin Appliqué — Make 10
Yarn: burnt orange. Published pumpkin appliqués commonly measure roughly 7–11 cm wide depending on yarn and hook. Source: Start Crochet Pumpkin Appliqué.
Using the 4 mm hook:
R1: 6 sc in MR (6).
R2: inc ×6 (12).
R3: (sc, inc) ×6 (18).
R4: (2 sc, inc) ×6 (24).
R5: (3 sc, inc) ×6 (30).
R6: (4 sc, inc) ×6 (36).
R7: sc around BLO (36).
R8: sc around (36).
R9: (4 sc, dec) ×6 (30).
R10: (3 sc, dec) ×6 (24).
Do not stuff. Flatten the piece so the decrease side sits behind the front surface.
Fasten off with a 30 cm tail.
To form ribs, thread a long matching strand vertically from bottom to top around the outer surface five times, dividing the pumpkin visually into six sections. Pull only enough to indent the fabric. Excess tension produces a star-shaped center instead of broad pumpkin lobes.
Pumpkin Stem — Make 10
Yarn: dark brown.
Ch 6.
Row 1: sc in second ch from hook, sc in next 4 ch (5).
Row 2: ch 1, turn, sc 5 (5).
Row 3: ch 1, turn, dec, sc, dec (3).
Row 4: ch 1, turn, sc 3 (3).
Fasten off. Leave a 15 cm sewing tail.
Attach the wider end behind the pumpkin crown so only the tapered upper portion remains visible.
Small Pumpkin Leaf — Make 14
Yarn: olive green.
Ch 7.
Working along the chain: sl st in second ch, sc, hdc, dc, hdc, 3 sc in final ch. Rotate and work along the opposite side: hdc, dc, hdc, sc, sl st.
Fasten off with a 15 cm tail.
For the curled vine, ch 12, work 2 sc in each chain back to the starting point, then fasten off.
Burgundy Maple Leaf — Make 6
Yarn: burgundy.
R1: 6 sc in MR (6).
R2: inc ×6 (12).
R3: Work the following sequence around: sl st, ch 4, sl st in second ch, sc in next ch, hdc in next ch, sl st into next base stitch. Repeat to create six pointed lobes.
For a larger middle lobe, replace one ch-4 section with ch 6 and work sl st, sc, hdc, dc down that chain.
Fasten off, leaving 25 cm for stitching.
Pin the six points first. Otherwise one side of the maple silhouette can twist during attachment.
Golden Lobed Leaf — Make 5
Yarn: mustard or ochre.
Ch 15 for the central vein.
Beginning in the second ch from the hook, sl st 2.
Branch 1: ch 4, sl st back down chain.
Branch 2: ch 6, sl st in second ch, sc, hdc, dc, sl st to central chain.
Branch 3: ch 8, sl st in second ch, sc, hdc 2, dc 2, sl st to vein.
Branch 4: repeat Branch 2.
Branch 5: repeat Branch 1.
Continue sl st along the remaining central chain.
Fasten off with a 25 cm tail.
The narrow central spine prevents the leaf from becoming a round medallion, which would compete with the sunflower motifs.
Olive Foliage Cluster — Make 5
Yarn: olive green.
Create one central stem:
Ch 18, sl st back along 17 ch.
For each side leaflet, join yarn at a selected stem chain and work:
Ch 7; sl st in second ch, sc, hdc, dc, hdc, sc; sl st back into stem.
Make four leaflets on each side, staggering their positions rather than pairing them exactly. Add a final small leaflet at the top.
Fasten off. Leave the main stem tail long enough to anchor the entire cluster to the square.
Sunflower Center — Make 4
Yarn: dark brown.
R1: 6 sc in MR (6).
R2: inc ×6 (12).
R3: (sc, inc) ×6 (18).
R4: (2 sc, inc) ×6 (24).
Fasten off.
The 6→12→18→24 progression uses six-stitch circular expansion, so the center should remain flat rather than cupping.
Sunflower Petals — 12 Per Flower
Yarn: mustard.
Join mustard in any center stitch.
Petal 1: ch 7, sl st in second ch from hook, sc, hdc, dc, hdc, sc, sl st into next brown stitch.
Repeat 12 times, distributing petals evenly around the center. Skip a center stitch where required to keep the petals from stacking on top of one another.
Fasten off.
A dark center about one-third of the full flower diameter preserves the sunflower proportion visible in the reference image.
Optional Rust Maple Leaf — Make 2–3
Yarn: rust.
Use the Burgundy Maple Leaf instructions, but extend two opposite lobes by one additional chain. This small asymmetry prevents repeated leaf motifs from appearing mechanically identical.
Fasten off with a sewing tail.
Square Layout
Arrange motifs before sewing. One useful 5 × 6 sequence is:
| Row | Square 1 | Square 2 | Square 3 | Square 4 | Square 5 |
|---|---|---|---|---|---|
| 1 | Pumpkin | Burgundy leaf | Sunflower | Pumpkin | Green foliage |
| 2 | Golden leaf | Pumpkin | Pumpkin | Green foliage | Rust leaf |
| 3 | Pumpkin | Pumpkin | Burgundy leaf | Sunflower | Golden leaf |
| 4 | Burgundy leaf | Pumpkin | Pumpkin | Burgundy leaf | Pumpkin |
| 5 | Golden leaf | Sunflower | Rust leaf | Green foliage | Pumpkin |
| 6 | Pumpkin | Burgundy leaf | Green foliage | Pumpkin | Green foliage |
The exact image contains natural variation, so do not mirror the chart mechanically if a more irregular distribution looks closer to the reference.
Green Inner Border
After all 30 squares are joined into a 5 × 6 rectangle, attach olive yarn at a corner.
Round 1: sc evenly around the blanket. Work 3 sc in each corner.
Round 2: sc around, maintaining 3 sc in the center corner stitch.
Round 3: sc around in BLO for a narrow raised line.
Fasten off.
Measure the blanket flat before beginning the decorative borders. If either long edge is more than 2 cm shorter than the other, correct the join tension first.
Cream Bobble-Style Accent Border
Attach cream yarn.
Round 1: sc evenly around.
Round 2: sc 2, make one small puff, sc 2; repeat around, modifying spacing at corners so the work remains flat.
For each small puff, yarn over, insert into the same stitch and pull up a loop three times, yarn over, pull through all loops, then ch 1 to close.
Fasten off.
Orange Scalloped Outer Border
Attach burnt orange yarn.
Round 1: sc around.
Round 2: skip 1 st, 5 dc in next st, skip 1 st, sl st in next st; repeat around.
At each corner, place a larger seven-dc shell if needed to turn the angle cleanly.
Round 3: Optional reinforcing round—sl st loosely behind the shells along the blanket edge.
Fasten off and weave in the final tail for at least 8 cm through several directional changes.
Assembly
- Block all 30 cream squares to one measurement before joining; a 3 mm difference repeated across five columns can distort the finished rectangle noticeably.
- Lay out the full 5 × 6 grid and photograph it before moving any square, because several orange pumpkins make orientation errors difficult to spot later.
- Join the squares with cream yarn using mattress stitch or a flat slip-stitch seam, keeping every horizontal seam under the same tension.
- Position the pumpkin appliqués near the vertical centers of their assigned squares and pin the outer ribs before stitching.
- Attach stems behind the pumpkin crowns, then add small leaves and spiral vines where the layout requires them.
- Pin maple and golden leaves at their tips, center, and stem before sewing the perimeter; this stops pointed lobes from rotating during attachment.
- Sew sunflower centers first, then tack each petal near its outer third so the petals retain slight relief.
- Attach the olive foliage by its central stem and tack the outer leaflets individually rather than sewing a dense line around the whole cluster.
- Work the green inner border, cream textured round, and orange shell edging only after confirming that the joined blanket lies flat.
- Weave every tail through at least three directional changes, trim, then block the completed blanket to final dimensions.
The finished textile should lie flat with the appliqué edges secure and the outer scallops distributed evenly.
7 Technical Tips
- Marker drift: Place a locking marker in the first stitch of every circular pumpkin round. Missing the true start by even one stitch shifts all six decreases and makes the final ribs lean diagonally.
- Overstuffing: Do not stuff the pumpkin appliqués in this version. Even 5–10 g of filling can create a dome that pulls the cream square inward when the perimeter is sewn down.
- Visible decreases: Use an invisible decrease on the pumpkin’s R9 and R10. A conventional two-stitch decrease can leave a horizontal bar that becomes more obvious after the rib thread compresses the fabric.
- Motif placement: Keep at least 20–25 mm between the outermost appliqué point and the square seam. Leaves stitched closer than this can overlap the joining line and make future repairs difficult.
- Tension mismatch: Work appliqués with a hook approximately 1 mm smaller than the blanket-square hook when the same yarn is used. If both components have identical loose tension, leaves curl and pumpkins lose their raised outline.
- Pinning distortion: Use at least six pins for each maple leaf—one at the center and one at each main point. Sewing from one side without full pinning can shorten one half of the leaf by more than 5 mm.
- Tail security: Weave appliqué tails for 8–10 cm and reverse direction at least twice. A single straight woven tail can migrate out after repeated folding, especially around the raised pumpkin ribs.
Why the Photograph Works as a Crochet Fall Blanket
The strongest element is not the pumpkin itself. It is repetition with controlled interruption.
Orange pumpkins recur often enough to establish the harvest theme, yet burgundy leaves, yellow sunflowers, and olive foliage prevent the blanket from becoming a single-motif grid. The cream ground performs a technical role too: it separates saturated colors and exposes each seam.
The outer edging uses the same principle. Green forms a narrow visual stop between the squares and the decorative trim. Cream repeats the ground. Orange then finishes the perimeter with enough contrast to frame the entire panel.
This structure is more useful for a photo-inspired crochet pumpkin blanket pattern than copying thirty identical pumpkin squares. Individual motifs can be scaled, reordered, or replaced while the basic grid remains unchanged.
Scaling the Blanket
Current pumpkin blanket references demonstrate a broad size range. One appliqué baby blanket is approximately 33 × 38 inches, while another published throw is 46 × 66 inches.
For the photo-inspired square system, resizing is simpler.
A 4 × 5 grid works as a smaller lap blanket. A 5 × 6 grid most closely preserves the photographed proportions. A 6 × 8 grid produces a larger sofa throw without enlarging the motifs themselves.
Add or remove complete columns rather than increasing the dimensions of every square unless you also enlarge the appliqués. Otherwise the ratio between motif and negative space changes noticeably.
Yarn Selection and Color Control
Worsted weight is the practical baseline because current pumpkin blanket patterns repeatedly specify category 4 yarn. It gives enough body for raised ribs and leaf points without making 30 joined squares excessively heavy.
Keep the cream yarn consistent across every square. Even two similarly named natural shades can become obvious when placed side by side under daylight.
The accent palette benefits from controlled duplication. One burnt orange should appear on most pumpkins and the outer border. Burgundy belongs primarily to maple leaves. Mustard carries the sunflowers and selected foliage. Olive links stems, leaves, and the inner frame.
Dark brown is the smallest color by area but performs several jobs: pumpkin stems, sunflower centers, and narrow botanical details.
Conclusion
Finish this project by laying the assembled blanket flat and checking every pumpkin rib, leaf point, sunflower petal, and border shell before trimming the remaining tails. The next practical step is to crochet one cream test square plus one pumpkin and one leaf, then measure the combined thickness before committing yarn to all 30 panels. Save the finished crochet pumpkin blanket pattern project to Pinterest and post the completed grid on Instagram with #HarvestPumpkinBlanket so the motif arrangement remains easy to reference. If you alter the layout, record the change before joining. Which square in this harvest grid would you replace first: a burgundy maple leaf, a sunflower, or one of the ribbed pumpkins?









