Introduction
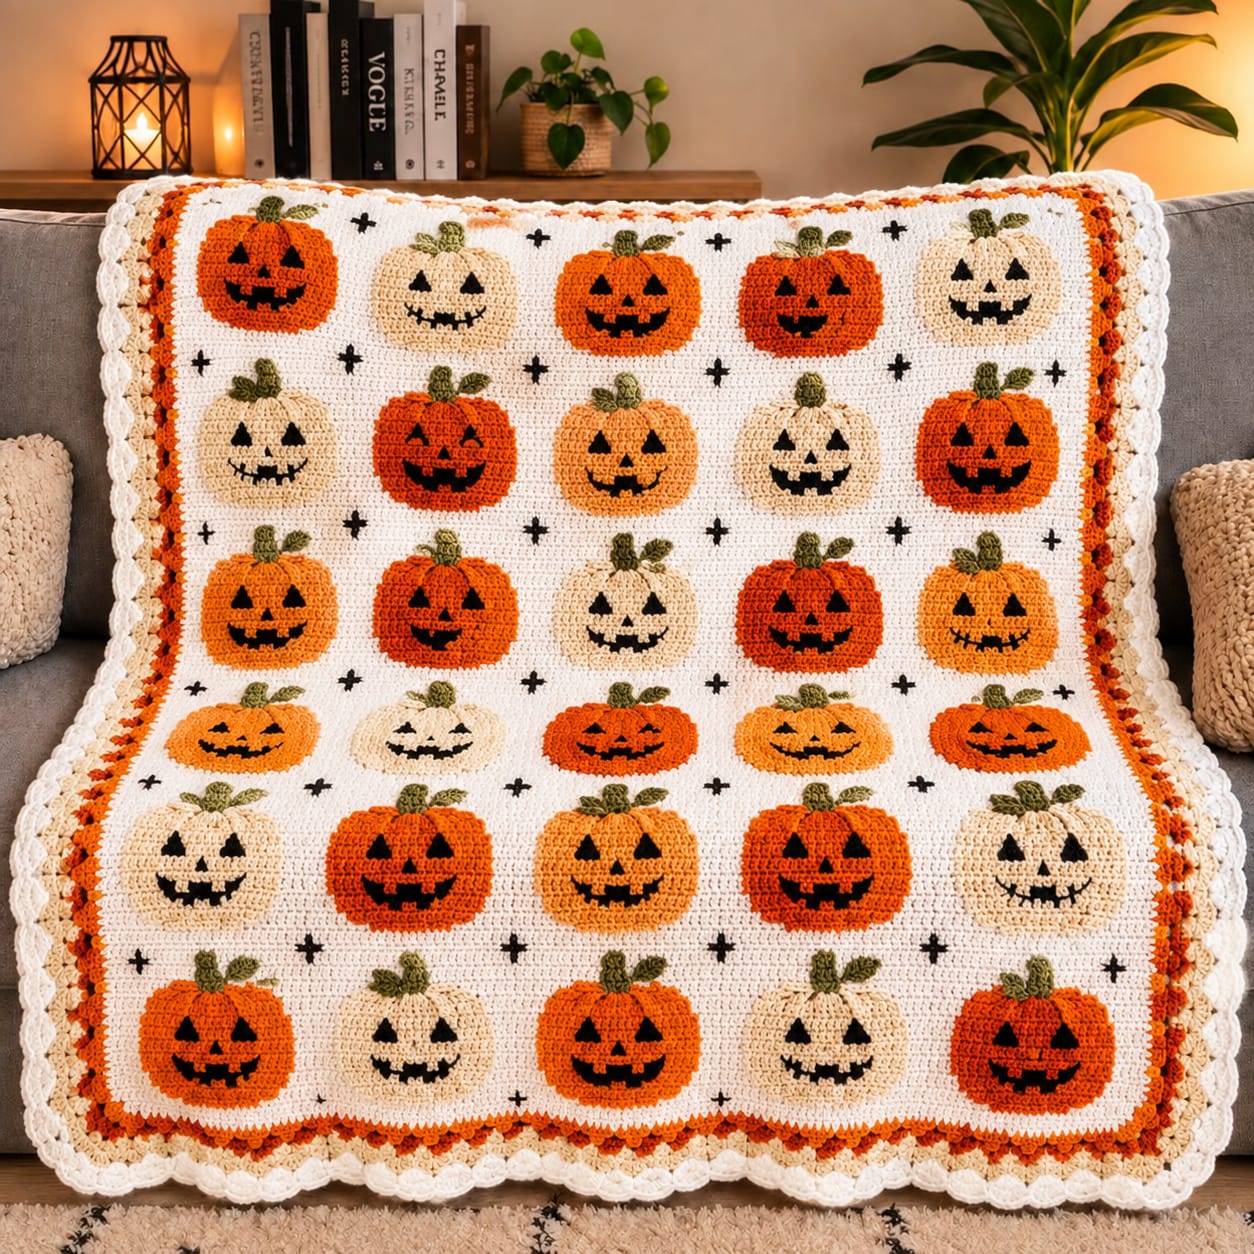
Thirty Jack-o’-lantern faces make one crooked grin impossible to hide inside the repeat. This jack o lantern crochet blanket pattern uses worsted yarn with 5 mm and 4 mm hooks to make an approximately 120 × 132 cm throw. Orange and cream pumpkins, olive stems, black facial details and a scalloped border create an intermediate Halloween appliqué project.
The Design: What Makes This Pumpkin Blanket Different
The blanket uses a five-column by six-row motif grid rather than one oversized pumpkin chart. Thirty separate faces create repetition, but the alternating orange and cream pumpkins prevent the field from becoming visually uniform. Most pumpkins use a rounded ribbed construction, while one central row contains flatter, wider versions that interrupt the vertical rhythm. Olive stems and leaves repeat across both pumpkin colors. Small black plus motifs occupy the negative spaces and connect visually to the facial details. A pumpkin face crochet blanket can pucker when eyes and mouths are sewn too tightly because black yarn crosses several rows of ribbed fabric. The face therefore needs to be completed before the pumpkin is attached to the blanket, allowing each appliqué to be flattened and measured again after embroidery.
Project Info at a Glance
| Skill Level | Time | Finished Size | Hooks | Best For |
|---|---|---|---|---|
| Intermediate | 42–55 hours | Approx. 120 × 132 cm | 5.0 mm blanket / 4.0 mm motifs | Halloween sofa throws, seasonal displays and large pumpkin collections |
Materials and Tools
Yarn
- Warm cream / ivory — worsted or Aran #4 — approximately 950–1,150 g — blanket field, cream pumpkins and scalloped edging.
- Pumpkin orange — worsted or Aran #4 — approximately 380–460 g — orange pumpkins and border accents.
- Olive / moss green — worsted or Aran #4 — approximately 100–130 g — stems, leaves and outer border.
- Black — worsted or Aran #4 — approximately 90–120 g — pumpkin faces and scattered plus motifs.
Use orange and cream yarns with similar twist and thickness. The same 24-row pumpkin panel can finish visibly different in width when one color is more loosely spun.
Tools
- 5.0 mm crochet hook for the blanket field and border
- 4.0 mm crochet hook for pumpkins, faces, stems and leaves
- Polyester fiberfill — approximately 180–250 g
- Yarn needle
- Long tapestry needle
- Stitch markers
- Dressmaking pins
- Blocking mats
- Rust-resistant pins
- Scissors
- Measuring tape
Abbreviations
- MR — magic ring
- ch — chain
- sc — single crochet
- hdc — half double crochet
- dc — double crochet
- sl st — slip stitch
- inc — increase
- dec — decrease
- BLO — back loop only
An invisible decrease is worked through the front loops of two neighboring stitches before completing one single crochet through both loops.
Pattern — Step by Step
Work the blanket field first. Block it to the intended dimensions before making the full set of thirty pumpkins, because the actual background width controls both motif spacing and pumpkin scale.
Main Cream Blanket Field
Yarn: warm cream — original reconstruction based on the visible proportions of the supplied blanket.
Foundation: ch 157.
Row 1: starting in the second chain, sc across. (156)
Row 2: ch 1, turn, sc across. (156)
Row 3: ch 2, turn, hdc across. (156)
Row 4: ch 1, turn, sc across. (156)
Rows 5–168: repeat Rows 3–4.
Fasten off.
Target before border: approximately 110–114 cm wide × 122–126 cm long after blocking.
Check the Blanket Field
Measure the bottom, center and top widths.
Keep all three measurements within approximately 10 mm.
Count several random rows and confirm 156 stitches.
Measure both diagonals.
A diagonal difference greater than about 20 mm should be corrected during blocking before any pumpkin is attached.
Plan the Five-by-Six Grid
Divide the blanket visually into five vertical columns and six horizontal rows.
Mark thirty motif centers with removable yarn markers.
Keep neighboring centers approximately 20–22 cm apart horizontally.
Vertical spacing should fall around 19–21 cm depending on your blocked length.
Leave a wider margin at the outside edges for the multicolor border.
Rounded Ribbed Pumpkin — Make 25
Most motifs in the supplied blanket are upright rounded pumpkins. Make a mixture of orange and cream pieces.
Pumpkin Panel
Yarn: pumpkin orange or warm cream — original BLO reconstruction.
Foundation: ch 13.
Row 1: starting in the second chain, hdc across. (12)
Row 2: ch 1, turn, hdc BLO across. (12)
Row 3: ch 1, turn, hdc BLO across. (12)
Row 4: ch 1, turn, hdc BLO across. (12)
Row 5: ch 1, turn, hdc BLO across. (12)
Row 6: ch 1, turn, hdc BLO across. (12)
Row 7: ch 1, turn, hdc BLO across. (12)
Row 8: ch 1, turn, hdc BLO across. (12)
Row 9: ch 1, turn, hdc BLO across. (12)
Row 10: ch 1, turn, hdc BLO across. (12)
Row 11: ch 1, turn, hdc BLO across. (12)
Row 12: ch 1, turn, hdc BLO across. (12)
Row 13: ch 1, turn, hdc BLO across. (12)
Row 14: ch 1, turn, hdc BLO across. (12)
Row 15: ch 1, turn, hdc BLO across. (12)
Row 16: ch 1, turn, hdc BLO across. (12)
Row 17: ch 1, turn, hdc BLO across. (12)
Row 18: ch 1, turn, hdc BLO across. (12)
Row 19: ch 1, turn, hdc BLO across. (12)
Row 20: ch 1, turn, hdc BLO across. (12)
Row 21: ch 1, turn, hdc BLO across. (12)
Row 22: ch 1, turn, hdc BLO across. (12)
Row 23: ch 1, turn, hdc BLO across. (12)
Row 24: ch 1, turn, hdc BLO across. (12)
Fasten off with approximately 60 cm of matching yarn.
Target rectangle: approximately 9–10 cm high × 26–29 cm long.
Seam the Rounded Pumpkin
Bring Row 1 and Row 24 together.
Match all twelve stitch positions.
Join with relaxed mattress stitch.
The seam should sit at approximately the same depth as the neighboring BLO channels.
Gather the First Edge
Thread matching yarn through all 24 row ends.
Pull gradually until the opening measures approximately 7–8 mm.
Cross the opening once.
Push the gathered point slightly inward.
Add Shallow Filling
Place a small ring of fiberfill around the outer wall.
Keep the central axis nearly empty.
Maximum appliqué depth should remain approximately 12–15 mm.
The pumpkin needs to stay flexible enough to move with the blanket.
Gather the Second Edge
Thread yarn through the remaining 24 row ends.
Pull to approximately 7–8 mm.
Press the two gathered centers toward each other.
Shape the pumpkin to approximately 14–17 cm wide.
Secure the gathering strand on the rear surface.
Define the Rounded Pumpkin Ribs
BLO rows supply the narrow vertical texture.
Add four broader shaping channels only when needed.
Anchor matching yarn behind the pumpkin.
Bring the yarn through a natural low channel to the crown and back to the rear.
Pull until the groove becomes approximately 3–4 mm deeper.
Work opposite channels in pairs.
Flat Wide Pumpkin — Make 5
The fourth visible motif row contains noticeably flatter pumpkins. Use this variation to reproduce that change in proportion.
Flat Pumpkin Panel
Yarn: orange or cream.
Foundation: ch 11.
Row 1: starting in second chain, hdc across. (10)
Rows 2–26: ch 1, turn, hdc BLO across. (10)
Fasten off with a long tail.
Seam Row 1 to Row 26.
Gather both ends using the same method as the rounded pumpkin.
Use minimal filling.
Press the two centers together until the pumpkin is approximately 15–18 cm wide but only about 7–8 cm high.
Olive Pumpkin Stem — Make 30
Yarn: olive green.
R1: 6 sc in MR (6)
R2: sc around (6)
R3: sc around (6)
R4: sc around (6)
R5: (2 sc, inc) ×2 (8)
Fasten off with a 20 cm tail.
Flatten the lower centimeter.
Sew the stem behind the upper pumpkin center.
Small Olive Leaf — Make 30
Yarn: olive green.
Ch 6.
Starting in second chain work:
sl st, sc, hdc, dc, sc.
Work 3 sc in the final chain.
Return along the opposite side:
sc, dc, hdc, sc, sl st.
Fasten off with a 12 cm tail.
Sew only the lower 8–10 mm beside the stem.
Black Triangle Eyes — Make 60
Yarn: black, 4.0 mm hook.
Ch 5.
Row 1: starting in second chain, sc across. (4)
Row 2: ch 1, turn, dec, dec. (2)
Row 3: ch 1, turn, dec. (1)
Fasten off with a 15 cm sewing tail.
Make two per pumpkin.
Black Triangle Nose — Make 30
Ch 4.
Row 1: sc across. (3)
Row 2: ch 1, turn, sc3tog. (1)
Fasten off with a 12 cm tail.
Jack-o’-Lantern Mouth — Make 30
The mouth is easiest to control as a crocheted black strip with selected tooth notches.
Mouth Foundation
Yarn: black.
Ch 12.
Starting in the second chain, sc across. (11)
Mouth Shaping Row
Ch 1 and turn.
Work:
sc, hdc, dc, sc, sl st, sc, dc, sc, hdc, sc, sl st.
Fasten off with a 25 cm sewing tail.
Gently curve the strip into a grin before pinning it to the pumpkin.
Add Tooth Details
Use short black or pumpkin-colored stitches to create the uneven Jack-o’-lantern teeth.
Keep each notch approximately 5–7 mm high.
Alternate upper and lower interruptions rather than making a perfectly regular sawtooth pattern.
Assemble Each Jack-o’-Lantern Face
Place the two eyes on the upper half of the pumpkin.
Keep their inner points approximately 25–30 mm apart.
Position the nose on the vertical center line about 15–20 mm below the eyes.
Place the mouth approximately 15–20 mm below the nose.
Pin every piece before sewing.
Attach black details using small relaxed stitches around their edges.
Check the Face After Sewing
Lay the pumpkin flat.
Measure its width before and after face attachment.
A reduction greater than approximately 5 mm indicates that the black sewing yarn is too tight.
Correct the face before attaching the pumpkin to the blanket.
Black Plus Motif — Make Approximately 35–45
Yarn: black.
Ch 5.
Sl st back to the middle chain.
Ch 3.
Sl st back to the same center.
Ch 3 in the opposite direction and sl st back.
Finish by working the remaining chain arm.
Fasten off.
Target approximately 2–3 cm across.
Place the Thirty Pumpkins
Spread the blocked cream field flat.
Pin five pumpkins across the first row.
Continue until all six rows are represented.
Alternate cream and orange motifs rather than placing all pale pumpkins in one section.
Keep pumpkin centers aligned to the previously marked five-by-six grid.
Recommended Color Arrangement
Row 1: Orange – Cream – Orange – Orange – Cream.
Row 2: Cream – Orange – Light Orange – Cream – Orange.
Row 3: Orange – Orange – Cream – Rust Orange – Golden Orange.
Row 4: Light Orange Flat – Cream Flat – Orange Flat – Golden Flat – Rust Flat.
Row 5: Cream – Rust Orange – Golden Orange – Orange – Cream.
Row 6: Orange – Cream – Orange – Cream – Rust Orange.
The exact shade distribution can vary, but keep pale pumpkins dispersed through the full blanket.
Attach the Pumpkin Appliqués
Pin each pumpkin at its top, bottom and widest side points.
Use matching body yarn.
Sew through the rear perimeter at approximately 10–12 mm intervals.
Leave the central ribbed surface free.
Check the background after half the perimeter has been attached.
If the cream field sinks more than 5 mm around the motif, loosen the most recent stitches.
Place the Black Plus Motifs
Fill selected spaces between pumpkin rows.
Do not position a plus directly midway between every pair.
The reference uses irregular spacing, which prevents the background from becoming another strict grid.
Leave at least approximately 25 mm between a black plus and the edge of a pumpkin face.
Attach the Black Plus Motifs
Sew through the center and outer tip of each arm.
Keep the arm ends flat against the blanket.
These small pieces require almost no relief.
Border Round 1 — Cream
Yarn: warm cream.
Join in any corner.
Sc evenly around the complete perimeter.
Work (2 sc, ch 2, 2 sc) in each corner.
Join.
Border Round 2 — Orange
Yarn: pumpkin orange.
Hdc around.
Work (2 hdc, ch 2, 2 hdc) in every corner.
Join.
Border Round 3 — Cream
Join cream.
Repeat sc, ch 1, skip 1 along each straight edge.
At corners work (sc, ch 2, sc).
Border Round 4 — Olive
Join olive into any ch-1 space.
Sc in every sc and every ch-1 space.
Work (sc, ch 2, sc) in each corner.
Border Round 5 — Orange Accent
Join orange.
Sc around once.
Keep the round narrow.
At corners work (sc, ch 2, sc).
Cream Scalloped Outer Border
Yarn: warm cream.
Join at one corner.
Repeat:
skip 1 stitch, 5 dc in next stitch, skip 1 stitch, sl st in next stitch.
Continue around all four sides.
Adjust by one stitch near corners when required so a full shell sits close to the corner point.
Fasten off.
Assembly
- Crochet the 156-stitch cream blanket field through 168 rows, block it and mark a five-column by six-row motif grid.
- Make twenty-five rounded pumpkin panels from 12 hdc by 24 BLO rows and five flatter pumpkins from 10 hdc by 26 BLO rows.
- Seam, gather and minimally fill all thirty pumpkins, keeping rounded versions approximately 14–17 cm wide and no more than about 15 mm deep.
- Crochet thirty olive stems and thirty small leaves, then attach one stem-and-leaf pair to every pumpkin crown.
- Make sixty triangular eyes, thirty triangular noses and thirty black mouth pieces, then assemble every face before blanket attachment.
- Lay all thirty pumpkins over the marked five-by-six grid, alternating orange and cream motifs across the field.
- Sew each pumpkin through its rear perimeter at approximately 10–12 mm intervals while leaving the ribbed center raised.
- Add approximately 35–45 small black plus motifs in selected negative spaces without forming a rigid secondary grid.
- Work the cream, orange, cream, olive and orange border rounds, followed by the broad cream scalloped finish.
- Block the blanket from the outside edge only, lift each pumpkin rib by hand and weave all remaining tails into matching yarn on the reverse.
The completed blanket should display thirty clearly separated Jack-o’-lanterns in six rows, with alternating orange and cream pumpkins, scattered black spacers and a wide cream scalloped frame.
7 Technical Tips
- Jack-o’-lantern face contracts the pumpkin: Black appliqué stitches are too tight. Measure the pumpkin before and after the face and keep the width reduction below approximately 5 mm.
- Pumpkin rows wander sideways: Motifs were positioned by eye rather than fixed centers. Mark all thirty centers first and keep neighboring horizontal centers approximately 20–22 cm apart.
- Rounded pumpkins become hard ornaments: Too much stuffing adds weight and depth. Keep maximum projection around 12–15 mm and leave the central axis almost empty.
- Flat pumpkins look identical to rounded pumpkins: Their height-to-width ratio has not changed enough. Use 10 hdc by 26 rows and compress them to roughly 7–8 cm high before sewing.
- Black mouths twist upward: The mouth strip is being attached before its curve is pinned. Fix the two outer corners and center first, then sew intermediate points every approximately 8–10 mm.
- Blanket field develops local craters: Pumpkin perimeter seams are tighter than the background. Keep sewing stitches about 10–12 mm apart and loosen them when surrounding cream fabric sinks more than 5 mm.
- Scalloped edge waves: Shell repeats are packed too closely around the perimeter. Maintain the skip-1, 5-dc, skip-1 sequence and alter spacing only locally near corners.
Why Thirty Separate Pumpkins Work Better Than One Large Graph
A single graphgan Jack-o’-lantern creates one dominant face. This construction uses thirty independent characters instead.
That changes the entire blanket structure.
Each pumpkin can have a slightly different grin, body color or width without modifying the background stitch count. A damaged or poorly shaped motif can also be replaced independently.
Separate appliqués add physical ribbing that a flat graph cannot reproduce. The background remains comparatively smooth while each pumpkin rises slightly from the surface.
That contrast is the main structural distinction of this jack o lantern crochet blanket pattern.
Why Cream Pumpkins Matter
Using only orange pumpkins would create a dense orange field across thirty positions.
Cream pumpkins interrupt that repetition while keeping the motifs connected to the blanket background.
The black eyes and mouths remain readable on both colors.
Olive stems also provide a constant color link between orange and cream versions.
Distribute the pale pumpkins from top to bottom rather than grouping them into one row.
Adjusting the Pumpkin Faces
The supplied blanket uses several Jack-o’-lantern expressions rather than one mechanically identical face.
Keep the basic geometry consistent: two triangle eyes, one small nose and one broad mouth.
Variation can come from tooth placement, eye angle and mouth curvature.
Do not move facial pieces close to the outer pumpkin edge.
Leave approximately 15–20 mm between the black details and the visible side ribs.
Changing the Blanket Size
For a smaller lap throw, use four columns by five rows for twenty pumpkins.
A five-by-five arrangement uses twenty-five motifs and creates a squarer format.
For a longer sofa blanket, retain five columns and add a seventh row for thirty-five pumpkins.
Resize the background first.
Keep pumpkin width around 65–75 percent of the horizontal center-to-center spacing so neighboring motifs remain visually separated.
Changing the Pumpkin Colors
Burnt orange and cream reproduce the reference most closely.
Mustard can replace several orange motifs.
Muted sage creates a botanical variation while still working with olive stems.
A black pumpkin is possible, but its facial features would require cream or orange contrast instead of black.
For the strongest resemblance to the supplied image, keep the majority of pumpkins orange and use pale cream as the principal alternate.
Controlling Thirty Repeated Motifs
Batch production reduces variation.
Crochet all pumpkin panels first.
Then seam the complete batch.
Gather and stuff them in groups of five.
Make all eye triangles in one session, followed by noses and mouths.
Comparing pieces while they are still unattached makes dimension errors easier to catch.
Set a width tolerance of approximately 8 mm for rounded pumpkins before continuing to assembly.
Positioning the Black Spacers
The plus-shaped accents are small but useful.
They break up large cream areas without competing with the Jack-o’-lantern faces.
A strict checkerboard placement would make them look like structural grid points.
Instead, alternate their heights and omit some locations.
The result should appear scattered while still filling obvious empty areas between rows.
Final Blocking
Do not press directly through the pumpkin faces.
Pin the four blanket corners first.
Add pins along the straight cream border and at several midpoint references.
Allow the main field to settle flat.
After drying, lift the pumpkin ribs and adjust the stems and leaves by hand.
View the blanket from several feet away and correct any pumpkin that tilts noticeably away from its row.
Conclusion
Complete one orange pumpkin and one cream pumpkin before producing the full batch because the two yarn colors must finish at nearly identical dimensions. Your next step is to block the cream field, mark all thirty centers and test one finished Jack-o’-lantern against the planned 20–22 cm spacing. Keep the facial sewing relaxed and the pumpkin filling shallow. Share the finished jack o lantern crochet blanket pattern project on Pinterest with all six rows visible, then post a face close-up on Instagram using #ThirtyPumpkinCrochetBlanket. For this blanket specifically, would you keep the cream Jack-o’-lanterns or replace them with olive-green pumpkins?









