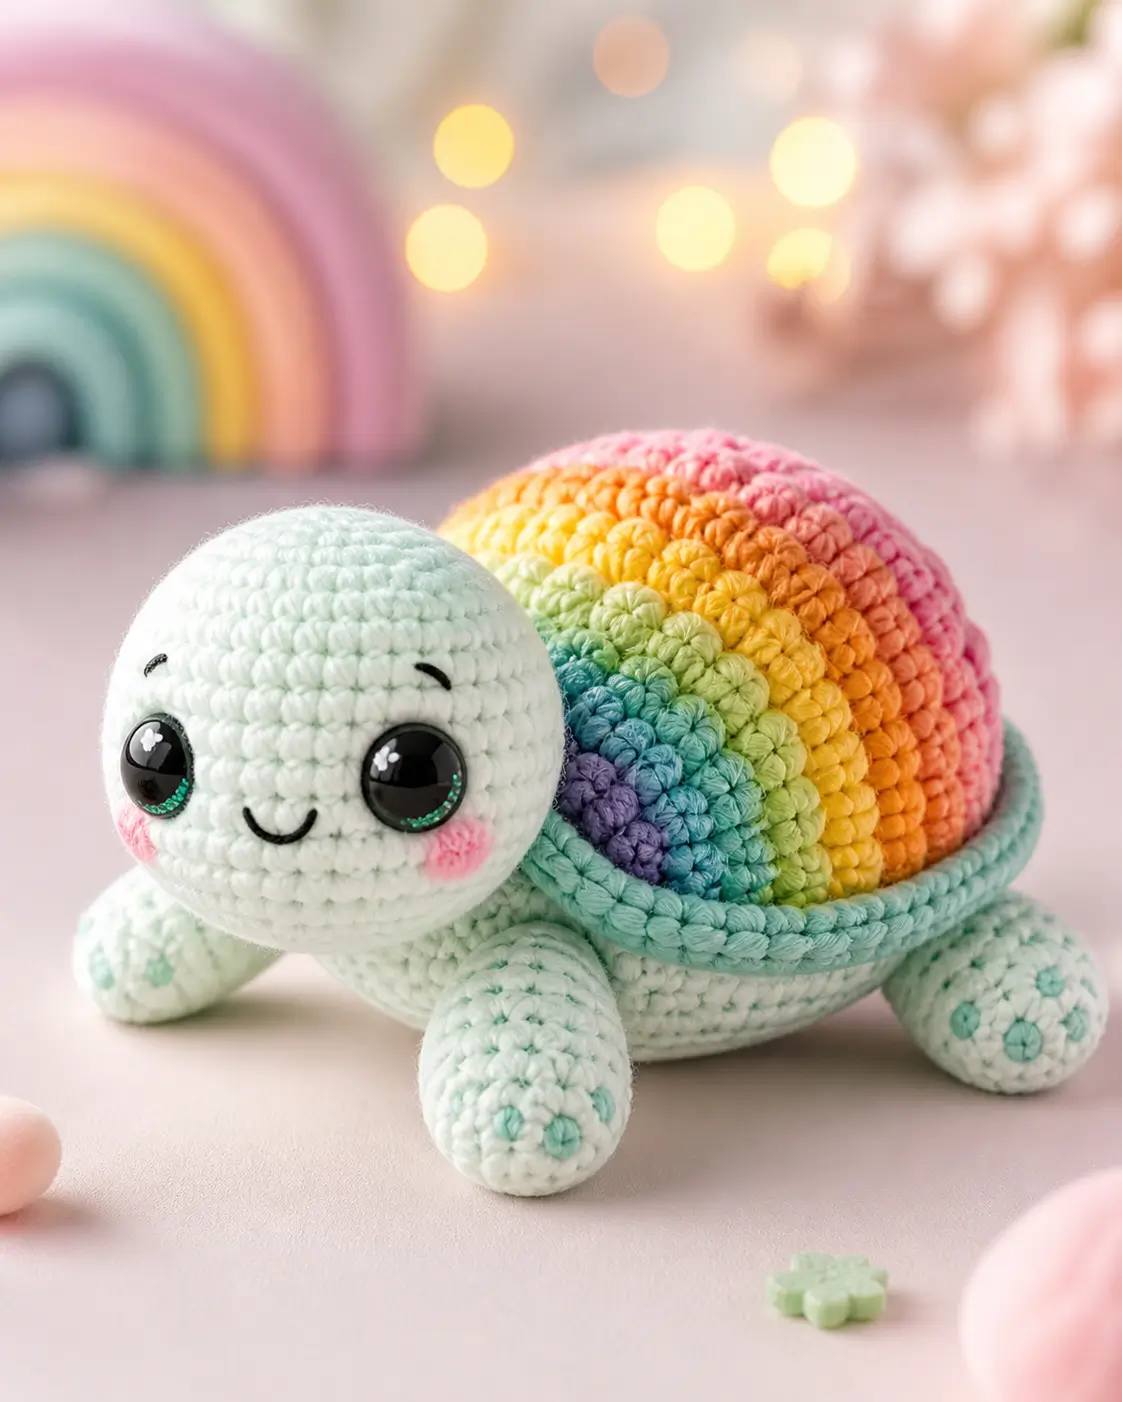
A turtle shell has to look heavy without making the toy tip backward. This turtle amigurumi crochet pattern uses a mint body, rounded head, four short legs, and a striped rainbow shell worked over a firm oval base. With worsted cotton, a 3.5 mm hook, and 12 mm safety eyes, the finished turtle measures about 15 cm long. Skill level: advanced beginner. Make it for shelf stock, market tables, or nursery display.
The Design: What Makes Rainbow Turtle Different
You build this rainbow turtle crochet pattern around shell mass first, then attach the face and limbs to match that weight. The shell is not a flat appliqué; it needs a domed 42-stitch top so the color bands rise over the back instead of lying like a coaster. The mint rim is a separate stuffed tube because a single edging round would look too thin beside the large eyes. For stability, the body base closes under the shell and gives the legs a firm anchor. The maker should not sew the head too high. A crochet turtle amigurumi with a raised head looks alert, but one stitched above the shell rim will roll forward. Keep the lower head seam level with the front legs and let the shell supply the height.
Project Info at a Glance
| Skill Level | Time | Finished Size | Hook | Best For |
|---|---|---|---|---|
| Advanced beginner | 3–4 hours | About 15 cm long | 3.5 mm | Decor, market display, photo props |
Published turtle sources support the 15 cm range, worsted yarn, and 3.5–3.75 mm hook choice used here.
Materials and Tools
Yarn
- Pale mint body yarn — worsted / aran — 30–35 g — Paintbox Cotton Aran or similar
- Pale mint rim yarn — worsted / aran — 12–15 g — same yarn family as body
- Purple shell yarn — worsted / aran — 3–5 g — cotton or acrylic
- Turquoise shell yarn — worsted / aran — 3–5 g — cotton or acrylic
- Lime shell yarn — worsted / aran — 3–5 g — cotton or acrylic
- Yellow shell yarn — worsted / aran — 3–5 g — cotton or acrylic
- Orange shell yarn — worsted / aran — 3–5 g — cotton or acrylic
- Pink shell yarn — worsted / aran — 5–8 g — cotton or acrylic
- Blush pink cheek yarn — worsted / aran — under 5 g
- Teal toe-dot yarn — worsted / aran — under 5 g
- Black embroidery floss — brows and smile
Tools
- Hook 3.5 mm
- 12 mm safety eyes
- Polyester fiberfill
- Tapestry needle
- Locking stitch markers
- Pins
- Small scissors
Use embroidered eyes instead of plastic eyes for toys intended for children under 3.
Abbreviations
- MR = magic ring
- sc = single crochet
- inc = 2 sc in same stitch
- dec = invisible decrease
- sl st = slip stitch
- ch = chain
- BLO = back loop only
- FLO = front loop only
Invisible decrease catches only the front loops of the next two stitches and reduces visible pitting on the face and shell.
Pattern — Step by Step
Continuous spiral unless noted. This turtle amigurumi crochet pattern uses an original stitch plan based on standard amigurumi increases and verified turtle size ranges.
Head
Yarn: pale mint
R1: 6 sc in MR (6)
R2: inc ×6 (12)
R3: (sc, inc) ×6 (18)
R4: (2 sc, inc) ×6 (24)
R5: (3 sc, inc) ×6 (30)
R6: (4 sc, inc) ×6 (36)
R7–R13: sc around (36)
Place safety eyes between R10 and R11, about 7 stitches apart. Start stuffing before the decreases tighten.
R14: (4 sc, dec) ×6 (30)
R15: (3 sc, dec) ×6 (24)
R16: (2 sc, dec) ×6 (18)
R17: (sc, dec) ×6 (12)
R18: dec ×6 (6)
Fasten off. Leave 25 cm tail for sewing.
Body Base
Yarn: pale mint
R1: 6 sc in MR (6)
R2: inc ×6 (12)
R3: (sc, inc) ×6 (18)
R4: (2 sc, inc) ×6 (24)
R5: (3 sc, inc) ×6 (30)
R6: (4 sc, inc) ×6 (36)
R7: (5 sc, inc) ×6 (42)
R8–R12: sc around (42)
R13: (5 sc, dec) ×6 (36)
R14: sc around in BLO (36)
R15: (4 sc, dec) ×6 (30)
R16: (3 sc, dec) ×6 (24)
R17: (2 sc, dec) ×6 (18)
Stuff firmly enough that the base supports the shell without denting.
R18: (sc, dec) ×6 (12)
R19: dec ×6 (6)
Fasten off. Weave in end.
Rainbow Shell Top
Yarn: purple, turquoise, lime, yellow, orange, pink
R1: purple, 6 sc in MR (6)
R2: purple, inc ×6 (12)
R3: turquoise, (sc, inc) ×6 (18)
R4: teal, (2 sc, inc) ×6 (24)
R5: lime, (3 sc, inc) ×6 (30)
R6: yellow, (4 sc, inc) ×6 (36)
R7: golden yellow, (5 sc, inc) ×6 (42)
R8: orange, sc around (42)
R9: coral, sc around (42)
R10: pink, sc around (42)
R11: pink, sc around (42)
R12: pink, sc around in BLO (42)
Fasten off. Leave 40 cm tail.
The purple center should face the turtle’s left front side, with the pink rows forming the rear dome.
Stuffed Shell Rim
Yarn: pale mint
R1: 6 sc in MR (6)
R2–R64: sc around (6)
Lightly stuff every 8–10 rounds. Stop early or add rounds if the tube does not meet around the shell edge without stretch.
Fasten off. Leave 45 cm tail.
Front Legs — Make 2
Yarn: pale mint
R1: 6 sc in MR (6)
R2: inc ×6 (12)
R3: (sc, inc) ×6 (18)
R4–R6: sc around (18)
R7: (sc, dec) ×6 (12)
R8–R9: sc around (12)
Stuff the paw end only. Keep the attachment end flat.
R10: dec ×6 (6)
Fasten off. Leave 25 cm tail.
Back Legs — Make 2
Yarn: pale mint
R1: 6 sc in MR (6)
R2: inc ×6 (12)
R3: (sc, inc) ×6 (18)
R4–R5: sc around (18)
R6: (sc, dec) ×6 (12)
R7–R8: sc around (12)
Stuff the rounded end lightly. Do not overfill the seam edge.
R9: dec ×6 (6)
Fasten off. Leave 25 cm tail.
Side Shell Accent Scutes — Make 2
Yarn: purple or teal
R1: 6 sc in MR (6)
R2: inc ×6 (12)
R3: (sc, inc) ×6 (18)
Fasten off. Leave 18 cm tail.
Tail
Yarn: pale mint
R1: 6 sc in MR (6)
R2: sc around (6)
R3: inc ×6 (12)
R4: sc around (12)
R5: dec ×6 (6)
Fasten off. Leave 18 cm tail. Do not overstuff.
Cheek Patches — Make 2
Yarn: blush pink
R1: 6 sc in MR (6)
R2: inc ×6 (12)
Sl st to first stitch.
Fasten off with 15 cm tail.
Toe Dots — Make 12
Yarn: teal
R1: 6 sc in MR (6)
Sl st to first stitch.
Fasten off with 8 cm tail. Make three dots for each leg.
Face Embroidery
Yarn: black embroidery floss
Embroider each brow as one short curved stitch above the eye, about 1 round higher than the eye top. Embroider the smile across 4 stitches between R12 and R13. Secure knots inside the head if working before the head is closed; otherwise bury tails through the back of the head.
Assembly
- Pin the head to the front of the body base with the lower head edge touching body R9–R11.
- Sew the head across 10–12 stitches, then pass through the neck twice more to stop wobble.
- Place the rainbow shell top over the body base with the purple center near the left front shoulder.
- Sew shell R12 to body R7–R12, adding a thin layer of stuffing before the final 5 cm closes.
- Sew the cheek patches below the eyes, centered between R12 and R14 of the head.
- Stitch the black brows and mouth after cheek placement so the expression stays balanced.
- Sew the front legs beside the head seam, angled forward and slightly outward.
- Sew the back legs near the rear curve, leaving about 3 cm between the inner leg edges.
- Attach the tail at the rear center under the pink shell band.
- Wrap the stuffed shell rim around the shell edge, sew it down at 8 anchor points, then add side scutes and toe dots.
The completed turtle has a closed body base, four attached legs, a domed rainbow shell, and a raised mint rim.
7 Technical Tips
- Mark the first stitch of every round with a locking marker. Failure mode: the rainbow shell seam shifts more than 3 stitches and the pink band no longer sits at the rear.
- Place the safety eyes before R14 of the head. Measurement: set them between R10 and R11 with about 7 stitches between posts for a wide turtle face.
- Stuff the head to medium firmness, not hard. Failure mode: a hard head pulls the neck seam forward and the turtle tips onto its chin.
- Keep the shell rim tube only lightly stuffed. Measurement: the finished tube should bend around the 42-stitch shell edge without making corners.
- Pin all four legs before sewing any limb. Failure mode: the back legs drift too far under the shell and become hidden from the front view.
- Work invisible decreases on the head and body base. Failure mode: normal decreases leave six visible pits around the face closure.
- Weave the shell-rim tail through the tube for at least 5 cm before cutting. Measurement: shorter buried tails can pop out where the rim curves beside the head.
Conclusion
This project is defined by proportion, not novelty color. The head needs a 36-stitch dome, the body needs a 42-stitch base, and the shell rim must meet without stretch before the final seam is tied. Next, crochet the shell top first and hold it over the body before making the rim tube; that test fit will tell you if two extra tube rounds are needed. Save the stitch map to Pinterest, then share the finished side view on Instagram so the rainbow bands and mint legs are visible. Final keyword placement: turtle amigurumi crochet pattern. Hashtag: #RainbowTurtle. Which band should face the head: purple, teal, or lime?









