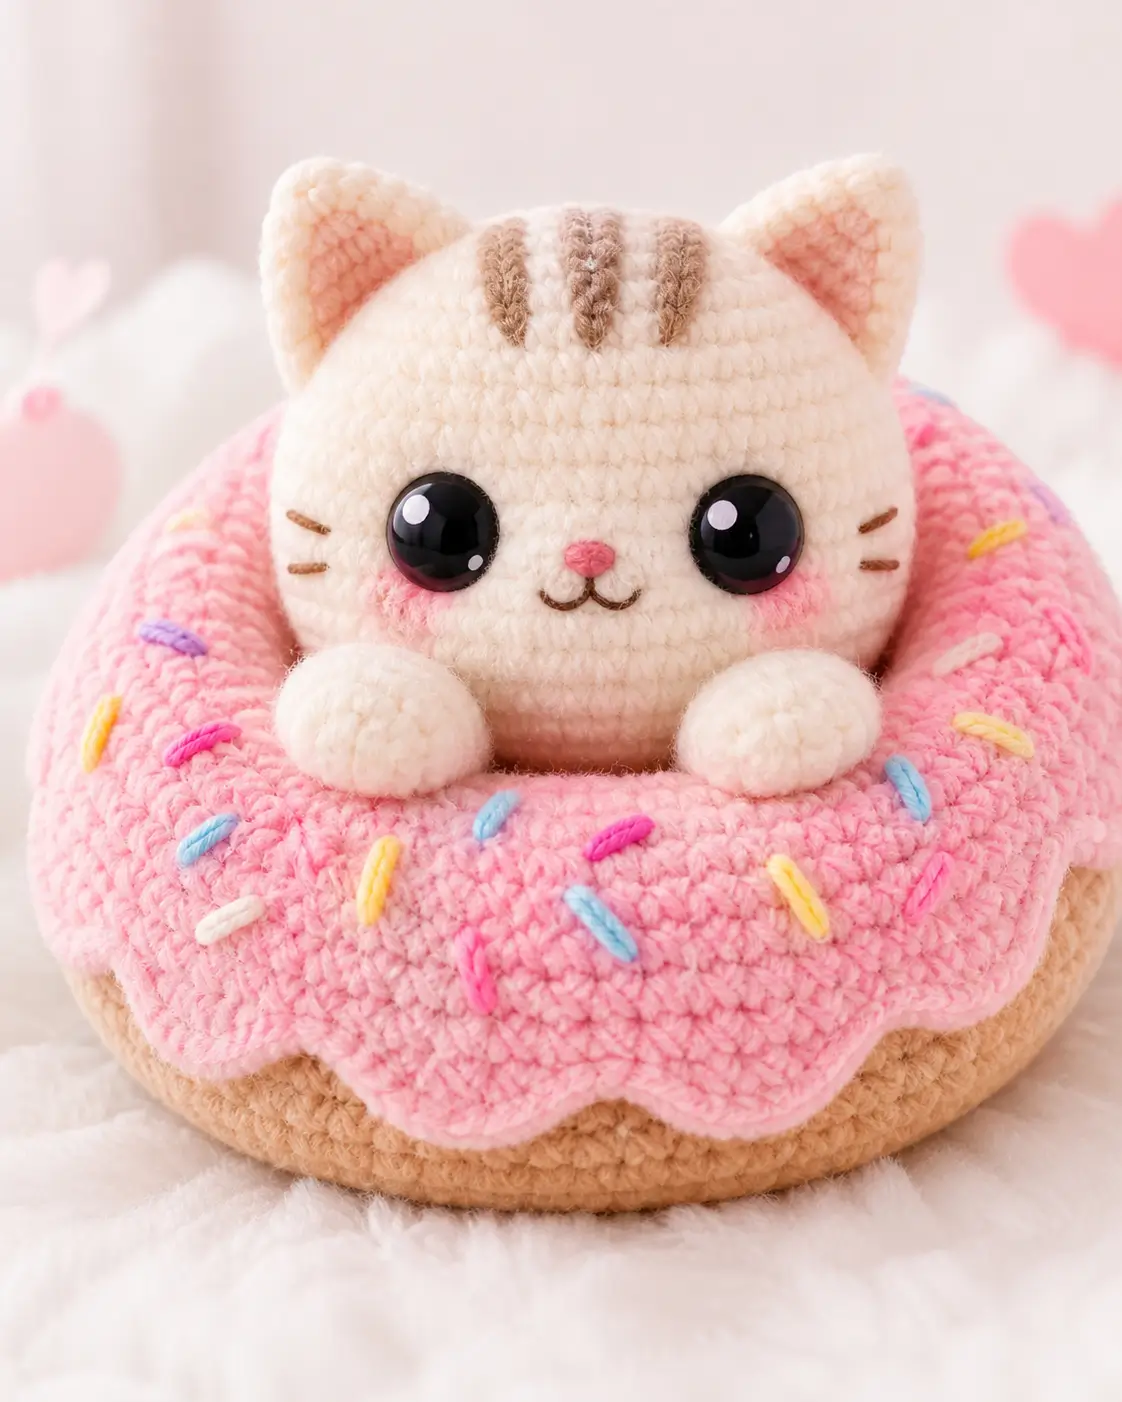
Cat ears do not belong on the frosting; they must break the donut silhouette. This cat donut amigurumi crochet pattern builds a cream tabby head inside a pink-frosted ring using DK yarn, a 2.5 mm hook, 8 mm safety eyes, and firm stuffing. The finished toy measures about 12 cm tall. Skill level: confident beginner. Make it when a flat donut pattern needs a character face and stable display base.
The Design: What Makes This Cat Donut Different
The cat is not shaped as a full standing animal. It is built as a round head with a small hidden body, then seated inside a stuffed donut ring. That keeps the face high enough to read as a kitten rather than a pastry with ears. The frosting uses a separate pink ring because the scalloped edge needs to sit above the tan base, not sink into it. A common mistake in a crochet donut cat is placing the ears too low, which makes the head look flat. Here, the ears attach across the upper curve and the tabby stripes pull the eye upward. The kawaii cat amigurumi face stays simple: two large eyes, blush patches, a small pink nose, and short brown whiskers. The pink frosting crochet donut adds width, so the paws are kept small.
Project Info at a Glance
| Skill Level | Time | Finished Size | Hook | Best For |
|---|---|---|---|---|
| Confident beginner | 4–6 hours | About 12 cm tall | 2.5 mm | Desk plush, market table sample, photo prop |
Materials and Tools
Yarn
- Cream / ivory — DK — about 50 g — Rico Ricorumi DK or Paintbox Cotton DK
- Pink — DK — about 25 g — frosting, blush, inner ears, nose
- Tan — DK — about 25 g — donut base
- Brown — DK or embroidery yarn — small amount — tabby stripes, whiskers, mouth
- Blue, yellow, purple, white, hot pink — DK scraps — sprinkles
Tools
- 2.5 mm crochet hook
- 8 mm safety eyes
- Polyester stuffing
- Tapestry needle
- Stitch markers
- Pins
- Scissors
Abbreviations
MR = magic ring; sc = single crochet; inc = increase; dec = decrease; sl st = slip stitch; ch = chain; BLO = back loop only; st = stitch; R = round or row. Work an invisible decrease through the front loops only so the closing rounds stay flat instead of pitted.
Pattern — Step by Step
Work in a continuous spiral unless a section says otherwise. Place a stitch marker in the first stitch of every round.
Head
Yarn: cream / ivory — Source: original stitch math based on standard amigurumi shaping.
R1: 6 sc in MR (6)
R2: inc ×6 (12)
R3: (sc, inc) ×6 (18)
R4: (2 sc, inc) ×6 (24)
R5: (3 sc, inc) ×6 (30)
R6: (4 sc, inc) ×6 (36)
R7–R14: sc around (36)
Insert 8 mm safety eyes between R10 and R11, about 8 stitches apart. Check that the eyes sit below the forehead stripe area.
R15: (4 sc, dec) ×6 (30)
R16: (3 sc, dec) ×6 (24)
R17: (2 sc, dec) ×6 (18)
Stuff firmly, especially across the cheeks and crown.
R18: (sc, dec) ×6 (12)
R19: dec ×6 (6)
Fasten off. Leave a 15 cm tail and close the remaining opening.
Body
Yarn: cream / ivory — Source: original stitch math for hidden sitting support.
R1: 6 sc in MR (6)
R2: inc ×6 (12)
R3: (sc, inc) ×6 (18)
R4: (2 sc, inc) ×6 (24)
R5: (3 sc, inc) ×6 (30)
R6–R11: sc around (30)
R12: (3 sc, dec) ×6 (24)
R13: (2 sc, dec) ×6 (18)
Stuff the lower half more firmly than the neck area so the cat sits inside the donut without tipping forward.
R14: (sc, dec) ×6 (12)
R15: dec ×6 (6)
Fasten off. Leave a 20 cm tail for sewing the body under the head.
Front Paws — Make 2
Yarn: cream / ivory — Source: original small-limb math.
R1: 6 sc in MR (6)
R2: inc ×6 (12)
R3–R5: sc around (12)
R6: dec ×6 (6)
Add only a small pinch of stuffing at the paw tip. A hard paw will push away from the frosting edge.
Fasten off. Leave a 20 cm tail on each paw.
Back Legs — Make 2
Yarn: cream / ivory — Source: original support-piece math. These are mostly hidden behind the donut rim.
R1: 6 sc in MR (6)
R2: inc ×6 (12)
R3–R4: sc around (12)
R5: dec ×6 (6)
Stuff lightly. These pieces act as rear support, not visible feet.
Fasten off. Leave a 15 cm tail on each leg.
Ears — Make 2
Yarn: cream / ivory — Source: original cone-style ear math.
R1: 6 sc in MR (6)
R2: inc ×6 (12)
R3: (sc, inc) ×6 (18)
R4–R5: sc around (18)
Do not stuff. Flatten each ear into a soft triangle before pinning.
Fasten off. Leave a 25 cm tail for sewing.
Inner Ear Patches — Make 2
Yarn: soft pink — Source: original flat patch shaping.
Row 1: ch 2, 2 sc in second ch from hook (2)
Row 2: ch 1, turn, inc ×2 (4)
Row 3: ch 1, turn, sc across (4)
Row 4: ch 1, turn, sc, inc ×2, sc (6)
Fasten off. Leave a 15 cm tail and sew one patch inside each ear before attaching the ears to the head.
Cheek Patches — Make 2
Yarn: blush pink — Source: original flat circle math.
R1: 6 sc in MR (6)
R2: inc ×6 (12)
Sl st to close (12)
Keep these patches flat. Do not stuff. They should sit just below the eyes, not beside the mouth.
Fasten off. Leave a 12 cm tail for sewing or split the yarn into thinner strands for a softer edge.
Donut Base Ring
Yarn: tan — Source: original ring math using common stuffed-donut construction principles.
R1: ch 24, join with sl st without twisting, sc in each ch around (24)
R2: (3 sc, inc) ×6 (30)
R3: (4 sc, inc) ×6 (36)
R4: (5 sc, inc) ×6 (42)
R5: (6 sc, inc) ×6 (48)
R6–R8: sc around (48)
R9: (6 sc, dec) ×6 (42)
R10: (5 sc, dec) ×6 (36)
R11: (4 sc, dec) ×6 (30)
R12: (3 sc, dec) ×6 (24)
Stuff the ring as you seam R12 to the starting chain edge. Keep the center opening wide enough for the body base.
Fasten off after closing the inner seam.
Pink Frosting Ring
Yarn: pink — Source: original frosting overlay math.
R1: ch 24, join with sl st without twisting, sc in each ch around (24)
R2: (3 sc, inc) ×6 (30)
R3: (4 sc, inc) ×6 (36)
R4: (5 sc, inc) ×6 (42)
R5: (6 sc, inc) ×6 (48)
Scallop edging: *skip 1 st, 5 dc in next st, skip 1 st, sl st in next st* repeat 12 times around the outer edge (12 scallops).
The scalloped edge should hang over the tan donut base by 1–1.5 cm. Pin before sewing.
Fasten off. Leave a 40 cm tail for attaching the frosting to the donut base.
Sprinkles
Yarn: blue, yellow, purple, white, hot pink — Source: photo-specific embroidery placement.
Cut 18–22 short yarn lengths, each about 8 cm long. Embroider straight sprinkles across the frosting after the frosting has been sewn down. Place each sprinkle over 2–3 crochet stitches. Rotate the angle of every sprinkle so the frosting does not look gridded.
Weave the sprinkle tails into the underside of the frosting layer before the final edge is fully closed.
Nose and Muzzle
Yarn: pink for nose, brown for mouth — Source: photo-specific face detail.
Embroider a small oval nose centered between the eyes, about 2 rounds below the eye line. Use 4–5 horizontal satin stitches for the nose. With brown yarn or embroidery thread, stitch one short vertical line down from the nose, then form two small curved mouth loops.
The mouth width should stay narrower than the distance between the inner edges of the eyes.
Tabby Forehead Stripes and Whiskers
Yarn: warm brown — Source: photo-specific tabby marking placement.
Make three short vertical stripes on the forehead between the ears. Each stripe should cover about 3 rounds and sit above the eye line. For the whiskers, stitch two short lines on each cheek, starting near the outer edge of the eye and angling slightly outward.
Keep the whiskers short. Long whiskers will compete with the frosting edge.
Assembly
- Sew the head to the top of the body, matching the center front of both pieces.
- Set the body into the center of the donut ring and pin it before stitching.
- Sew the lower body to the inner wall of the tan donut base with small hidden stitches.
- Attach the ears across R4–R8 of the head, with the inner ear patches facing forward.
- Sew the cheek patches under the eyes, leaving 1 stitch of space from the mouth area.
- Embroider the nose, mouth, forehead stripes, and whiskers after the eyes are locked in place.
- Pin the front paws over the front frosting edge, then sew only the upper half of each paw.
- Sew the hidden back legs behind the body inside the donut opening for balance.
- Place the frosting ring over the tan donut and sew around the inner and outer edges.
- Add sprinkles last, then bury every yarn tail inside the donut stuffing.
The finished cat sits inside the donut with the paws resting on the frosting and the ears rising above the ring.
7 Technical Tips
- Stitch marker drift: If the marker moves diagonally by more than 2 stitches across the head, the face will tilt. Reset the marker at the back of the head after R8.
- Stuffing firmness: A soft donut ring collapses under the paws. Pack the outer rim firmly enough that it springs back when pressed with one finger.
- Invisible decrease gaps: Standard decreases can leave small holes on cream yarn. Work every head and body decrease through front loops only.
- Eye placement timing: Safety eyes must go in before R15 of the head. After that round, the opening becomes too narrow for clean washer placement.
- Frosting overhang: More than 1.5 cm of overhang makes the pink edge curl downward. Pin the frosting before sewing and trim the visual drop to 1–1.5 cm.
- Pinning symmetry: Uneven ears are obvious on a round cat head. Pin both ears first, then measure the gap from each ear base to the nearest eye.
- Tail weaving: Loose sprinkle tails can pull out during handling. Weave each tail through at least 3 stitches on the frosting underside before trimming.
Conclusion
This cat donut amigurumi crochet pattern works because the toy is planned as two forms: a stable pastry ring and a round kitten face. The next step is to crochet the donut base first, then test the body inside the opening before sewing the frosting in place. That order gives more control over height, paw position, and face angle. Share the finished cat on Pinterest and Instagram with the hashtag #CatDonutAmigurumi. For this exact design, the key choice is the frosting edge: would you make the pink scallops shallow like the photo, or add deeper drips for a heavier dessert look?









