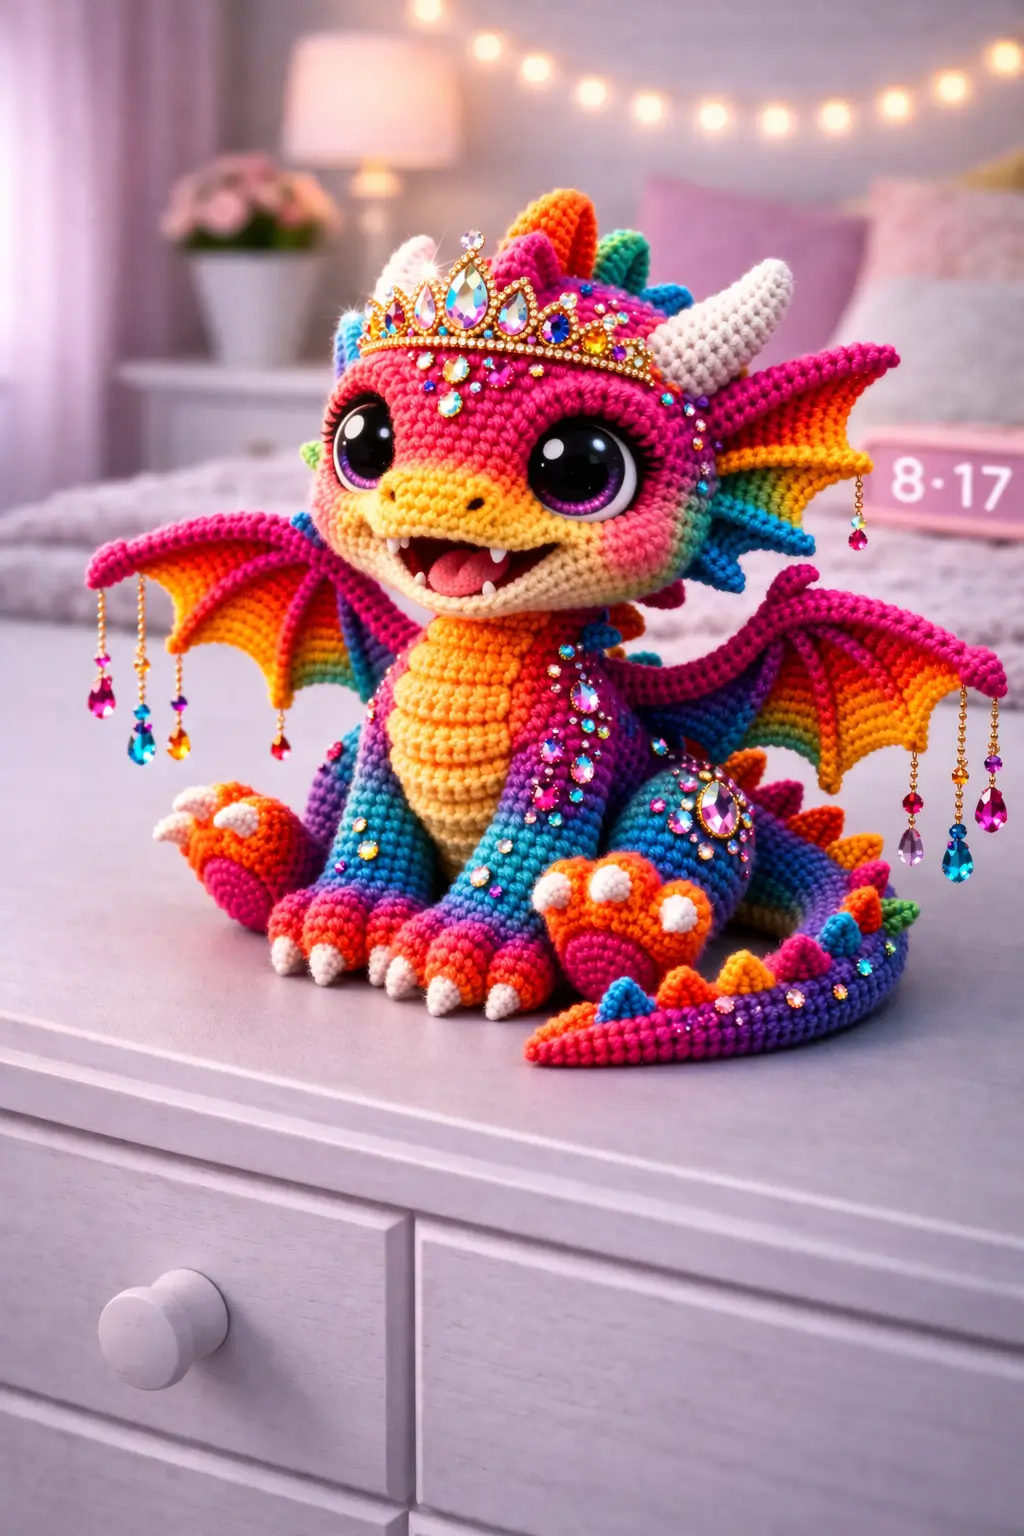
A dragon with a crown has one extra engineering problem: the forehead must carry jewels, horn, and eyelids without collapsing. This rainbow dragon amigurumi crochet pattern gives you materials, verified size, hook, skill level, and full part-by-part construction for the crowned dragon in the photo. You get head, body, legs, wings, horn, tail, spikes, cheek patches, and accessories. The practical reason is clear. One base dragon supports many premium fantasy variations.
The Design: What Makes Rainbow Princess Dragon Different
This dragon is not structured like a plain baby dragon with color changes. The first critical decision is the head ratio. It must stay broad enough for the eye placement and crown line, because a narrower head turns the tiara into a costume prop instead of part of the silhouette. Then the body stays shorter. That preserves the seated stance and keeps the winged rainbow dragon amigurumi look readable from the front. A second decision is wing proportion. The membranes are wide, but not tall, which keeps the dragon compact. Common mistake: undersized wings paired with an oversized head. Then the plush reads as a dinosaur in accessories. Current rainbow dragon sources consistently treat wings, horns, and claws as the defining structural parts, and that matches the photo exactly.
Project Information at a Glance
| Skill Level | Time | Finished Size | Hook | Best For |
|---|---|---|---|---|
| Intermediate | 4–6 hours | 20–23 cm / 8–9 in | 3.25 mm | Fantasy decor, gift makes, premium handmade listings |
Materials and Tools
Yarn
- Hot pink — Worsted / aran — 25g — Paintbox Yarns Cotton Aran
- Orange — Worsted / aran — 15g — Paintbox Yarns Cotton Aran
- Yellow — Worsted / aran — 10g — Paintbox Yarns Cotton Aran
- Teal — Worsted / aran — 12g — Paintbox Yarns Cotton Aran
- Blue — Worsted / aran — 10g — Paintbox Yarns Cotton Aran
- Purple — Worsted / aran — 18g — Paintbox Yarns Cotton Aran
- White — Worsted / aran — 8g — Paintbox Yarns Cotton Aran
- Gold thread or trim — Worsted-compatible accessory yarn — 2g — for crown finishing
Main yarn total: 90g. Accent yarn total: 35g. Source for grams: Standard amigurumi math.
Tools
- 3.25 mm crochet hook
- 10 mm safety eyes
- Fiberfill stuffing
- Yarn needle
- Stitch markers
- Sharp embroidery scissors
- Crown base or felt-backed trim
- Flat-back rhinestones
- Lightweight dangling charm beads
Crochet Abbreviations
MR / sc / inc / dec / sl st / ch / BLO / hdc / dc
Use invisible decrease only on the closing rounds; standard decreases leave six visible dents on a tightly shaped dragon face.
Step-by-Step Rainbow Princess Dragon Crochet Pattern
Work in continuous spiral rounds unless noted.
Head (Make 1)
Yarn: hot pink
Source: Standard amigurumi math
R1: 6 sc in MR (6)
R2: inc x6 (12)
R3: (sc, inc) x6 (18)
R4: (2 sc, inc) x6 (24)
R5: (3 sc, inc) x6 (30)
R6: (4 sc, inc) x6 (36)
R7: sc around (36)
R8: sc around (36)
R9: sc around (36)
R10: sc around (36)
R11: sc around (36)
Insert 10 mm safety eyes between R8 and R9. Decorative eye surrounds can be added later to enlarge the visible eye effect.
R12: (4 sc, dec) x6 (30)
R13: (3 sc, dec) x6 (24)
R14: (2 sc, dec) x6 (18)
Stuff firmly through the forehead and cheeks. The crown needs support.
R15: (sc, dec) x6 (12)
R16: dec x6 (6)
Fasten off. Leave 30 cm tail.
Body (Make 1)
Yarn: purple to blue gradient
Source: Standard amigurumi math
R1: 6 sc in MR (6)
R2: inc x6 (12)
R3: (sc, inc) x6 (18)
R4: (2 sc, inc) x6 (24)
R5: (3 sc, inc) x6 (30)
R6: (4 sc, inc) x6 (36)
R7: sc around (36)
R8: sc around (36)
R9: sc around (36)
R10: (4 sc, dec) x6 (30)
R11: (3 sc, dec) x6 (24)
R12: sc around (24)
Stuff more lightly than the head. The body should seat, not balloon.
Fasten off. Leave 28 cm tail.
Front Legs (Make 2)
Yarn: teal to orange gradient
Source: Standard amigurumi math
R1: 6 sc in MR (6)
R2: inc x6 (12)
R3: sc around (12)
R4: sc around (12)
R5: sc around (12)
R6: (4 sc, dec) x2 (10)
R7: sc around (10)
Stuff firmly at the paw only. Leave upper section softer for shaping.
Fasten off. Leave 22 cm tail.
Back Legs (Make 2)
Yarn: purple to pink gradient
Source: Standard amigurumi math
R1: 6 sc in MR (6)
R2: inc x6 (12)
R3: sc around (12)
R4: sc around (12)
R5: sc around (12)
R6: (4 sc, dec) x2 (10)
R7: sc around (10)
Match both legs exactly. A 5 mm height mismatch shows immediately in seated dragons.
Fasten off. Leave 22 cm tail.
Wings (Make 2)
Yarn: pink outer edge with rainbow membrane
Source: Standard amigurumi math; supported by current rainbow dragon references
R1: ch 18
Row 1: starting in 2nd ch from hook, sc across (17)
Row 2: ch 1, turn, dec, sc across to last 2 sts, dec (15)
Row 3: ch 1, turn, dec, sc across to last 2 sts, dec (13)
Row 4: ch 1, turn, dec, sc across to last 2 sts, dec (11)
Row 5: ch 1, turn, dec, sc across to last 2 sts, dec (9)
Row 6: ch 1, turn, dec, sc across to last 2 sts, dec (7)
Work color stripes by row. Add a pink edging with sc evenly around after membrane shaping.
Fasten off. Leave 30 cm tail.
Horn (Make 1)
Yarn: white
Source: Standard amigurumi math
R1: 6 sc in MR (6)
R2: sc around (6)
R3: sc around (6)
R4: sc around (6)
Stuff lightly. A rigid horn can tip the crown upward.
Fasten off. Leave 18 cm tail.
Tail (Make 1)
Yarn: purple to pink gradient
Source: Standard amigurumi math
R1: 6 sc in MR (6)
R2: sc around (6)
R3: (2 sc, inc) x2 (8)
R4: sc around (8)
R5: sc around (8)
R6: (3 sc, inc) x2 (10)
R7: sc around (10)
R8: sc around (10)
Stuff the first half only. The end should taper and curve.
Fasten off. Leave 24 cm tail.
Dorsal Spikes (Make 8)
Yarn: mixed rainbow colors
Source: Standard amigurumi math
R1: 4 sc in MR (4)
R2: sc around (4)
R3: sc around (4)
Fasten off. Leave 10 cm tail.
Belly / Chest Panel (Make 1)
Yarn: yellow to cream
Source: Standard amigurumi math
R1: ch 12
Row 1: starting in 2nd ch from hook, sc across (11)
Row 2: ch 1, turn, sc across (11)
Row 3: ch 1, turn, sc across (11)
Row 4: ch 1, turn, sc across (11)
Row 5: ch 1, turn, sc across (11)
Fasten off. Leave 20 cm tail.
Muzzle / Mouth Panel (Make 1)
Yarn: yellow
Source: Standard amigurumi math
R1: 6 sc in MR (6)
R2: inc x6 (12)
R3: sc around (12)
R4: sc around (12)
Flatten lightly before sewing. The panel should sit under the eyes, not protrude far.
Fasten off. Leave 20 cm tail.
Teeth (Make 4)
Yarn: white
Source: Standard amigurumi math
R1: 4 sc in MR (4)
Fasten off. Leave 8 cm tail.
Cheek Patches (Make 2)
Yarn: pink blush tone
Source: Standard amigurumi math
R1: 6 sc in MR (6)
R2: sc around (6)
Fasten off. Leave 8 cm tail.
Crown Base (Make 1)
Yarn: gold thread or felt-backed trim
Source: Standard amigurumi math for crochet band; jewel finishing adapted to visible accessory
R1: ch 26
Row 1: starting in 2nd ch from hook, sc across (25)
Fasten off. Leave 15 cm tail.
Attach rhinestones and jewel drops after assembly. The photo clearly uses non-yarn embellishment in addition to crochet structure.
Wing Jewel Chains (Make 4)
Yarn: metallic thread or fine chain substitute
Source: Photo adaptation
R1: ch 8
R2: sl st back across (8)
Fasten off. Leave 6 cm tail.
Add one lightweight charm bead to the end after sewing.
Assembly Instructions
- Sew the head to the body, keeping the chin slightly low so the crown line does not sit too vertical.
- Attach the muzzle panel to the lower front of the head and add the four teeth evenly inside the open mouth line.
- Sew the belly panel to the front of the body before attaching limbs.
- Add the front legs first, then set the back legs so the dragon sits level on a flat surface.
- Attach the horn at the forehead center.
- Sew the two wings wide on the upper back so the membrane edges clear the crown from side view.
- Add the tail at the rear center and curve it to one side before tightening the seam.
- Sew the dorsal spikes from crown line to tail tip, graduating colors across the back.
- Attach the cheek patches, then sew on the crown base and add rhinestones and wing jewel chains last.
- Check the dragon from front, side, and rear view, then weave every tail at least 4 cm into the stuffing path.
The rainbow princess dragon is complete.
7 Technical Tips for Cleaner Amigurumi
- Use stitch markers on every increase round. Missing one increase before the 36-stitch plateau distorts the forehead, and the crown stops sitting level.
- Stuff the head firmer than the torso. A soft head buckles under accessory weight, especially once the horn and crown are attached.
- Place the eyes before the final head decreases. Forcing 10 mm eyes into a nearly closed face can stretch the stitch line and distort the cheek area.
- Keep tension slightly tighter on the wings. Loose wing fabric sags, and jewel chains exaggerate that droop immediately.
- Pin both wings before sewing either one. A wing even 1 cm lower than the other is obvious on a symmetrical fantasy build.
- Use invisible decrease, not standard decrease, on the face rounds. Standard decreases leave a notch that catches light right under the eye.
- Bury tails at least 4 cm deep. Shorter tails often loosen first at the wing base and crown line, where the plush gets handled most.
Conclusion
This rainbow dragon amigurumi crochet pattern works because the structure stays disciplined while the decoration does the theatrical work. Use the verified 20–23 cm size band, 3.25 mm hook, worsted/aran yarn class, and 10 mm safety-eye baseline as your starting point, then correct balance with stuffing density and wing placement rather than random stitch changes. Post the finished dragon on Pinterest and Instagram after photographing it from a front three-quarter angle so the crown, wing chains, and tail all stay visible. Use #RainbowPrincessDragon. One precise question remains: will the next version keep the gold tiara, or switch to silver stones with cooler blue-violet wing gradients?









