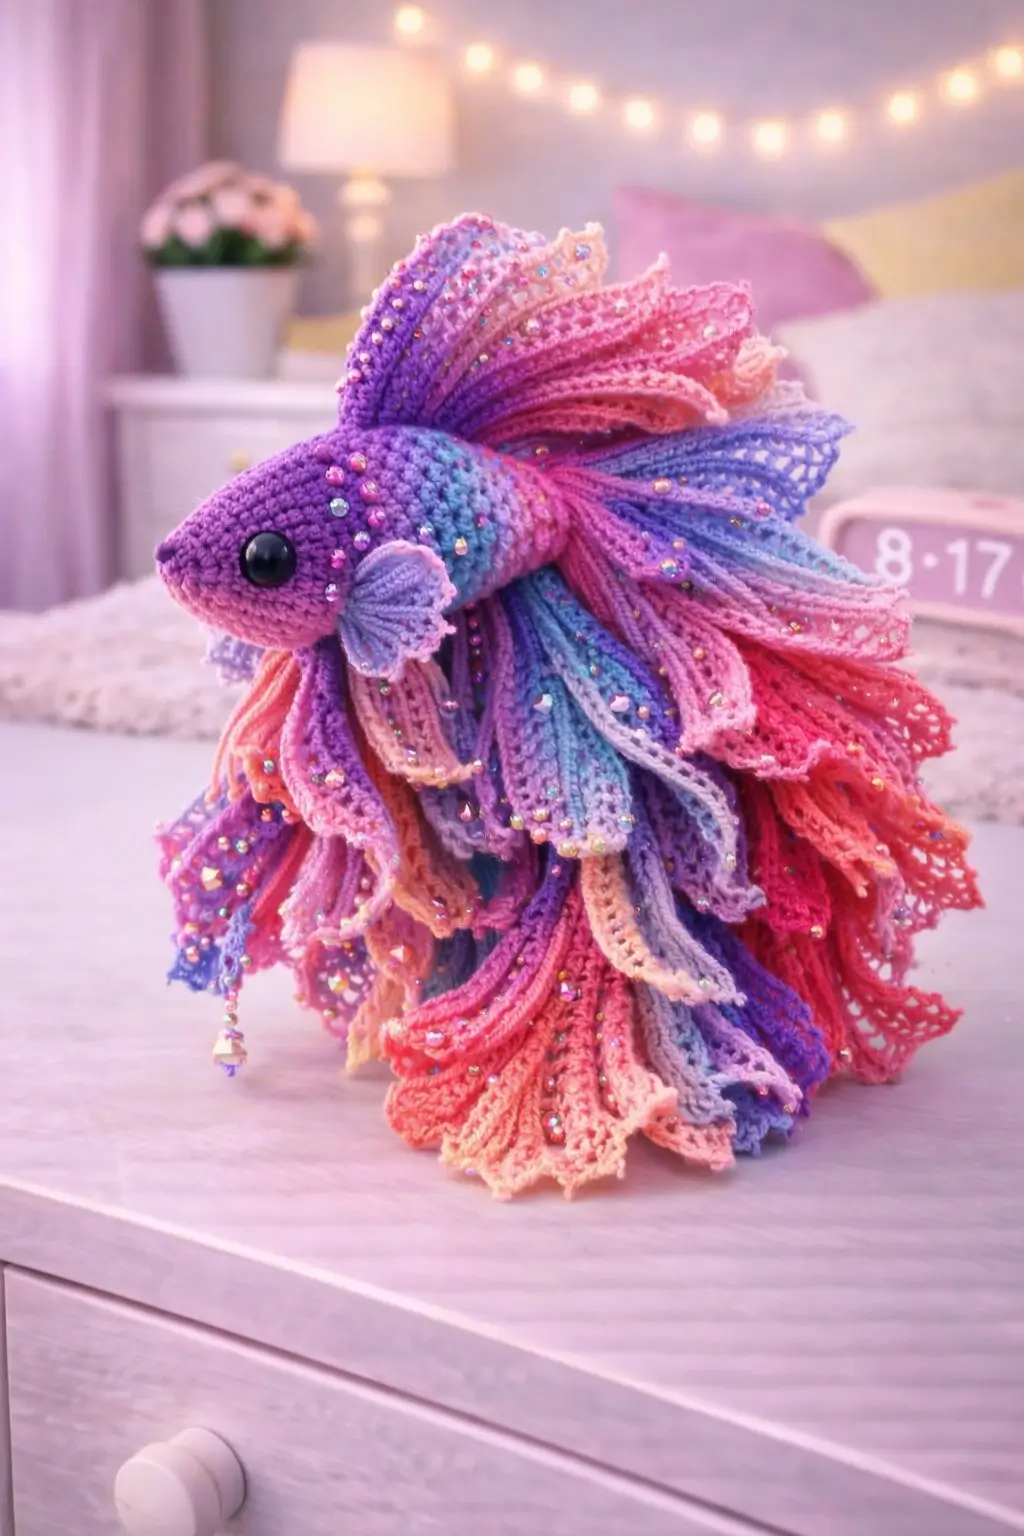
Betta fish have one real construction problem: the fins must look extravagant without collapsing the body profile. This betta fish amigurumi crochet pattern gives you materials, verified size, hook, skill level, and the full fish build with layered fins and embellishment options. You get head, body, tail, dorsal fin, anal fin, side fins, and ventral fins. The practical gain is commercial. One fish base supports dozens of colorways.
The Design: What Makes Rainbow Betta Fish Different
This fish depends on silhouette more than anatomy. The body is compact, almost torpedo-shaped, while the fins carry most of the visual mass. That matches current betta tutorials, which consistently treat the body as the stable core and the fins as the expressive layer. Here, the most important decision is fin density. The tail and lower skirt fin are long, scalloped, and repeated in multiple panels because a plain flat fin would not match the show-betta profile in the photo. Then there is embellishment. Rhinestones and one dangling charm push the design away from a standard amigurumi fish pattern and toward a decorative display piece. Common mistake: makers overstuff the body, then the fins sit too upright and stop reading as flowing.
Project Information at a Glance
| Skill Level | Time | Finished Size | Hook | Best For |
|---|---|---|---|---|
| Intermediate | 3–5 hours | 16.5 cm / 6.5 in long, 10 cm / 4 in tall | 3.5 mm | Desk decor, gifts, aquarium-themed display |
Materials and Tools
Yarn
- Lavender-purple — Medium / worsted / aran — 18g — Paintbox Yarns Cotton Aran
- Hot pink — Medium / worsted / aran — 10g — Paintbox Yarns Cotton Aran
- Soft pink — Medium / worsted / aran — 6g — Paintbox Yarns Cotton Aran
- Peach — Medium / worsted / aran — 4g — Paintbox Yarns Cotton Aran
- Periwinkle — Medium / worsted / aran — 5g — Paintbox Yarns Cotton Aran
- Coral — Medium / worsted / aran — 4g — Paintbox Yarns Cotton Aran
- White — Medium / worsted / aran — 3g — Paintbox Yarns Cotton Aran
Main yarn total: 35g
Accent yarn total: 28g
Tools
- 3.5 mm crochet hook
- 12 mm safety eyes
- Fiberfill stuffing
- Yarn needle
- Stitch markers
- Sharp embroidery scissors
- Flat-back rhinestones
- Optional small charm bead
Crochet Abbreviations
MR / sc / inc / dec / sl st / ch / BLO / hdc / dc
Use invisible decrease only on the closing rounds; standard decreases leave visible dents on the forehead and snout line of a small fish head.
Step-by-Step Rainbow Betta Fish Crochet Pattern
Work in continuous spiral rounds unless noted.
Head (Make 1)
Yarn: lavender-purple
Source: Standard amigurumi math
R1: 6 sc in MR (6)
R2: inc x6 (12)
R3: (sc, inc) x6 (18)
R4: (2 sc, inc) x6 (24)
R5: (3 sc, inc) x6 (30)
R6: (4 sc, inc) x6 (36)
R7: sc around (36)
R8: sc around (36)
R9: sc around (36)
R10: sc around (36)
R11: (4 sc, dec) x6 (30)
R12: (3 sc, dec) x6 (24)
Insert 12 mm safety eyes between R8 and R9, about 8 stitches apart.
R13: (2 sc, dec) x6 (18)
Stuff firmly through the face first. A soft forehead throws off the eye line.
R14: (sc, dec) x6 (12)
R15: dec x6 (6)
Fasten off. Leave 25 cm tail.
Body (Make 1)
Yarn: lavender-purple to pink gradient
Source: Standard amigurumi math
R1: 6 sc in MR (6)
R2: inc x6 (12)
R3: (sc, inc) x6 (18)
R4: (2 sc, inc) x6 (24)
R5: (3 sc, inc) x6 (30)
R6: (4 sc, inc) x6 (36)
R7: sc around (36)
R8: sc around (36)
R9: (4 sc, dec) x6 (30)
R10: (3 sc, dec) x6 (24)
Stuff lightly. The body must support the fins, not dominate them.
Fasten off. Leave 28 cm tail.
Dorsal Fin (Make 1)
Yarn: lilac, pink, peach mix
Source: Standard amigurumi math
R1: ch 18
Row 1: starting in 2nd ch from hook, sc across (17)
Row 2: ch 1, turn, dec, sc across to last 2 sts, dec (15)
Row 3: ch 1, turn, dec, sc across to last 2 sts, dec (13)
Row 4: ch 1, turn, dec, sc across to last 2 sts, dec (11)
Row 5: ch 1, turn, dec, sc across to last 2 sts, dec (9)
Row 6: ch 1, turn, dec, sc across to last 2 sts, dec (7)
Edge lightly with sl st or picot-style trim if you want the lace-like finish visible in the photo.
Fasten off. Leave 22 cm tail.
Tail Fan Panels (Make 6)
Yarn: pink, lilac, periwinkle, coral, peach mix
Source: Standard amigurumi math
R1: ch 18
Row 1: starting in 2nd ch from hook, sc across (17)
Row 2: ch 1, turn, dec, sc across to last 2 sts, dec (15)
Row 3: ch 1, turn, dec, sc across to last 2 sts, dec (13)
Row 4: ch 1, turn, dec, sc across to last 2 sts, dec (11)
Row 5: ch 1, turn, dec, sc across to last 2 sts, dec (9)
Row 6: ch 1, turn, dec, sc across to last 2 sts, dec (7)
Make the panels in alternating colors. Overlap them slightly during assembly to build the show-betta tail.
Fasten off. Leave 20 cm tail.
Anal Skirt Fin Panels (Make 5)
Yarn: pink, peach, lilac, coral
Source: Standard amigurumi math
R1: ch 18
Row 1: starting in 2nd ch from hook, sc across (17)
Row 2: ch 1, turn, dec, sc across to last 2 sts, dec (15)
Row 3: ch 1, turn, dec, sc across to last 2 sts, dec (13)
Row 4: ch 1, turn, dec, sc across to last 2 sts, dec (11)
Row 5: ch 1, turn, dec, sc across to last 2 sts, dec (9)
Row 6: ch 1, turn, dec, sc across to last 2 sts, dec (7)
These sit beneath the body and should drape lower than the side fins.
Fasten off. Leave 20 cm tail.
Side Fins / Pectoral Fins (Make 2)
Yarn: lilac with pale edging
Source: Standard amigurumi math
R1: ch 10
Row 1: starting in 2nd ch from hook, sc across (9)
Row 2: ch 1, turn, dec, sc across to last 2 sts, dec (7)
Row 3: ch 1, turn, dec, sc across to last 2 sts, dec (5)
Row 4: ch 1, turn, dec, sc, dec (3)
Fasten off. Leave 15 cm tail.
Ventral Fins (Make 2)
Yarn: soft pink or peach
Source: Standard amigurumi math
R1: ch 14
Row 1: starting in 2nd ch from hook, sc across (13)
Fasten off. Leave 14 cm tail.
These two narrow fins hang below the jaw. Keep them slim.
Snout / Mouth Ridge (Make 1)
Yarn: lavender-purple
Source: Standard amigurumi math
R1: ch 7
Row 1: starting in 2nd ch from hook, sc across (6)
Row 2: ch 1, turn, sc across (6)
Fasten off. Leave 12 cm tail.
Rhinestone Accent Cluster (Make 3 optional zones)
Yarn: none; non-crochet accessory visible in photo
Source: Photo adaptation
Zone 1: forehead line above eye
Zone 2: gill area behind eye
Zone 3: trailing fin edges
Attach only after full fin placement. Rhinestones cannot fix a bad silhouette.
Charm Drop (Make 1 optional)
Yarn: metallic thread or fine beading wire
Source: Photo adaptation
R1: ch 8
R2: sl st back across (8)
Fasten off. Leave 6 cm tail.
Attach one small charm bead at the end.
Assembly Instructions
- Sew the head to the front of the body, keeping the snout slightly low so the fish reads streamlined rather than round.
- Add the snout ridge before attaching any fins; it sets the face line and controls the front profile.
- Sew the dorsal fin centered along the top back line of the body.
- Overlap the six tail fan panels at the rear, staggering the colors so no two matching shades sit edge to edge.
- Attach the five anal skirt fin panels under the body, letting them flare lower than the tail.
- Sew the two side fins just behind the eye line.
- Add the two ventral fins beneath the head, slightly apart from center.
- Check the fish from front, side, and top view before adding rhinestones.
- Apply the rhinestone accent zones and the optional charm drop only after the fin silhouette is final.
- Weave all yarn tails at least 4 cm into the stuffing path and trim only after the fish stands balanced.
The rainbow betta fish is complete.
7 Technical Tips for Cleaner Amigurumi
- Mark every increase round with a stitch marker. Missing one increase before the 36-stitch plateau leaves the forehead asymmetrical, and the fin line will never look centered.
- Stuff the head firmer than the body. If both sections are equally packed, the face looks blunt and the tail appears oversized by comparison.
- Insert the 12 mm eyes before the final decrease rounds. Forcing them into a narrowed head stretches the stitch line and pushes one eye off axis by several millimeters.
- Keep tension tighter on the fin panels than on the body. Loose fin fabric droops, and any rhinestone trim exaggerates that sag immediately.
- Pin all tail panels before sewing one down. A single panel placed even 1 cm higher than the rest breaks the fan symmetry.
- Use invisible decrease on the face only. Standard decreases create a notch that catches light near the eye line and reads as a dent.
- Weave tails at least 4 cm deep. Shorter tails loosen first along the tail base, where layered panels create constant drag.
Conclusion
This betta fish amigurumi crochet pattern works because the body stays controlled while the fins carry the drama. Use the verified 16.5 cm by 10 cm size band, 3.5 mm hook, medium/worsted/aran yarn class, and 12 mm safety-eye baseline as the starting point, then adjust the layering order of the fins rather than rewriting the core body math. Photograph the finished fish from a three-quarter side angle so the dorsal fin, tail fan, and rhinestone line stay visible in one frame. Share it on Pinterest and Instagram with #RainbowBettaFishAmigurumi. One direct question remains: will your next betta keep the pastel jewel palette, or switch to a darker halfmoon style with longer ventral fins?










Ty