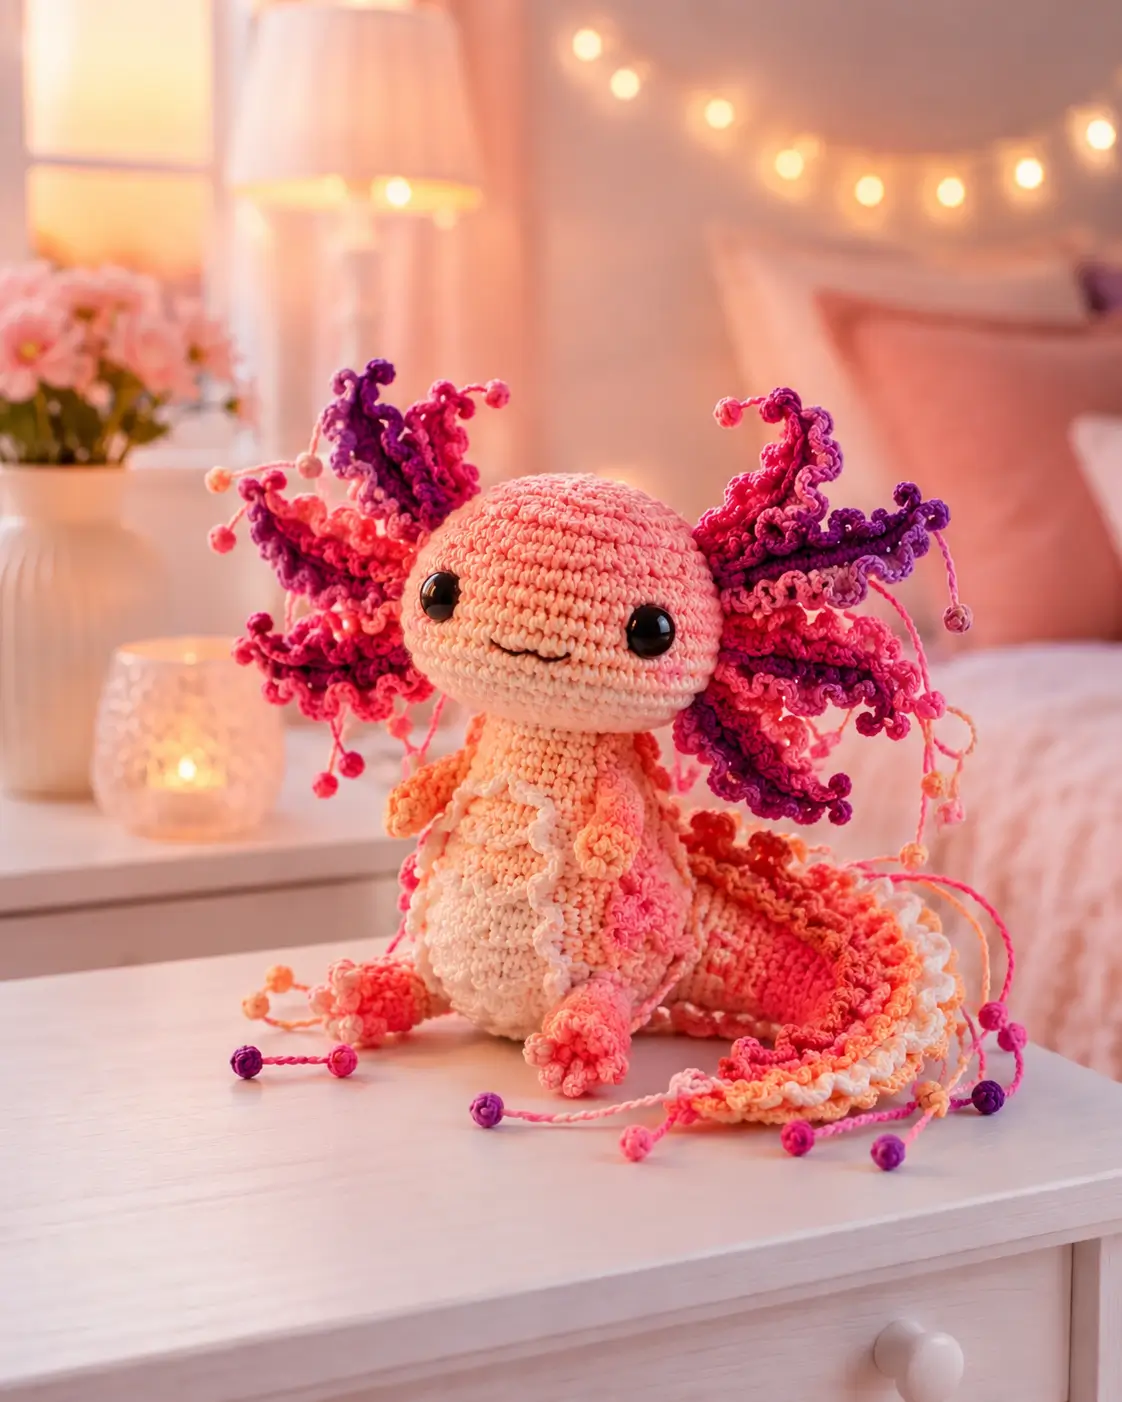
An axolotl wears its gills outside its head, so this axolotl amigurumi crochet pattern starts by controlling six frilled side branches before the face can read correctly. This version uses bulky polyester yarn, an estimated 20 cm seated size, 18 mm safety eyes, and intermediate shaping. Make it when you need a display piece that tests color planning, ruffle tension, and clean limb placement.
The Design: What Makes This Axolotl Different
Axolotls fail when the gills are treated like ears. The photo shows three layered gill fans on each side, not a single flat flap, so this design builds each branch from a narrow stem and then adds bobbled fringe. That keeps the silhouette wide without making the head roll backward. A 42-stitch head plateau gives the safety eyes room to sit low and far apart; smaller heads make the mouth look pinched. The tapered body sits under the head, then the tail is sewn as a counterweight. Many crochet axolotl pattern instructions underplay this balance issue. Another common mistake is placing the external gills level with the eyes. For a rainbow axolotl amigurumi, the top branch should start slightly above eye height while the lower branch angles toward the jaw.
Project Info at a Glance
| Skill Level | Time | Finished Size | Hook | Best For |
|---|---|---|---|---|
| Intermediate | 4–6 hours | About 20 cm seated | 4.5 mm | Display plush, colorwork practice, frilled gill shaping |
Materials and Tools
Yarn
- Peach-pink — bulky chenille / blanket-style yarn — 120–145 g — Premier Parfait Chunky, Bernat Baby Blanket, or similar plush polyester.
- Coral — bulky chenille — 10 g — for lower gills, feet accents, and tail base.
- Hot pink — bulky chenille — 10 g — for side ruffles and bobbles.
- Magenta — bulky chenille — 10 g — for outer gill fans and tail frill.
- Purple — bulky chenille — 8–10 g — for gill tips and tendril bobbles.
- Cream — bulky chenille — 5–8 g — for belly ruffle and tail highlight.
Tools
- Hook 4.5 mm
- 18 mm safety eyes
- Polyester stuffing
- Yarn needle
- Locking stitch markers
- Long pins
- Black embroidery thread
- Scissors
Abbreviations
- MR = magic ring
- sc = single crochet
- inc = increase, 2 sc in one stitch
- dec = decrease
- sl st = slip stitch
- ch = chain
- BLO = back loop only
- FLO = front loop only
- bo = bobble stitch
- st / sts = stitch / stitches
Invisible decrease: work through the front loops only of the next two stitches before completing one sc, which reduces holes on closing rounds.
Pattern — Step by Step
Continuous spiral unless noted. Counts are written in brackets. The head and body use a large 42-stitch plateau; that scale matches the photo’s oversized face and plush yarn.
Head
Yarn: peach-pink.
R1: 6 sc in MR (6)
R2: inc ×6 (12)
R3: (sc, inc) ×6 (18)
R4: (2 sc, inc) ×6 (24)
R5: (3 sc, inc) ×6 (30)
R6: (4 sc, inc) ×6 (36)
R7: (5 sc, inc) ×6 (42)
R8–R15: sc around (42)
R16: (5 sc, dec) ×6 (36)
R17: (4 sc, dec) ×6 (30)
R18: (3 sc, dec) ×6 (24)
R19: (2 sc, dec) ×6 (18)
R20: (sc, dec) ×6 (12)
R21: dec ×6 (6)
Insert eyes between R10 and R11, about 10–11 visible stitches apart. Begin stuffing after R17 and pack the lower face firmly enough to hold the smile line.
Fasten off. Leave a 20 cm tail for closing and shaping.
Body
Yarn: peach-pink.
R1: 6 sc in MR (6)
R2: inc ×6 (12)
R3: (sc, inc) ×6 (18)
R4: (2 sc, inc) ×6 (24)
R5: (3 sc, inc) ×6 (30)
R6: (4 sc, inc) ×6 (36)
R7: (5 sc, inc) ×6 (42)
R8–R13: sc around (42)
R14: (5 sc, dec) ×6 (36)
R15: sc around (36)
R16: (4 sc, dec) ×6 (30)
R17: (3 sc, dec) ×6 (24)
R18: (2 sc, dec) ×6 (18)
R19: (sc, dec) ×6 (12)
R20: dec ×6 (6)
Stuff the base firmly and the neck lightly. A too-soft base will let the head tilt forward.
Fasten off. Leave a 35 cm tail for sewing to the head.
Arms / Front Legs
Yarn: peach-pink with coral bobble tips. Make 2.
R1: 6 sc in MR (6)
R2: inc ×6 (12)
R3–R6: sc around (12)
R7: dec ×6 (6)
For the paw edge, attach coral yarn to the front of R2 and work: ch 2, sl st in same stitch, repeat into next 2 stitches. Do not overstuff the arm.
Fasten off. Leave a 25 cm tail on each arm.
Back Legs
Yarn: peach-pink with coral toe nubs. Make 2.
R1: 6 sc in MR (6)
R2: inc ×6 (12)
R3: (sc, inc) ×6 (18)
R4–R5: sc around (18)
R6: (sc, dec) ×6 (12)
R7: sc around (12)
R8: dec ×6 (6)
Stuff only the heel half. Add three coral toe nubs across the wider end with ch 2 and sl st anchors.
Fasten off. Leave a 30 cm tail.
External Gill Fans
Yarn: coral, hot pink, magenta, purple. Make 2 side sets. Each set has 3 branches.
Top Branch — Make 2
Row 1: ch 13 (13)
Row 2: starting in 2nd ch from hook, sc 12 (12)
Row 3: ch 1, turn, (sc, ch 3, sl st in same st) ×12 (12 anchors)
Row 4: change to purple, sl st along back spine (12)
Middle Branch — Make 2
Row 1: ch 16 (16)
Row 2: starting in 2nd ch from hook, sc 15 (15)
Row 3: ch 1, turn, (sc, ch 3, sl st in same st) ×15 (15 anchors)
Row 4: change to magenta, sl st along back spine (15)
Lower Branch — Make 2
Row 1: ch 11 (11)
Row 2: starting in 2nd ch from hook, sc 10 (10)
Row 3: ch 1, turn, (sc, ch 3, sl st in same st) ×10 (10 anchors)
Row 4: change to coral, sl st along back spine (10)
Stack one top, one middle, and one lower branch on each side. The middle branch should sit widest; the top branch tilts upward, and the lower branch points toward the jaw.
Fasten off each branch with a 30 cm tail.
Tail
Yarn: peach-pink changing to coral near the tip.
R1: 6 sc in MR (6)
R2: sc around (6)
R3: inc ×6 (12)
R4–R5: sc around (12)
R6: (sc, inc) ×6 (18)
R7–R8: sc around (18)
R9: (2 sc, inc) ×6 (24)
R10–R12: sc around (24)
R13: (3 sc, inc) ×6 (30)
R14–R18: sc around (30)
R19: (3 sc, dec) ×6 (24)
R20: sc around (24)
Stuff as a curved wedge, not a rigid cone. Pin it so the tail curls to the viewer’s right before sewing.
Fasten off. Leave a 45 cm tail.
Tail Ridge and Ruffled Edge
Yarn: coral, cream, hot pink, magenta.
Row 1: with coral, ch 31 (31)
Row 2: starting in 2nd ch from hook, sc 30 (30)
Row 3: change to cream, ch 1, turn, (sc, ch 2, sl st in same st) ×30 (30 anchors)
Row 4: change to hot pink, sl st into every second anchor across (15)
Row 5: change to magenta, ch 3, sl st in next anchor across the outer edge (15 loops)
This strip is sewn along the top of the tail after the tail is attached. Keep the cream edge visible on the outside curve.
Fasten off. Leave a 35 cm tail.
Belly Ruffle
Yarn: cream with peach-pink base.
Row 1: ch 19 (19)
Row 2: starting in 2nd ch from hook, sc 18 (18)
Row 3: ch 1, turn, (sc, ch 2, sl st in same st) ×18 (18 anchors)
Row 4: ch 1, turn, sc across the back ridge only (18)
Place this vertically from the lower neck to R13 of the body. The ruffle must sit centered or the whole plush reads twisted.
Fasten off. Leave a 30 cm tail.
Cheek Patches
Yarn: pale coral. Make 2.
R1: 6 sc in MR (6)
R2: inc ×6 (12)
R3: (sc, inc) ×6 (18)
Sl st to join (18)
Do not stuff. Flatten with the yarn tail on the back side.
Fasten off. Leave a 20 cm tail.
Bobble Tendrils
Yarn: hot pink, magenta, purple, coral. Make 10–14 tendrils in mixed colors.
Row 1: ch 12 (12)
Row 2: sl st in 2nd ch from hook and next 9 ch (10), bo in last ch (1 bobble)
Row 3: ch 4 from the bobble end, sl st back along 3 ch (3)
Attach 6 tendrils around the gills, 4 along the tail ruffle, and any remaining strands near the lower body. Keep the longest strands on the outer tail curve.
Fasten off. Leave 15–20 cm tails for knotting inside seams.
Smile Line
Yarn: black embroidery thread.
Insert the needle below the left eye, stitch a shallow curve across 7–8 stitches, and exit below the right eye. Anchor once inside the head, then bury the thread end. The smile should sit one round below the eye line.
Assembly
- Sew the head to the body through the closed base of the head and the closed top of the body; use a full circle of stitches, then a second stabilizing pass across the front neck.
- Position the body so the belly center faces forward and the head sits slightly tilted upward, not flat over the chest.
- Place the smile after the head is sewn on, because neck angle changes the apparent mouth height.
- Sew cheek patches below the eyes, centered between the mouth corners and the outer edge of the face.
- Attach front legs at body R15–R17, angled downward with the paw nubs facing forward.
- Attach back legs at body R8–R11, set 5–6 stitches apart so the plush can sit without rolling.
- Pin each gill set behind the head from R8 to R14, with the middle branch widest and the lower branch closest to the jaw.
- Sew the tail to the back-right side of the body across a 10–12 stitch oval, then curve the tip forward before securing the lower edge.
- Sew the tail ridge along the outer curve, then add the belly ruffle down the center front.
- Knot bobble tendrils into gill and tail seams, bury all tails, and trim only after the final balance check.
The finished axolotl should sit with the head centered, gill fans lifted, and the tail acting as a side support.
7 Technical Tips
- Stitch marker drift: If the marker moves more than 3 stitches off center by R12 of the head, the eye line will skew. Move the marker back at the end of a plain round and record the shift.
- Stuffing firmness: The head needs firm stuffing from R8 through R17 and lighter stuffing at R20. A soft lower face collapses the smile into a crease.
- Invisible decrease gaps: Chenille yarn shows holes on R19–R21 when regular decreases are used. Work front-loop invisible decreases and add a pea-sized piece of stuffing before the final 6-stitch closure.
- Eye placement timing: Install 18 mm eyes between R10 and R11 before closing past R17. Waiting until the opening is smaller than 24 stitches makes washer placement unreliable.
- Velvet tension: Bulky chenille can worm if the stitch height changes across ruffle rows. Keep each chain arch the same length; replace any ch-3 arch that stretches past 1.5 cm.
- Pinning width: The full gill span should measure about 1.7 times the head width. If it passes 2 times the head width, the head will lean backward unless the tail is made heavier.
- Tail weaving: Tendril tails need at least 8 cm buried through seams. Shorter buried ends can slip out of chenille after handling, especially near the tail curve.
Conclusion
This axolotl is built around the gills first, then the face, body, and tail are adjusted to support that wide profile. Keep the 42-stitch head plateau if you want the same large-eyed proportion, and do not reduce the tail too much, because it works as a counterweight. Your next step is to pin every gill branch before sewing and check the side view against the photo. Save this axolotl amigurumi crochet pattern to Pinterest, post the finished plush on Instagram, and tag it with #RainbowAxolotlAmigurumi. Which gill branch should carry the strongest purple accent on your version: top, middle, or lower?









