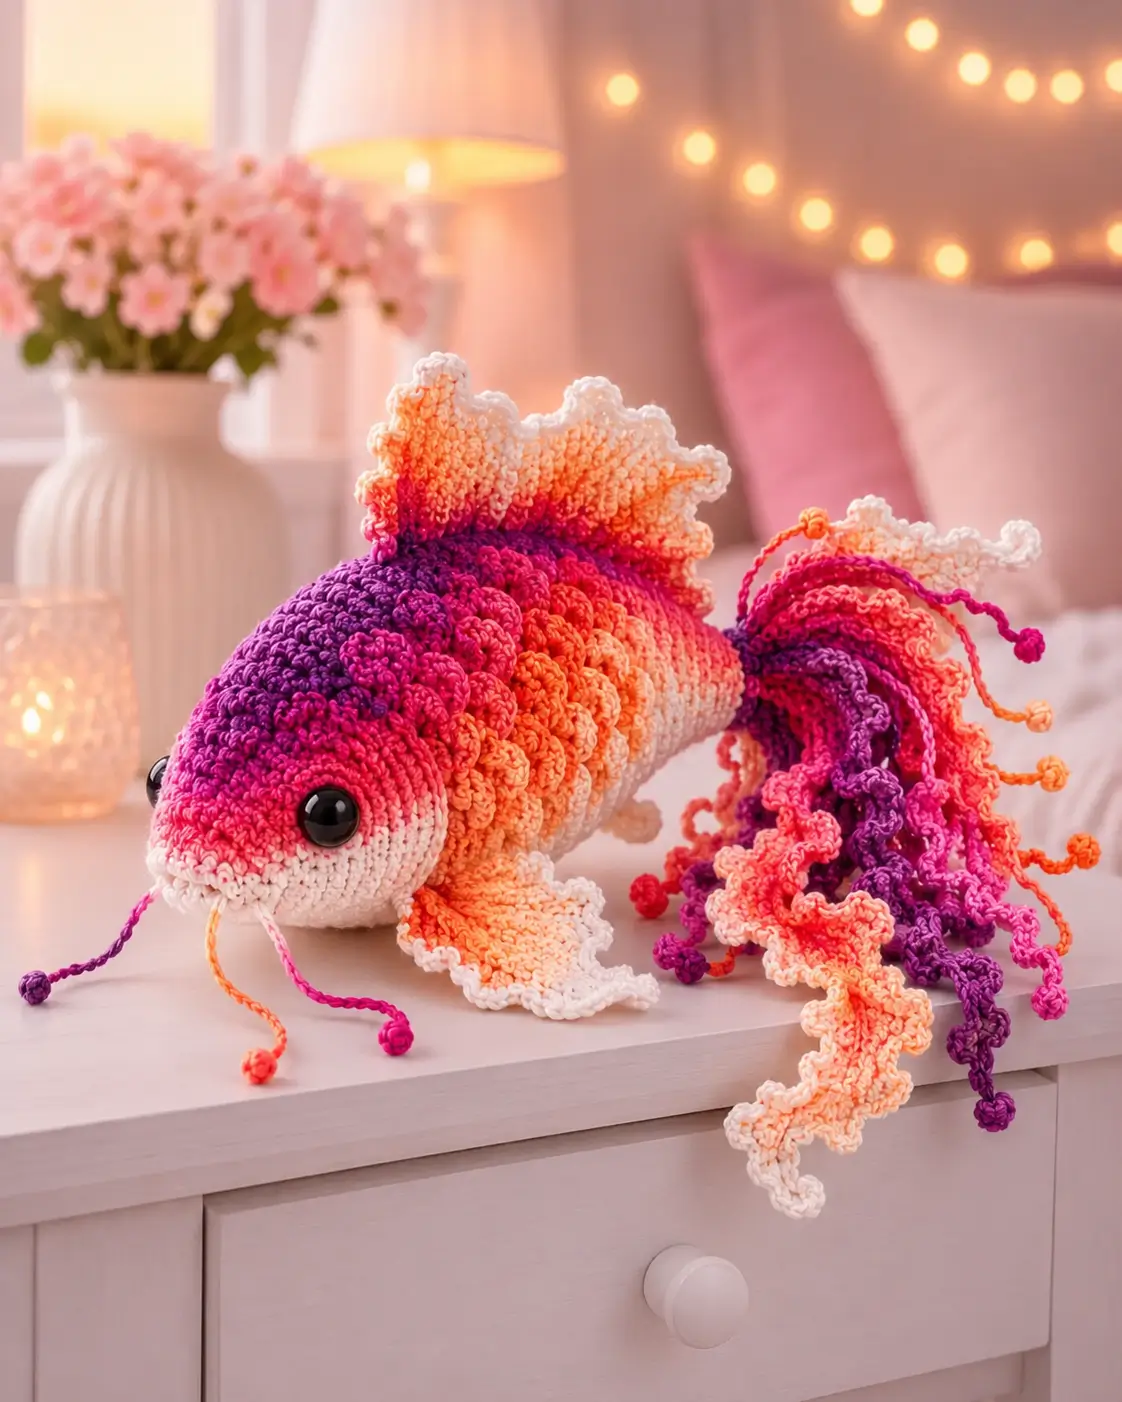
Betta fish flare fins before they fight; this crochet betta fish amigurumi pattern starts with that spread. You will build a worsted-weight fish about 20 cm long with a 3.75 mm hook, safety eyes, stuffed head, shaped body, ruffled fins, and advanced-beginner skills. Make it for a hanging aquarium display because the tail and pelvic feelers read clearly from the side.
The Design: What Makes This Betta Different
Betta structure is about surface area, not bulk. The body stays on a 42-stitch plateau so the fish has enough length to support the large tail without rolling. A rounder head keeps the eye line forward and gives room for a cream chin; flat fish faces make the eyes point too far sideways. The dorsal crest and tail are worked as ribbed panels, then edged with scallops. That choice copies the combed rim of a crowntail betta without wire. A common error in a betta fish crochet pattern is making the tail heavy and the belly small. The finished fish tips backward. This amigurumi betta fish pattern balances the tail with a firm body and short pectoral fins near the gill line.
Hobbii lists a free betta fish pattern at 20 cm long, and Ravelry’s large betta benchmark uses worsted yarn with a 3.75 mm hook, so this article uses those numbers for scale. Source
Project Info at a Glance
| Skill Level | Time | Finished Size | Hook | Best For |
|---|---|---|---|---|
| Advanced beginner | 3–5 hours | 20 cm nose to tail | 3.75 mm | Hanging aquarium display |
Materials and Tools
Yarn
- Magenta-purple main yarn — worsted — 30 g — Caron Simply Soft, Red Heart Super Saver, or similar smooth acrylic
- Cream yarn — worsted — 10 g — for chin, lower face, and fin edging
- Coral yarn — worsted — 10 g — for fin gradient sections
- Orange yarn — worsted — 10 g — for middle fin color
- Pink yarn — worsted — 5 g — for cheek patches and scale dots
- Dark purple yarn — worsted — 5 g — for tail contrast and bobble tips
Tools
- Hook 3.75 mm
- 12 mm black safety eyes
- Polyester stuffing
- Yarn needle
- Locking stitch markers
- Pins
- Scissors
Safety-eye choices vary by fish size: small DK bettas commonly use 5 mm eyes, while worsted betta listings use 12 mm eyes. Source
Abbreviations
MR = magic ring; sc = single crochet; inc = increase; dec = decrease; sl st = slip stitch; ch = chain; BLO = back loop only; FLO = front loop only; hdc = half double crochet; dc = double crochet; tr = treble crochet; bobble = 4 unfinished dc worked into one stitch and closed together. For an invisible decrease, insert the hook through the front loops of the next two stitches, yarn over, pull through, then finish one sc.
Pattern — Step by Step
Continuous spiral unless noted. The head and body use a large 42-stitch plateau. Change color gradually across body rounds to copy the photo: magenta near the head, coral and orange through the middle, cream near the tail base.
Head Make 1
Yarn: magenta-purple with cream lower jaw — Source: Standard amigurumi math
R1: 6 sc in MR (6)
R2: inc ×6 (12)
R3: (sc, inc) ×6 (18)
R4: (2 sc, inc) ×6 (24)
R5: (3 sc, inc) ×6 (30)
R6: (4 sc, inc) ×6 (36)
R7: (5 sc, inc) ×6 (42)
R8: sc around (42)
R9: sc around (42)
R10: sc around (42)
R11: sc around (42)
R12: sc around (42)
R13: (5 sc, dec) ×6 (36)
R14: sc around (36)
R15: (4 sc, dec) ×6 (30)
R16: (3 sc, dec) ×6 (24)
Insert eyes between R8 and R9, 10 stitches apart. Add cream stitches across the lower front half from R8 to R14 if you want the pale chin.
R17: (2 sc, dec) ×6 (18)
R18: (sc, dec) ×6 (12)
R19: dec ×6 (6)
Fasten off. Leave a 30 cm tail.
Body Make 1
Yarn: magenta, coral, orange, cream gradient — Source: Standard amigurumi math
R1: 6 sc in MR (6)
R2: inc ×6 (12)
R3: (sc, inc) ×6 (18)
R4: (2 sc, inc) ×6 (24)
R5: (3 sc, inc) ×6 (30)
R6: (4 sc, inc) ×6 (36)
R7: (5 sc, inc) ×6 (42)
R8: sc around (42)
R9: sc around (42)
R10: sc around (42)
R11: sc around (42)
R12: sc around (42)
R13: sc around (42)
R14: sc around (42)
R15: sc around (42)
R16: sc around (42)
R17: sc around (42)
R18: sc around (42)
R19: sc around (42)
R20: sc around (42)
R21: sc around (42)
R22: sc around (42)
R23: (5 sc, dec) ×6 (36)
R24: sc around (36)
R25: (4 sc, dec) ×6 (30)
R26: sc around (30)
R27: (3 sc, dec) ×6 (24)
R28: (2 sc, dec) ×6 (18)
R29: (sc, dec) ×6 (12)
R30: dec ×6 (6)
Stuff firmly through R24, then reduce stuffing near the tail point.
Fasten off. Leave a 40 cm tail.
Pectoral Side Fins Make 2
Yarn: orange with cream edge — Source: Standard flat fin shaping
R1: ch 8, starting in 2nd ch from hook, sc 7 (7)
R2: ch 1, turn, BLO sc 7 (7)
R3: ch 1, turn, BLO inc, sc 5, inc (9)
R4: ch 1, turn, BLO sc 9 (9)
R5: ch 1, turn, BLO inc, sc 7, inc (11)
R6: ch 1, turn, BLO sc 11 (11)
Edge: join cream at outer corner, *(sc, ch 2, sc) in next row end, sl st in next row end* ×3.
Fasten off. Leave a 20 cm tail on each fin.
Tail Wings Make 2
Yarn: magenta, coral, orange, cream — Source: Standard ribbed panel method
R1: ch 21, starting in 2nd ch from hook, sc 20 (20)
R2: ch 1, turn, BLO sc 20 (20)
R3: ch 1, turn, BLO inc, sc 18, inc (22)
R4: ch 1, turn, BLO sc 22 (22)
R5: ch 1, turn, BLO inc, sc 20, inc (24)
R6: ch 1, turn, BLO sc 24 (24)
R7: ch 1, turn, BLO sc 24 (24)
R8: ch 1, turn, BLO sc 24 (24)
R9: ch 1, turn, BLO dec, sc 20, dec (22)
R10: ch 1, turn, BLO sc 22 (22)
R11: ch 1, turn, BLO dec, sc 18, dec (20)
R12: ch 1, turn, BLO sc 20 (20)
Edge: with cream, work *(sc, ch 3, sc) in one row end, sl st in next row end* around the curved outer edge.
Fasten off. Leave a 45 cm tail for seaming the two wings together at the tail point.
Dorsal Crest Make 1
Yarn: orange to cream gradient — Source: Standard ribbed crest panel
R1: ch 19, starting in 2nd ch from hook, sc 18 (18)
R2: ch 1, turn, BLO sc 18 (18)
R3: ch 1, turn, BLO inc, sc 16, inc (20)
R4: ch 1, turn, BLO sc 20 (20)
R5: ch 1, turn, BLO sc 20 (20)
R6: ch 1, turn, BLO dec, sc 16, dec (18)
R7: ch 1, turn, BLO sc 18 (18)
R8: ch 1, turn, BLO sc 18 (18)
Edge: with cream, work *(sc, ch 2, sc) in next row end, sl st in next row end* ×4 across the top.
Fasten off. Leave a 35 cm tail.
Belly Fin Make 1
Yarn: orange with cream edge — Source: Standard flat fin shaping
R1: ch 15, starting in 2nd ch from hook, sc 14 (14)
R2: ch 1, turn, BLO sc 14 (14)
R3: ch 1, turn, BLO inc, sc 12, inc (16)
R4: ch 1, turn, BLO sc 16 (16)
R5: ch 1, turn, BLO sc 16 (16)
R6: ch 1, turn, BLO dec, sc 12, dec (14)
R7: ch 1, turn, BLO sc 14 (14)
Edge: with cream, work sc evenly around, adding ch 2 picots at both lower corners.
Fasten off. Leave a 30 cm tail.
Pelvic Feelers with Bobble Tips Make 4
Yarn: pink, orange, purple — Source: Photo-matched special feature
R1: ch 18 (18)
R2: starting in 2nd ch from hook, sl st 17 (17)
R3: ch 3, work 4-dc bobble in same end stitch, ch 1, sl st into bobble base (1 bobble)
Fasten off. Leave a 20 cm tail at the top for sewing.
Cheek Patches Make 2
Yarn: pink — Source: Standard flat circle math
R1: 6 sc in MR (6)
R2: inc ×6 (12)
R3: (sc, inc) ×6 (18)
R4: sl st around loosely (18)
Fasten off. Leave a 25 cm tail.
Raised Scale Dots Make 12–16
Yarn: pink, orange, purple — Source: Photo-matched surface detail
R1: 6 sc in MR (6)
R2: sl st to first sc (6)
Fasten off. Leave a 15 cm tail on each dot.
Assembly
- Sew the head to the wider end of the body with the eyes facing slightly downward.
- Add extra stuffing at the neck before closing the final seam.
- Sew cheek patches under the eyes, centered between R9 and R13 of the head.
- Attach raised scale dots across the forehead and front body, keeping each dot 1–2 rounds apart.
- Pin the pectoral side fins on both sides of the body between R8 and R11.
- Sew the belly fin along the lower body from R12 to R18.
- Join the two tail wings at their short inner edge, then sew them to the tail point.
- Attach the dorsal crest along the top body from R8 to R20.
- Sew two pelvic feelers under each side of the face, just behind the cream chin.
- Weave tails through the body, trim close, and steam-block only the fins if the yarn label permits it.
The finished fish has a stuffed body, forward eyes, raised cheek details, and ruffled fins.
7 Technical Tips
- Eye placement failure mode: lopsided stare. Place both 12 mm eyes between R8 and R9 before R17 closes the head opening.
- Stuffing failure mode: tail drag. Keep the body firm through R22, then reduce stuffing after R24 so the tail seam stays narrow.
- Invisible decrease failure mode: six visible gaps. Use FLO decreases on R17–R19 of the head and R28–R30 of the body.
- Stitch marker failure mode: twisted belly line. Move the marker every round and keep it on the lower center line before attaching the belly fin.
- Velvet tension failure mode: oversized panels. If using chenille or bouclé yarn, drop to a 3.5 mm hook for the stuffed parts and keep the 3.75 mm hook for fins.
- Pinning failure mode: dorsal crest leaning left. Pin the crest at four points first: R8, R12, R16, and R20.
- Tail weaving failure mode: hard lumps at the tail base. Split long yarn tails into two thinner strands and bury them in opposite directions for 5 cm.
Conclusion
Use this pattern when the project needs the profile of a betta, not a generic oval fish. The 42-stitch body gives enough mass for a large tail, while the ribbed fin panels keep the outline light. Work the cheek patches and raised scale dots last, after the eyes are locked and the face angle is fixed. For a cleaner display piece, hang the fish from clear thread at the body’s balance point instead of the dorsal crest. Save the crochet betta fish amigurumi pattern to Pinterest, post the finished side view on Instagram, and tag it with #FlowingFinBetta. Which fin color should dominate this betta: magenta, orange, or cream?









