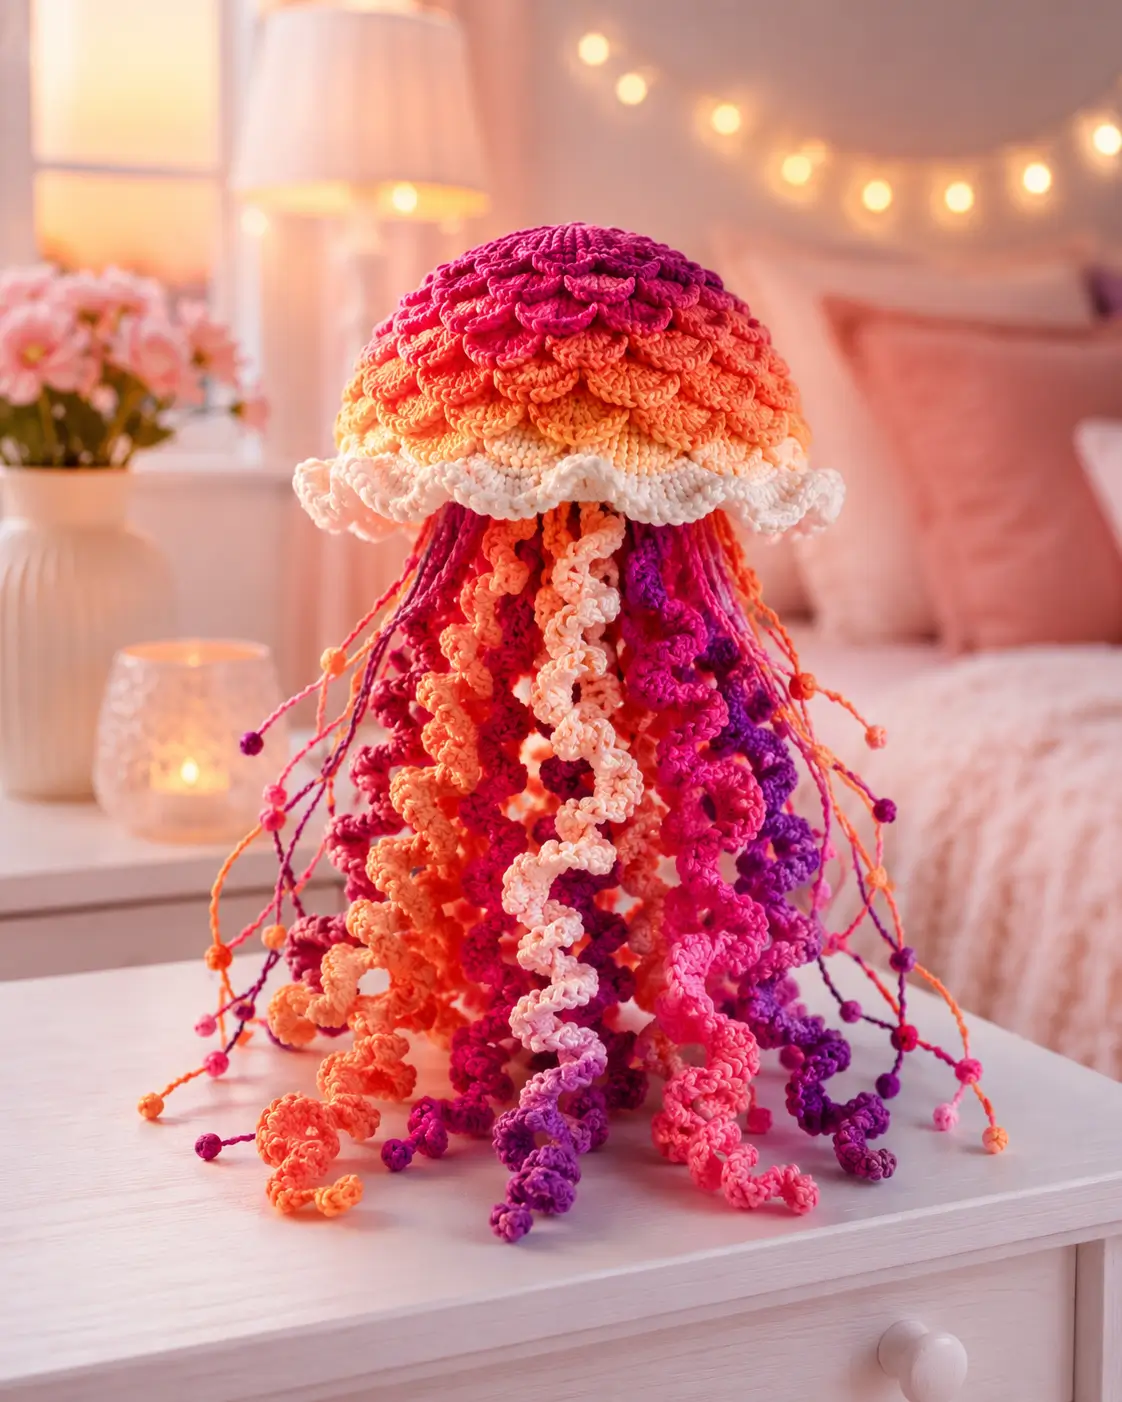
A jellyfish is mostly bell, fringe, and controlled drag. This jellyfish amigurumi crochet pattern translates that shape into a 42-stitch dome, scalloped rim, and mixed tentacle lengths. You need worsted cotton, a 4 mm hook, stuffing, stitch markers, and no safety eyes unless adding a face. The finished piece is about 25.5 cm tall. Skill level: advanced beginner. Make it for hanging nursery decor, not crib sleep.
The Design: What Makes This Jellyfish Different
The bell uses a large 42-stitch plateau because the photo has a wide cap, not a small keychain dome. That wider count keeps the underside flat enough to carry many strands without pulling into a cone. A cream scalloped rim is worked after the cap, so the lower edge reads as a separate jellyfish mantle instead of a color-change stripe. The tentacles are divided into thick curly oral arms and thin outer strands. Realistic proportion matters here: too many equal curls create an octopus look. A common maker mistake is placing every strand at the center of the belly disk. This crochet jellyfish pattern spreads weight across the underside, and the amigurumi jellyfish tutorial below keeps long strands anchored for display stability.
Project Info at a Glance
| Skill Level | Time | Finished Size | Hook | Best For |
|---|---|---|---|---|
| Advanced beginner | 4–6 hours | About 25.5 cm tall | 4.0 mm | Hanging decor, sea-theme display, market table sample |
Materials and Tools
Yarn
- Magenta — medium worsted #4 — 15 g — cotton or cotton-blend yarn
- Orange — medium worsted #4 — 15 g — cotton or cotton-blend yarn
- Cream — medium worsted #4 — 15 g — cotton or cotton-blend yarn
- Coral, hot pink, purple, peach — medium worsted #4 — 35 g total — scraps work well
- Optional black or pink detail yarn — fine yarn — under 2 g — only for optional face details
Tools
- Hook 4.0 mm
- No safety eyes for photo match
- Optional 8 mm safety eyes if adding a face
- Polyester stuffing
- Yarn needle
- Stitch markers
- Pins
- Scissors
Abbreviations
- MR = magic ring
- sc = single crochet
- inc = increase
- dec = decrease
- sl st = slip stitch
- ch = chain
- BLO = back loop only
- FLO = front loop only
- dc = double crochet
- hdc = half double crochet
Invisible decrease means inserting the hook through the front loops of the next two stitches, pulling up one loop, then finishing one sc decrease to reduce bulk.
Pattern — Step by Step
Continuous spiral unless noted. The bell and belly use standard 6-stitch amigurumi increase math, with a large 42-stitch plateau for the photo scale.
Head / Bell Cap
Yarn: magenta, orange, cream.
R1: 6 sc in MR (6)
R2: inc ×6 (12)
R3: (sc, inc) ×6 (18)
R4: (2 sc, inc) ×6 (24)
R5: (3 sc, inc) ×6 (30)
R6: (4 sc, inc) ×6 (36)
R7: (5 sc, inc) ×6 (42)
R8: sc around in magenta (42)
R9: sc around in magenta (42)
R10: sc around in coral-pink (42)
R11: sc around in coral-pink (42)
R12: sc around in orange (42)
R13: sc around in orange (42)
R14: BLO sc around in cream (42)
R15: sc around in cream (42)
Stuff the bell lightly after the belly disk is attached. Do not overfill before sewing the underside.
Fasten off. Leave a 50 cm tail.
Body / Underside Disk
Yarn: cream.
R1: 6 sc in MR (6)
R2: inc ×6 (12)
R3: (sc, inc) ×6 (18)
R4: (2 sc, inc) ×6 (24)
R5: (3 sc, inc) ×6 (30)
R6: (4 sc, inc) ×6 (36)
R7: (5 sc, inc) ×6 (42)
Keep this disk flat. Steam blocking is not needed if the stitch tension is even.
Fasten off. Leave a 60 cm sewing tail.
Scalloped Bell Rim
Yarn: cream.
Join cream yarn to any unused FLO from Head R14.
R1: (sc, hdc, 3 dc in next st, hdc, sc, sl st) ×7 around the 42 front loops (56)
The rim should wave downward and outward. If it folds upward, the slip stitches are too tight.
Fasten off. Weave the tail into the inside of the bell.
Front Oral Arms
Yarn: coral and peach. Make 2.
R1: ch 36 (36)
R2: starting in 2nd ch from hook, 3 sc in each ch across (105)
These two curls sit at the front center and should be the thickest visible strands.
Fasten off. Leave a 25 cm tail.
Inner Curly Tentacles
Yarn: magenta, hot pink, orange, purple, cream. Make 8.
R1: ch 31 (31)
R2: starting in 2nd ch from hook, 3 sc in each ch across (90)
Make at least one cream curl and one purple curl for the photo color balance. Twist each curl by hand before pinning.
Fasten off. Leave a 20 cm tail.
Back Support Tendrils
Yarn: magenta and orange. Make 2.
R1: ch 41 (41)
R2: starting in 2nd ch from hook, sl st in each ch across (40)
These strands sit toward the rear underside and stop the front curls from making the jellyfish lean forward.
Fasten off. Leave a 20 cm tail.
Long Fine Tentacles
Yarn: magenta, orange, hot pink, purple. Make 12.
R1: ch 46 (46)
R2: starting in 2nd ch from hook, sl st in each ch across (45)
Vary 3 strands by chaining 56 instead of 46 if a looser outer net is wanted. Do not make these for unsupervised baby use.
Fasten off. Leave a 20 cm tail.
Side Bell Fins
Yarn: cream. Make 2.
R1: ch 7 (7)
R2: starting in 2nd ch from hook, sc, hdc, dc, dc, hdc, sc (6)
R3: ch 1, turn, sc, hdc, 2 dc, 2 dc, hdc, sc (8)
Place one fin at each side under the scalloped rim to copy the photo’s left-right flare.
Fasten off. Leave a 20 cm sewing tail.
Terminal Beads / End Knots
Yarn: matching tentacle colors. Make 12 for display only.
R1: 6 sc in MR (6)
R2: sc around (6)
Pull the opening tight around the end of a fine tentacle. These are small parts, so omit them for child handling.
Fasten off. Use both tails to tie the bead to a tentacle end.
Optional Cheek Patches
Yarn: pale pink. Make 2, or omit to match the photo.
R1: 6 sc in MR (6)
R2: inc ×6 (12)
R3: sl st around loosely (12)
The reference photo has no face. Add these only if the post version needs a kawaii variation.
Fasten off. Leave a 15 cm sewing tail.
Optional Face
Yarn: black embroidery thread or optional 8 mm safety eyes.
Place optional 8 mm eyes between Head R10 and R11, 7 stitches apart.
Embroider a small mouth between the eyes with two short stitches.
Skip this whole section for the exact no-face reference look.
Secure all ends inside the bell before attaching the belly disk.
Assembly
- Pin the cream underside disk to the open lower edge of the bell with wrong sides facing inward.
- Sew through one stitch of the bell and one stitch of the disk at a time, stopping with a 5 cm opening.
- Add stuffing until the dome holds its shape but the underside still stays nearly flat.
- Close the final 5 cm and knot the yarn inside the bell.
- Pin the two front oral arms to the front-center underside, about 1 cm apart.
- Add the eight inner curly tentacles around the next ring of underside stitches.
- Place the two back support tendrils at the rear underside, opposite the front curls.
- Attach the twelve long fine tentacles around the outer underside edge, spacing them about 1.5 cm apart.
- Sew the side bell fins under the left and right rim scallops.
- Add terminal beads to display versions, weave each tail through at least 6 underside stitches, and trim only after a pull test.
The completed jellyfish has a stuffed 42-stitch bell, flat underside, scalloped rim, and mixed tentacle lengths.
7 Technical Tips
- Stitch-marker drift: Place the marker in the first stitch of every bell round. A one-stitch drift shifts the gradient seam and makes the rim scallops land off center.
- Stuffing firmness: Add fiberfill until the bell resists light finger pressure by about 3 mm. Overstuffing rounds the underside disk and turns the jellyfish into an octopus shape.
- Invisible decrease control: Work any decrease through front loops only, then tighten the working yarn before the next sc. Loose decreases leave pinholes along the cream lower band.
- Eye placement timing: No eyes are visible in the reference photo, so skip plastic eyes for a display match. If a face is added, install 8 mm eyes before the belly disk is sewn on.
- Cotton tension: Worsted cotton shows row-height changes quickly. Keep the bell near 3.5–4 rounds per 2.5 cm so the dome does not flare.
- Pinning gaps: Pin 8 curly arms and 12 fine tentacles before sewing. Gaps larger than 1.5 cm expose the belly disk and make the underside look sparse.
- Tail weaving length: Weave each tentacle tail through at least 6 underside stitches. Shorter weaving lets long strands pull free when the jellyfish is hung.
Conclusion
Check the underside before photographing the finished piece. The strongest version has visible color separation: magenta at the crown, orange through the lower bell, cream at the rim, then mixed pink, orange, purple, and cream tentacles below. For the next step, make one test tentacle in each color and pin the layout before sewing any strands permanently. This jellyfish amigurumi crochet pattern works best as hanging decor or a supervised display plush because the long tentacles can tangle. Share the finished jellyfish on Pinterest and Instagram with #RainbowJellyfishAmigurumi. Would you cluster the purple strands on one side or spread them evenly through the tentacle curtain?









