Introduction
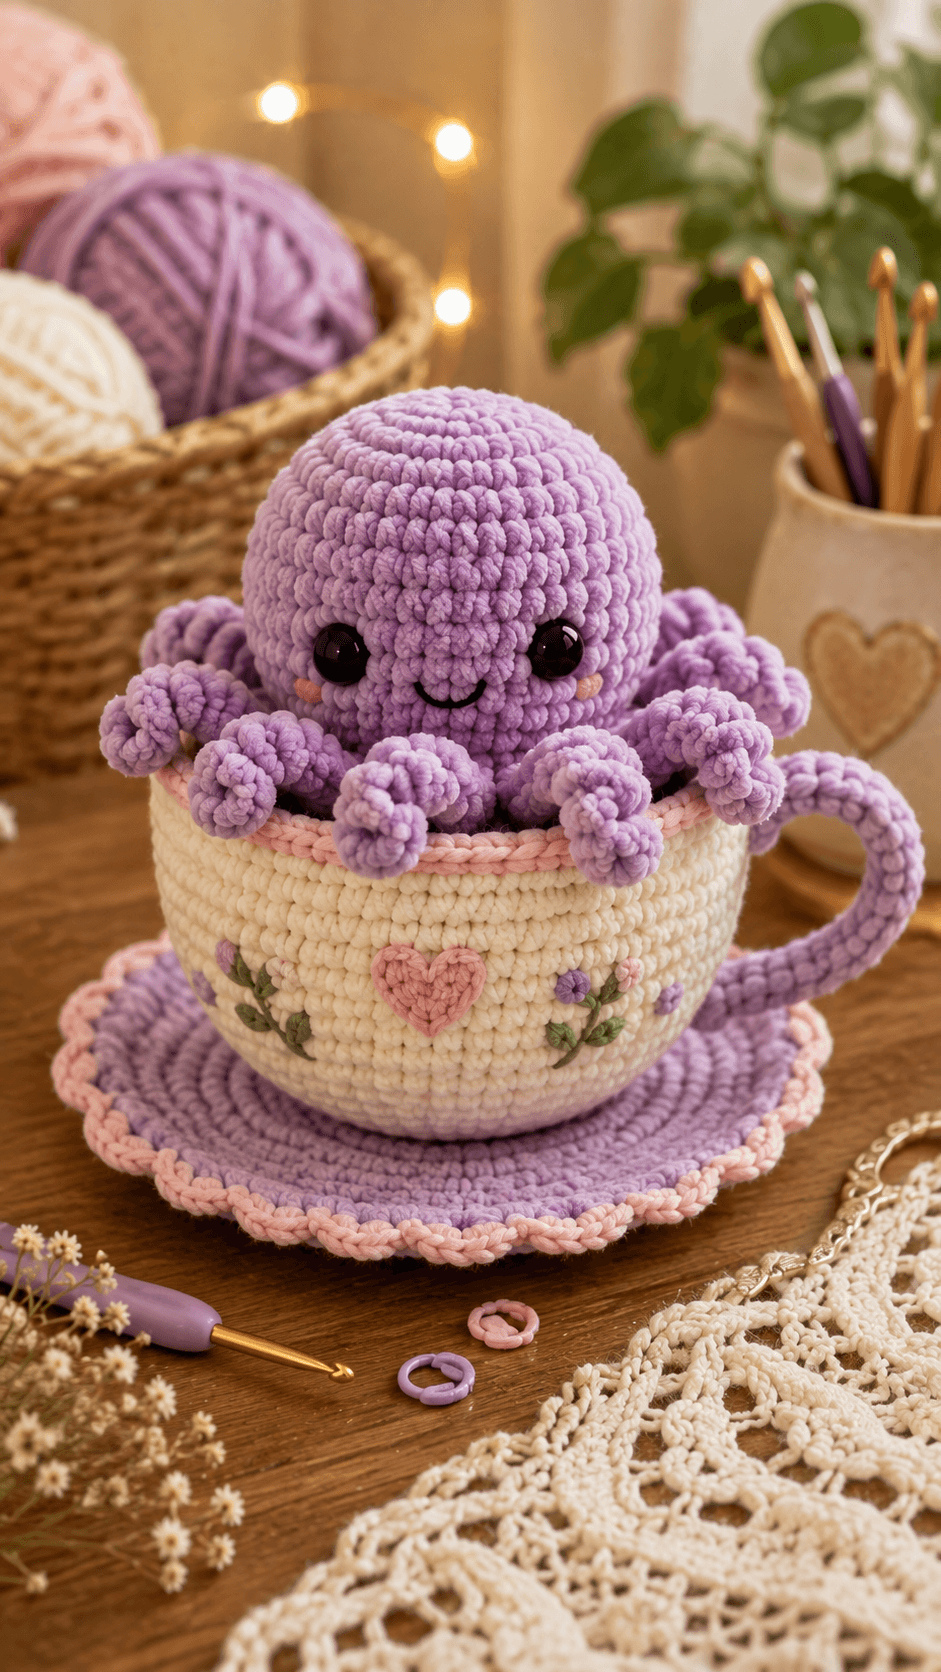
An octopus has eight arms, but this one has to fit all eight over a teacup rim without hiding the handle. This octopus in teacup crochet pattern uses plush yarn, a 4.5 mm hook, 16 mm eyes, a 42-stitch octopus body, a reinforced cream cup, and a lavender saucer. The complete display measures approximately 24–28 cm high and requires intermediate amigurumi, shaping, and assembly skills.
The Design: What Makes This Octopus Teacup Different
The octopus remains a complete stuffed character rather than a head permanently built into the cup. Eight separate tubular arms surround its lower body, allowing some tentacles to sit inside the cup while others curl visibly over the pink rim. The cup uses a 60-stitch wall so the purple octopus amigurumi does not force the opening outward. Its handle deliberately repeats the purple yarn instead of matching the cream ceramic effect, while the saucer carries the same lavender with a pink scalloped finish. Small green stems, lavender buds, and a central pink heart break up the cream cup surface. One common failure in a crochet octopus teacup is making all eight arms equally visible. That produces a dense ring around the head and hides the upper cup edge, so several arms should remain lower inside the vessel.
Project Info at a Glance
| Skill Level | Time | Finished Size | Hook | Best For |
|---|---|---|---|---|
| Intermediate | 12–16 hours | Approx. 24–28 cm overall | 4.5 mm | Display piece, tea-themed décor, amigurumi collection |
Materials and Tools
Yarn
- Lavender purple — plush / chenille #6 — approximately 130–170 g — octopus, cup handle, saucer
- Warm cream — plush / chenille #6 — approximately 160–200 g — teacup
- Blush pink — compatible plush yarn — approximately 45–60 g — cup rim, saucer scallops, heart, cheeks
- Olive green — smooth worsted or compatible plush yarn — approximately 10–15 g — stems and leaves
- Deep lavender — small amount — cup flower buds
- Black smooth yarn or embroidery thread — small amount — mouth
Tools
- 4.5 mm crochet hook
- 16 mm safety eyes ×2
- Polyester stuffing
- Large yarn needle
- Locking stitch markers
- Sharp scissors
- Flexible plastic canvas for the cup and saucer, optional but recommended for display use
- Straight pins
Replace plastic eyes with securely embroidered features when the octopus is made for a child under three.
Abbreviations
MR — magic ring
sc — single crochet
inc — increase, 2 sc in next stitch
dec — invisible decrease
sl st — slip stitch
ch — chain
hdc — half double crochet
dc — double crochet
BLO — back loop only
FLO — front loop only
For an invisible decrease, insert the hook through the front loops of the next two stitches and complete them together as one single crochet.
Pattern — Step by Step
Work the stuffed octopus pieces in continuous spirals unless stated otherwise. Mark the first stitch of every round. The construction below is photo-matched using standard six-stitch amigurumi shaping.
Octopus Head and Body
Yarn: lavender — Source: standard amigurumi math.
R1: 6 sc in MR (6)
R2: inc ×6 (12)
R3: (sc, inc) ×6 (18)
R4: (2 sc, inc) ×6 (24)
R5: (3 sc, inc) ×6 (30)
R6: (4 sc, inc) ×6 (36)
R7: (5 sc, inc) ×6 (42)
R8: sc around (42)
R9: sc around (42)
R10: sc around (42)
R11: sc around (42)
R12: sc around (42)
R13: sc around (42)
R14: sc around (42)
Insert 16 mm safety eyes between R10 and R11, approximately 7–8 visible stitches apart.
R15: sc around (42)
R16: (5 sc, dec) ×6 (36)
R17: (4 sc, dec) ×6 (30)
R18: (3 sc, dec) ×6 (24)
Stuff firmly through the crown and moderately around the lower body. Keep the base slightly flatter than the top.
R19: (2 sc, dec) ×6 (18)
R20: (sc, dec) ×6 (12)
Add final stuffing. Do not create a pointed base.
R21: dec ×6 (6)
Fasten off with a 25 cm tail and close the remaining opening.
Curled Tentacles — Make 8
Yarn: lavender — Source: standard amigurumi math.
R1: 6 sc in MR (6)
R2: inc ×6 (12)
R3: sc around (12)
R4: sc around (12)
R5: sc around (12)
R6: sc around (12)
R7: sc around (12)
R8: sc around (12)
R9: sc around (12)
R10: sc around (12)
R11: dec ×6 (6)
R12: sc around (6)
R13: sc around (6)
R14: sc around (6)
Stuff R1–R8 lightly. Leave the narrow final rounds unstuffed so the tentacle can curl.
Fasten off with a 30 cm sewing tail.
Curve each tentacle into a loose C or spiral. Pass the sewing tail invisibly through the inner curve and take one or two small anchoring stitches between R4 and R10. Keep the eight curls slightly different rather than making identical coils.
Pink Cheeks — Make 2
Yarn: blush pink — Source: standard flat-circle math.
R1: 6 sc in MR (6)
R2: inc ×6 (12)
Join with sl st.
Fasten off with a 15 cm sewing tail.
Embroidered Smile
Yarn: black smooth yarn.
Embroider one shallow U-shaped mouth between the eyes, approximately 2.5–3 cm wide.
Place the lowest point approximately one round below the eye centers.
Teacup Base and Wall
Yarn: warm cream — Source: standard circular increase math.
R1: 6 sc in MR (6)
R2: inc ×6 (12)
R3: (sc, inc) ×6 (18)
R4: (2 sc, inc) ×6 (24)
R5: (3 sc, inc) ×6 (30)
R6: (4 sc, inc) ×6 (36)
R7: (5 sc, inc) ×6 (42)
R8: (6 sc, inc) ×6 (48)
R9: (7 sc, inc) ×6 (54)
R10: (8 sc, inc) ×6 (60)
R11: BLO sc around (60)
R12: sc around (60)
R13: sc around (60)
R14: sc around (60)
R15: sc around (60)
R16: sc around (60)
R17: sc around (60)
R18: sc around (60)
R19: sc around (60)
R20: sc around (60)
R21: sc around (60)
If using plastic canvas, cut a circle just smaller than the R10 base and place it inside the cup before access becomes restricted.
Do not fasten off.
Pink Teacup Rim
Change to blush pink.
R22: sc around (60)
R23: BLO sc around (60)
R24: sc around (60)
Fasten off.
Fold R23–R24 outward slightly to produce the rounded pink rim visible in the reference.
Purple Cup Handle
Yarn: lavender.
Ch 33.
Row 1: starting in second ch from hook, 32 sc (32)
Row 2: ch 1, turn, 32 sc (32)
Row 3: ch 1, turn, 32 sc (32)
Fasten off with a 45 cm sewing tail.
Fold the strip lengthwise and whipstitch the long edges together to create a thick cord. Bend it into a broad C before attaching.
Saucer
Yarn: lavender — Source: standard flat-circle math.
R1: 6 sc in MR (6)
R2: inc ×6 (12)
R3: (sc, inc) ×6 (18)
R4: (2 sc, inc) ×6 (24)
R5: (3 sc, inc) ×6 (30)
R6: (4 sc, inc) ×6 (36)
R7: (5 sc, inc) ×6 (42)
R8: (6 sc, inc) ×6 (48)
R9: (7 sc, inc) ×6 (54)
R10: (8 sc, inc) ×6 (60)
R11: (9 sc, inc) ×6 (66)
R12: sc around (66)
Do not fasten off.
Pink Saucer Scallops
Change to blush pink.
R13: *sl st in next st, skip 1 st, 5 dc in next st, skip 1 st* around, adjusting the final repeat by one stitch if required so the edge lies flat.
Fasten off.
Block the saucer flat. Add a thin plastic-canvas circle underneath when the finished piece will remain on display.
Pink Heart Appliqué
Yarn: blush pink.
R1: 6 sc in MR (6)
R2: ch 2, 3 dc in first st, 2 hdc in next st, sc in next st, (sc, ch 2, sc) in next st, sc in next st, 2 hdc in next st, 3 dc in final section, sl st to center.
Fasten off with a 20 cm sewing tail.
Shape the lower chain point downward while attaching.
Small Lavender Cup Buds — Make 4
Yarn: deep lavender.
R1: 6 sc in MR (6)
Pull the ring firmly closed.
Join with sl st.
Fasten off with a 12 cm tail.
Small Pink Cup Buds — Make 2
Yarn: blush pink.
R1: 6 sc in MR (6)
Join with sl st.
Fasten off with a 12 cm tail.
Tiny Green Leaves — Make 8
Yarn: olive green.
Ch 5.
Starting in second ch from hook:
sl st, sc, hdc, 3 sc in final ch.
Continue down the opposite side:
hdc, sc, sl st.
Fasten off with a 12 cm tail.
Green Floral Stems
Yarn: olive green.
Embroider two shallow branching stems on the front of the cream cup, beginning approximately 2–3 cm from either side of the heart.
Keep the longest stem approximately 5–6 cm.
Positioning the Eight Tentacles
Do not distribute all eight tentacles at the same height.
Two should sit mostly inside the cup behind the visible front arms. Four can cross the pink rim around the front and sides. The final two should sit farther toward the back to build the full silhouette without obscuring the eyes.
Pin every tentacle to the lower octopus body before sewing.
The curled ends should point in several directions. Repeating the same clockwise curl eight times creates an artificial radial pattern that is not present in the photograph.
Assembly
- Finish the stuffed octopus body and check that the 42-stitch crown remains round before adding any tentacles.
- Pin all eight tentacles around the lower third of the body, keeping approximately equal spacing at their attachment points but varying the curl direction.
- Sew each tentacle through at least 3–4 body stitches, then place the octopus temporarily inside the cream cup to check how many arms remain visible above the rim.
- Attach both pink cheeks below and slightly outside the eyes, then embroider the centered black smile.
- Sew the purple cup handle to the right side with its upper join approximately 2 cm below the pink rim and its lower join near the bottom third of the cup.
- Attach the pink heart to the cup front, then embroider the green stems on both sides before adding the smaller buds and leaves.
- Sew the lavender and pink buds at the ends of the green branches, placing the eight leaves in pairs or alternating positions along the stems.
- Center the cup on the lavender saucer and secure it with several hidden stitches through the cup base if the finished piece will be displayed permanently.
- Place the octopus inside the cup and tack the lower body to the cup interior at three points so it cannot rotate; leave the visible tentacles free except where additional support is required.
- Reshape every tentacle curl, straighten the pink rim, flatten the saucer scallops, weave remaining tails into matching stitches, and confirm that the handle remains visible from the front three-quarter view.
The finished display should show a complete lavender head above the cream cup, several curled arms crossing the pink rim, a visible purple handle, and a lavender saucer extending beyond the cup on every side.
7 Technical Tips
- Hidden cup rim: Eight arms placed at one height can cover almost the complete pink edge. Keep at least two tentacles approximately 2–3 cm lower inside the cup so roughly half of the front rim remains visible.
- Head collapse: Understuffing the 42-stitch body allows the cup rim to press the lower head inward. Fill the upper body until a light finger press compresses the surface by less than approximately 1 cm.
- Tentacle rotation: A tentacle attached through only one body stitch will swivel after handling. Anchor every arm across at least 3–4 adjacent body stitches before burying the tail.
- Cup flaring: Loose tension through R12–R21 can make the 60-stitch wall widen instead of remaining cylindrical. Move down by 0.5 mm in hook size if the upper diameter exceeds the base by more than approximately 2 cm.
- Handle collapse: A single chain handle cannot support the large C-shaped loop in the photo. Use the three-row folded strip and attach at least 2 cm of each end to the cup wall.
- Saucer ruffling: Excess increases before the scalloped edge create waves that blocking cannot fully remove. The flat lavender section should remain at 66 stitches through R12 before the decorative border begins.
- Floral crowding: Buds larger than approximately 2 cm compete with the central pink heart. Use one-round six-stitch buds and keep the longest embroidered stem near 5–6 cm.
Why the Octopus Uses a 42-Stitch Body
The octopus has to remain large enough to rise above the cup without turning into a giant sphere. A 36-stitch plateau would make the 16 mm eyes disproportionately large in plush yarn, while 48 stitches would require a wider cup and saucer.
Forty-two stitches provide the middle scale needed for this composition.
The seven standard increase rounds also satisfy clean amigurumi geometry: 6, 12, 18, 24, 30, 36, then 42. Several plateau rounds build height without widening the lower body.
Once the decreases begin, the shape rounds toward the underside. Because the lower third sits inside the cup, it does not need an extended torso.
Shaping the Curled Tentacles
The photo uses thick arms rather than thin spiral chains.
A 12-stitch tube produces enough volume to remain recognizable when draped over the cup rim. Reducing directly from 12 stitches to six creates a narrow section near the end while preserving the heavier base.
Stuff only the wider rounds.
The final six-stitch section needs flexibility so it can curl. After fastening off, bend the arm and secure one invisible inner stitch between separated sections of the tube.
Do not tighten that shaping strand until the tentacle forms a hard coil. Loose curves reproduce the overlapping appearance more closely.
Reinforcing the Crochet Teacup
The cup is a structural component rather than a loose toy accessory.
Its base needs to carry the octopus while keeping the handle and rim upright. Working R11 in BLO creates a definite corner between the circular base and vertical wall.
For a display piece, add flexible plastic canvas beneath the cup base. Cut it several millimeters smaller than the crochet circle so no sharp edge presses into the stitches.
The walls can remain unlined if the yarn is dense. When very soft chenille is used, a second inner cream cup can be crocheted and inserted as a lining.
Building the Oversized Cup Handle
The handle is visually closer to a padded cord than a conventional one-row crochet loop.
Three flat rows create enough material to fold into a thick tube.
Before sewing it to the cup, bend the strip into a C and pin it for ten minutes. This gives the stitches time to settle into the required shape.
Place the upper join below the rim rather than directly on it. Attaching through the pink edge can pull that decorative round downward.
The lower join should sit high enough that the handle never extends beneath the cup base.
Constructing the Saucer
The saucer needs to be wider than the cup but not so large that it becomes the dominant object.
A 66-stitch flat circle gives approximately one visible border section beyond a 60-stitch cup base when both use the same yarn and hook.
The pink shells add additional diameter without requiring another full lavender increase round.
Block the completed saucer before attaching the cup. If the scallops turn upward, relax the edge by stretching only the pink shells rather than pulling the lavender center out of shape.
Adding the Heart and Floral Decoration
The central heart gives the cup a clear front orientation.
Attach it before any stems so the botanical layout can be balanced around that reference point. The two green vines should rise outward rather than meeting directly above the heart.
Place the lavender buds farther from the center and use the smaller pink buds closer to the heart.
Leaves should alternate along the stems instead of forming symmetrical pairs at every point.
This keeps the surface decoration informal while leaving most of the cream cup visible.
Choosing Yarn and Hook Size
Current plush octopus patterns provide useful benchmarks. One no-sew design uses plush yarn with a 4.5 mm hook and 16 mm eyes, while a 2024 chenille version uses a 4 mm hook with 13 mm eyes.
A 4.5 mm hook fits this larger display because the cup and saucer also need visible plush stitches.
Work the octopus through R7 as the gauge test.
Spread the 42-stitch fabric over two fingers. Reduce the hook to 4 mm if openings large enough to reveal stuffing appear between the stitches.
Estimating Yarn Quantity
Published consumption varies sharply. Compact plush octopuses may use only around 26 g, while larger chenille designs can consume roughly 50 g per color before a cup or saucer is added.
This project contains much more crocheted surface than a stand-alone octopus.
Weigh the completed lavender octopus before making the saucer. Reserve approximately another 50–70% of that lavender weight for the saucer and handle.
Cream is concentrated almost entirely in the 60-stitch teacup, so buying two matching balls from one dye lot is safer than trying to match a second cream later.
Competition Gap
Current octopus competition is dominated by tiny plushies, no-sew market designs, reversible mood octopuses, realistic marine animals, preemie toys, and stand-alone curled-tentacle characters. Tea-set patterns usually treat the cup and saucer as miniature play-food objects.
The supplied reference crosses those two pattern categories.
A full plush octopus occupies an oversized floral teacup crochet pattern with a functional-looking handle, reinforced cup body, separate saucer, heart appliqué, botanical embellishment, and pink decorative edging.
That combination creates a stronger long-tail topic than another generic plush octopus because the vessel is roughly half of the finished design rather than a minor accessory.
Finishing Checks
Place the finished piece on a hard level surface.
The saucer should contact the surface all the way around without rocking.
View the cup from the front and confirm that the heart sits near the horizontal center.
Check the handle from the side. Its C shape should remain open rather than flattening against the cup.
Count all eight tentacles and verify that several appear at different depths around the rim.
Inspect the face last. Both eyes should remain completely visible, and no tentacle should rise high enough to cover the embroidered smile.
Conclusion
Complete the 42-stitch octopus before committing to the teacup diameter, because actual plush-yarn tension determines how much clearance the octopus in teacup crochet pattern needs inside its 60-stitch cup. Curl and pin all eight arms first, then adjust their height around the pink rim before sewing. Build the saucer only after the cup sits level. The next concrete step is to crochet one 42-stitch test body and measure its widest diameter against your planned cup. Share the finished floral cup on Pinterest and the full display on Instagram with #OctopusTeaPartyCrochet. Which tentacle would you place nearest the purple handle?









